
@94ai/softphone-sdk-readme
v1.0.1
Published
94 Intelligent Technology Co., Ltd softphone SDK


Readme
前言
94ai软电话前端SDK,框架无关(支持vue,react,angular等)
项目参考demo: https://gitee.com/softphone-demo(有权限问题,具体找94智能开发同事拉入团队组织即可)
安装
94智能sdk目前暂不在公网公布sdk源码,如有需要,可以联系94智能开发同事加入团队,具体步骤:
获取加入团队邀请链接
向94智能开发同事申请到【加入到团队的连接】,如: https://account-devops.aliyun.com/account/invite?sign=ab965d478dbed5dad3cc145a5a5b406c&next_url=https%3A%2F%2Fpackages.aliyun.com%3ForgId%3D644f755a97d94d909e43534c
进入上述链接后,进到阿里云登录页
如果你是主账号,直接登录即可:
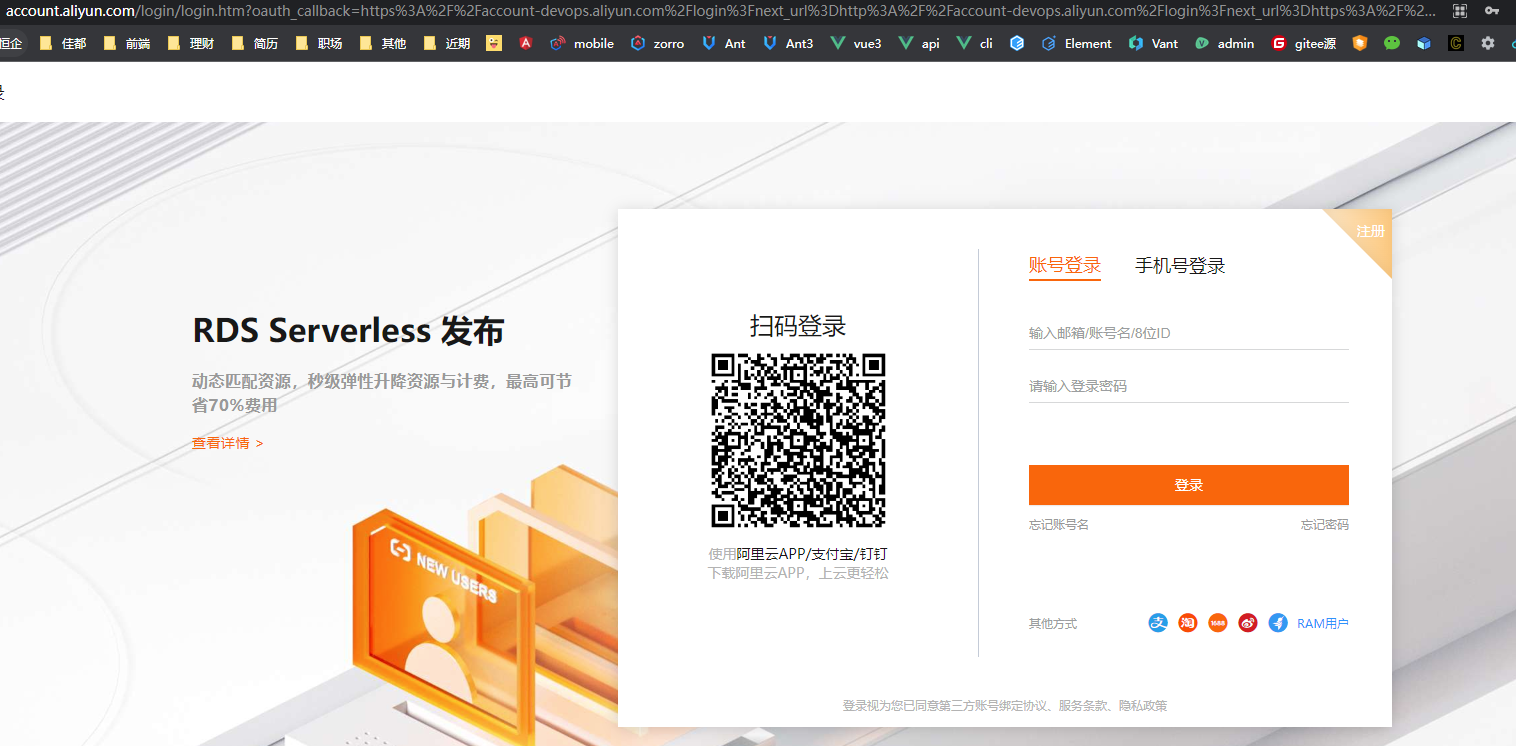
如果你是RAM子账号,选择下面RAM用户登录:
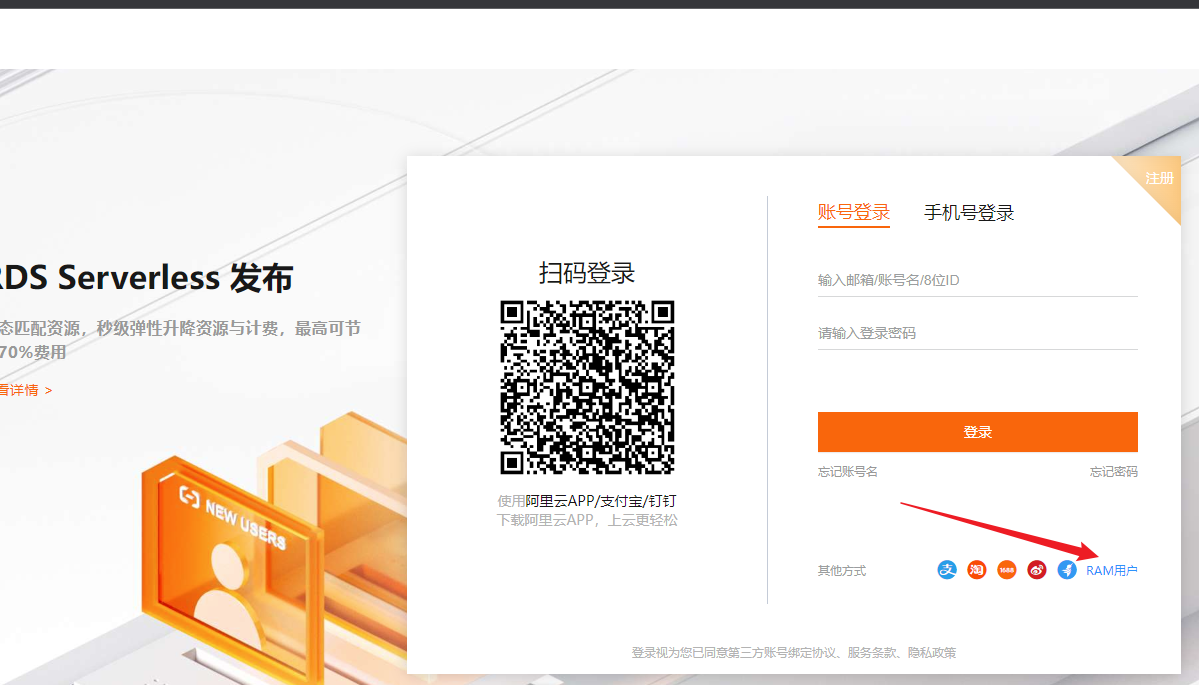
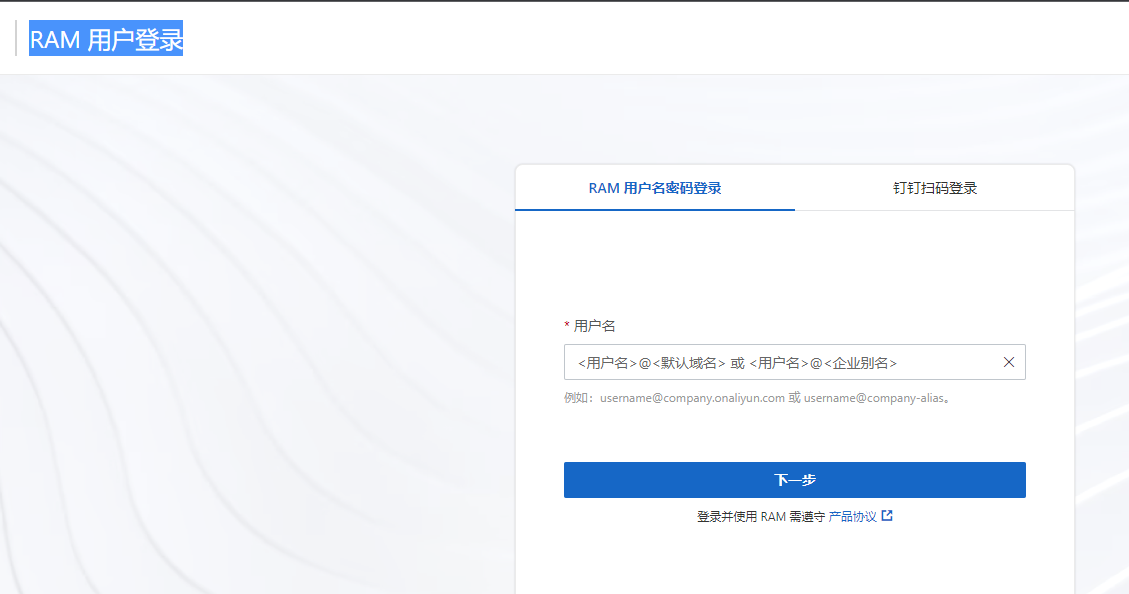
进入RAM 用户登录页登录即可:
阿里的数字安全码
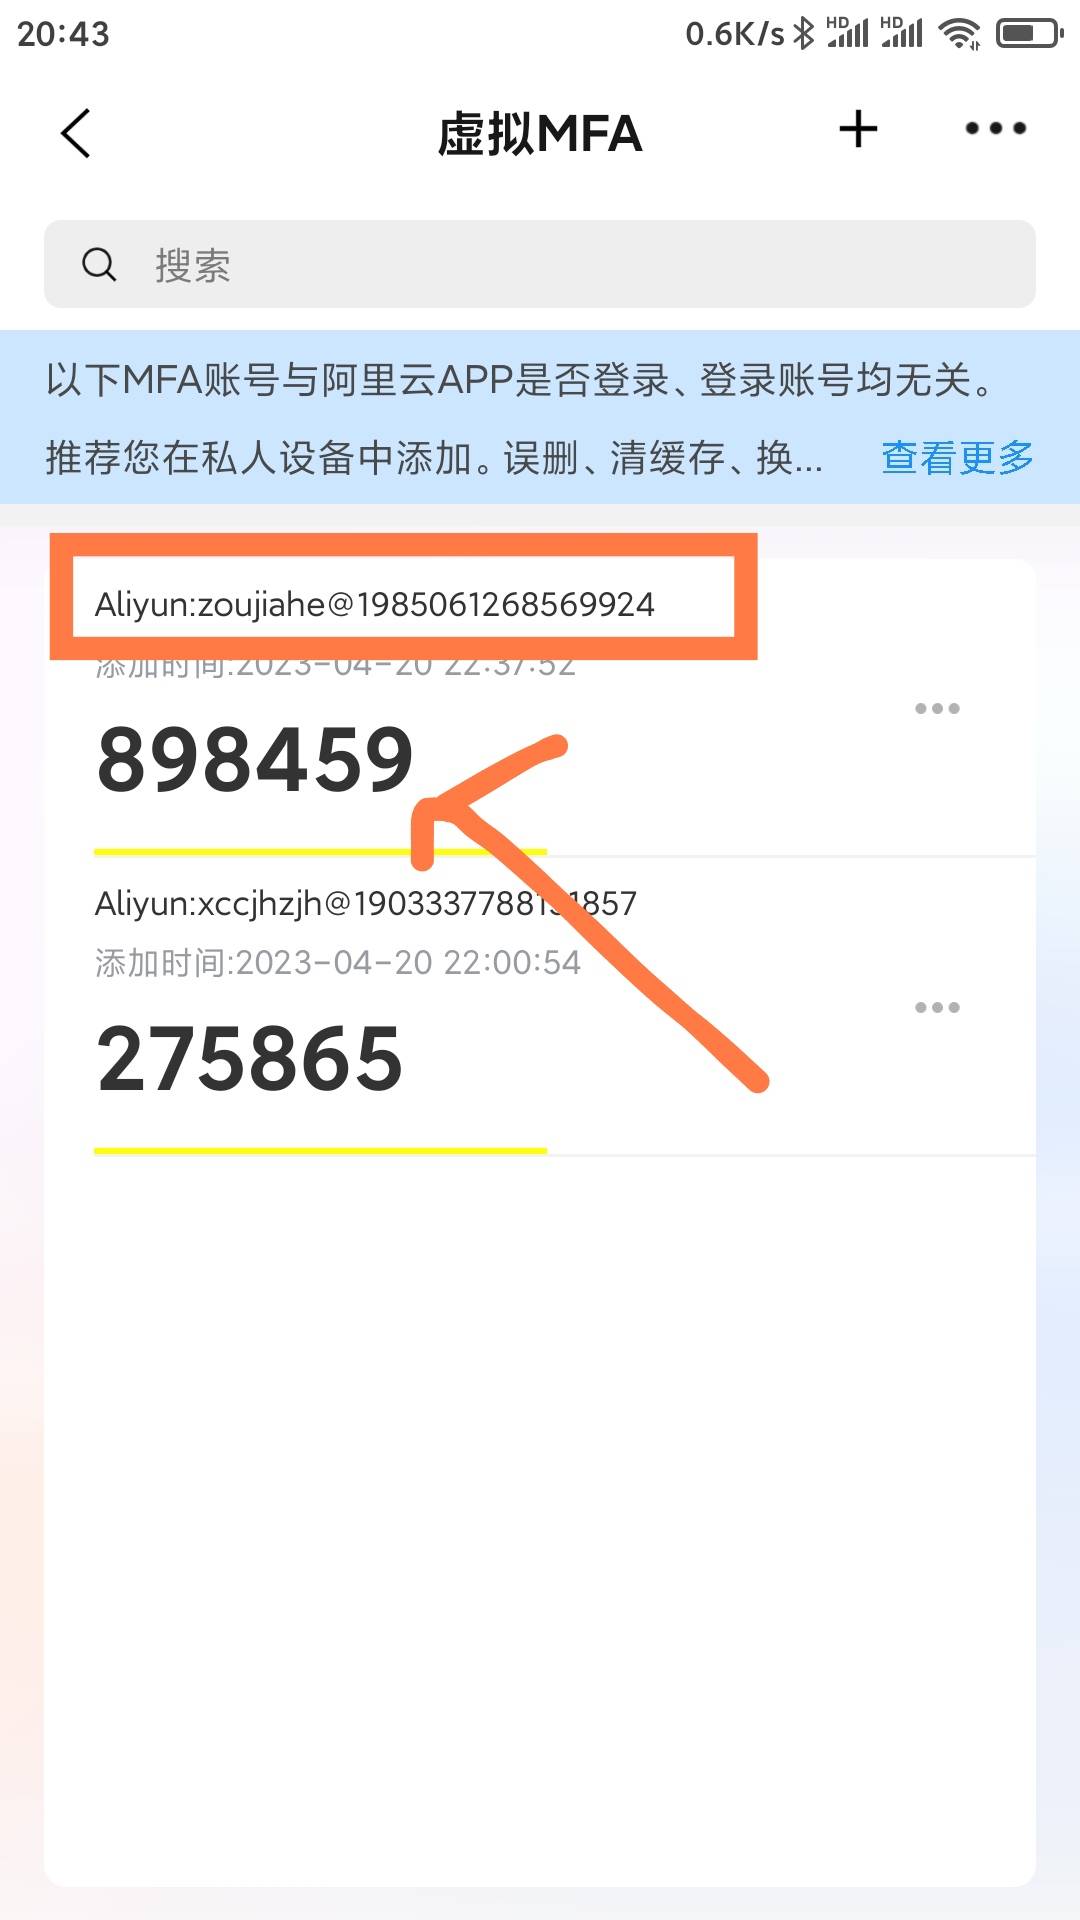
登录过程会提示你填写 验证虚拟MFA设备数字安全码
1.如果以前使用过阿里云产品并绑定过
可以直接在【阿里云app】或使用【虚拟MFA验证小程序】获取【数字安全码】填写即可,如下:
- 下载阿里云app

- 定位首页的mfa图标

- 找到对应账号的数字安全码
2.如果以前没有绑定过
如下面选择 虚拟 MFA 设备
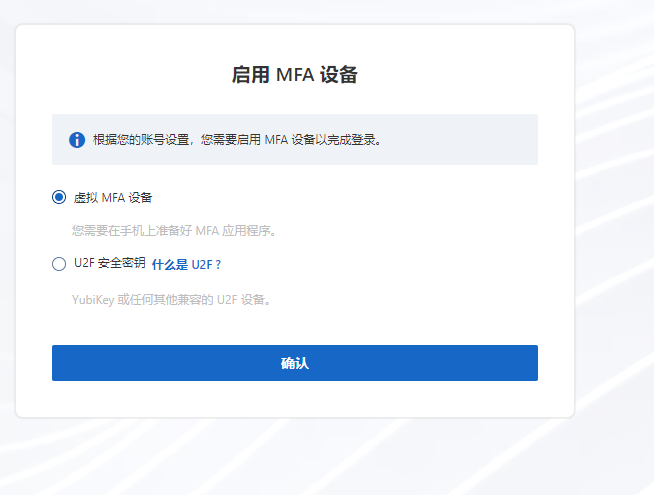
然后在手机安装【阿里云app】或使用【小程序虚拟MFA验证】,然后扫码绑定设备

在设备添加账号点确定

之后会每隔一小段时间会刷新获取到最新的【数字安全码】

3.如果使用小程序
在微信搜索mfa二次验证如下,具体可以百度下:

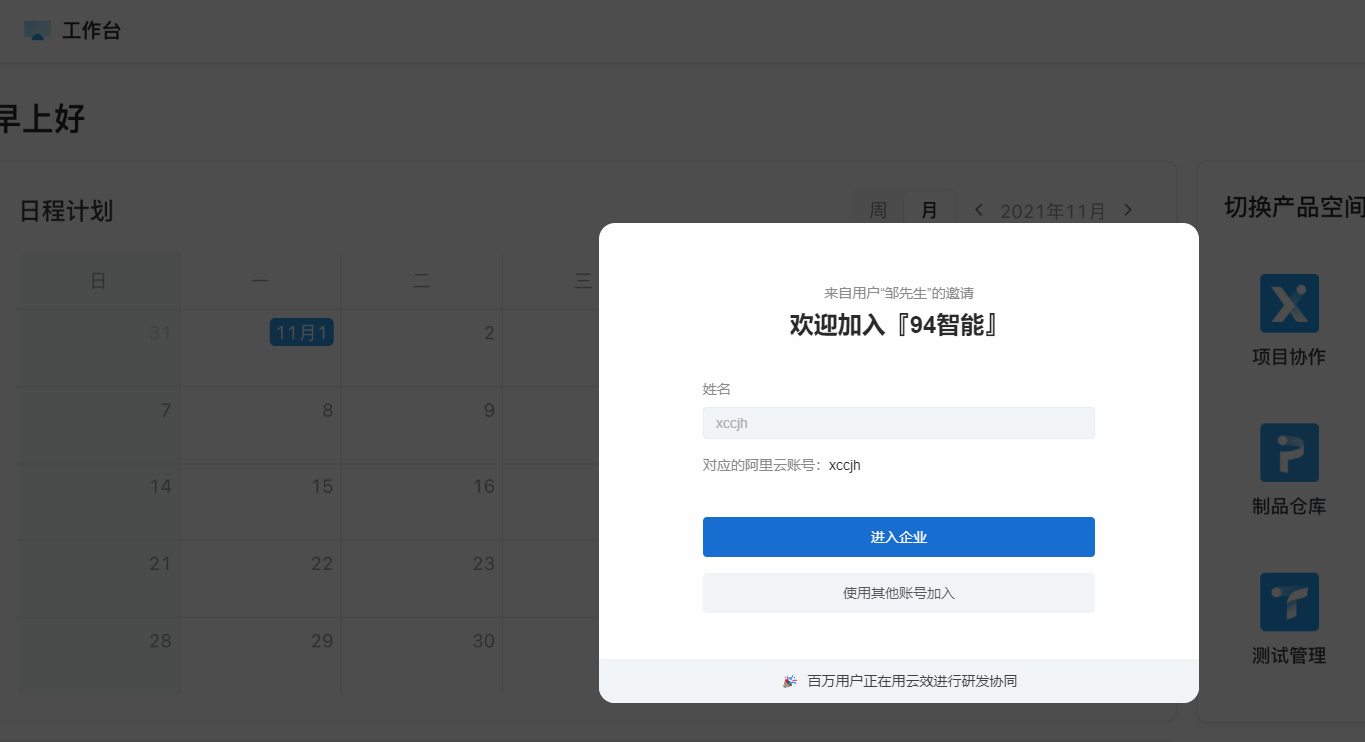
4.设置昵称申请加入
登录成功后会提示你加入团队,设置号昵称点加入


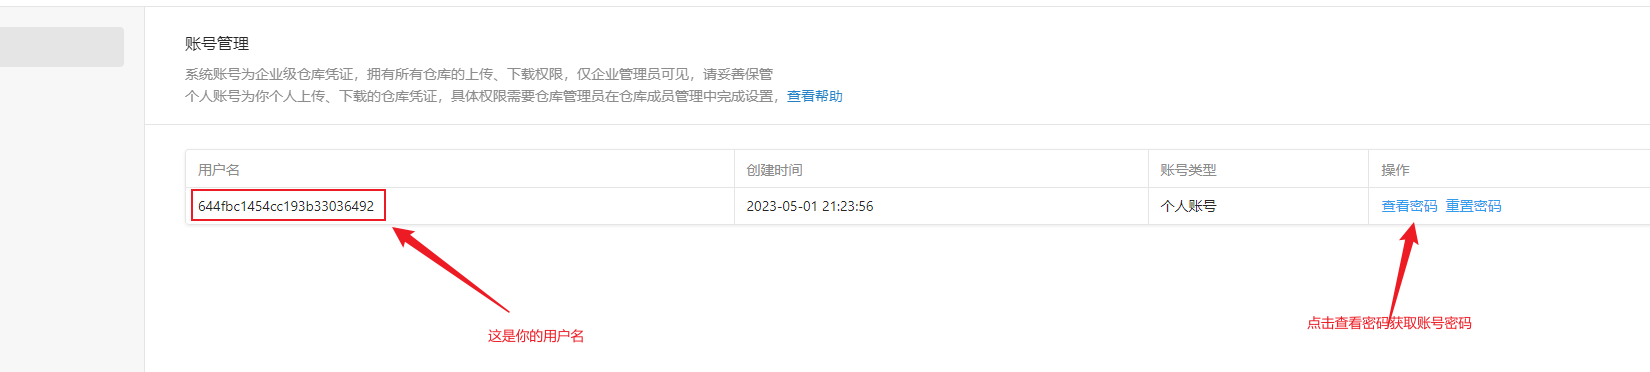
查看个人账号信息
等待审核通过后,刷新页面,点击进入企业
1.选择角色
选择作为研发者,开始工作

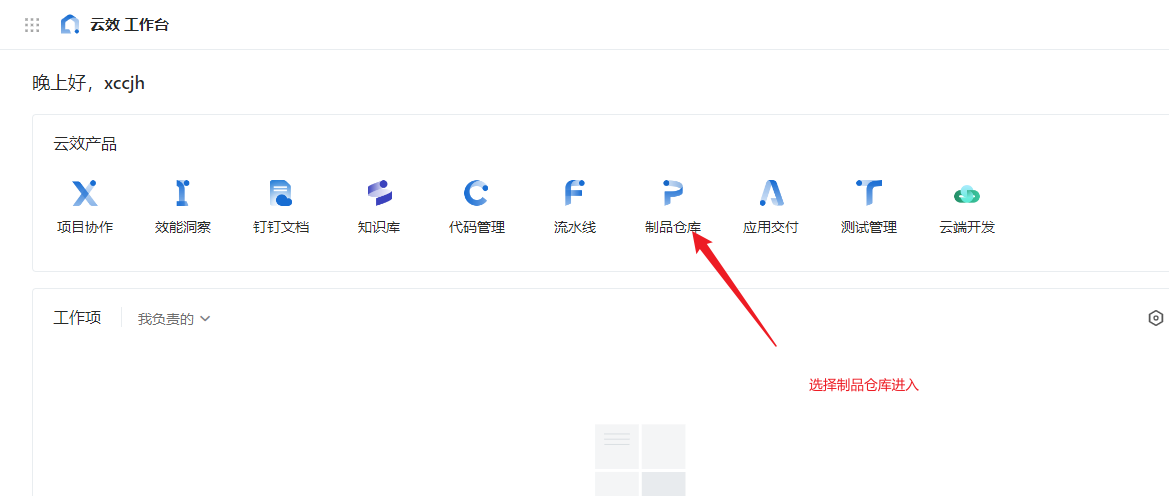
2.进入制品仓库
在工作台选择【制品仓库】进入
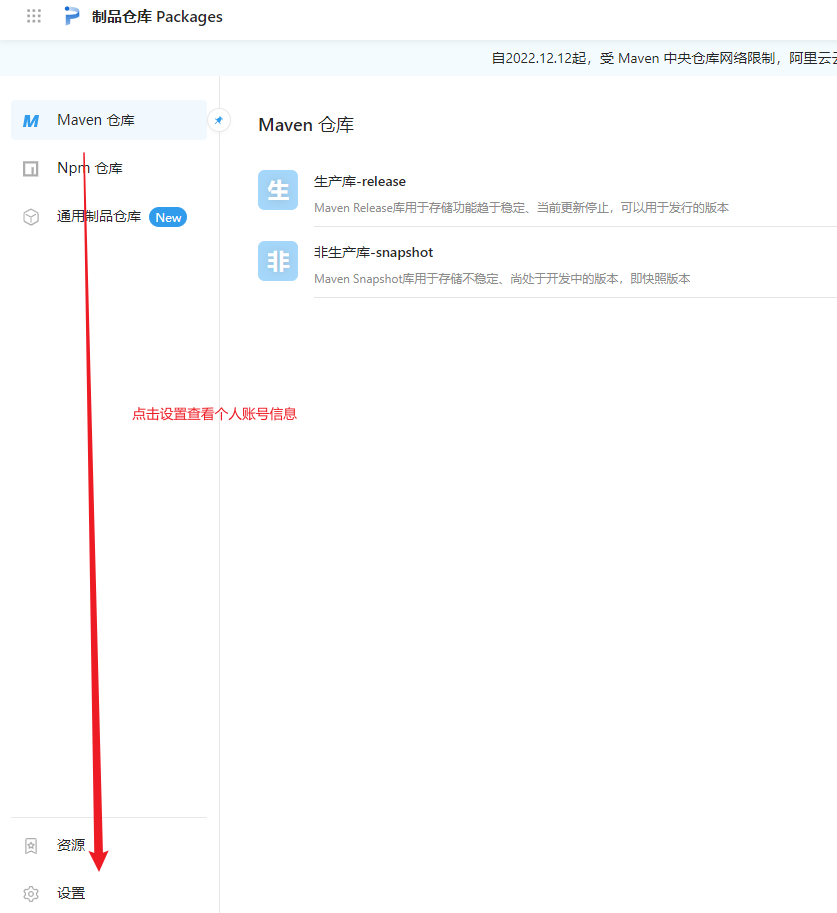
3.查看账号密码
选择设置查看个人账号信息
设置私库源
1.新建rc文件
在需要使用94智能sdk的项目根目录,新建一个rc文件:
- 如果你使用的npm或pnpm,新建.npmrc,内容如下:
@94ai:registry=https://packages.aliyun.com/644f755a97d94d909e43534c/npm/npm-registry/
//packages.aliyun.com/644f755a97d94d909e43534c/npm/npm-registry/:username=username
//packages.aliyun.com/644f755a97d94d909e43534c/npm/npm-registry/:_password=password
//packages.aliyun.com/644f755a97d94d909e43534c/npm/npm-registry/:always-auth=true- 如果你使用的yarn1,新建.yarnrc,内容如下:
"@94ai:registry" "https://packages.aliyun.com/644f755a97d94d909e43534c/npm/npm-registry/"
"//packages.aliyun.com/644f755a97d94d909e43534c/npm/npm-registry/:username" "username"
"//packages.aliyun.com/644f755a97d94d909e43534c/npm/npm-registry/:_password" "password"
"//packages.aliyun.com/644f755a97d94d909e43534c/npm/npm-registry/:always-auth" true- 如果你使用的yarn2~3,新建.yarnrc.yml,内容如下:
enableImmutableInstalls: false
nodeLinker: node-modules
yarnPath: .yarn/releases/yarn-3.1.1.cjs
#npmRegistryServer: "https://nexusdev.k8s.94ai.pro/repository/npm-group/"
npmScopes:
  94ai:
    npmRegistryServer: "https://packages.aliyun.com/644f755a97d94d909e43534c/npm/npm-registry/"
    npmAlwaysAuth: true
    npmAuthIdent: "username:password"
#unsafeHttpWhitelist:
#  - 192.168.20.9
2.配置个人账号信息
把对应rc文件
username替换成你的账号名称如果你使用的是yarn1,npm或pnpm,则把你的账号密码做base64加密之后替换掉对应rc文件
password,如在这里在线base64加密获取base64加密的密码
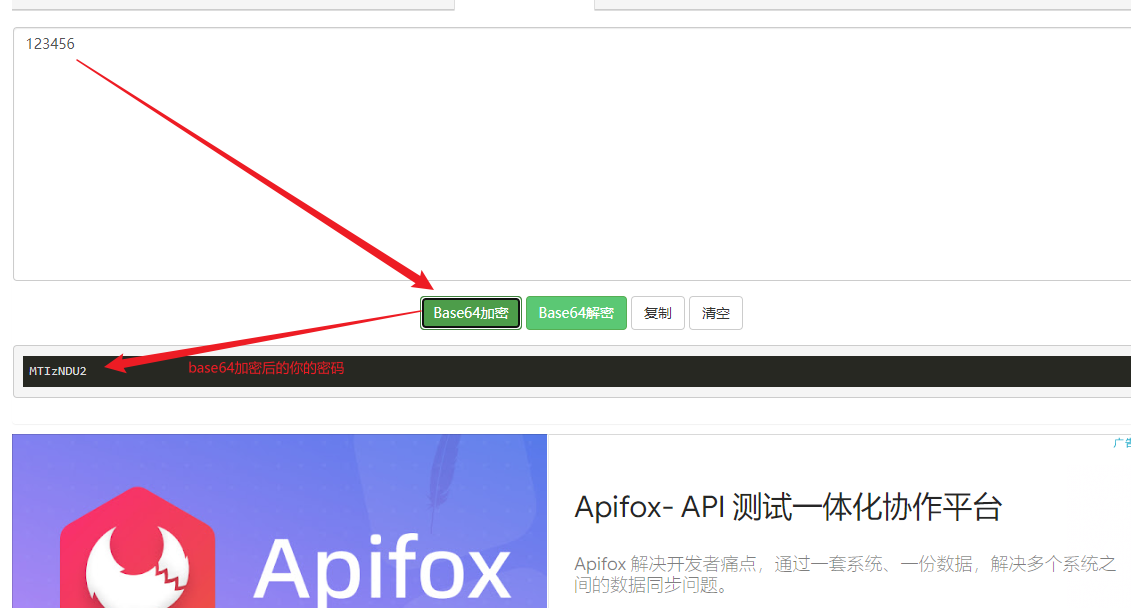
- 如果你使用的是yarn2~3,则把你的账号密码直接替换掉对应rc文件
password
3.安装依赖
之后该项目只要是@94ai域的私包都会经过94智能私服抓取
其他包【包括@94ai域私包的子包(非@94ai域)】都会经由个人电脑配置的npm包registry源抓取
执行install命令即可成功安装@94ai域的所有私包,包括sdk,如
$ yarn add @94ai/softphone
# or
$ npm i @94ai/softphone
# or
$ pnpm add @94ai/softphone
使用
初始化
1.作为NPM包使用
// Example:
// 1.softphone.ts
import { UserAgent, userAgentManager, URI } from '@94ai/softphone'
import FingerprintJS from '@fingerprintjs/fingerprintjs'

interface UserAgentOptions {
  authorizationPassword: string, // 通过openApi获取坐席组分机用户密码
  authorizationUsername: string, // 通过openApi获取坐席组分机用户名
  viaHost: string, // 指纹,唯一标志,用来排查线路故障
  uri: URI, // sip服务地址
  logLevel: 'debug' | 'log' | 'warn' | 'error', // sip日志查看等级,一般情况下生产开error,开发用debugger
  transportOptions: {
    server: string // websocket协商地址
  },
  contactName: string // 一般设置同authorizationUsername,相当于MicroSIP的显示名称
}

export class SoftphoneManager {
  static #getDeviceId: () => Promise<string>
  #userAgentManager: InstanceType<typeof UserAgentManager>

  static {
    /**
     * 获取指纹
     */
    SoftphoneManager.#getDeviceId = (() => {
      let visitorId = ''
      return async (): Promise<string> => {
        if (visitorId) return visitorId
        const fp = await FingerprintJS.load()
        const result = await fp.get()
        visitorId = result.visitorId
        return visitorId
      }
    })()
  }

  async getUserAgentManager () {
    if (!this.#userAgentManager) {
      this.#userAgentManager = UserAgentFactory.getUserAgentManager(await this.initSeatsInfo()) // 👈 得到softphone代理对象
    }
    return this.#userAgentManager
  }

  /**
   * 通过openApi获取分机信息
   */
  async initSeatsInfo (): Promise<UserAgentOptions> {
    const result = await getSeatsInfo()
    if (result.code === 200) {
      const {
        extPassword, // 分机密码
        extensionNumber, // 分机号
        wsRegisterAddress, // socket地址
        wsProtocol // socket协议
      } = result.data
      return {
        authorizationPassword: extPassword,
        authorizationUsername: extensionNumber,
        viaHost: `${await SoftphoneManager.#getDeviceId()}.sip`,
        uri: UserAgent.makeURI(`sip:${extensionNumber}@${wsRegisterAddress}`),
        logLevel: 'error',
        transportOptions: {
          server: `${wsProtocol}://${wsRegisterAddress}`
        },
        contactName: extensionNumber
      }
    }
    const tips = i18nManagerInstance.getI18nInstance().global.t('faileObtInfo')
    useToast.showToast(tips)
    throw new Error(tips)
  }
}

const getUserAgentManager = async () => await new SoftphoneManager().getUserAgentManager()

export {
  getUserAgentManager
}
// 2.other.ts
const userAgentManager = await getUserAgentManager()
userAgentManager.prepareUserAgent(
  { // config
    refresh(path, value) { // 当软电话状态变化时会实时刷新这个方法
    }
  },
  { // event
    onInvite(invitation) { // 当有外呼过来
    }
  }
)
2.直接在JavaScript中使用
- 获取umd文件
- 确保安装了node,随手新建一个目录,打开cmd或bash。
- 设置@4ai域账号授权,依次执行执行如下,其中
:username=xxxx替换你的账号名字,:_password=xxxx替换你的账号密码在做base64加密后的结果
npm config set @94ai:registry=https://packages.aliyun.com/644f755a97d94d909e43534c/npm/npm-registry/
npm config set //packages.aliyun.com/644f755a97d94d909e43534c/npm/npm-registry/:username=xxx
npm config set //packages.aliyun.com/644f755a97d94d909e43534c/npm/npm-registry/:_password=xxx
npm config set //packages.aliyun.com/644f755a97d94d909e43534c/npm/npm-registry/:always-auth=true- 最后执行
npx -y @94ai/softphone -- sdk-umd,之后在当前执行命令路径下即可获取到softphone.umd.min.js
- 在index.html引入
softphone.umd.min.js文件
<!DOCTYPE html>
<html lang="en">
<head>
  <meta charset="UTF-8" />
  <meta name="viewport" content="width=device-width, initial-scale=1, maximum-scale=1, minimum-scale=1, user-scalable=no" />
  <title>softphone</title>
</head>
<body>
<div id="softphone-app"></div>
<script src='./softphone.umd.min.js'></script>
<script>
const {
  UserAgentFactory,
  UserAgent
} = softphone
const userAgentManager = UserAgentFactory.getUserAgentManager({
  authorizationPassword: 'xxx',
  authorizationUsername: 'xxx',
  viaHost: 'xxx',
  uri: UserAgent.makeURI('xxx'),
  logLevel: 'error',
  transportOptions: {
    server: 'xxx'
  },
  contactName: 'xxx'
})
userAgentManager.prepareUserAgent(
    { // config
      refresh(path, value) { // 当软电话状态变化时会实时刷新这个方法
      }
    },
    { // event
      onInvite(invitation) { // 当有外呼过来
      }
    }
)
</script>
</body>
</html>
签入
userAgentManager.prepareUserAgent(
  { // config
    refresh(path, value) { // 当软电话状态变化时会实时刷新这个方法
      userAgentStatus[path] = value // 外部想要响应状态可以实时更新外部的userAgentStatus
    }
  },
  { // event
    onInvite(invitation) { // 当有外呼过来
      playMedia('localAudio') // 播放模拟来电响铃
      popNotice() // 提示通知   来电了
      invitation.stateChange.addListener((state) => { // 一旦接听(执行accept),监听会话的生命周期
        switch (state) {
          case SessionState.Initial:
            break
          case SessionState.Establishing:
            break
          case SessionState.Established: // session建立后就可拿到webrtc的各种基础api,如userAgentManager.getPeerConnection(),如userAgentManager.getSenders()等等
            const mediaElement1 = getMedia('remoteAudio')
            mediaElement1.srcObject = userAgentManager.getStream() // 获取流
            mediaElement1.play() // 把softphone流导入到audio接入用户语音
            break
          case SessionState.Terminating:
          case SessionState.Terminated: // 在挂断电话时候会执行
            const mediaElement2 = getMedia(id) // 获取audio dom
            mediaElement2.srcObject = null
            mediaElement2.pause() // 释放audio
            break
          default:
            throw new Error('Unknown session state.')
        }
      })
    }
  })
接听
const acceptInvite = () => {
  refreshShowTime() // 重新计算通话时长
  pauseMedia('localAudio') // 暂停来电铃声
  userAgentManager.acceptInvite() // 👈 接入电话流
}
忽略
const ignoreInvite = () => {
  pauseMedia('localAudio') // 暂停来电铃声
  userAgentManager.ignoreInvite() // 👈 忽略
}
挂断
const hangUpInvite = () => {
  refreshShowTime()
  userAgentManager.hangUpInvite() // 👈 挂断
}
按*号转人工
const sendStarDtmf = () => {
  refreshShowTime()
  userAgentManager.sendStarDtmf() // 👈 按*号转人工
}
销毁
const disconnect = () => {
  refreshShowTime()
  userAgentManager.dispose() // 👈 一个方法安全销毁
}
传输本地声音到远端
const unMuteLocalAudio = () => {
  userAgentManager.unMuteLocalAudio() // 👈 通过webrtc的方式控制 本地音频流 推送到 远端
}
不传输本地声音到远端
const muteLocalAudio = () => {
  userAgentManager.muteLocalAudio() // 👈 通过webrtc的方式控制 本地音频流 禁用推送
}
接听远端声音
const unMuteRemoteAudio = () => {
  userAgentManager.unMuteRemoteAudio() // 👈 通过webrtc的方式控制 是否接受 远端音频流
}
不接听远端声音
const muteRemoteAudio = () => {
  userAgentManager.muteRemoteAudio() // 👈 通过webrtc的方式控制 是否接受 远端音频流
}
获取webrtc基础api
const senders = userAgentManager.getSenders()
const receivers = userAgentManager.getReceivers()
const peerConnection = userAgentManager.getPeerConnection()
获取代理用户相关sip协议通讯实例
const userAgent = userAgentManager.getUserAgent()
const sessionDescriptionHandler = userAgentManager.getSessionDescriptionHandler()
const currentInvitation = userAgentManager.getCurrentInvitation()
const currentInviter = userAgentManager.getCurrentInviter()
const localMixedMediaStream = userAgentManager.getStream()
查看代理用户目前状态
interface userAgentStatus {
  connectStatus: boolean, // 软电话是否已签入
  registerStatus: boolean, // 软电话是否已注册
  invitatingStatus: boolean, // 软电话是否正拨出
  incomingStatus: boolean, // 软电话是否正来电
  answerStatus: boolean, // 软电话是否正接听
}
const userAgentStatus: userAgentStatus = userAgentManager.getUserAgentStatue()
软电话状态可以根据企业特定业务流程定制扩展额外的状态,如94智能决策系统 额外扩展了 【监听中】,【整理中】,【小休中】等状态