
@apixly/jev-filter
v0.3.0
Published
Task-aware semantic tools for AI agents. Native runtime included.


Readme
放在工具与主模型之间的语义筛选器兼托管执行器。 在 CLI 内部采集命令输出、搜索结果、网页控件或日志,用 Jev 根据 AI 提供的任务与上下文判断,再返回相关证据和待复核 ID,减少整批原始结果进入主模型上下文。**0.3 新增:**让 CLI 自己操作网页或桌面应用,或对上千条记录做调研汇总,决策同样是类型化、可复核的。托管执行 →
本地节省统计看板
配置本地数值账本后,运行 jev-filter stats dashboard(8765 被占用时自动选择空闲端口)即可自动打开浏览器,查看估算输入 token 减少量、美元输入价值、Jev 成本与净值,按模型/日期筛选,并导出 JSON 或独立 HTML。未知和负收益明确保留;这些是输入等价值估算,不是账单节省。参见配置与统计口径。
三个核心优势
- 让主模型少读无关内容。 先筛选再返回,需要时按 ID 取回原文。新完成的 48 次整段任务测试中,返回上下文减少 88–97%。证据与代价 →
- 减少 Jev 的重复输入开销。 自动合批,最多 30 个请求并发。公开测试输入 token 减少 56.5%,相比单条并发快 32.4%。复现方法 →
- 规则由 AI 控制,结果可复核。 自定义上下文、问题与输出;缺事实保留
REVIEW。8/8 组测试结果正确,三条已安装流程通过验收。公开数据 · 集成证据
适合 记录多、语义判断重复、标准明确 的任务。精确路径、ID、selector、计算和少量短结果优先用原生工具;开放推理和写作仍交给主模型。
托管执行:浏览器、桌面与数据
Jev 负责选,程序负责做。每一步先观察页面或窗口,用一次 Jev 请求在程序枚举的控件里选出下一步操作和目标,重新核对目标后再执行。Jev 从不产出选择器、坐标、命令或文字。browse 和 desktop 输出一个 JSON 包,只有 status: done(退出码 0)才算成功;extract 和 survey 只有结果 ok 且 complete 时才以退出码 0 结束。命令无法启动时 stdout 没有输出,原因写在 stderr。
操作网页
jev-filter browse --url https://shop.example/ \
  --goal 'Buy the cheapest in-stock red shoes in size 42' \
  --value query='red shoes' --keep-open
它会停在下单按钮前,把决定交还给你(测试商店上的真实输出,有删节):
{
  "status": "needs_confirmation",
  "steps": 8, "requests": 9, "elapsed_ms": 3820,
  "usage": {"input_tokens": 26220, "output_tokens": 1678},
  "pending": {"label": "Place order", "role": "button"},
  "reason": "label_rule", "irreversible_probability": 0.67,
  "confirm_token": "0e5a2ab5892ab560:e2",
  "session": {"cdp_port": 61129, "target_id": "04C5D2DC…"},
  "trace": [{"step": 1, "operation": "CLICK", "action": "Reject optional cookies"},
            {"step": 2, "operation": "TYPE_TEXT", "action": "Search products", "value_key": "query"}, "…"]
}
用户同意后在同一个标签页续跑,只执行被确认的那个动作,然后校验:
jev-filter browse --cdp-port 61129 --target-id 04C5D2DC… --confirm 0e5a2ab5892ab560:e2 \
  --goal 'Buy the cheapest in-stock red shoes in size 42' \
  --verify-text 'order has been placed' --close-browser
# {"status": "done", "confirmed": true, "verification": {"passed": true, "text": true}, …}需要说明用途或不能进日志的值,用文件传:--values values.json,内容如 {"email": {"value": "…", "description": "contact email", "sensitive": true}}。要用你自己已登录的浏览器,加 --cdp-port;也可以用 --transport camofox --session NAME。--dry-run 把选中的控件放在 pending 里返回,什么都不执行。
从网页取结构化数据
jev-filter extract --url 'https://shop.example/results?q=shoes' \
  --task 'In-stock products under $70' --analysis analysis.json
{"requirements": [
{"id": "product", "statement": "The record is a product row, not a heading or a link.", "expected": true},
{"id": "in_stock", "statement": "The product is in stock.", "expected": true},
{"id": "under_70", "statement": "The product costs less than $70.", "expected": true}],
"fields": ["source_id", "text"]}表格会变成带表头的行。测试页上 14 条记录,排除了 12 条:
{"selected_ids": ["r1", "r3"], "review_ids": [], "complete": true,
 "excerpts": [{"source_id": "r1", "text": "Product: Red Runner | Category: shoes | Price: $59 | Rating: 4.4 | Availability: In stock"},
              {"source_id": "r3", "text": "Product: Blue Runner | Category: shoes | Price: $55 | Rating: 4.1 | Availability: In stock"}]}
每个条件单独写成一条 requirement。不给 --analysis 时默认只问相关性,同一页面还会把 72 美元和 99 美元的鞋也选进来。
操作桌面应用
pip install 'jev-filter[desktop] @ git+https://github.com/apixly-ai/[email protected]'   # UI Automation + OCR,或 macOS 辅助功能
jev-filter desktop --list             # 列出可选窗口
jev-filter desktop --window '^Invoice Tool$' \
  --goal 'Set the customer name to Ada Lovelace, choose the Pro plan, turn on the weekly report, and save the profile' \
  --value name='Ada Lovelace' --verify-text 'saved Ada Lovelace'
输出包的结构和 browse 相同。“Delete all records”这类目标会在删除前以 needs_confirmation 结束。终端、密码管理器和系统设置会被拒绝;创建 ~/.jev-filter/STOP 或把鼠标停在屏幕左上角可以随时停止。
对上千条记录做调研
jev-filter survey --input tickets.jsonl --spec survey.json --dry-run   # 只估算,不推理
jev-filter survey --input tickets.jsonl --spec survey.json --format md
{"task": "Summarise what customers contact support about, how they feel, and churn risk.",
"keep": ["product"],
"screen": {"instructions": "The record is a genuine support request (not spam)."},
"questions": {
"topic": {"type": "choice", "instructions": "Main topic?",
"criteria": {"billing": "…", "bug": "…", "feature_request": "…", "account": "…", "shipping": "…", "other": "…"}},
"sentiment": {"type": "score", "instructions": "How does the customer feel?",
"criteria": ["Angry", "Neutral", "Positive"]},
"churn": {"type": "noul", "instructions": "The customer threatens to cancel or switch."}},
"group_by": ["topic", "product"]}报告里有各选项的数量和占比、评分分档、交叉表、每组置信度最高的样例、不确定和失败的 ID、用量与费用。Jev 不写文字,由你的 agent 根据报告来叙述。上面这 2000 条生成的工单:76 次请求、9.3 秒、约 0.044 美元输入费用;对照生成器的标签,主题准确率 100%,情绪 95.2%。这些记录天生容易判断,请用 --labels 在自己的数据上测。
在 agent 里使用
让 agent 继续做规划。它按短小的子目标逐次调用 browse 或 desktop,带上值和校验条件,然后读 status。needs_confirmation 和 needs_value 要回到用户;blocked 且原因是 challenge 或 login_required 时也一样。skill 参考:输入、输出和每种状态的处理 →
测了什么
- 安全由结构保证。 支付、发送、删除类动作会暂停等待确认;导航限制在起始来源内;密码和验证码一律交还,不代为处理;桌面执行拒绝终端和凭据管理器,出现 STOP 文件即停止。
- 在本地合成夹具上用真实 Jev 实测(每项三轮,成功与否由程序校验,不以模型的 DONE 为准):
| 线 | 任务数 | 通过 | 单任务耗时中位范围 | |---|---:|---:|---| | 浏览器(Camofox) | 5 | 15/15 | 0.7–13.7 s | | 浏览器(Chromium,CDP) | 6 | 18/18 | 0.7–3.9 s | | 桌面(Windows UIA + OCR) | 4 | 12/12 | 0.8–5.6 s | | survey(10,000 条) | 1 | 主题 100.0%,情绪 95.7% | 19.6 s,375 次请求,约 $0.22 输入费用 |
这些是小规模合成测试,记录由模板生成、难度较低,展示的是机制和成本,不代表开放网络上的成功率。在真实公开网站上情况要差一些:一次只读审计中 24 个目标跑了 48 次,去掉被人机验证、登录墙或接口故障挡住的运行后,34 次里有 16 次达成目标,其中自定义组件最弱。真实网站审计 → · 使用说明与限制 → · 测试方法 →
实测收益与代价
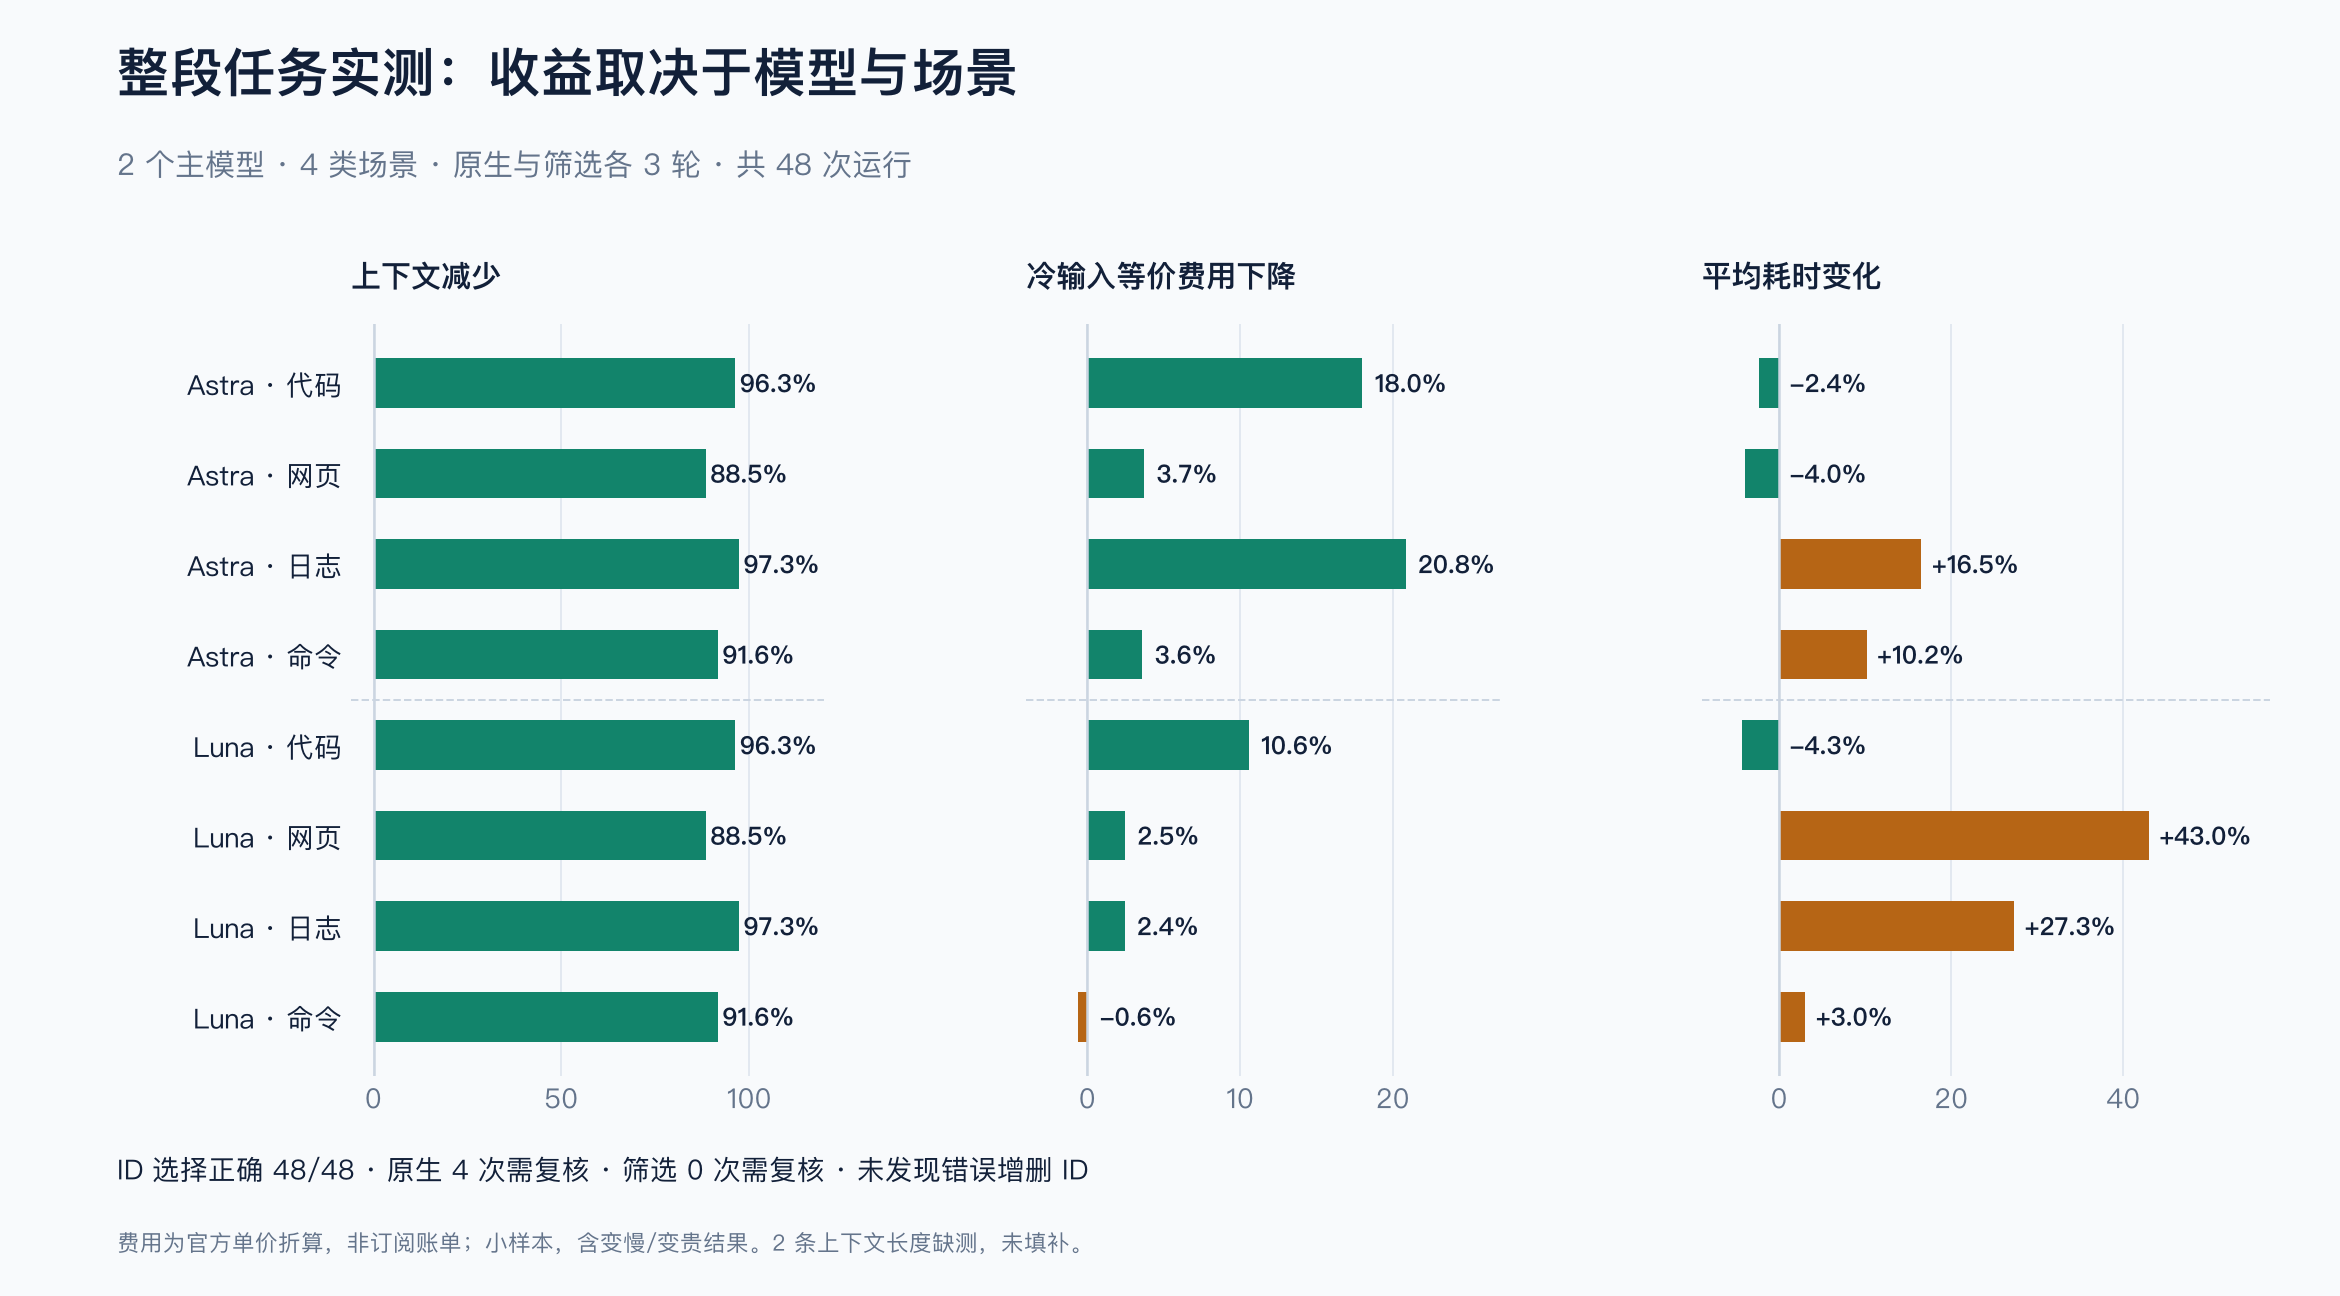
**48 次真实 agent 运行:**Astra 和 Luna、四类场景、原生/筛选两组、各三轮。 所有运行都选对预期 ID;原生组四次要求额外复核,筛选组没有。工具返回上下文减少 88–97%, 冷输入 API 等价费用从 下降 20.8% 到上升 0.6%,耗时有升有降。这是小规模合成测试,不是生产保证。
方法与完整结果 · 逐次 JSON · CSV · 判断证据
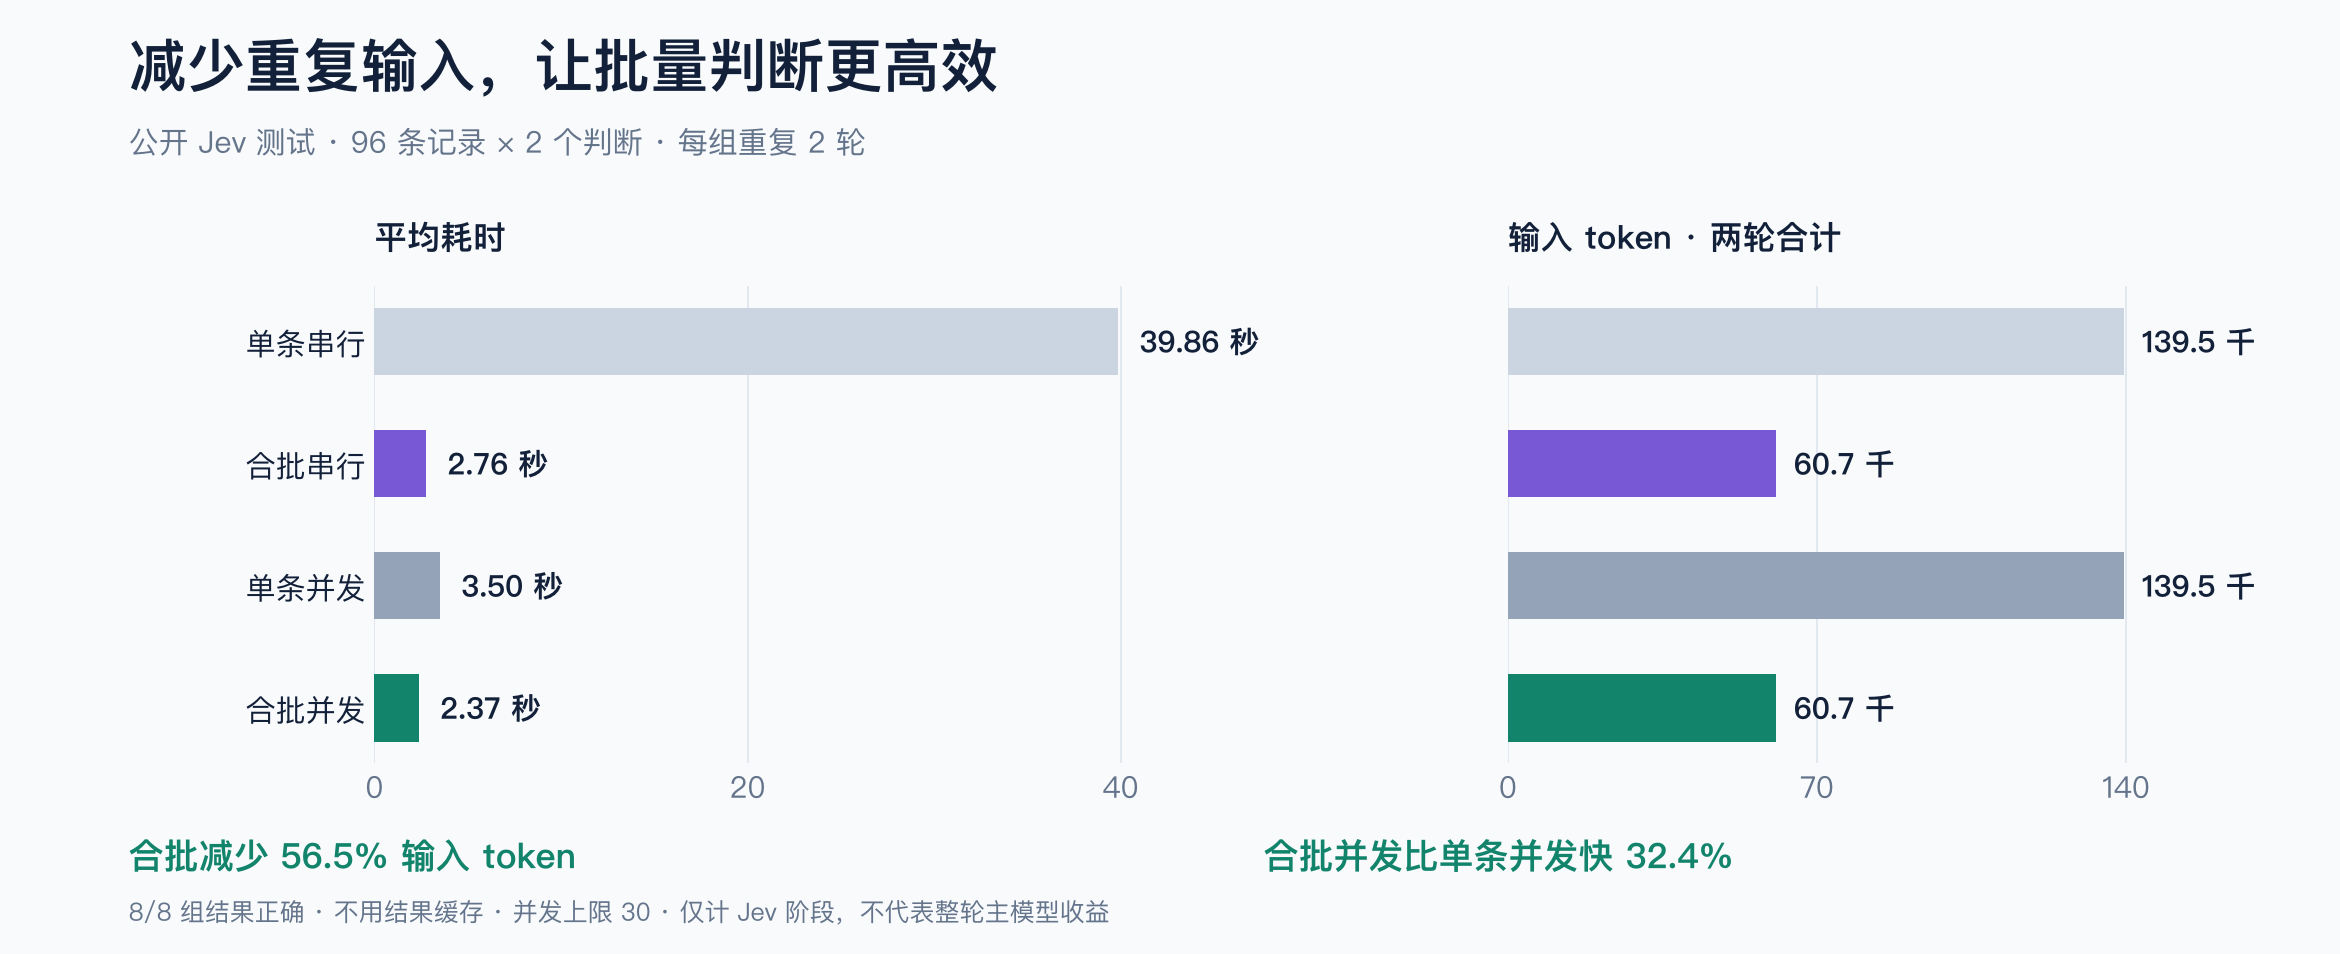
96 条合成记录,每条两个条件,每组两轮。合批使 Jev 输入 token 减少 56.5%, 合批并发比单条并发快 32.4%。这是 Jev 阶段,不是主模型整轮加速。 原始数据 · 复现
快速开始
Node.js 22+ · macOS / Linux · npm 发行包不需要另外安装 Python。 Windows 可用 WSL,或从 GitHub Release 的 wheel / pip install 'jev-filter[code] @ git+https://github.com/apixly-ai/[email protected]' 原生安装 Python 包(Python 3.10+;search 需要 PATH 里有 rg;未发布到 PyPI)。只有实际推理才需要 TypeSafe Jev API key。
通过 npm 安装:
npm install -g @apixly/jev-filter
jev-filter doctor
配置 key 后,在任意目录运行这个完整例子:
export TYPESAFE_API_KEY='your-key'

jev-filter query --input - --mode choose \
  --task '选择当前仍未恢复的 DNS 故障记录' <<'JSON'
[
  {"id":"a","text":"之前 DNS 失败,现已恢复,请求成功。"},
  {"id":"b","text":"DNS 解析仍失败,无法建立连接。"}
]
JSON
预期选中 b,以下省略了诊断元数据:
{"selected_ids":["b"],"review_ids":[],"complete":true}小例子用于学习接口;这么短的实际输入通常直接用原生工具更合适。处理真实批量数据时,让 CLI 自己执行采集命令:
jev-filter exec --task '找出尚未恢复的网络故障' \
  --analysis analysis.json -- your-collector --json
先复制 分析契约示例,再替换采集命令。命令以参数数组透传,不隐式启动 shell。如何读结果与退出码 →
接入你的 AI
能执行命令的 AI 都可以接入。不需要再启动一个代理,也不要求先部署 MCP 服务。
1. 安装配套 skill。 npm 全局安装后,以 Codex 为例:
mkdir -p ~/.codex/skills
cp -R "$(npm root -g)/@apixly/jev-filter/skills/jev-filter" ~/.codex/skills/
其他 AI 将同一个 skill 放入其支持的目录即可。Claude Code 与通用工具接入 →
2. 给 AI 一段明确的使用规则。
大量记录需要标准明确的语义判断时使用 jev-filter。
传入任务、范围、排除条件、成功标准和有来源的已知事实。
让采集→分析→精简输出在一次工具调用内部完成。
复核未确定的 ID,不重复判断已完成项,不再次封装已有 Jev 流程。
精确查询和少量短结果使用原生工具。
3. 把决定答案所需的上下文传进去。 Jev 不会自动继承聊天历史。共享事实放 context,各记录的历史随记录传入,用必要字段声明拦住缺信息的请求。问题、筛选、排序和输出投影都由调用者控制。完整接入指南 → · 上下文契约 →
按任务选择入口
| 你要处理什么 | 使用 | 示例 |
|---|---|---|
| 自定义命令的大量输出 | exec | 采集命令 |
| JSON 候选记录 | query | 结合上下文选择 |
| 广泛关键词命中的源代码 | code-search | 完整代码符号 |
| 本地 Camofox 页面上的控件 | locate | 网页选择 |
| 多请求的 JSON/JSONL 日志 | triage | 关联事件 |
| 让 CLI 完成一个网页目标 | browse | 托管执行 |
| 从网页取结构化数据 | extract | 页面数据 |
| 在 Windows/macOS 应用里完成目标 | desktop | 桌面 |
| 上千条记录要分类汇总 | survey | 大量记录 |
| 已有类型化 Jev 流程 | Python batch.run / CLI batch | 程序内接入 |
我们自己也在用
资料标注、Telegram 维护计划和 SRE 分流已保留原接口,并用真实 Jev 调用、合成数据通过验收。私有身份、密钥和生产数据不进入开源仓库。
- 不使用结果缓存。 明确上下文、采集边界、失败项和模型用量。
- 受保护的发布。 必须通过 CI/安全检查,发布标签不可改写,安装包附校验和与来源证明。
- 可复用的内核。 Python library 与 npm CLI;自动合批,最多 30 个在途请求。
- 明确的边界。 参与推理的输入会发送给 TypeSafe;
exec执行你提供的命令,不是沙箱;托管执行只执行程序枚举出的动作,不可逆动作会先暂停。安全说明 →
完成一次 npm 包信任配置后,GitHub Release 成功会自动通过 OIDC 发布五个包,并从注册表全新安装验收,无需保存长期 npm token。参见首次配置与续办。
参与开发
git clone https://github.com/apixly-ai/jev-filter.git
cd jev-filter
python -m venv .venv && . .venv/bin/activate
python -m pip install -e '.[code,dev]'
sh scripts/check.sh
npm test
贡献指南 · 开发与发布 · 项目治理 · 更新记录 · 报告问题
Apixly / JIA-ss 维护 · MIT · 独立于 TypeSafe。