
@cleanuidev/react-native-scanner
v1.0.0-beta.7
Published
High-performance native barcode and QR code scanner for React Native. Scan barcodes in configurable target areas for precise detection. Built with CameraX & ML Kit (Android) and AVFoundation & Vision (iOS).
Maintainers
 cleanuidev
Keywords
Readme
📱 React Native Scanner
A powerful, native barcode and QR code scanner for React Native with configurable target area scanning. Limit scan area and restrict scanning to a specific region.

![]()
![]()
Built with ❤️ by CleanUI.dev
What’s in this README
- Features — What the library does
- Quick Start — Get running in a few lines
- Installation — Expo vs bare React Native
- Usage & API — Examples and prop reference
- FAQ — Common questions
✨ Features
| Feature | Description | |:------:|:-----------| | 🚀 Native Performance | Built with CameraX & ML Kit (Android) and AVFoundation & Vision (iOS) for optimal performance | | 🎯 Target Area Scanning | Scan barcodes within configurable target areas for precise detection | | 🔦 Torch Control | Built-in flashlight/torch control | | 📊 Multiple Formats | Support for QR codes, Code128, Code39, EAN, UPC, and more | | 🎨 Customizable | Configurable target area colors, barcode frame visualization, and scanning behavior | | 📱 Cross Platform | Android & iOS support (new Fabric architecture) |
🎯 Why Choose @cleanuidev/react-native-scanner?
If you mainly need barcode/QR scanning and want a focus area (scan only inside a box) without wiring it yourself, this library gives you that out of the box. For a full comparison, see the table below.
🆚 Comparison
| Feature | @cleanuidev/react-native-scanner | react-native-vision-camera | expo-camera | |---------|--------------------------------|---------------------------|-------------| | Target Area Scanning / Limit Scan Area | ✅ Built-in (limit scan area, restrict scan region) | ❌ Manual implementation | ❌ Manual implementation | | New Architecture Support | ✅ Full Fabric support | ✅ Yes | ✅ Yes | | Native Performance | ✅ CameraX + ML Kit / AVFoundation + Vision | ✅ Yes | ✅ Yes | | Expo Support | ✅ Dev builds | ✅ Dev builds | ✅ Expo Go | | Barcode Frame Visualization | ✅ Built-in | ⚠️ Custom | ❌ No | | Multiple Scan Strategies | ✅ 4 strategies (ONE, ALL, BIGGEST, SORT_BY_BIGGEST) | ⚠️ Custom | ❌ No | | Setup Complexity | ⭐⭐ Simple | ⭐⭐⭐ Moderate | ⭐ Easy | | Bundle Size | Small | Medium | Small | | Active Maintenance | ✅ Active | ✅ Active | ✅ Active | | License | MIT | MIT | MIT | | Best For | Barcode/QR scanning with target areas | General camera + scanning | Expo projects |
💡 When to choose this library: If you need barcode/QR code scanning with the ability to limit scan area, restrict scanning region, or scan within target areas, this library provides a simpler API and built-in features compared to general-purpose camera libraries.
⚡ Quick Start
npm install @cleanuidev/react-native-scannerimport ScannerView, { BarcodeFormat } from '@cleanuidev/react-native-scanner';
<ScannerView
barcodeTypes={[BarcodeFormat.QR_CODE]}
onBarcodeScanned={(e) => console.log(e.nativeEvent)}
/>📦 Installation
Install Beta Version
Currently, the library is in beta. Install the beta version using:
npm install @cleanuidev/react-native-scanner@beta
# or
yarn add @cleanuidev/react-native-scanner@beta
Install Specific Version
To install a specific beta version:
npm install @cleanuidev/[email protected]
# or
yarn add @cleanuidev/[email protected]Note: Once the library reaches stable release (1.0.0), you can install it without the
@betatag:npm install @cleanuidev/react-native-scanner # or yarn add @cleanuidev/react-native-scanner
Platform Setup
Expo Setup
⚠️ Important: This library uses native code and requires an Expo development build. It cannot run in Expo Go.
Prerequisites
- Expo SDK 53+ (recommended)
- EAS CLI installed:
npm install -g eas-cli - Expo development build configured
Installation
- Install the package:
npx expo install @cleanuidev/react-native-scanner- Configure app.json or app.config.js:
Add camera permissions directly to your Expo configuration:
{
  "expo": {
    "ios": {
      "infoPlist": {
        "NSCameraUsageDescription": "This app needs camera access to scan barcodes and QR codes"
      }
    },
    "android": {
      "permissions": [
        "android.permission.CAMERA",
        "android.permission.WAKE_LOCK"
      ]
    }
  }
}- Create a development build:
For iOS:
eas build --profile development --platform iosFor Android:
eas build --profile development --platform androidOr build locally:
npx expo run:ios
# or
npx expo run:android- Install the development build on your device:
- For EAS builds: Download and install the build from the EAS dashboard
- For local builds: The build will be installed automatically
Android Setup (Bare React Native)
Add the following permissions to your android/app/src/main/AndroidManifest.xml:
<uses-permission android:name="android.permission.CAMERA" />
<uses-permission android:name="android.permission.WAKE_LOCK" />
<uses-feature android:name="android.hardware.camera" android:required="true" />
<uses-feature android:name="android.hardware.camera.autofocus" android:required="false" />
<uses-feature android:name="android.hardware.camera.flash" android:required="false" />
iOS Setup (Bare React Native)
For iOS, add camera usage description to your ios/YourApp/Info.plist:
<key>NSCameraUsageDescription</key>
<string>This app needs camera access to scan barcodes and QR codes</string>
Then install CocoaPods:
cd ios && pod install && cd ..Usage
Permissions
Request camera permission before showing the scanner. Use react-native-permissions to request on both Android and iOS:
npm install react-native-permissions
# Then link and add to Info.plist (iOS) / AndroidManifest (Android) per the library’s setup.
import { Platform } from 'react-native';
import { check, request, PERMISSIONS, RESULTS } from 'react-native-permissions';
const cameraPermission =
Platform.OS === 'ios'
? PERMISSIONS.IOS.CAMERA
: PERMISSIONS.ANDROID.CAMERA;
const requestCameraPermission = async (): Promise<boolean> => {
const status = await check(cameraPermission);
if (status === RESULTS.GRANTED) return true;
if (status === RESULTS.BLOCKED || status === RESULTS.UNAVAILABLE) return false;
const result = await request(cameraPermission);
return result === RESULTS.GRANTED;
};
// Usage: request before showing the scanner
const [hasPermission, setHasPermission] = useState<boolean | null>(null);
useEffect(() => {
requestCameraPermission().then(setHasPermission);
}, []);
if (hasPermission === null) return null; // or a loading state
if (!hasPermission) return <Text>Camera permission is required</Text>;
return <ScannerView ... />;Basic scanner
import React from 'react';
import { View, StyleSheet } from 'react-native';
import ScannerView, { BarcodeFormat } from '@cleanuidev/react-native-scanner';

export default function App() {
  const handleBarcodeScanned = (event) => {
    console.log('Scanned:', event.nativeEvent.data);
  };

  return (
    <View style={styles.container}>
      <ScannerView
        style={styles.scanner}
        barcodeTypes={[BarcodeFormat.QR_CODE, BarcodeFormat.CODE_128]}
        onBarcodeScanned={handleBarcodeScanned}
      />
    </View>
  );
}

const styles = StyleSheet.create({
  container: {
    flex: 1,
  },
  scanner: {
    flex: 1,
  },
});
Scanner with Target Area - Limit Scan Area Example
import React, { useState } from 'react';
import { View, StyleSheet, TouchableOpacity, Text } from 'react-native';
import ScannerView, { BarcodeFormat } from '@cleanuidev/react-native-scanner';

export default function FocusAreaScanner() {
  const [torchEnabled, setTorchEnabled] = useState(false);

  // Target area configuration - limit scan area to specific region
  const focusAreaConfig = {
    enabled: true,        // Limit scan area - only scan barcodes within the target area
    showOverlay: true,    // Show overlay outside the target area
    size: 300,           // Size of the target area (square)
    color: '#00FF00',    // Color of the target area border
  };

  const barcodeFramesConfig = {
    enabled: true,        // Show frames around detected barcodes
    color: '#FF0000',     // Color of barcode frames
    onlyInFocusArea: false, // Show frames for all barcodes
  };

  return (
    <View style={styles.container}>
      <ScannerView
        style={styles.scanner}
        barcodeTypes={[
          BarcodeFormat.QR_CODE,
          BarcodeFormat.CODE_128,
          BarcodeFormat.EAN_13,
          BarcodeFormat.UPC_A,
        ]}
        focusArea={focusAreaConfig}
        barcodeFrames={barcodeFramesConfig}
        torch={torchEnabled}
        onBarcodeScanned={(event) => {
          console.log('Scanned:', event.nativeEvent.data);
        }}
        onScannerError={(event) => {
          console.error('Error:', event.nativeEvent.error);
        }}
        onLoad={(event) => {
          console.log('Scanner loaded:', event.nativeEvent.success);
        }}
      />

      <View style={styles.controls}>
        <TouchableOpacity
          style={styles.button}
          onPress={() => setTorchEnabled(!torchEnabled)}
        >
          <Text>Toggle Torch</Text>
        </TouchableOpacity>
      </View>
    </View>
  );
}
API Reference
Props
| Prop | Type | Default | Description |
|------|------|---------|-------------|
| barcodeTypes | BarcodeFormat[] | [BarcodeFormat.QR_CODE] | Array of barcode formats to scan |
| focusArea | FocusAreaConfig | - | Limit scan area and restrict scanning region - target area configuration for precise scanning |
| barcodeFrames | BarcodeFramesConfig | - | Barcode frame visualization configuration |
| torch | boolean | false | Enable/disable torch/flashlight |
| zoom | number | 1.0 | Camera zoom level |
| pauseScanning | boolean | false | Pause/resume scanning |
| barcodeScanStrategy | BarcodeScanStrategy | BarcodeScanStrategy.ALL | Strategy for processing multiple detected barcodes |
| keepScreenOn | boolean | true | Keep screen on while camera is active (prevents auto-lock) |
| onBarcodeScanned | function | - | Callback when barcode is scanned |
| onScannerError | function | - | Callback when scanner encounters an error |
| onLoad | function | - | Callback when scanner is loaded |
FocusAreaConfig
type FocusAreaConfig = {
  enabled?: boolean;        // Limit scan area - whether to restrict scanning to target area only
  size?: FrameSize;         // Size of the target area (scan region limit)
  color?: string;           // Color of target area border
  showOverlay?: boolean;    // Whether to draw overlay outside the target area
};
BarcodeFramesConfig
type BarcodeFramesConfig = {
  enabled?: boolean;        // Whether to draw frames around detected barcodes
  color?: string;           // Color of barcode frames
  onlyInFocusArea?: boolean; // Only show frames for barcodes in target area
};
FrameSize
type FrameSize = number | { width: number; height: number };
// number: square frame (e.g., 300)
// object: rectangular frame (e.g., { width: 300, height: 200 })
BarcodeScanStrategy
import { BarcodeScanStrategy } from '@cleanuidev/react-native-scanner';

// Available strategies:
BarcodeScanStrategy.ONE              // Process only the first barcode detected
BarcodeScanStrategy.ALL              // Process all detected barcodes
BarcodeScanStrategy.BIGGEST          // Process only the largest barcode by area
BarcodeScanStrategy.SORT_BY_BIGGEST  // Process all barcodes sorted by size (largest first)
Barcode formats
import { BarcodeFormat } from '@cleanuidev/react-native-scanner';

// Available formats:
BarcodeFormat.QR_CODE        // QR Code
BarcodeFormat.CODE_128       // Code 128
BarcodeFormat.CODE_39        // Code 39
BarcodeFormat.EAN_13         // EAN-13
BarcodeFormat.EAN_8          // EAN-8
BarcodeFormat.UPC_A          // UPC-A
BarcodeFormat.UPC_E          // UPC-E
BarcodeFormat.DATA_MATRIX    // Data Matrix
BarcodeFormat.PDF_417        // PDF417
BarcodeFormat.AZTEC          // Aztec
BarcodeFormat.ITF            // ITF (Interleaved 2 of 5)
Event Payloads
onBarcodeScanned
{
  nativeEvent: [
    {
      data: string;           // The scanned barcode data
      format: BarcodeFormat;  // The format of the scanned barcode
      timestamp: number;      // Timestamp when scanned
      boundingBox?: {         // Bounding box coordinates (if available)
        left: number;
        top: number;
        right: number;
        bottom: number;
      };
      area?: number;          // Area of the barcode (if available)
    }
  ]
}
onScannerError
{
  nativeEvent: {
    error: string;          // Error message
    code: string;           // Error code
  }
}
onLoad
{
  nativeEvent: {
    success: boolean;       // Whether scanner loaded successfully
    error?: string;         // Error message if loading failed
  }
}
Target Area Configuration - Limit Scan Area
The target area feature provides precise control over where barcodes are scanned. You can limit scan area, restrict scanning region, and confine barcode detection to a specific area on the screen:
Basic Target Area
<ScannerView
  focusArea={{
    showOverlay: true,    // Show overlay outside the target area
    size: 300,           // 300x300 pixel square
    color: '#00FF00',    // Green border
  }}
  // Scans entire camera view
/>
Limit Scan Area - Restricted Scanning
Limit scan area and restrict scanning to a specific region:
<ScannerView
  focusArea={{
    enabled: true,        // Limit scan area - only scan barcodes within the target area
    showOverlay: true,    // Show overlay outside the target area
    size: 300,           // 300x300 pixel square
    color: '#00FF00',    // Green border
  }}
/>
This configuration restricts scanning region and limits scan area to the defined target area only.
Rectangular Target Area
<ScannerView
  focusArea={{
    enabled: true,
    showOverlay: true,
    size: { width: 300, height: 200 }, // Rectangular target area
    color: '#00FF00',
  }}
/>
Positioning Target Area with Coordinates
You can position the target area anywhere on the screen using percentage-based coordinates (0-100):
<ScannerView
  focusArea={{
    enabled: true,
    showOverlay: true,
    size: 300,
    position: { x: 50, y: 50 }, // Center position (default)
    color: '#00FF00',
  }}
/>
Example: Position target area at top center
<ScannerView
  focusArea={{
    enabled: true,
    showOverlay: true,
    size: 250,
    position: { x: 50, y: 25 }, // Top center
    color: '#00FF00',
  }}
  onBarcodeScanned={handleBarcodeScanned}
/>
Barcode frames
The scanner can display visual frames around detected barcodes to help users see what's being scanned:
Show All Barcode Frames
<ScannerView
  barcodeFrames={{
    enabled: true,
    color: '#FF0000',     // Red frames
    onlyInFocusArea: false, // Show frames for all barcodes
  }}
/>
Show Frames Only in Target Area
<ScannerView
  focusArea={{
    enabled: true,
    showOverlay: true,
    size: 300,
  }}
  barcodeFrames={{
    enabled: true,
    color: '#FF0000',
    onlyInFocusArea: true, // Only show frames for barcodes in target area
  }}
/>
Barcode Scan Strategy
The scanner now supports different strategies for processing multiple detected barcodes. The onBarcodeScanned event always returns an array of barcodes, even when only one barcode is processed.
Process All Barcodes (Default)
<ScannerView
  barcodeScanStrategy={BarcodeScanStrategy.ALL}
  onBarcodeScanned={(event) => {
    const barcodes = event.nativeEvent;
    console.log(`Found ${barcodes.length} barcodes:`, barcodes);
  }}
/>
Process Only the First Barcode
<ScannerView
  barcodeScanStrategy={BarcodeScanStrategy.ONE}
  onBarcodeScanned={(event) => {
    const barcodes = event.nativeEvent;
    // Will always have 0 or 1 barcode
    if (barcodes.length > 0) {
      console.log('First barcode:', barcodes[0]);
    }
  }}
/>
Process Only the Largest Barcode
<ScannerView
  barcodeScanStrategy={BarcodeScanStrategy.BIGGEST}
  onBarcodeScanned={(event) => {
    const barcodes = event.nativeEvent;
    // Will always have 0 or 1 barcode (the largest one)
    if (barcodes.length > 0) {
      console.log('Largest barcode:', barcodes[0]);
      console.log('Area:', barcodes[0].area);
    }
  }}
/>
Process All Barcodes Sorted by Size
<ScannerView
  barcodeScanStrategy={BarcodeScanStrategy.SORT_BY_BIGGEST}
  onBarcodeScanned={(event) => {
    const barcodes = event.nativeEvent;
    // Barcodes are sorted from largest to smallest
    barcodes.forEach((barcode, index) => {
      console.log(`Barcode ${index + 1}:`, barcode.data, 'Area:', barcode.area);
    });
  }}
/>
Torch Control
The torch/flashlight can be controlled via the torch prop:
const [torchEnabled, setTorchEnabled] = useState(false);
<ScannerView torch={torchEnabled} ... />
Keep Screen On
The scanner automatically keeps the screen on while the camera is active to prevent auto-lock during scanning sessions. This behavior can be controlled via the keepScreenOn prop:
Default Behavior (Screen Stays On)
<ScannerView
  keepScreenOn={true} // Default behavior
  onBarcodeScanned={handleBarcodeScanned}
/>
Allow Screen Auto-Lock
<ScannerView
  keepScreenOn={false} // Allow screen to auto-lock
  onBarcodeScanned={handleBarcodeScanned}
/>
Dynamic Control
const [keepScreenOn, setKeepScreenOn] = useState(true);

<ScannerView
  keepScreenOn={keepScreenOn}
  onBarcodeScanned={handleBarcodeScanned}
/>

// Toggle button
<TouchableOpacity onPress={() => setKeepScreenOn(!keepScreenOn)}>
  <Text>{keepScreenOn ? 'Disable Keep Screen On' : 'Enable Keep Screen On'}</Text>
</TouchableOpacity>Note: The screen is kept on by default (keepScreenOn={true}) as this is typically desired for scanning applications. When disabled, the screen may auto-lock, which could interrupt scanning sessions.
🎨 UI Design Note
💡 Note: The native overlays and frames are provided to fulfill minimum design requirements and for debugging during development. We recommend implementing custom React Native UI for enhanced user experiences.
To use custom UI, simply disable the native visual overlays and build your own:
<ScannerView
  focusArea={{ enabled: true, showOverlay: false }} // Disable native overlay
  barcodeFrames={{ enabled: false }} // Disable native frames
  onBarcodeScanned={handleBarcodeScanned}
/>
Permissions
The scanner requires camera permissions. Make sure to request camera permissions in your app before using the scanner:
import { PermissionsAndroid, Platform } from 'react-native';

const requestCameraPermission = async () => {
  if (Platform.OS === 'android') {
    try {
      const granted = await PermissionsAndroid.request(
        PermissionsAndroid.PERMISSIONS.CAMERA,
        {
          title: "Camera Permission",
          message: "This app needs camera access to scan barcodes",
          buttonNeutral: "Ask Me Later",
          buttonNegative: "Cancel",
          buttonPositive: "OK"
        }
      );
      return granted === PermissionsAndroid.RESULTS.GRANTED;
    } catch (err) {
      console.warn(err);
      return false;
    }
  }
  return true;
};
Example
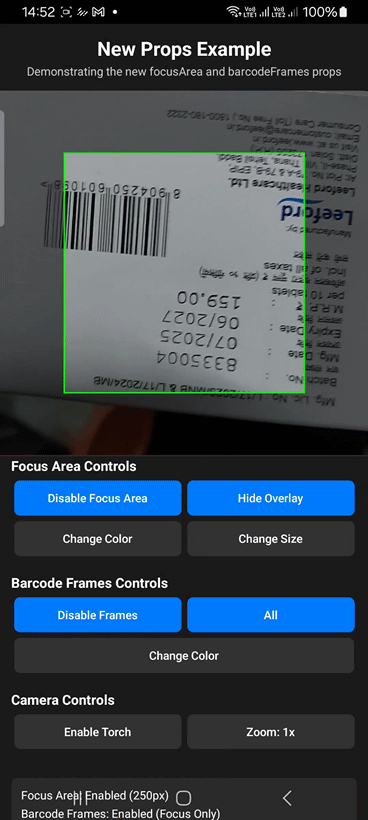
See the example/ directory for complete working examples, including the "New Props Example" that demonstrates the updated prop structure.
❓ Frequently Asked Questions
Is this library compatible with Expo?
Yes! This library works with Expo development builds (SDK 53+). It does not work with Expo Go due to native code requirements. See the Expo Setup section for detailed instructions.
Does it support React Native's new architecture?
Yes! Full support for Fabric (new architecture) on both Android and iOS. The library is built with the new architecture in mind.
How does it compare to react-native-vision-camera?
This library focuses specifically on barcode/QR code scanning with built-in target area support and multiple scan strategies. react-native-vision-camera is a general-purpose camera library that requires more setup for barcode scanning. If you only need barcode scanning, this library provides a simpler API and built-in features.
Can I limit the scan area or restrict scanning to a specific region?
Yes! You can limit the scan area and restrict scanning to a specific region. The target area is optional. By default, you can scan the entire camera view. Set focusArea.enabled: true to limit scan area and restrict scanning to a specific region only.
Is it possible to limit scan area?
Yes! This library provides built-in support for limiting scan area. You can restrict scanning to a specific region using the focusArea prop with enabled: true. This allows you to limit scan area to a defined region on the screen, perfect for precise barcode detection.
Can I scan barcodes outside the target area?
Yes! The target area is optional. By default, you can scan the entire camera view. Set focusArea.enabled: true to restrict scanning to a specific area.
What barcode formats are supported?
QR Code, Code128, Code39, EAN-13, EAN-8, UPC-A, UPC-E, Data Matrix, PDF417, Aztec, and ITF (Interleaved 2 of 5). See the Barcode Formats section for the complete list.
Is it production-ready?
The library is currently in beta (1.0.0-beta.7) but is stable and actively maintained. Production use is recommended with proper testing. We're working towards a stable 1.0.0 release.
Does it work with React Native 0.83+?
Yes! The library supports React Native 0.83 and newer versions, including full support for the new architecture.
Can I customize the target area appearance?
Yes! You can customize the target area size, position, color, and overlay. See the Target Area Configuration section for details.
How do I handle multiple barcodes?
The library supports multiple scan strategies: process all barcodes, only the first one, only the largest, or all sorted by size. See the Barcode Scan Strategy section.
💼 Use Cases
- Retail & E-commerce: Product barcode scanning for inventory and checkout (limit scan area for precise product detection)
- Inventory Management: Stock tracking and warehouse management systems (restrict scan region for accurate scanning)
- Event Management: QR code ticket scanning and attendee check-in (limit scan area for ticket validation)
- Authentication: QR code-based login and two-factor authentication (restrict scanning region for security)
- Payment Systems: QR code payment processing and transaction scanning (limit scan area for payment codes)
- Document Management: Document barcode scanning and tracking (restrict scan region for document processing)
- Asset Tracking: QR/barcode-based asset management systems (limit scan area for asset identification)
- Healthcare: Medical device and medication barcode scanning (restrict scanning region for medical accuracy)
Contributing
- Fork the repository
- Create your feature branch (
git checkout -b feature/amazing-feature) - Commit your changes (
git commit -m 'Add some amazing feature') - Push to the branch (
git push origin feature/amazing-feature) - Open a Pull Request
💼 Consulting & Support
Community Support (Free)
For bug reports, feature requests, and general questions:
- 📝 Open an issue on GitHub
- 💬 Use GitHub Discussions for questions and community help
Support the Maintainer
If you find this library useful, consider supporting the maintainer/developer directly through donations:
- 💰 Donate via PayPal - Support the maintainer directly and help keep this project maintained and improved
- ⭐ Star the repository - Show your appreciation and help others discover this library
Your donations help:
- 🐛 Maintain and fix bugs
- ✨ Add new features and improvements
- 📚 Keep documentation up to date
- ⚡ Ensure long-term sustainability of the project
Commercial Support & Consulting
Need professional help with implementation, custom development, or enterprise support?
- 📧 Email: [email protected]
- 🌐 Company: cleanui.dev
We offer:
- ✅ Custom implementation assistance
- ✅ Enterprise support and SLA
- ✅ Feature development and customization
- ✅ Code reviews and architecture consulting
License
This project is licensed under the MIT License - see the LICENSE file for details.