
@confimedis/sdk
v3.12.1
Published
TypeScript SDK for the Confimedis Platform

Readme
Software Development Kit (SDK) for the Confimedis Platform
Confimedis is a modular, standards-compliant platform for clinical trials and medical research.
Fully compliant with ICH GCP and FDA CFR Part 11. Validated according to GAMP 5.
The official TypeScript SDK for the Confimedis Clinical Trial Platform.
It allows you to integrate our platform into your web or mobile application, reporting pipeline, or any server-side automation or custom tooling built around your study.
Fully typed end-to-end, it runs on any modern JavaScript runtime (Node, Deno, Bun) and gives you a clean, expressive API to work with all aspects of a clinical study:
- Data access: Query study metadata, clinical data, administrative data, and more, with flexible filtering, sorting, and cross-project support
- Data editing: Create or modify study data reliably with a single commit call, with all changes automatically recorded in the audit trail
- Audit trail: Query the complete history of all study data changes, supporting data integrity and GCP compliance
- Live updates: Subscribe to real-time changes via live queries that automatically reflect updates as they happen
- File management: Upload and download files securely with resumable transfers, supporting files up to 5 GB
The Confimedis Platform and the SDK are built around PostgreSQL Row Level Security (RLS) Policies and Triggers. This ensures that:
- Scoped access: Only the projects and data the authenticated user has been granted access to can be read or modified through the SDK
- Automated records: All data changes are automatically recorded in the audit trail, attributed to the user with a server-side timestamp
Getting started
Installation
# npm
npm install @confimedis/sdk

# pnpm / yarn / bun
pnpm add @confimedis/sdk

# Deno
deno add npm:@confimedis/sdk
Initialization
Before you can authenticate within the SDK, please create an API key in the web application. Click on your name in the bottom-left corner, select Account, and then create an API key at the bottom of the dialog.
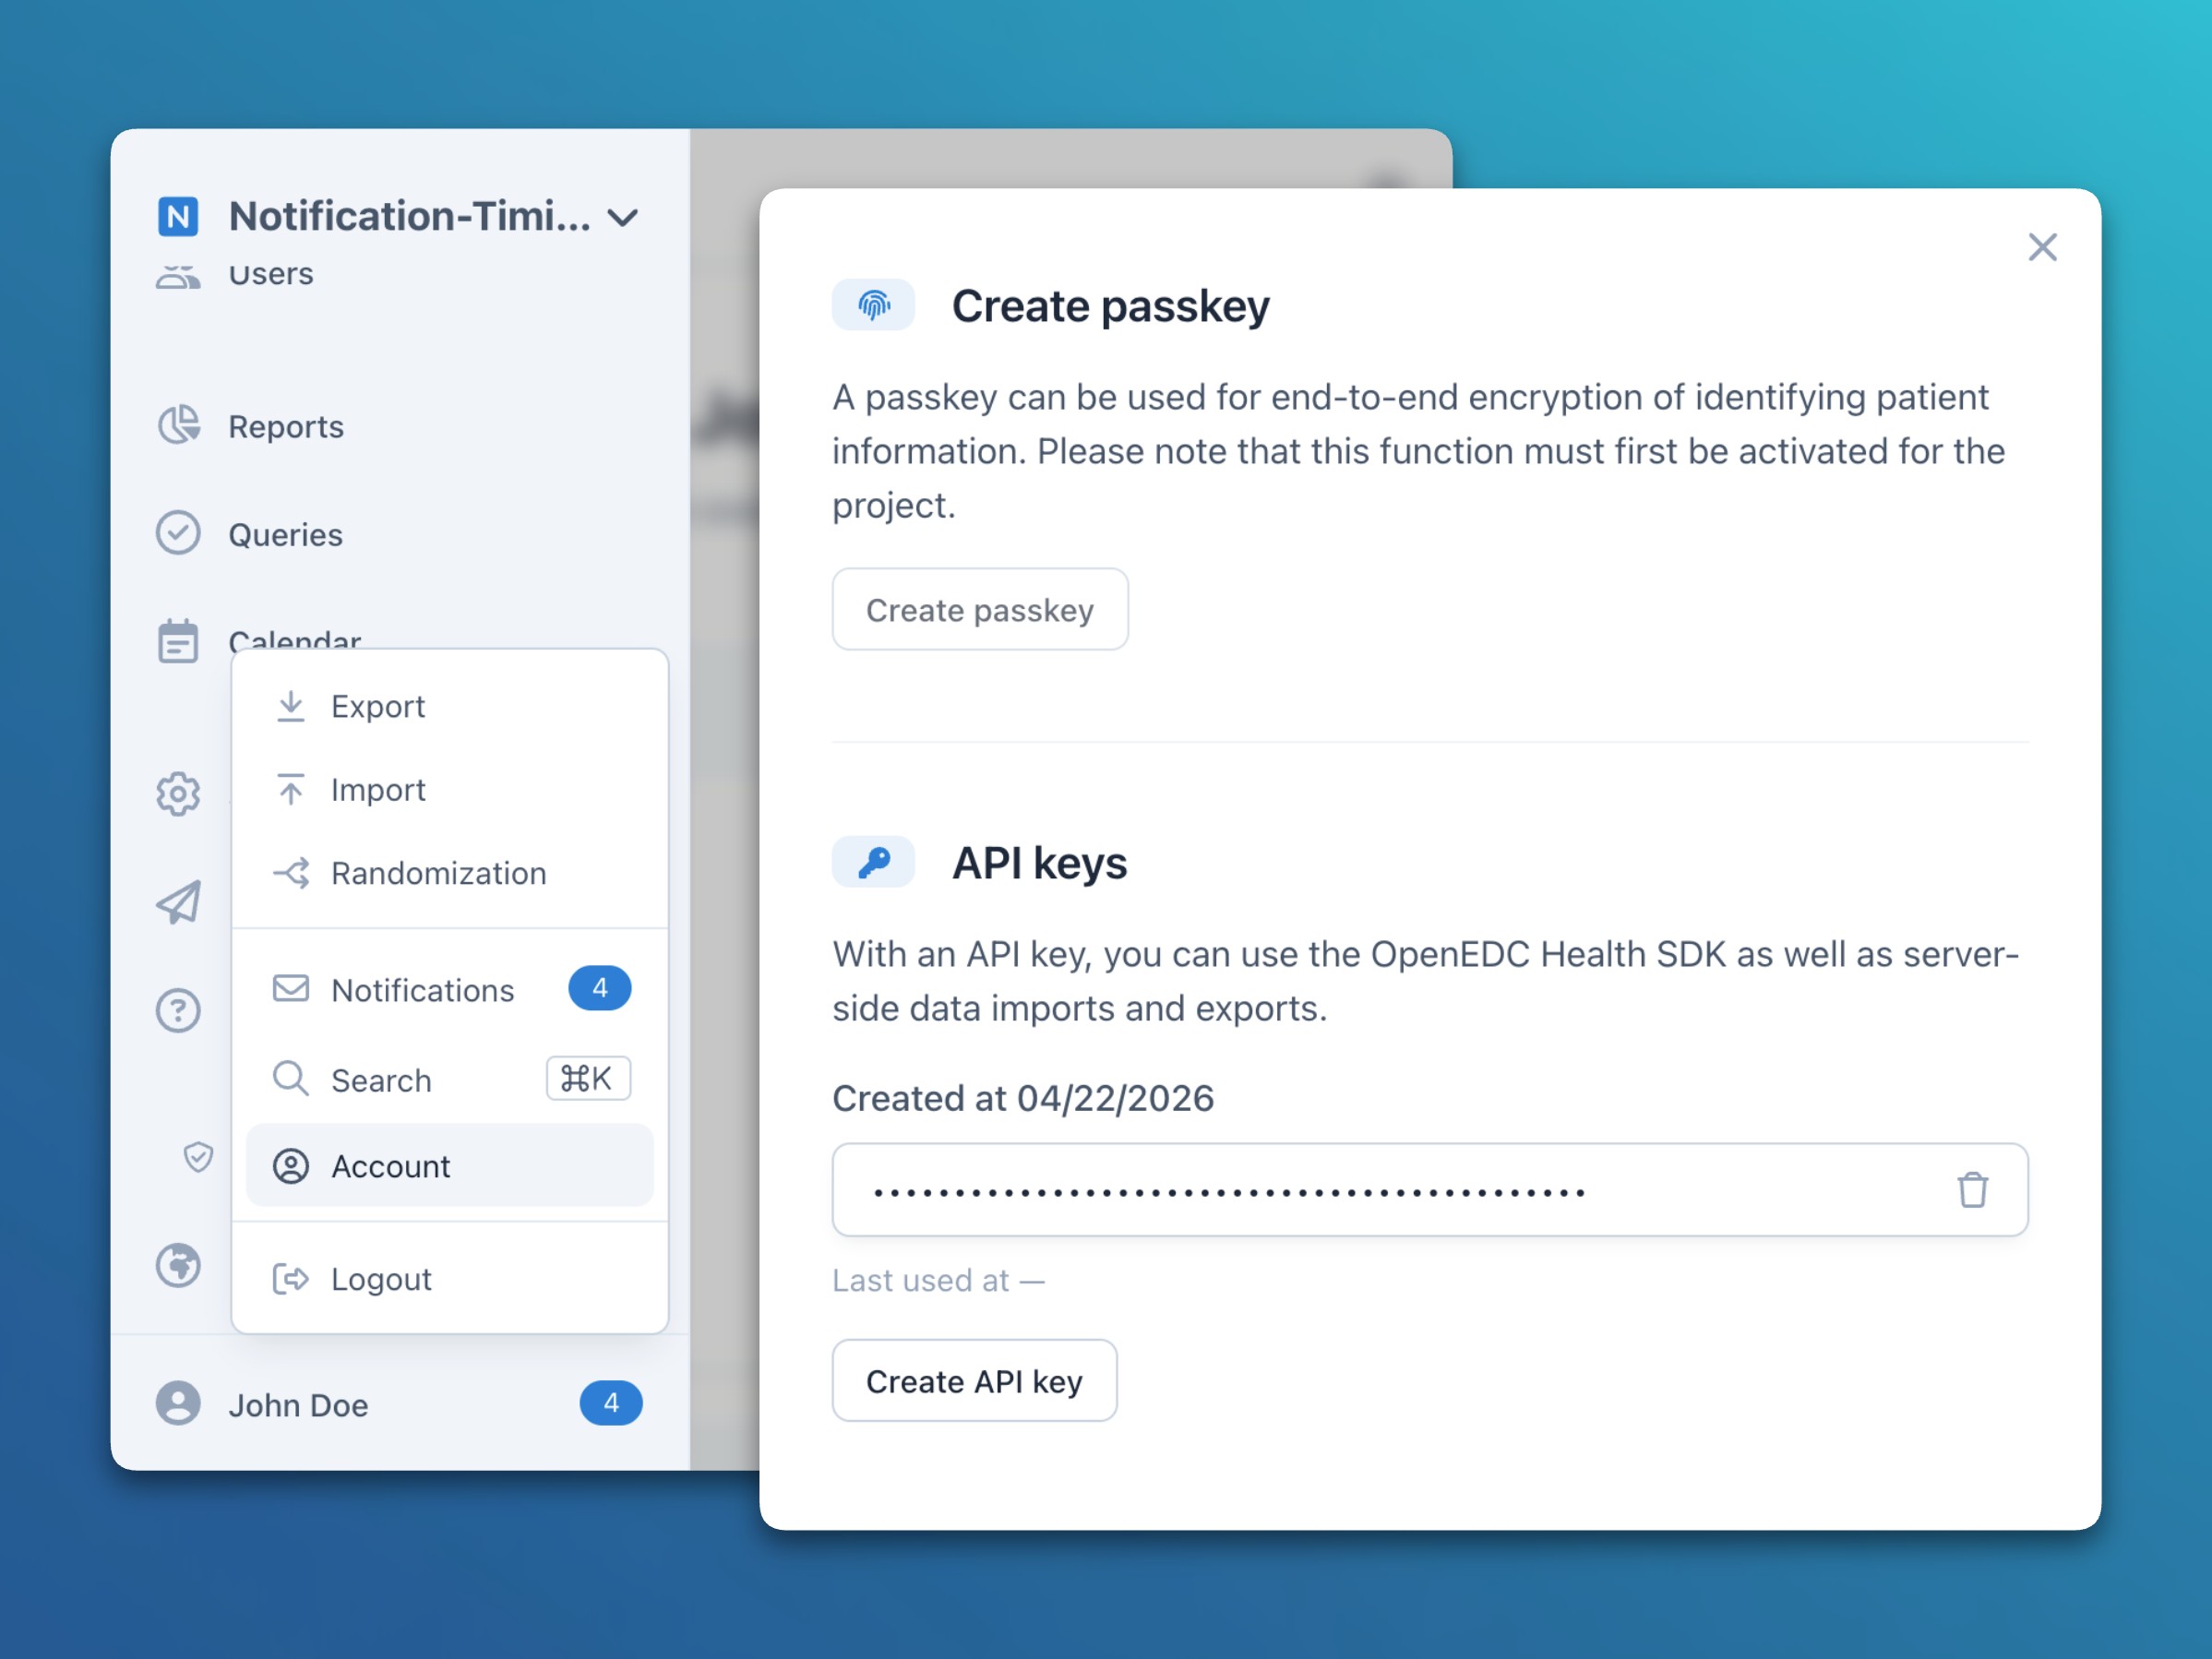
The API key can then be used as shown below.
import { login, logout } from "@confimedis/sdk";

const user = await login({
    serverUrl: "server-base-url",
    apiKey: "your-api-key"
});

await logout();
Usage
Data querying, creation, and modification
Explicit project scope
import { Project, Location, SubjectData } from "@confimedis/sdk";

// Get project by name
const project = await Project
    .where({ name: "Exemplary study" })
    .first();

// Get the first location
const location = await Location
    .where()
    .project(project)
    .first();

// Get all subjects from a location sorted by creation
const subjects = await SubjectData
    .where({ location })
    .project(project)
    .sort("createdDate").asc()
    .all();

// Create a new subject within a location
const subject = await new SubjectData("Patient-001", location.reference)
    .commit({ project });

// Update an existing subject (no need to specify the project again)
subject.subjectKey = "Patient-002";
await subject.commit();

// Alternatively, use .set() for a single expression
await subject.set({ subjectKey: "Patient-003" }).commit();
Global project scope
Instead of specifying the project per call, a global scope can be set for all upcoming statements. This works well for linear, sequential flows but should be avoided in parallel or callback-based code that handles multiple projects concurrently. This scope is assumed for the rest of the examples.
import { scope, Location, SubjectData } from "@confimedis/sdk";

// Scope subsequent queries and commits
scope(project);

const sameLocation = await Location
    .where()
    .first();

const sameSubjects = await SubjectData
    .where({ location })
    .sort("createdDate").asc()
    .all();

// Create a new subject (note that Patient-003 would result in a unique constraint violation)
const newSubject = await new SubjectData("Patient-004").commit();
Clinical data retrieval
import { ItemGroupDef, ItemDef, ItemData } from "@confimedis/sdk";

// Get data for specific subject and form (project-scoped from above)
const form = await ItemGroupDef
    .where({
        type: "Form",
        name: "Demographics"
    })
    .first();

const formData = await ItemData
    .where({
        subject,
        formOID: form?.oid
    })
    .all();

// Get data for specific subject, form, and item (using a form-scoped local search)
const item = form?.find(ItemDef, "name", "Gender");

const itemData = await ItemData
    .where({
        subject,
        formOID: form?.oid,
        itemOID: item?.oid
    })
    .all();
Subject key rendering
Full subject keys (e.g., SCREENING-MS-001) are rendered dynamically to allow updates to prefix, padding, and location settings. This requires the use of certain SubjectData methods to compose and render full subject keys at runtime.
import { SubjectData } from "@confimedis/sdk";

// Render one subject key dynamically
const subject = await SubjectData.where().first();
const subjectKey = await subject.getIdAsync();

// Render multiple subject keys in a loop
const subjects = await SubjectData.where().all();
const keyOptions = await SubjectData.fetchSubjectKeyOptions();
const subjectKeys = subjects.map(subject => subject.getId(keyOptions));
Live queries
// Subscribe to subject changes with a live query
await SubjectData.where({ location }).all((_, subject, method) => {
    console.log(`Subject ${subject.subjectKey} was ${method} in ${location.name}.`);
});
import { FormStatus } from "@confimedis/sdk";
// Subscribe to item data changes via the form status as proxy
await FormStatus.where().all(async (_, status) => {
const subject = await status.subject.data;
const items = await ItemData.where(ODMPath.with(status).toObject()).all();
console.log(`Updated form with ${items.length} items for subject ${subject.subjectKey}.`);
});Audit trail
// Get the audit trail of all subjects within a project
const auditTrailSubjects = await SubjectData.where().audit();

// Get the audit trail of all item data of a given subject
const auditTrailItemsBySubject = await ItemData.where({ subject }).audit();
File management
import { FileMetadata, FileContent } from "@confimedis/sdk";

// Upload a file (only readable to users with access to the subject)
const file = new File(["exemplary-data"], "file.txt");
const fileMetadata = await new FileMetadata(file, subject.reference).commit();
const fileContent = await new FileContent(fileMetadata.reference, file).commit();

// Track upload progress in real time
await fileContent.upload(progress => {
    console.log(`Upload progress: ${progress * 100}`);
});
// Download a file
const downloadMetadata = await FileMetadata.where({ fileName: "file.txt" }).first();
const downloadContent = await FileContent.where({ metadata: downloadMetadata }).first();
const downloadURL = await downloadContent?.getUrl();Further examples
Create custom randomization schedule
If you want to use a custom randomization schedule that is not yet supported by Confimedis natively, you can use the SDK to upload your own schedule.
For this, first create the treatment groups and randomization configuration within the web application that matches your desired configuration as good as possible (e.g., selecting a simple, permuted, or stratified block randomization and choosing stratification variables).
Then, fetch the created draft randomization plan and create your schedule programmatically:
import { RandomizationPlan, RandomizationSchedule, StudyEventGroupDef } from "@confimedis/sdk";

// First, fetch the created draft randomization plan
const plan = await RandomizationPlan.where().first();

// Also get the list of your study arms
const arms = await StudyEventGroupDef.where("armOID").notEquals(undefined).all();

// Then, generate and commit your custom randomization schedule as a batch using these parameters:
// new RandomizationSchedule(planReference, orderNumber, blockNumber, subjectKey, armReference).
// In this example, 6 entries with a block size of 3 and 2 arms with 2:1 ratio are created.
await RandomizationSchedule.commit([
    new RandomizationSchedule(plan.reference, 0, 1, 1, arms[0].reference),
    new RandomizationSchedule(plan.reference, 1, 1, 2, arms[0].reference),
    new RandomizationSchedule(plan.reference, 2, 1, 3, arms[1].reference),
    new RandomizationSchedule(plan.reference, 3, 2, 4, arms[1].reference),
    new RandomizationSchedule(plan.reference, 4, 2, 5, arms[0].reference),
    new RandomizationSchedule(plan.reference, 5, 2, 6, arms[0].reference)
]);

// Finally, update the plan status to be able to see and review it within Confimedis
await plan.info.set({ status: "review" }).commit();
When using stratification variables, you can specify them for each randomization schedule entry. During randomization, the system will then automatically draw the next available entry for the given values of the current subject.
// Specify values for one or more stratification variables (please use the actual
// location UUID instead of munich and the actual item OID instead of gender)
await RandomizationSchedule.commit([
    new RandomizationSchedule(plan.reference, 0, 1, 1, arms[0].reference).set({ stratification: {
        locationUUID: "munich",
        gender: "female"
    }}),
    new RandomizationSchedule(plan.reference, 1, 1, 2, arms[0].reference).set({ stratification: {
        locationUUID: "munich",
        gender: "male"
    }}),
    // ...
]);
If you want to start over, you can either delete the created randomization schedule within the web application or execute await RandomizationSchedule.where({ plan }).delete(); using the SDK.