
@dotdrelle/wiki-manager
v0.14.10
Published
Agentic shell and orchestration cockpit for llm-wiki workspaces.

Maintainers
 dotdrelle
Readme
llm-wiki-manager

llm-wiki-manager is the local cockpit for several llm-wiki workspaces. It
creates workspace folders, assigns ports, starts Docker services, exposes MCP
endpoints, and provides the donna shell: an agent-first terminal UI that can
inspect workspaces, run safe manager commands, call MCP tools, guide production
jobs, and run one-shot headless tasks.
Current coordinated release: 0.14.5. Managed llm-wiki services expose
the Wiki Graph v2 browser and APIs; rebuild the llm-wiki image when deploying
this release through Docker.
The manager does not implement the wiki engine or the external agents. It
orchestrates them — generically. Since 0.12.0 the Donna core is
business-agnostic: agents declare their capabilities through a standard
contract (agent_describe / agent_plan / agent_execute / agent_status /
agent_cancel), plans target capabilities rather than agent names, and a
deterministic dispatcher executes bounded tasks with idempotency, bounded
approvals, per-run budgets and automatic recovery after restart. The chat
stays available while runs execute; additional requests are queued.
Scope note: this is a single-user deployment baseline. The multi-user model is
specified in llm-wiki/docs/industrialisation.md and planned next. Until
then, do not expose the runtime as a shared write surface; it binds to
127.0.0.1 by default, and --host 0.0.0.0 must be an explicit deployment
choice with bearer-token and network protection.
What it's for, in one sentence
wikiLLM turns a pile of scattered documents (Confluence pages, files, notes…) into a clean, up-to-date wiki, and can then regenerate deliverables from it (reports, pages, exports). The manager is the control deck: it keeps each project in its own corner, starts the right services, and lets you drive everything — either with the mouse in a browser, or by talking to an assistant.
A workspace = a project. Each project is isolated: its documents, settings, and results never get mixed up with the others.
Installation and command modes
The package can be installed either locally in a project or globally. The command used afterwards depends on the installation mode.
Local installation
Use a local installation when the manager should be pinned in a project's
package.json:
npm install @dotdrelle/wiki-manager
npm approve-scripts [email protected]  # only when npm reports that Bun's postinstall is pending
npx wiki-manager
npx wiki-workspace --help
npm install does not add wiki-manager or wiki-workspace to the shell's
global PATH. Run local executables with npx (or npm exec wiki-manager and
npm exec wiki-workspace). Bun is installed automatically as a package runtime;
you do not need to add ~/.bun/bin to PATH. Recent npm versions may require
the explicit npm approve-scripts [email protected] security approval shown above
before the first launch.
Global installation
Use a global installation when the commands should be available directly from any directory:
npm install --global @dotdrelle/wiki-manager
wiki-manager
wiki-workspace --help
The global installation also installs the required Bun runtime. A separately installed Bun remains supported, but is not required. If npm blocks Bun's installation script, reinstall with:
npm install --global --allow-scripts=bun @dotdrelle/wiki-managerIn both modes, launch the commands from the directory that should hold the
manager state (workspaces/, .env, and mcp.endpoints.json).
Functional overview
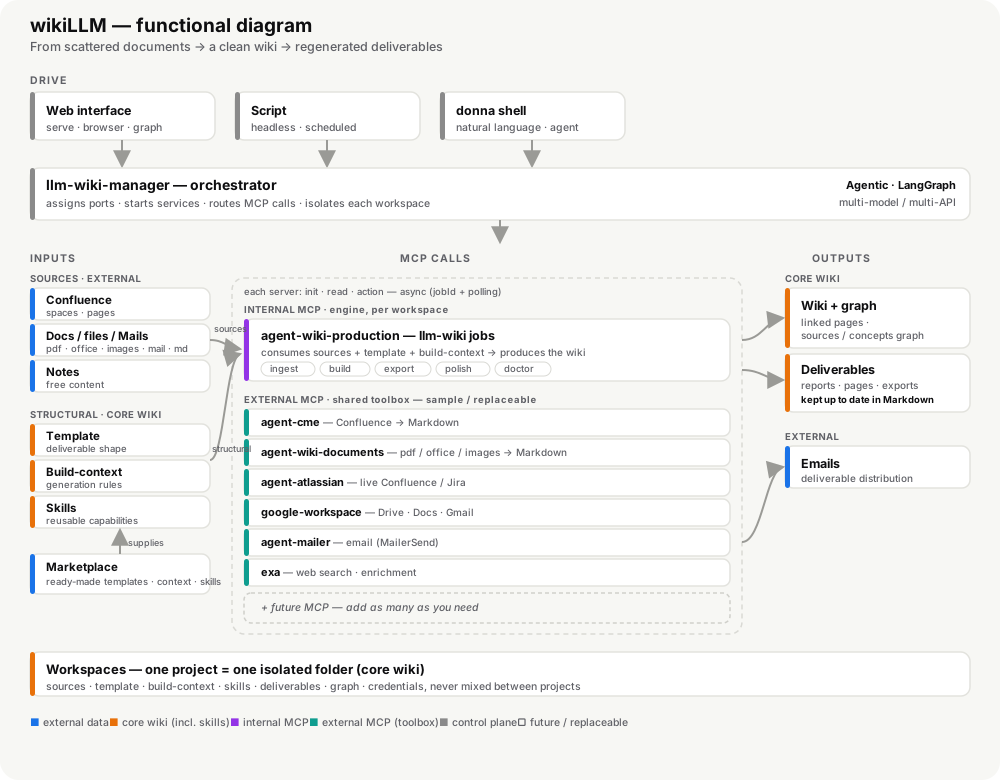
The diagram below shows the whole picture at a glance: how inputs (external sources plus structural template / build-context / skills from a marketplace) flow through the MCP calls — split between the internal production engine and a replaceable toolbox of external MCP servers — to produce the core wiki outputs, all driven by an agentic, multi-model orchestrator and grounded in isolated workspaces.
Quick start — your first wiki in ~5 minutes
The fastest way in: a browsable wiki, its dependency graph, and a grounded chat — all on the shipped example, with no external source to configure. External agents (Confluence, mail…) come later, only when you plug in real sources.
Prerequisites: Docker running and Node ≥ 22. Bun is installed with the npm package.
1 — Install globally, pick a home folder.
The manager keeps its state (workspaces, .env, endpoints) in the directory
where you launch it, so give it a home. This quick start uses the global mode;
see Installation and command modes for the
local npm install + npx mode.
npm install --global @dotdrelle/wiki-manager
mkdir -p ~/llm-wiki && cd ~/llm-wiki      # all manager state lives here
2 — Set the environment.
Copy the template and keep the defaults — nothing is mandatory for the local
demo (tokens/credentials are only needed when you connect real sources, see
docs/usage.md). The mcp.endpoints.json file is created
automatically on the first command.
cp .env.example .env3 — Start the shared agents.
Start the common toolbox once (Confluence export cme, documents).
They run in the background and serve every workspace.
wiki-workspace agents up
wiki-workspace agents status              # ✅ each agent should report healthy
4 — Create the demo workspace.
This creates the folder, auto-selects ports, and runs wiki init with the
"basic" scaffold — a working example out of the box.
wiki-workspace config demo5 — Start it. Two doors, your choice:
# A) just serve — the web interface
wiki-workspace up demo --open             # wiki + graph + built-in chat, in your browser

# B) the donna shell — talk in plain language
wiki-manager                              # then: /use demo
6 — Check everything is live.
Before doing real work, confirm the wiring from the donna shell:
/use demo            # activate the workspace
/config status       # ✅ LLM configured (apiKey, model, baseUrl)
/mcp status          # ✅ MCP endpoints connected (llm-wiki, production, cme, documents…)
/mcp tools           # the tools each agent exposes
/services            # ✅ serve / mcp-http / production-mcp running
Then send a one-line prompt to confirm the LLM answers, e.g.
say hello in one word. From the CLI you can re-check anytime with
wiki-workspace agents status and wiki-workspace list.
If
/config statusreports missing fields, run/config editto open the workspace.wikirc.yaml. That's where you set both the LLM (llm.provider,llm.model,llm.apiKey,llm.baseUrl) — direct chat needs them — and the vectorization underretrieval.vector(enabled,embeddingModel, optional separatebaseUrl/apiKey, and reranking) used for retrieval-grounded answers.
7 — Try a few commands & prompts.
Plain-language prompts (web chat or donna shell):
"Summarize wiki/index.md and list the pages it links to."
"What sources is this page grounded on?"
"Build the deliverable from the current wiki."
Slash primitives (shell):
/wiki                # inspect the wiki
/skills              # bundled examples: pipeline, diagnose, status, wiki-sync
/skills run pipeline # run the shipped end-to-end example
8 — See a concrete result.
Open the default page wiki/index.md and the graph view in the browser,
then regenerate a deliverable:
wiki-workspace wiki demo build # or, in the shell: /skills run pipelineThat's the whole loop. Next: the four ways to use it and how to configure the external agents (CME & co.) live in docs/usage.md; the detailed story is in The journey; and installing from source is in Installing from source.
The journey: from first launch to first result
Follow this little story in order. By the end you'll have seen it all: the interface, the assistant, the tools, and scripting.
Step 1 — Create your workspace with wiki-workspace.
Everything starts here: wiki-workspace creates your project, e.g. my-project.
It's the folder that will hold its documents, settings, and results, all on its
own. It ships pre-filled with an example (the "basic" scaffold): enough to
have a working use case from the start.
Step 2 — Configure the MCPs and the environment. Fill in the services (MCP) and the environment file: the keys, URLs, and tokens the project needs (Confluence, e-mail, production…). It's like plugging in the cables before switching on.
Step 3 — Start the shared external agents. Start the common toolbox once and for all (Confluence, documents, e-mail, production). These agents run in the background and serve all your projects:
wiki-workspace agents up        # start cme, documents…
wiki-workspace agents status    # check they respond
Step 4 — Move to wiki-manager or serve.
Two entry doors, your choice:
wiki-workspace up my-project --open # open the web interface (serve) in the browserserve→ the web interface: you browse the wiki (with its interdependency graph), click around, and chat with the built-in assistant.wiki-manager(thedonnashell) → you talk in plain language; it organizes the steps into a workflow and calls the tools for you.
👉 From this step you already have a concrete result: your wiki is in front of you.
(If the stack is already running, wiki-workspace wiki my-project serve --open
just reopens the web page.)
Step 5 — Discover the shipped use case via the wiki-manager commands.
The scaffold ships ready-to-use examples. In the shell, explore them:
/skills              list the bundled examples (diagnose, pipeline, status, wiki-sync…)
/skills show <name>  see what an example does
/skills run <name>   run it to see the result
It's the best way to discover every facet without building anything yourself: you start from a working case, then adapt it.
Step 6 — Let it run on its own (optional). Once comfortable, turn a task into a script and schedule it (e.g. every morning) — that's scripting mode. No need to think about it anymore.
Understanding a project's structure
A workspace keeps everything in five folders. The easiest way is to see them as a production line, from raw materials to finished product:
| Folder | Role | Image |
| --- | --- | --- |
| raw/ | The raw sources you provide (Confluence exports, converted docs). They land in raw/untracked/, then are archived into raw/ingested/ once processed. | Raw material |
| wiki/ | The knowledge base: clean markdown pages, linked together, created and kept up to date from the sources. The consultable core. | The organized warehouse |
| templates/ | The deliverable templates: the shape of the final document, with slots to fill. | The mold |
| build-context/ | The rules and references guiding generation: style, citation rules, expected structure, quality checks. | The build instructions |
| deliverables/ | The final deliverables generated from the templates, fed by the wiki and the build-context. | The finished product |
In one sentence: you ingest the sources into the wiki, then generate the deliverables by filling the templates with wiki content, according to the rules in the build-context.
How a deliverable is generated
The process always follows the same chain. Two entry points depending on your starting source.
Everything is driven in plain language (the web interface chat or the donna
shell), or by running a ready-made skill. No command line needed.
Entry point A — from a wiki / Confluence export
At each step, either you ask for it in plain language, or you run the skill.
- Export Confluence (via the CME agent) → the markdown lands in
raw/untracked/. → "Export the KEY Confluence space into my-project" - Ingest — the sources become clean pages in
wiki/(the originals are archived inraw/ingested/). → "Ingest the project's sources" - Index — builds the search index so the AI finds the right passage. → "Update the index"
- Build — fills the
templates/with the wiki + thebuild-context/→ thedeliverables/. → "Generate the deliverables" - Export / polish — expands citations into their source and refines the rendering. → "Export and polish the deliverables"
💡 Even simpler:
/skills run wiki-syncchains export + ingestion, and/skills run pipelineruns the whole chain end to end.
Entry point B — from a simple PDF (the fastest)
Ingestion only reads markdown. For a PDF (or a Word file, HTML…), the documents agent does the conversion (it even reads scanned PDFs thanks to OCR, in French and English). Two ways to hand it the file:
- Simplest — via chat: drag/attach the PDF directly into the conversation and
ask "Convert this PDF into my-project". The agent turns it into markdown and
drops it into
raw/untracked/by itself. - Via folder: put the PDF in the documents agent's input folder
(
.agents-data/documents/input/), then ask "Convert the file my-doc.pdf into my-project".
Then it's the same path as entry point A: ingest → index → build → export. The
shortest route for a first try: hand over a PDF, then /skills run pipeline.
Exploring the example data
The scaffold ships with a working case. To discover it, in the chat or the donna
shell:
/skills                 list the examples (diagnose, pipeline, status, wiki-sync)
/skills show pipeline   show what the end-to-end example does
/skills run pipeline    run the full chain on the example sources
/wiki                   inspect the project's wiki
You can also simply open the folders raw/, wiki/, templates/, and
deliverables/ of the workspace to see, at each step, what goes in and what comes
out.
⚙️ Advanced (later): the same steps exist on the command line via
wiki-workspace wiki …(doctor,ingest,build,logs). Keep these for automation and debugging — for everyday use, stay in the chat or the skills.
In short
| You want to… | You use… |
| --- | --- |
| Explore and click | The web interface (up … --open) |
| Let it run on its own | Scripting mode (script + scheduler) |
| Talk in plain language | The donna assistant (shell, agentic) |
| The shared services | The external agents (Confluence, e-mail, production) |
The right reflex to get started: steps 1 → 4, and your wiki is already in front of you in the browser (create → configure → start the agents → open).
Technical reference
Toolchain
| Repository | Role |
| --- | --- |
| llm-wiki | Workspace engine: CLI, web UI, MCP server, retrieval, deliverables, skills |
| llm-wiki-manager | Multi-workspace cockpit, Docker orchestration, donna shell |
| agent-cme | Global Confluence to Markdown MCP exporter; workspace injected automatically by Donna |
| agent-wiki-production | Workspace-scoped production jobs: ingest, build, export, polish, pipeline |
| agent-wiki-documents | Document conversion MCP: PDF/Office/HTML/images → Markdown (OCR-capable) |
| agent-mailer-api | Optional external mailer MCP endpoint (user-side override, not in the default stack) |
Workspace Model
Each managed workspace is a normal llm-wiki workspace plus manager metadata:
workspaces/<name>/
  .env                 # ports, tokens, workspace path
  .wikirc.yaml         # LLM/vector config for this workspace
  raw/
  wiki/
  templates/
  build-context/
  deliverables/
  .wiki/
The .env file is manager-owned. The .wikirc.yaml file is workspace-owned and
stores provider/model/baseUrl/apiKey/retrieval settings.
Confluence exports land directly in:
raw/untracked/The normal production pipeline starts at ingest:
ingest -> build -> export -> polishThe legacy copy step is only for deployments that explicitly configure external import mappings.
Configuration overview
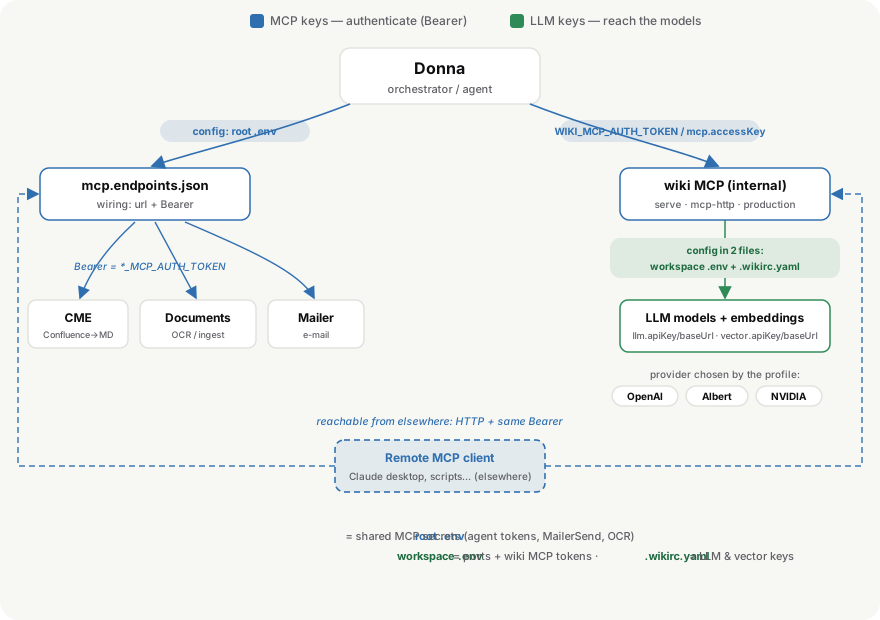
wikiLLM is configured by four files held together by two families of keys:
MCP keys (Bearer tokens that authenticate who connects to whom) and LLM
keys (apiKey + baseUrl that reach a model).
| File | Owner | Scope | Holds |
| --- | --- | --- | --- |
| .env | manager | global | shared secrets: agent MCP tokens, OCR LLM, port overrides, variables for any user-declared external MCP |
| mcp.endpoints.json | manager | global | where each external agent lives + which Bearer/header to send |
| workspaces/<name>/.env | manager | per workspace | ports, workspace path, the wiki's own MCP tokens |
| workspaces/<name>/.wikirc.yaml (+ .wikirc.yaml.<profile>) | workspace | per workspace | LLM & vector keys (provider/model/apiKey/baseUrl/retrieval) |
Donna reaches the external agents and the internal wiki MCP through Bearer
tokens; the wiki then uses its .wikirc.yaml LLM keys to call models and
embeddings. Because every MCP server is an HTTP endpoint, remote MCP clients can
connect to the same surfaces with the same tokens. MCP keys are set in the
root .env; the wiki's LLM keys live in each workspace .wikirc.yaml.
See the full, field-by-field reference in docs/configuration.md.
Installing from source
corepack enable
pnpm install
Whether installed locally, globally, or from source, wiki-manager keeps its
state outside the package, in the directory where the command is launched:
./workspaces/            # workspace registry
./.env                   # local configuration (gitignored; copy from .env.example)
./mcp.endpoints.json     # external MCP endpoints (gitignored; copy from .env.example)
WIKI_WORKSPACES_DIR is available as an explicit override for the workspaces
directory, but not required for normal usage.
WIKI_MANAGER_ENDPOINTS_FILE can override the default
./mcp.endpoints.json. Compose templates remain in the installed package, while
relative volumes and runtime state are resolved from the directory where
wiki-workspace is launched.
Local .env
Copy .env.example to .env and fill in your values:
cp .env.example .envThe .env file is loaded automatically by both wiki-manager (Node/Bun process)
and wiki-workspace (Docker Compose). It sets WORKSPACES_ROOT, per-agent auth
tokens and optional port overrides; credentials of optional connectors you enable via the user override.
External MCP endpoints
mcp.endpoints.json declares external agents for the shell, TUI, headless, and
the served chat UI. Values support ${VAR} interpolation resolved from the
process environment (including the .env loaded at startup):
{
  "mcpServers": {
    "cme": {
      "url": "http://host.docker.internal:${CME_MCP_PORT:-3336}/mcp/",
      "headers": { "Authorization": "Bearer ${CME_MCP_AUTH_TOKEN}" },
      "requireApproval": ["cme_export_run"],
      "retry": { "maxAttempts": 2, "backoffMs": 500 },
      "toolRetries": {
        "cme_export_run": { "maxAttempts": 3, "backoffMs": 1000 }
      }
    },
    "documents": {
      "url": "http://host.docker.internal:${DOCUMENTS_MCP_PORT:-3337}/mcp/",
      "headers": { "Authorization": "Bearer ${DOCUMENTS_MCP_AUTH_TOKEN}" }
    }
  }
}
Copy mcp.endpoints.example.json to mcp.endpoints.json and set the matching
token variables in .env.
MCP tools/call requests retry transient HTTP/MCP failures before the run fails.
They also share a per-endpoint outbound control budget (45 RPM by default,
configurable with WIKI_MANAGER_MCP_REQUESTS_PER_MINUTE). This budget is
independent from .wikirc requestsPerMinute, which remains reserved for LLM,
embedding, and reranking provider calls.
Set global defaults with WIKI_MANAGER_MCP_RETRY_MAX_ATTEMPTS and
WIKI_MANAGER_MCP_RETRY_BACKOFF_MS, or override them per endpoint with retry
and per tool with toolRetries.
After a clean runtime run, the manager runs a lightweight evaluator pass against
the original task, final plan, recent activities, and recent conversation. The
verdict is emitted as run_evaluated and appears in runtime state as
evaluation. Disable it globally with WIKI_MANAGER_EVALUATOR=0, or per run by
posting /run with "evaluate": false.
When evaluation fails, or when a watched activity ends in error, the runtime can
ask the LLM for a partial recovery plan and continue only the remaining steps.
Each recovery is emitted as run_replanned and appears in runtime state as
replans. Limit attempts with WIKI_MANAGER_REPLANNER_MAX_REPLANS or per run
with "replans": 1 in the /run body.
Runtime approvals support two levels. For run-level approval, post /run with
"requireApproval": true; the runtime emits run_pending_approval before the
first action and waits for POST /approve?runId=.... For tool-level approval,
set requireApproval on an external endpoint, or set
WIKI_MANAGER_REQUIRE_APPROVAL_TOOLS=production.production_start_job for
workspace-native MCP tools. Pending tool approvals appear in the queue with
status pending_approval and can be approved with POST /approve?itemId=...
or the shell command /approve item <id>. The approval timeout defaults to 10
minutes and can be changed with WIKI_MANAGER_APPROVAL_TIMEOUT_MS or
approvalTimeoutMs in the /run body.
While a run is active, GET/POST /control still answers without waiting for
it to finish: {"action":"status"} returns the current run/plan/queue state,
{"action":"explain"} adds a one-line plain-language summary, and
{"action":"enqueue","input":"..."} accepts a new request without touching the
active plan. A queued request starts automatically as soon as the workspace
goes idle — either because the enqueue call itself found the workspace free,
or because the run in progress finished and drained the next queued item.
GET /config/profiles lists the .wikirc profiles for a workspace and
POST /config/use {"profile":"..."} switches the active one — the same
switch as the shell's /config use, rejected with 409 while a run is active.
The manager is the source of truth for which profile is active; llm-wiki
serve's config-profile picker mirrors whatever the manager reports rather
than tracking its own state.
Starting external agents
Start CME and documents once for all workspaces:
wiki-workspace agents upThis uses the packaged agents.docker-compose.yml (it lives inside the npm
package — never edit it, updates overwrite it). On first run, agents up
generates the missing agent auth tokens into your manager .env and seeds
mcp.endpoints.json from the packaged example. WORKSPACES_ROOT is resolved
automatically from the manager workspaces directory. Agent state is stored under
./.agents-data/ unless AGENTS_DATA_DIR is set.
Optional agents and user overrides
Anything beyond the default stack (for example the MailerSend agent) is an
external connector operated at the user's charge — built and published, but
not part of the delivery. To enable one, create a file named
agents.docker-compose.override.yml next to your .env:
cp "$(npm root -g)/@dotdrelle/wiki-manager/agents.docker-compose.mailer.example.yml" \
   agents.docker-compose.override.yml
agents up includes it automatically when present (standard Docker Compose
merge: new services are added, same-name keys override the defaults — you can
also use it to pin a port or a variable of a default agent). The file is
yours: wiki-manager never generates or overwrites it. Complete the setup by
adding the connector's variables to your .env and its endpoint block to
your mcp.endpoints.json — every variable an external MCP endpoint needs
lives in the .env and is referenced as ${VAR_NAME} from
mcp.endpoints.json. Detailed steps are in the example file header.
Workspace-native MCP servers (llm-wiki, production) stay configured through
each workspace .env. External agents are workspace-agnostic: the active
/use <workspace> is injected automatically on every CME and documents tool
call — no need to pass workspace explicitly.
CME data is isolated per workspace:
.agents-data/cme/<workspace>/cme/app_data.json     # Confluence credentials
.agents-data/cme/<workspace>/sources-manifest.yaml # export sources
workspaces/<workspace>/raw/untracked/               # exported Markdown
Create a workspace:
wiki-workspace config my-project [path]Start it:
wiki-workspace up my-projectRun wiki commands:
wiki-workspace wiki my-project doctor
wiki-workspace wiki my-project ingest
wiki-workspace wiki my-project build --plan
wiki-workspace wiki my-project build
Services
The shared docker-compose.yml starts one workspace stack:
| Service | Role | Port variable |
| --- | --- | --- |
| serve | Wiki web UI and browser chat, container port 3000 | WIKI_SERVE_PORT |
| mcp-http | llm-wiki MCP endpoint, container port 3333 | WIKI_MCP_PORT |
| production-mcp | Production job MCP endpoint, container port 8080 | PRODUCTION_MCP_PORT |
Use wiki-workspace whenever possible so Compose receives the right project
name, env file, ports, and volume mounts.
Runtime split: the host manager/runtime uses Node.js 22+ for node:sqlite; the
interactive OpenTUI shell uses Bun 1.2+; workspace Docker services run from the
published images and do not depend on host node_modules.
As of 0.11.4, the host runtime store carries a minimal format guard:
PRAGMA user_version = 1 in SQLite plus .wiki/meta.json with
schemaVersion: 1. Unknown future versions stop startup with a clear error.
On startup, terminal runs older than 30 days are deleted with their events and
the database is vacuumed. The runtime test suite also includes a fixed-latency
parallel scheduler guard asserting that two independent build tasks run under
65% of the sequential duration.
wiki-workspace list
wiki-workspace agents up
wiki-workspace agents status
wiki-workspace up my-project
wiki-workspace wiki my-project logs
Document uploads
The shell can deposit local documents into the documents agent input volume and
convert them when the documents MCP endpoint is connected:
/upload /path/to/rapport.pdf
/uploads
/upload convert pending
/uploads clean --older-than 30d
Original files are stored under
.agents-data/documents/input/<workspace>/. Converted Markdown is written by
the documents agent to <workspace>/raw/untracked/. If the documents agent is
down, the upload remains stored and can be converted later.
Image files, scanned PDFs, and images detected inside PDF or Office documents
are sent through LLM OCR automatically.
The donna Shell
Start the agent shell:
bun start          # full OpenTUI shell (requires Bun ≥ 1.2)
pnpm start         # alias for bun start
pnpm run start:node  # fallback: legacy repl.js shell under Node
The interactive shell is agentic by default:
- input starting with
/runs a deterministic shell primitive; - by default, any other input goes to the LangGraph orchestrator with MCP tools;
/chatswitches free text to direct LLM chat without tools;/agentswitches free text back to the LangGraph orchestrator;- the visible agent name is
donna; - conversation history is separated per workspace;
- Ctrl+C interrupts active LLM/MCP calls; Ctrl+C twice exits when idle.
Direct chat requires an active workspace config with llm.apiKey, llm.model,
and llm.baseUrl. If those are missing, the shell reports the missing fields
and points to /use, /config list, /config use, or /config edit.
The TUI uses a two-pane layout:
- Left — scrollable conversation thread with a chat input at the bottom.
Typing
/opens a slash-command completion overlay just above the input. Mouse wheel scrolls the conversation, and selecting text copies it through the TUI clipboard bridge. Message headers also expose a[ copy ]target for copying one message. PageUp/PageDown remain available for keyboard scrolling. - Right — Plan/Queue tabs, active MCP jobs, plus a live log/trace panel.
Ctrl+Qtoggles the tabs; clickingPlanorQueue (N)selects that tab directly. MCP connection details remain available through/mcp status.
Useful primitives:
/workspace list
/new <name> [path]              # interactive TUI wizard
/workspace init <name> [path]   # low-level non-interactive creation
/use <workspace>
/config list
/config use <name>
/config status
/services
/start [service]
/stop [service]
/logs <service>
/mcp endpoints
/mcp status
/mcp tools [mcp]
/mcp call <mcp> <tool> [json]
/queue
/queue cancel <id>
/queue clear
/approve [run|item] <id>
/wiki
/wiki run <args...>
/skills
/skills show <name>
/skills run <name>
/chat
/agent
/clear
Skills are loaded only from the active workspace. The manager itself has no root
SKILL.md and no root skills/ directory.
Workspace switching is isolated. When you run /use my-project, the shell
switches both the displayed conversation and the LLM history to my-project.
Returning to another workspace restores that workspace's in-memory conversation
for the current shell process.
Agent Tooling
The donna agent uses a LangGraph (@langchain/langgraph) ReAct loop (max 80
tool-use iterations). The LLM client is the openai SDK against any
OpenAI-compatible endpoint. Each agent turn makes a single streaming LLM call via
Server-Sent Events. Text tokens appear in the TUI as they arrive. When the LLM decides to call tools, the stream
switches to tool-call accumulation; tool results feed back into the next LLM call
until the agent produces a final text response.
The LLM can call:
- connected MCP tools — discovered at
/usetime and re-discovered on/mcp status,/start, and/stop; shell__run_command— restricted internal tool for safe manager primitives only.
For actionable requests, the orchestrator must not answer with future intent only. If a connected MCP tool or safe primitive can perform the action, it must call the tool in the same turn. If required arguments are missing, ask for the exact missing values. If the tool/server is unavailable, name the concrete blocker.
shell__run_command is limited to safe manager primitives and does not expose
arbitrary system commands, /mcp call, /wiki run, /start, /stop, /logs,
or /exit.
Tool naming
LLM-facing tool names use <server>__<tool>. For the llm-wiki MCP server this
means remote tools are intentionally named with both the server namespace and the
canonical llm-wiki tool name:
wiki__wiki_list_pages
wiki__wiki_read_page
wiki__wiki_collect_context
The only internal manager tools under the wiki__* namespace are wiki__plan_set
and wiki__plan_done. All other wiki__* calls are routed to the remote wiki
MCP endpoint.
Production job queue
production_start_job remains protected by the production MCP workspace lock.
When a production job is already active, or when the production MCP returns
workspace_busy, the manager stores the new request in an in-memory local queue
instead of dropping it.
The queue is intentionally narrow in this version: only production_start_job is
queueable; the production MCP lock remains the source of truth; queue items are
scoped to the workspace that created them; switching workspaces freezes queued
items from the previous workspace until you switch back.
Use the Queue tab in the right pane, or /queue, /queue cancel <id>, and
/queue clear. /queue cancel <id> removes waiting/starting items locally; for a
running production queue item, it calls production_cancel_job(jobId).
Non-Interactive Mode
The --once mode runs one agent turn:
node ./bin/wiki-manager.js --once "list configured workspaces"It is intentionally lightweight and does not preload a workspace, LLM config, or MCP endpoints.
Scheduled unattended execution uses headless mode, not --once:
node ./bin/wiki-manager.js --headless --workspace my-project --skill pipeline
node ./bin/wiki-manager.js --headless --workspace my-project --prompt "check production status"
Headless mode creates a normal session, runs /use, and writes a log under
.wiki/logs/ by default. --prompt runs one agent turn unless --wait is passed.
--skill uses the agentic loop by default: agent turn, wait for active MCP jobs
declared through _activity.poll, then re-invoke the agent with the completed job
summary so it can start the next required step.
Useful headless controls:
node ./bin/wiki-manager.js --headless --workspace my-project --skill pipeline --timeout 3600 --max-turns 20
node ./bin/wiki-manager.js --headless --workspace my-project --skill pipeline --no-wait
node ./bin/wiki-manager.js --headless --workspace my-project --prompt "check production status" --wait
--timeout applies per wave of active jobs, not to the whole run. --max-turns
limits the number of LLM turns in a skill run. The process exits non-zero on
failed/cancelled activities, activity timeout, max-turn exhaustion, or setup
failure. Use --log-file <path> to choose a specific log path.
MCP Activity Contract
The manager is MCP-agnostic for job tracking. Any MCP response can opt into
automatic shell/headless monitoring by including _activity:
{
  "_activity": {
    "id": "job-123",
    "source": "production",
    "kind": "pipeline",
    "label": "Production pipeline",
    "status": "running",
    "progress": { "percent": 42, "step": "build" },
    "poll": {
      "server": "production",
      "tool": "production_job_status",
      "args": { "jobId": "job-123" },
      "intervalMs": 2500
    },
    "startedAt": "2026-06-05T12:00:00Z",
    "updatedAt": "2026-06-05T12:03:00Z",
    "error": null,
    "terminal": false
  }
}
The existing native payload should stay intact. _activity is additive metadata
for the manager. When poll is present, the shell/TUI and headless loop call the
declared MCP tool until the activity becomes terminal.
Orchestration Contract
Beyond _activity, an MCP server can become a fully orchestrable agent by
exposing five tools: agent_describe (capabilities, limits, health),
agent_plan (returns a task-graph fragment for an objective — planner agents
only), agent_execute (starts one bounded, idempotent task), agent_status
and agent_cancel. The manager discovers these at startup and on a periodic
re-scan, and routes tasks by capability: workspace config can pin
preferredAgents / allowedAgents / fallbackAgents per capability under
capabilityRouting. Executor-only agents (like agent-cme) declare
canPlan: false and receive single tasks planned elsewhere. Mutating
operations must carry an idempotencyKey — the agent persists key→job
mappings so a retry never duplicates work. Capabilities that mutate external
systems should declare defaultRequiresApproval: true; the manager then
requires a bounded approval (scoped to run, plan revision and approval class)
before dispatch. Contracts and schemas live in
plan-directeur-orchestration.md at the wikiLLM workspace root and in
src/contracts/schemas.js.
Local Compose Overrides
Do not put machine-specific settings in the shared docker-compose.yml.
For example, if a VPN/proxy requires a custom CA bundle, create a local ignored
override such as docker-compose.ca.local.yml and run:
docker compose \
  -p wiki-my-project \
  -f docker-compose.yml \
  -f docker-compose.ca.local.yml \
  --env-file workspaces/my-project/.env \
  up -d serve production-mcp
Files matching docker-compose*.local.yml are ignored by Git.
Security Model
- Workspace names created by
/workspace initare path-safe identifiers: alphanumeric at both ends, only letters/digits/underscore/dot/dash inside, and no..sequence. - Manager MCP tokens are local coordination secrets. They are stored in memory for local calls and are not displayed by status commands.
- Provider API keys belong in the workspace
.wikirc.yamlor in the owning service environment, not in manager-level docs. - Clipboard copy uses
execFileSync, not shell-string execution. .wikirc.yamlis parsed as YAMLcoreschema and must be an object..envquoted values support basic escapes such as\",\\,\n,\r, and\t.
Development
pnpm install
pnpm start
pnpm run check-versions
pnpm run check
When bumping a coordinated release, keep llm-wiki, llm-wiki-manager, Python
agent _AGENT_VERSION values, MCP clientInfo.version / server versions, Git
tags, and Docker image tags aligned. Run:
pnpm run check-versions
CHECK_GIT_TAG=1 pnpm run check-versions          # pre-release tag check
CHECK_DOCKER_IMAGES=1 pnpm run check-versions    # after local image build
build-and-push.sh synchronizes the coordinated version, runs
pnpm run check-versions, builds images tagged with that version, and can push
the matching latest tags.
pnpm run check verifies the CLI version, help output, and limited --once mode.
For headless changes, also test a controlled error path, for example:
node ./bin/wiki-manager.js --headless --workspace __missing__ --prompt testRepository Layout
llm-wiki-manager/
├── bin/wiki-manager.js
├── bunfig.toml             # Bun preload for @opentui/solid
├── tsconfig.json           # TSX compilation (jsxImportSource = @opentui/solid)
├── src/
│   ├── agent/              # agentic orchestration: @langchain/langgraph (ReAct loop) + openai SDK (OpenAI-compatible LLM client, SSE streaming)
│   ├── cli/                # CLI entrypoint
│   ├── commands/           # slash commands
│   ├── core/               # compose, env, MCP, activity, agentEvents, plan, skills, workspace registry
│   └── shell/
│       ├── repl.js         # legacy TUI and pipe shell (Node fallback)
│       ├── tui.tsx         # OpenTUI shell root (Bun)
│       ├── LeftPane.tsx    # conversation view + chat input
│       ├── RightPane.tsx   # plan, activity, and log panel
│       ├── SlashDialog.tsx # completion overlay
│       ├── useSession.ts   # reactive session state
│       ├── useAgent.ts     # agent call wrapper (drives the @langchain/langgraph run)
│       └── renderer.ts     # markdown stripping and line coloring
├── docker-compose.yml      # workspace-scoped stack (serve, mcp-http, production-mcp)
├── agents.docker-compose.yml  # global external agents (cme, documents, mailer)
├── wiki-workspace
├── .env.example            # template for local .env (WORKSPACES_ROOT, agent tokens, …)
├── mcp.endpoints.example.json
└── workspaces/.env.example
License
Released under the PolyForm Noncommercial License 1.0.0. See LICENSE.