
@fastmcp-me/claude-mermaid
v1.2.0
Published
MCP server for previewing Mermaid diagrams in Claude Code

Readme


Claude Mermaid MCP Server
MCP server for rendering Mermaid diagrams in Claude Code with live reload functionality.
Automatically renders diagrams in your browser with real-time updates as you refine them. Perfect for iterative diagram development and documentation workflows.
✨ Features
- 🔄 Live Reload - Diagrams auto-refresh in your browser as you edit
- 🎨 Multiple Save Formats - Export to SVG, PNG, or PDF
- 🌈 Themes - Choose from default, forest, dark, or neutral themes
- 📐 Customizable - Control dimensions, scale, and background colors
- 🪄 Interactive Preview - Pan diagrams by dragging, zoom with browser controls, reset position with one click
- 🗂️ Multiple Previews - Use
preview_idto work on multiple diagrams simultaneously - 💾 Persistent Working Files - Live previews are stored under
~/.config/claude-mermaid/live
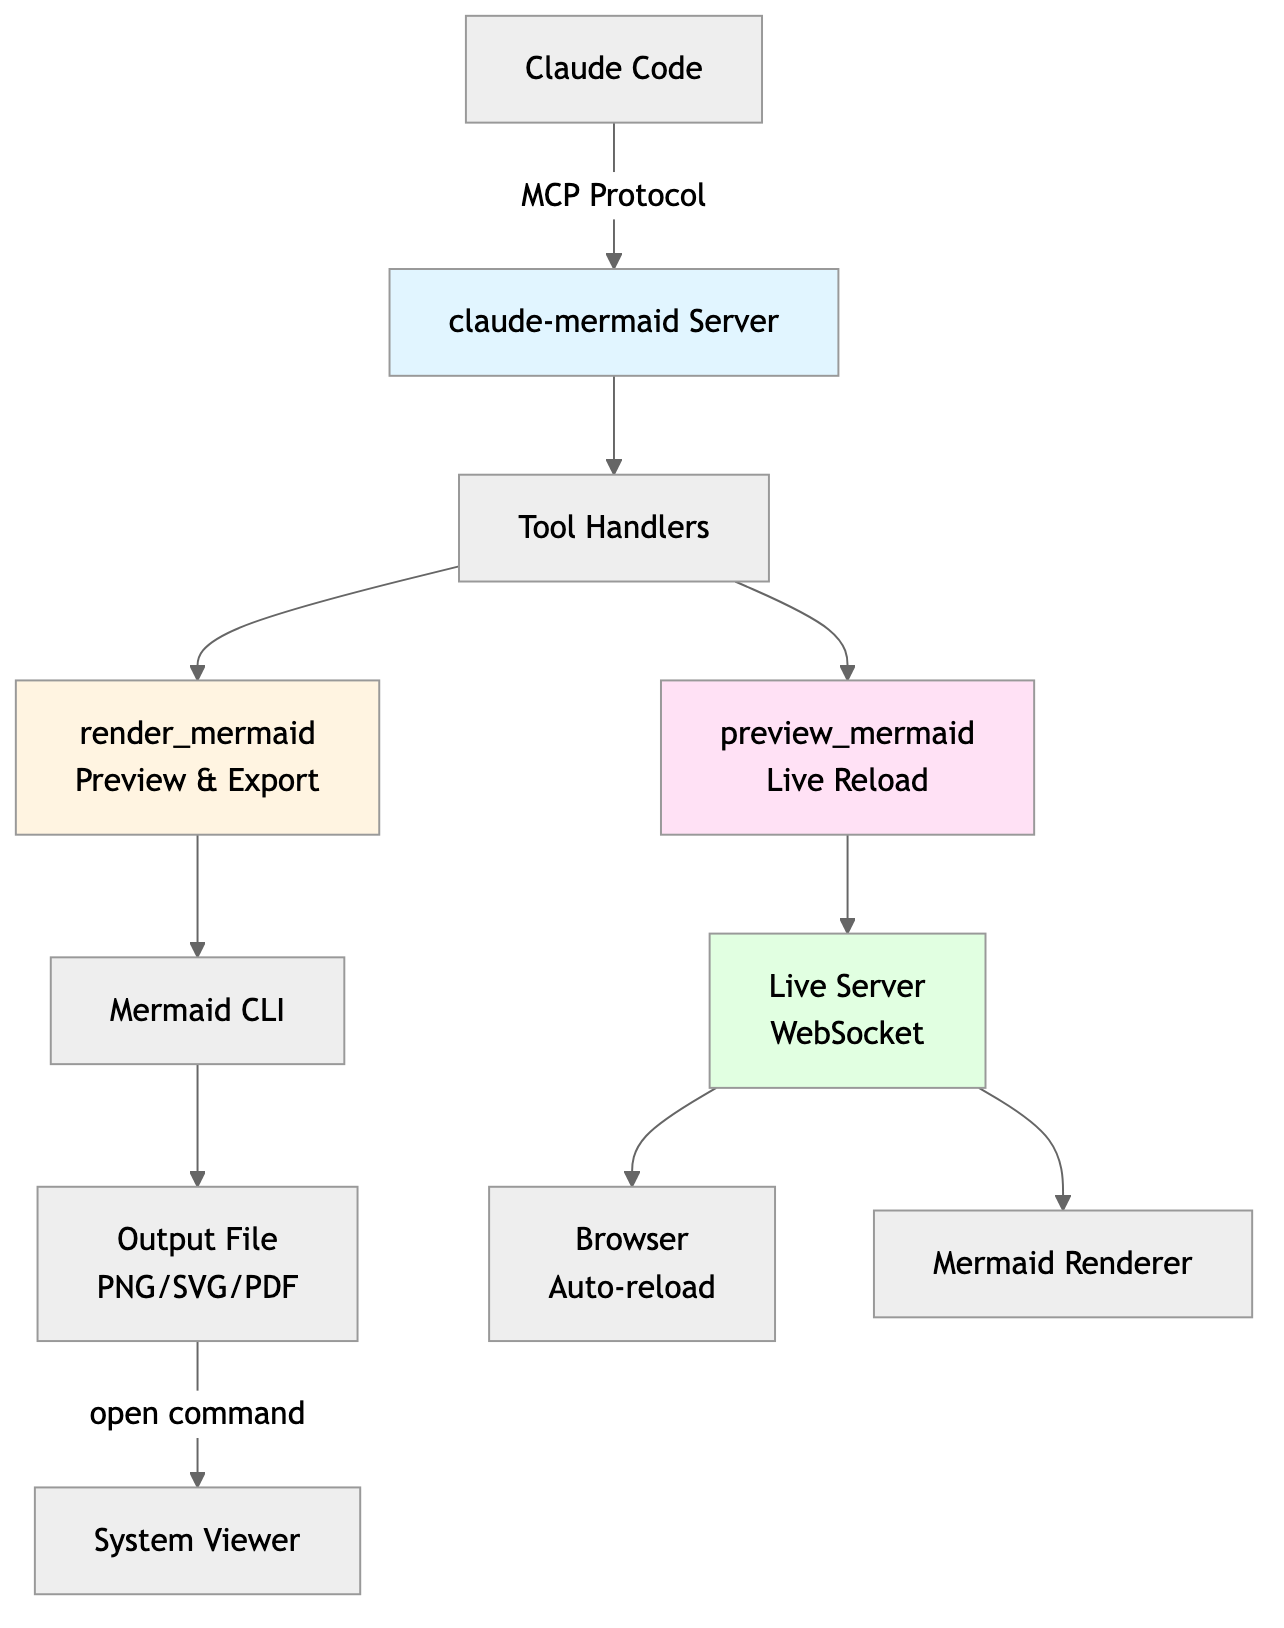
Architecture

🚀 Quick Start
1. Install
Plugin Install (Recommended)
In Claude Code, first add the marketplace:
/plugin marketplace add veelenga/claude-mermaidThen enable the plugin:
/plugin enable claude-mermaidFrom npm:
npm install -g claude-mermaidFrom source:
git clone https://github.com/veelenga/claude-mermaid.git
cd claude-mermaid
npm install && npm run build && npm install -g .
2. Configure Claude Code
Note: If you installed via the plugin system, configuration is handled automatically. Skip to step 3 to verify installation.
Global setup (recommended - works in all projects):
claude mcp add --scope user mermaid claude-mermaidProject-specific setup:
claude mcp add mermaid claude-mermaidManual configuration:
Add to your MCP config file (.claude.json or .mcp.json):
{
  "mcpServers": {
    "mermaid": {
      "command": "claude-mermaid"
    }
  }
}
3. Verify Installation
claude mcp listYou should see mermaid: claude-mermaid - ✓ Connected
🔌 Other MCP Client Configurations
While this server is optimized for Claude Code, it can work with any MCP-compatible client. Here's how to configure it for other popular tools:
Add to your Codex MCP settings file (~/.codex/mcp_settings.json):
{
  "mcpServers": {
    "mermaid": {
      "command": "claude-mermaid"
    }
  }
}
Or configure via Codex CLI:
codex mcp add mermaid claude-mermaidAdd to your Cursor MCP config file (.cursor/mcp.json or settings):
{
  "mcpServers": {
    "mermaid": {
      "command": "claude-mermaid"
    }
  }
}
Or use Cursor's settings UI:
- Open Cursor Settings (Cmd/Ctrl + ,)
- Navigate to MCP Servers
- Add a new server with command:
claude-mermaid
If using the Cline extension for VSCode:
- Open VSCode settings (Cmd/Ctrl + ,)
- Search for "Cline MCP"
- Add to MCP Settings JSON:
{
  "mcpServers": {
    "mermaid": {
      "command": "claude-mermaid"
    }
  }
}
Add to Windsurf's MCP configuration file:
{
  "mcpServers": {
    "mermaid": {
      "command": "claude-mermaid"
    }
  }
}
Configuration location varies by platform:
- macOS:
~/Library/Application Support/Windsurf/mcp.json - Linux:
~/.config/windsurf/mcp.json - Windows:
%APPDATA%\Windsurf\mcp.json
Add to Gemini CLI's MCP configuration file (~/.gemini/mcp.json):
{
  "mcpServers": {
    "mermaid": {
      "command": "claude-mermaid"
    }
  }
}
Or use the Gemini CLI to configure:
gemini config mcp add mermaid --command claude-mermaidFor any MCP-compatible client, use the standard configuration:
{
  "mcpServers": {
    "mermaid": {
      "command": "claude-mermaid"
    }
  }
}
The command claude-mermaid should be available in your PATH after installation.
Note: Some clients may require the full path to the executable:
- Find the path:
which claude-mermaid(Unix/macOS) orwhere claude-mermaid(Windows) - Use absolute path in config:
"command": "/path/to/claude-mermaid"
💡 Usage
Simply ask Claude Code to create Mermaid diagrams. The server will:
- ✅ Render the diagram
- 🌐 Open it in your browser with live reload
- 🔄 Auto-refresh when you make changes
- 💾 Save to your project path using the
mermaid_savetool
Basic Examples
"Create a Mermaid diagram showing the user authentication flow"
"Draw a sequence diagram for the payment process"
"Generate a flowchart for the deployment pipeline"
Advanced Examples
With custom formatting:
"Create a dark theme architecture diagram with transparent background"
"Generate a forest theme flowchart and save to ./docs/flow.svg"
With specific output format:
"Create an ER diagram and save as PDF to ./docs/schema.pdf"
"Save the flowchart as PNG to ./docs/flow.png"
Note: Browser always shows SVG for live preview, while saving to your chosen format.
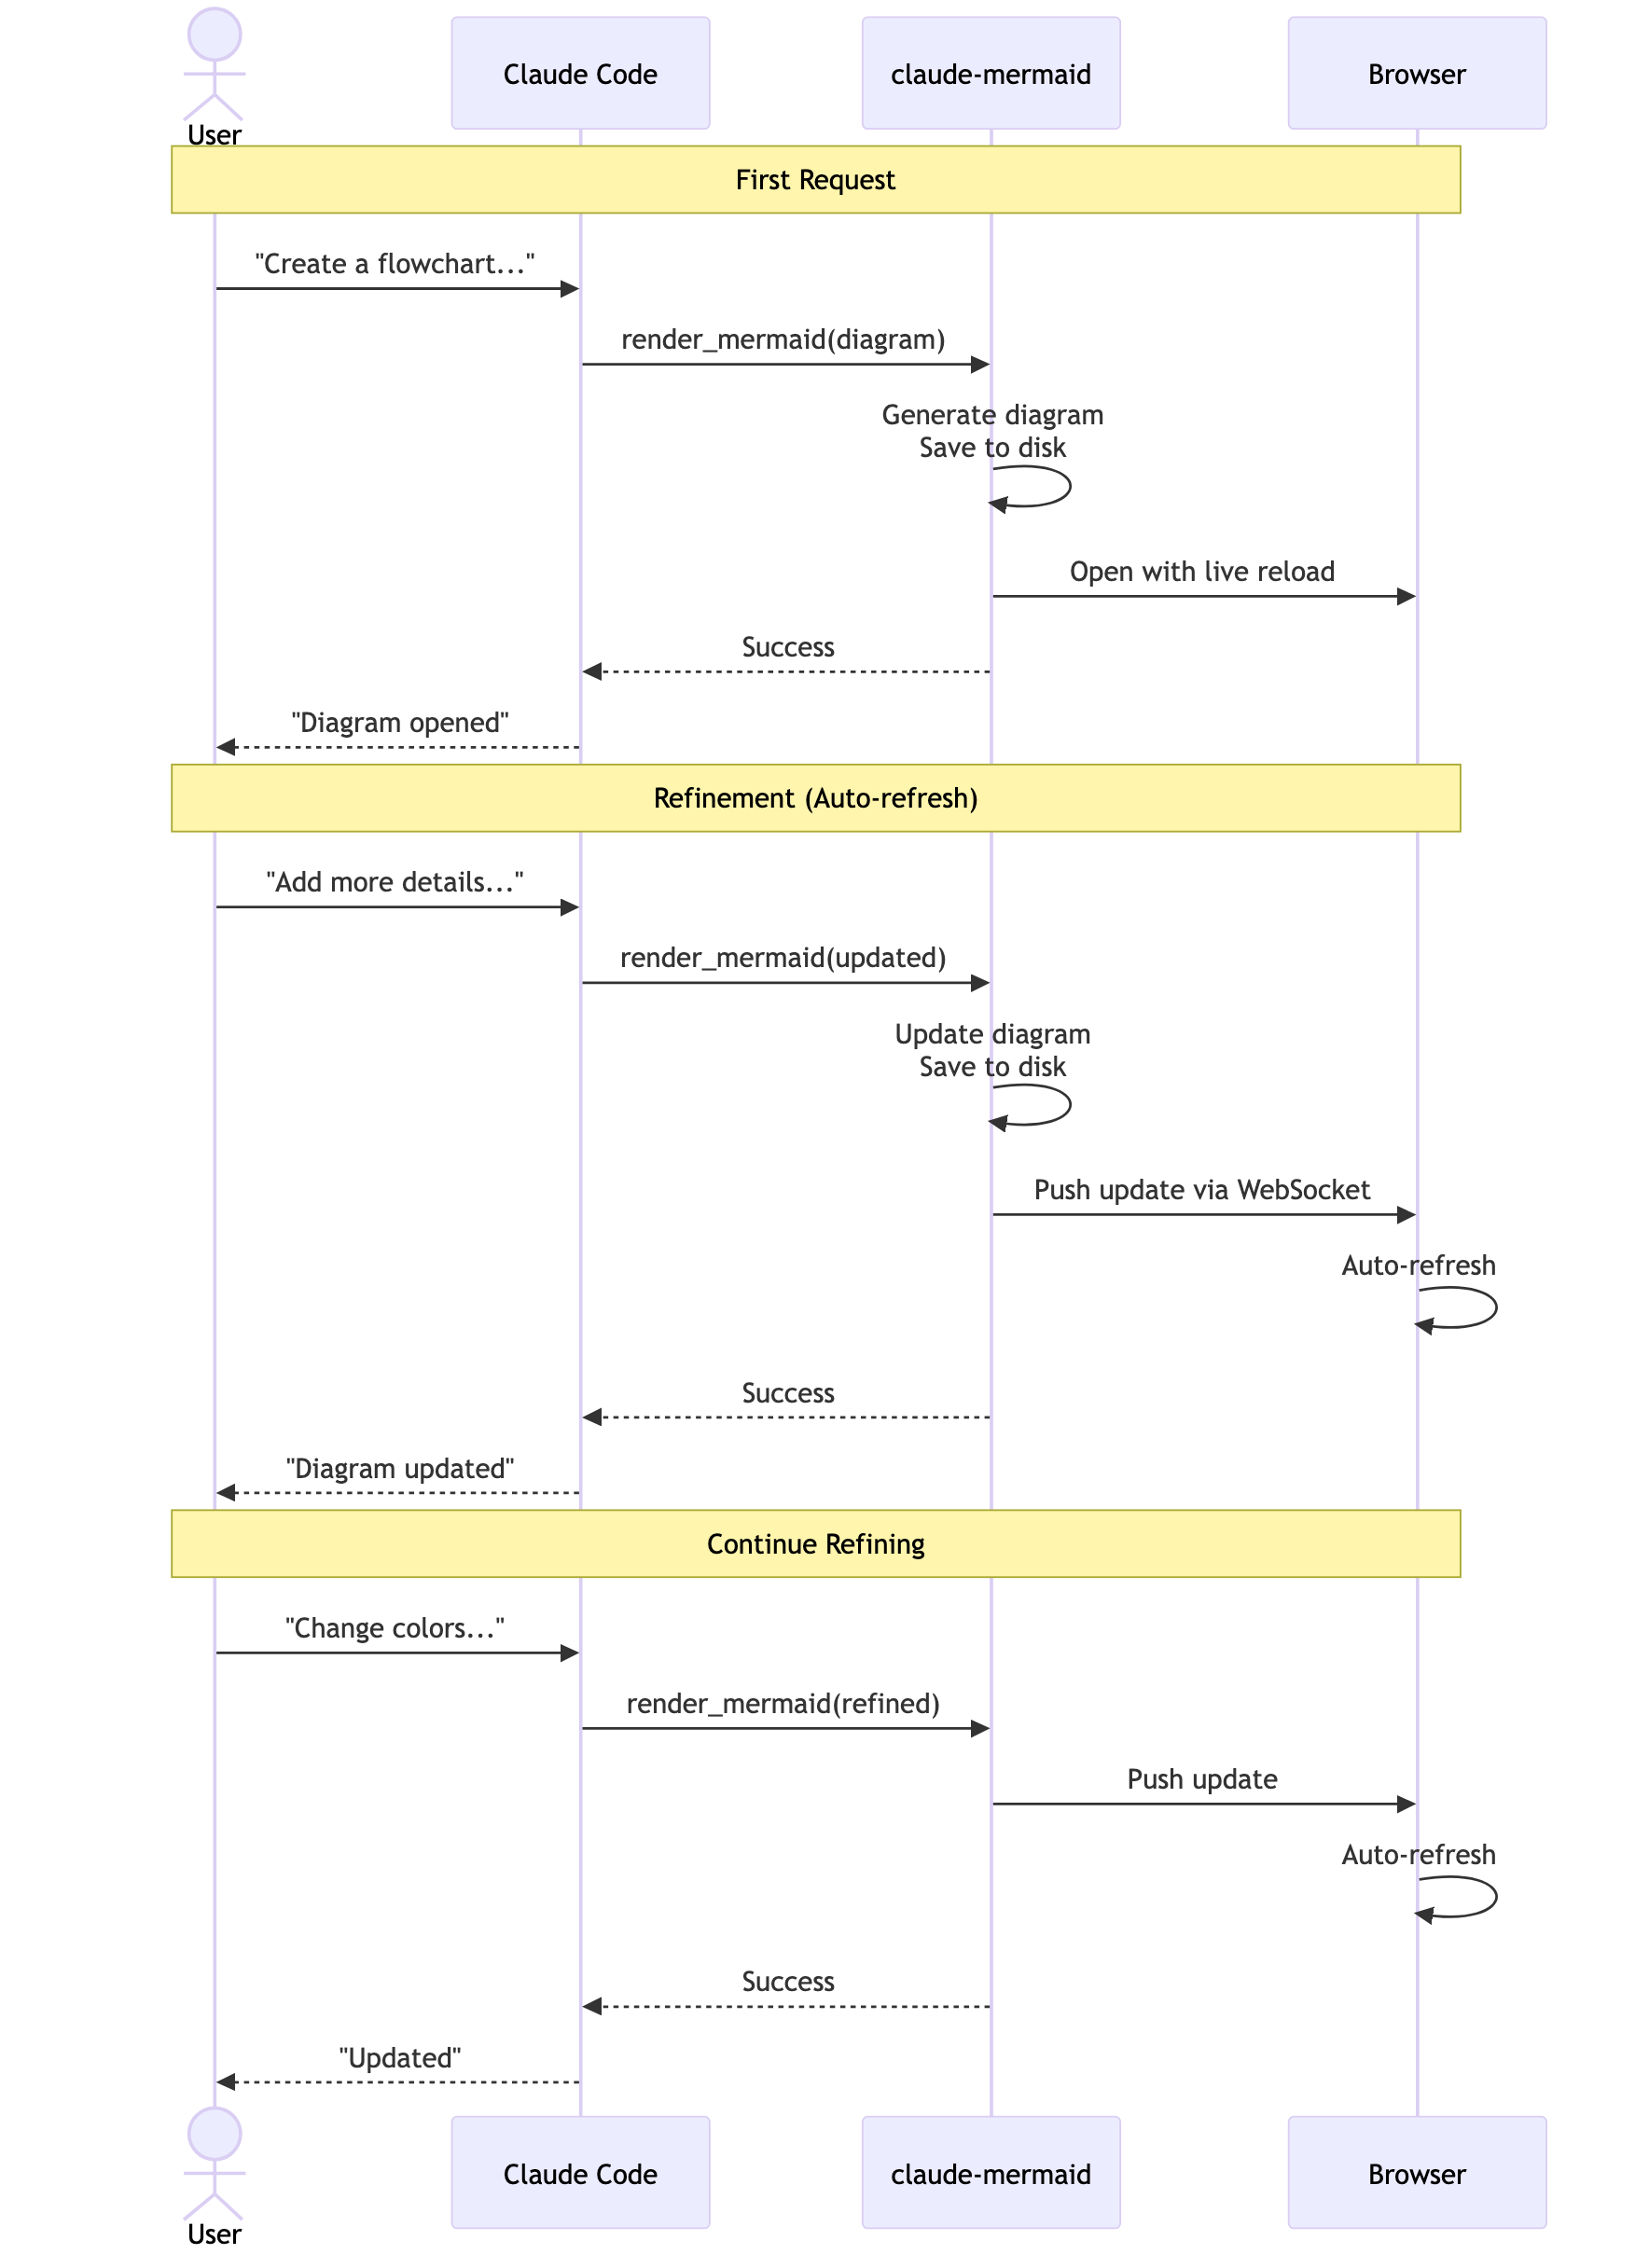
Iterative refinement:
"Create a class diagram for the User module"
// Browser opens with live preview
"Add the Address and Order classes with relationships"
// Diagram updates automatically in browser!
Complete Example
"Create a flowchart and save to ./docs/auth-flow.svg:

graph LR
    A[User Login] --> B{Valid Credentials?}
    B -->|Yes| C[Access Granted]
    B -->|No| D[Access Denied]
    C --> E[Dashboard]
    D --> F[Try Again]

    style A fill:#e1f5ff
    style C fill:#d4edda
    style D fill:#f8d7da
"
The diagram will be saved to ./docs/auth-flow.svg and opened in your browser with live reload enabled.
🔧 Tools and Parameters
There are two tools exposed by the MCP server:
mermaid_preview— render and open a live preview
diagram(string, required) — Mermaid diagram codepreview_id(string, required) — Identifier for this preview session. Use different IDs for multiple concurrent diagrams (e.g.,architecture,flow).format(string, defaultsvg) — One ofsvg,png,pdf. Live preview is available only forsvg.theme(string, defaultdefault) — One ofdefault,forest,dark,neutral.background(string, defaultwhite) — Background color. Examples:transparent,white,#F0F0F0.width(number, default800) — Diagram width in pixels.height(number, default600) — Diagram height in pixels.scale(number, default2) — Scale factor for higher quality output.
mermaid_save— save the current live diagram to a path
save_path(string, required) — Destination path (e.g.,./docs/diagram.svg).preview_id(string, required) — Must match thepreview_idused inmermaid_preview.format(string, defaultsvg) — One ofsvg,png,pdf. If the live working file for this format doesn’t exist yet, it is rendered on demand before saving.
🎯 How Live Reload Works
- First render: Opens diagram in browser at
http://localhost:3737/{preview_id} - Make changes: Edit the diagram through Claude Code
- Auto-refresh: Browser detects changes via WebSocket and reloads
- Status indicator: Green dot = connected, Red dot = reconnecting
The live server uses ports 3737-3747 and automatically finds an available port.
Live Preview Controls
- Pan: Click and drag the diagram to move it around
- Zoom: Use browser zoom (Ctrl/Cmd + +/- or pinch-to-zoom on trackpad)
- Reset Position: Click the ⊙ button in the status bar to recenter the diagram
Notes
- Live preview is available for
svgformat only; PNG/PDF are rendered without live reload. - For sequence diagrams, Mermaid does not support
styledirectives insidesequenceDiagram.
🛠️ Development
# Install dependencies
npm install

# Build the project
npm run build

# Run tests
npm test

# Watch mode for development
npm run dev

# Start the MCP server directly
npm start
📝 Troubleshooting
Server not connecting:
# Check if server is installed
claude-mermaid -v

# Reinstall if needed
npm install -g claude-mermaid

# Verify MCP configuration
claude mcp list
Permission denied error:
# Make sure the binary is executable
chmod +x $(which claude-mermaid)
Port already in use:
- The server uses ports 3737-3747
- It will automatically find an available port
- Check if another process is using these ports:
lsof -i :3737-3747
Diagrams not rendering or live reload not working:
The server logs to ~/.config/claude-mermaid/logs/:
mcp.log- Tool requests and diagram renderingweb.log- HTTP/WebSocket connections and live reload
Enable debug logging in your MCP config:
{
  "mcpServers": {
    "mermaid": {
      "command": "claude-mermaid",
      "env": {
        "CLAUDE_MERMAID_LOG_LEVEL": "DEBUG"
      }
    }
  }
}
Then check the logs:
# View MCP operations
tail -f ~/.config/claude-mermaid/logs/mcp.log

# View WebSocket connections
tail -f ~/.config/claude-mermaid/logs/web.log
Available log levels: DEBUG, INFO (default), WARN, ERROR, OFF
🤝 Contributing
Contributions are welcome! Please feel free to submit a Pull Request.
📄 License
MIT - see LICENSE file for details