
@fedeghe/leonardo
v1.1.0
Published
A simple library to draw sgv programmatically
Maintainers
 fedeghe
Readme
 leonardo javascript svg library v. 1.1.0
![]()
A simple library to draw sgv programmatically
... no, neither this libray neither the svg above have nothing to deal with the unparalleled towering Leonardo da Vinci ... neither with actors or turtles obviously.
Tha one is inspired by "La creazione di Adamo" painted by Michelangelo Buonarroti (Cappella Sistina, Rome, 1508–1512 A.C.).
I choosed that name cause of the immense admiration and silent astonishing deep mixed sense of hope and ignorance I'm wasted on when I think about the most incredible mind ever lived so close to us. Unarguably Leonardo da Vinci
Install Leonardo
> yarn add @fedeghe/leonardo
use Leonardo
First of all in your html include it in the <head> tag:
<script src="path/to/Leonardo/dist/index.js"></script>Now create another <script>; here the Leonardo factory for each svg you need:
<script>+function(){
    var L = Leonardo(300, 200, {id: 'theRootSvg', target: theTargetNode});
    // ...
}()
</script>width: mandatory Integerheight: mandatory Integeroptions: an optional object literal which allows to set some attributes that will be added to the root svg tag:ns: set the namespaces that are needed, one or more from['cc', 'dc', 'ev', 'rdf', 'svg', 'xlink', 'math', 'xhtml', 'xml']if all are needed is enough to pass*.target: define the target node for rendering
anyway it will be possible to set (or override if given already in the instance constructor) the target even when invoking the render method on the instance.
Here the list of the references for the namespaces (from official w3c standard and drafts):
Tags
To draw something we need to append to the svg tag the right tags. Leonardo lets you create all tags giving some additional method on some of them.
Then some additional functions allow to create more easily some "composed" elements: textBox, textPath and arcSectionPath. More will come.
Every tag we get from Leonardo is primarily an Element instance, and thus benefits the following methods: getAttributes, setAttributes, getStyles, setStyles, append, remove, on, off, once, trigger, clone, use, rotate, scale, skewX, skewY, mirrorH, mirrorV, move, bringToTop, bringToBottom, timeout, bringTo, clear and replace. I will describe all them soon below here. Then every element might extend the Element and add methods or properties.
Anyway svg tags set is quite huge and I just tried to cover the very most common. Whenever you need to use a tag not contempled here you can still use .Element to create it:
var aHatch = L.Element('hatch')this will grant the ability to use all the utility methods listed above (and detailed soon).
There is the list of the methods available to create tags (all visible ones will show a 👁️ close to their title tag). In case
<desc>
var myDesc = L.desc('This is the description of my svg')Returns a <desc> tag containing the text passed to it.
No additional methods attached
<circle> 👁️
var myCircle = L.circle(cx, cy, r)Returns a <circle> tag centered at {cx, cy} with radius r.
<ellipse> 👁️
var myEllipse = L.ellipse(cx, cy, rx, ry)Returns a <ellipse> tag centered at {cx, cy} with radiuses rx and ry.
<foreignObject>
var fObj = L.foreignObject(x, y, width, height)Returns a <foreignObject> sized and positioned according to the passed parameters.
<g>
var myGroup = L.group()Returns a group <g> tag.
Optionally you can pass one or more elements to itL.group(a, b, c)
for appending instead of invoke after myGroup.append(a, b, c)
<image> 👁️
var myImage = L.image(x, y, w, h, src)Returns a <image> tag positioned at {x,y} about w and h are meant to be the clearly the sizes but real image size will win on it, in the end the ratio cannot be modified.
<line> 👁️
var myLine = L.line(x1, y1, x2, y2)Returns a <line> tag representing a segment starting from {x1,y1} and ending in {x2, y2}.
<path> 👁️
var myPath = L.path(d)Returns a <path> tag with data corresponding to the d parameter passed; for example for a simple triangle could be something like M150 0 L75 200 L225 200 Z as here. Leonardo makes it easy to create that for you.
<polygon> 👁️
var myPolygon = L.polygon(x1, y1, ...xn, yn)Returns a <polygon> tag with points attribute corresponding to those passed; for example for a simple triangle could be something like 200,10 250,190 160,210 as here. Leonardo makes it easy to create that for you.
<polyline> 👁️
var myPolyline = L.polyline(x1, y1, ...xn, yn)creates a polyline which can even be opened (it does not close automatically).
<rect> 👁️
var myRect = L.rect(x, y, w, h)Returns a <rect> tag with the upper left corner positioned at {x, y} then w is for the width and `h for the height.
<text> 👁️
var myText = L.text(x, y, content)Returns a <text> tag with positioned at the upper left corner positioned at {x, y} containing the text passed as content.
<title> 👁️
var myTitle = L.title(txt)Returns a <title> tag containing the text passed as content.
<script>
var myScript = L.script(content)Returns a <script> tag containing the text passed as content.
Extras
Leonardo knows
<textPath> 👁️
var myTextPath = L.textPath(d, content);If we want a text to follow a path then a single tag is not enough
This function returns an element which contains all is needed given an id, a d data for the path and a content string.
arcSectionPath 👁️
var myArcSection = instance.path(
    instance.arcSection(
        centerX, centerX,
        innerRadius, outerRadius,
        fromAngle, toAngle,
        outerVersus=1,
        innerVersus=0
    )
)
If we want a section of a circle slice.
Elements
Now that we know how to create a root <svg> and sub-elements we need some methods to append them so to create the right hierarchy, to style them, give attributes, ... and more.
All you get is a factory function:
const Leonardo = require('@fedeghe/leonardo');

// meant to be used as all factory methods

const mySVG = Leonardo(800, 600);
/* build it and then render */
mySVG.render({ target: aDOMnode }); // must pass a target
In case when invoking the Leonardo factory method the target parameter has been passed then it becomes optional when rendering.
var root = Leonardo(300, 200, {target: myDomNode})
root.render(); // now is optional, if used overrides
tagInstance.setAttributes(attributes) -> tagInstance
Here attributes is an object literal that can contain all the attributes we may need to add to the tag. For example for a <line> tag we could write:
myLine.setAttributes({'stroke-width': 12, stroke: 'black'});tagInstance.setStyles(styles) -> tagInstance
Here styles is an object literal that can contain all the styles we may need to add to the tag. For example for a <recat> tag we could write:
myRect.setStyles({cursor: 'pointer'})tagInstance.append(tag1 [, tag2 [, ...]]) -> tagInstance
This adds all tags passed to it into the instance tag. For example let's say we have a <g> of objects and we would like to rotate (see tranformation section) all the elements contained into it; optionally also an array of elements can be passed:
myGroup.append(line, circle)
// now we can act on all elements just working on the group
// e.g.: rotation, filtering, events....
tagInstance.on(eventName, callback) -> tagInstance
This method allows to register an event listener for a tag:
var handler = function (e) {
    console.log(e)
};
myRect.on('click', handler);
tagInstance.off(eventName, callback) -> tagInstance
This method allows to unregister an event listener for a tag:
myRect.off('click', handler);As expected if You plan to register and unregister an handler function You must use the same referenced handler function in both calls.
tagInstance.once(eventName, callback) -> tagInstance
Should be clear what this does.
tagInstance.clone() -> clone tagInstance
Creates a clone of the instance
tagInstance.use() -> Element tagInstance
Creates something similar to a clone of the instance, the limitation/power of a <use> tag is that one cannot override the properties defined in the original instance. More here.
tagInstance.clear() -> void
Removes the subtree of a tag.
tagInstance.remove() -> void
Removes a tag.
tagInstance.replace(oldTag, newTag) -> void
Replaces oldTag with newTag.
Transform a tag
instance.rotate(deg, x, y) // -> instanceRotates a tag of deg degrees around the point {x, y}.
instance.scale(sx, sy) // -> instanceScales a tag using sx to scale along x axis and sy to scale along y axis.
instance.mirrorH() // -> instanceMirrors a tag horizontally.
instance.mirrorV() // -> instanceMirrors a tag vertically.
instance.move(x, h) // -> instanceMoves a tag of x pixels along x axis and y pixels along y axis.
instance.skewX(n) // -> instanceSkews along the x axis.
instance.skewY(n) // -> instanceSkews along the y axis.
Filters
instance.filter(filter, ...) // -> filter id With Leonardo you can use all svg possible filters easily.
Let's suppose, for example, you want to use feTurbolence and a feConvolveMatrix, then it is enough to set the right attributes:
tagToFilter.setAttributes({
    filter: instance.filter(
        {
            type: 'feTurbulence',
            attrs: {
                type: "turbulence",
                baseFrequency: ".02",
                numOctaves: "2",
                result: "turbulence"
            }
        },
        {
            type:'feConvolveMatrix',
            attrs:{
                kernelMatrix:"0 1 0  1 0 1  0 -5 0"
            }
        }
    )
})
Gradients
Leonardo let you used both the svg gradients: linear and radial.
var myGradient = instance.linearGradient(
    gradientData,
    {
        fromX = '0%', fromY = '0%',
        toX = '100%', toY = '0%',
        spreadMethod = 'pad'
    }
) //  returns filling gradient
the gradientData can be specified as an array of objects containing a perc and a color fields as {perc:10, color: '#f00'}.
When the distribution of the colors is uniform then it is enough to just pass an array of colors.
The optional object containing fromX, fromY, toX, toY are the percentage starting and ending coords which allows to decide a starting and ending point (default is start at 0% 0% end at 100% 0%, thus from left to right).
Then it's enough to use it on a tag simply as value for the fill attribute:
myTag.setAttributes({fill: myGradient}) Small working example:
<div id="root"></div>
<script>
(function (){
    var svg = Leonardo (300, 200, {
            target: document.getElementById('root')
        }),
        grad1 = L.linearGradient([
            {perc: "0", color: "#0a0"},
            {perc: "5", color: "#00a"},
            {perc: "95", color: "#aa0"},
            {perc: "100", color: "#f00"},
        ], {
            x1: '0%', y1: '0%',    // askew
            x2: '100%', y2: '100%'
        }),
        // or distributed equally, and left to right
        grad2 = L.linearGradient([
            "#f00", "#0a0", "#00a"
        ]),
        circle = L.circle(150, 100, 50)
            .setAttributes({ fill: grad1});
    svg.append(circle).render();
})()
</script>
Radial version
var myGradient = instance.radialGradient(
    gradientData,
    {
        fx = '50%', fy = '50%', fr = '0%',
        cx = '50%', cy = '50%', r = '50%',
        spreadMethod = 'pad'
    }
) // returns filling gradient
Here you can see the details about the parameters.
Shortly:{fx, fy} the starting circle (default: (50%, 50%))fr the radius of the start circle (default: 0%){cx, cy} the ending circle (default: (50%, 50%))r the radius of the end circle (default: 50%)
For the radial case the radialData is expected to be exactly the same as in the linear case.
Animate
an attribute
instance.animate.attrs(config) // animate tag This method is useful when we need to animate an attribute of a tag. Svg allows to do that creating an <animate> tag containing the right parameters and append it inside the tag that needs to be animated, with Leonardo could not be easier:
var circle = instance.circle(100, 100, 20),
    animateTag = instance.animate.attrs({
        attributeName: 'r',
        from: 20,
        to: 1E3,
        dur: '10s',
        repeatCount: 'indefinite'
    });
circle.append(animateTag);
It's also possible to move a tag, changing the x and y position attributes, but this acts directly on the tag:
instance.animate.cartesian(tag, funcX, funcY, t) // returns stopper function ...still need to be documented, there's anyway a clear sample
instance.animate.polar(tag, funcR, funcPHI, t) // returns stopper function ...still need to be documented, there's anyway a clear sample
via cartesian function
One might want to animate an object along two cartesian parametric
$$x = f(t) = r * cos(t)$$ $$y = f(t) = r * sin(t)$$
clearly the case $y = f(x)$ can be achieved just fooling the $x$ to be defined as $x = f(t) = t$
In general:
Instance.animate.parametricCartesian(
    tag,
    fx,
    fy,
    interval
)
utilities
instance.positionInspector(options)To me happened many times to draw by hand something or target a specific image and then having the need to move that into an <svg> path.
If you ever tried you are perfectly aware of how much time this can take (I'm clearly considering the programmatinc way). The positionInspector utility aims to offer a tool to come and help in such cases.
Let's say we target a random image 🥰, and we want a raw silouhette path (<path/>) of it :

we can start a simple file:
window.onload = function () {
    var target = document.getElementById('trg'),
        width = 987,
        height = 652,
        w = function (p) {return width * p/100;},
        h = function (p) {return height * p/100;},
        Leo = Leonardo(width, height, { ns: '*', target: target }),
        img = Leo.image(0,0,width, height, './god.jpg').setAttributes({opacity: 0.6}),
        main = Leo.group(),
        fillStyle = {
			"stroke-width": 2,
			"stroke": '#ef88d8',
			"stroke-opacity": 1,
			"fill-opacity": 10,
			"stroke-linejoin": "round",
			fill: 'transparent'
		};

    main.append(img);
    Leo.append(main);

    // here it is
    Leo.positionInspector();
    //

    Leo.render();
}
to get
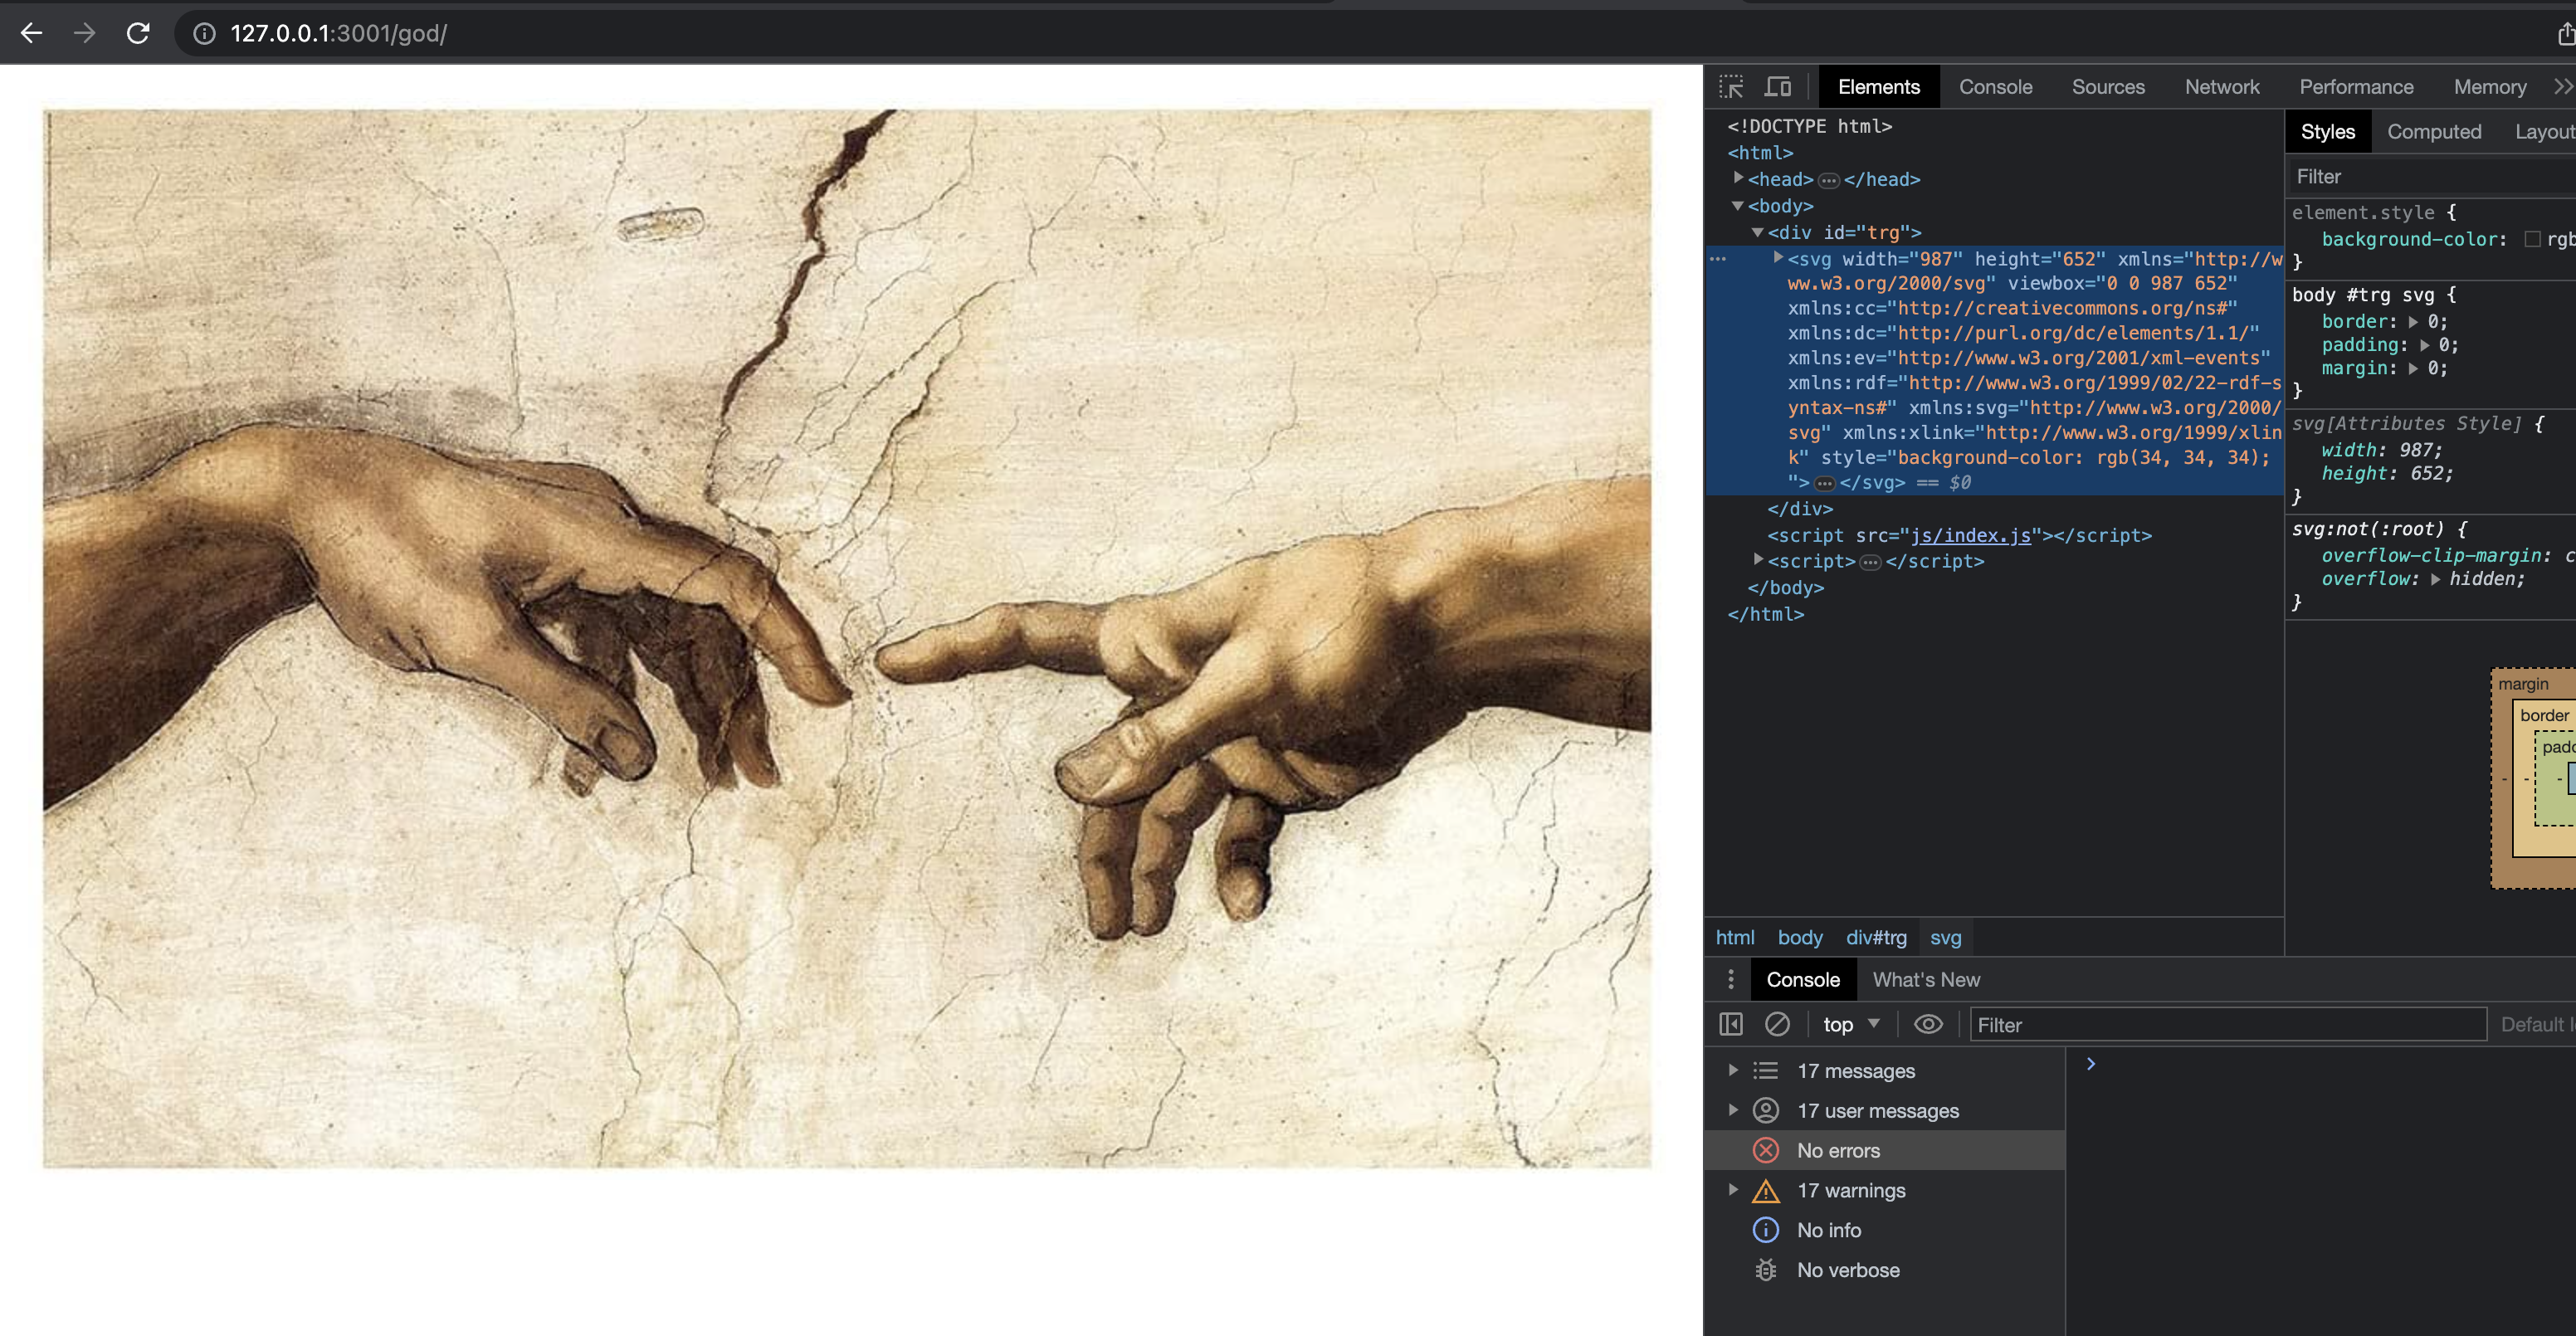
now, we would want to have a quick way to get the right d attribute content to be used in a <path/> tag so to draw what we want, all we need to do is invoke Leo.positionInspector().
Some extra
This section exposes some extra functions available on Leonardo as instance and static methods to ease some common needs.
It consists in:
- composing functions 🧱
- utility functions 🛠️
The first set is composed by function allowing in a single shot create a set of tags concurring to a specific result. The second set are basically helpers function siving csome useful composing informations.
Composing functions
> instance.textPath(d, text)
A very common thing is rendering a text along a path. As in the following example
T e x t P a t h - I s - T h e r e - F o r - Y o u
This requires basically defining the path, a text and lastly linking the two
<text fill="yellow">
    <defs>
        <path d="M10,10A100,100,0,0,0,200,100" id="leo_id_1"></path>
    </defs>
    <textPath xlink:href="#leo_id_1">
        T e x t P a t h - I s - T h e r e - F o r - Y o u
    </textPath>
</text>
nothing forbids you to compose all pieces and append (4 elements, 2 append)
but you can use .textPath method:
var curvedText = myInstance.textPath(
    "M10,10A100,100,0,0,0,200,100", // see pathBuild utility
    'T e x t P a t h - I s - T h e r e - F o r - Y o u'
).sas({
    fill: 'yellow'
});
/**
 * you can also use pathBuild to create more maintainable `d` parameter
 * see AppendixA for more information about `pathBuild`

 L.pathBuild
    .M(10, 10)
    .A(100, 100, 0,0,0, 200, 100)
*/
the returned element is the text Element enhanced with:
updateText(newText)to update the contained text
> instance.textBox(text, w, h, textAttrs, boxAttrs, rotation)
Sometimes we need to center orizontally and vertically some text in a predefined sized box:
Some text here
to achieve it we need basically a sub svg node containing a rect tag and a text tag.
<svg width="500" height="80" viewBox="0 0 500 80">
    <rect
        x="0" y="0"
        width="500" height="80"
        stroke-width="0" stroke="transparent"
        fill="green"
    ></rect>
    <text x="50%" y="50%"
        dominant-baseline="middle" text-anchor="middle"
        fill="red" stroke="white" font-size="2em"
        font-family="verdana" font-weight="bold"
    >Some text here</text>
</svg>
The text has always the same positioning parameters so Leonardo exploits that small thing in a method allowing you to do it just in one call:
var textBox = myInstance.textBox(
    'Some text here', 500, 80, {
        fill: 'red',
        stroke:'white',
        'font-size': '2em',
        'font-family': 'verdana',
        'font-weight': 'bold'
    }, {
        fill: 'green'
    }
);
the returned element is the svg Element enhanced with:
updateText(newText)to update the contained text
> instance.arcSectionPath(cx, cy, r1, r2, from, to, vrs1, vrs2)
Similary to what happens for a text along a curve, drawing a circular slice section requires some work composing the d parameter to be used in the <path/> tag.
Leonardo offers a handy method:
var arcSection = .arcSection(
   centerX, centerY,
   radiusInner, radiusOuter,
   fromAngle, toAnglew,
   innerVersus=1, outerVersus=0
);
parameters should be clear apart from the last two which allow to decide in case to invert the side where the arc is drawn.
Passing 0 for the inner one fr example allows to get the following result.
Some samples
In the source/demo folder there are some examples I use for development purposes.
If You run yarn start (and let it go since it is watching for changes in the source folder) and then visit http://127.0.0.1:3001 You can see all of them.
APPENDIX A
pathBuild
This is a tool to help us to compose the d attribute for the <path /> tag calling functions.
Let's assume we need to create a path, we need to know how the d attribute should be, and usually consist in a single string and it can become quickly challenging to maintain it (check some examples here).
For example instead of passing
var d = "M 10 315
        L 110 215
        A 36 60 0 0 1 150.71 170.29
        L 172.55 152.45
        A 30 50 -45 0 1 215.1 109.9
        L 315 10";
we can
var d = ourInstance.pathBuild
    .M(10, 315)
    .L(110, 215)
    .A(36, 60, 0, 0, 1, 150.71, 170.29)
    .L(172.55, 152.45)
    .A(30, 50, -45, 0, 1, 215.1, 109.9)
    .L(315, 10)
making it easier. Additionally a method maybe is available to conditionally make a step or skip it:
var d = ourInstance.pathBuild.M(10, 315)
    .L(110, 215)
    .maybe(value > threshold, 'A', [36, 60, 0, 0, 1, 150.71, 170.29])
    .L(172.55, 152.45)
    .A(30, 50, -45, 0, 1, 215.1, 109.9)
    .L(315, 10)
it expects in order:
- a condition (if evaluated false then the opertion will now affect the result).
- an operation among the possbile ones
aAcChHlLmMqQrRsStTvVzZ(more) - an array of parameters to be used in the operation