
@geoapify/angular-geocoder-autocomplete
v3.0.1
Published
Angular component for the Geoapify Geocoder Autocomplete library
Maintainers
 geoapify
Readme
Angular Geocoder Autocomplete
The Angular Geocoder Autocomplete component integrates the core @geoapify/geocoder-autocomplete library into Angular. It provides an easy-to-use Angular wrapper for the Geoapify Geocoding Autocomplete API, allowing developers to add advanced, localized, and flexible address search functionality to their applications.
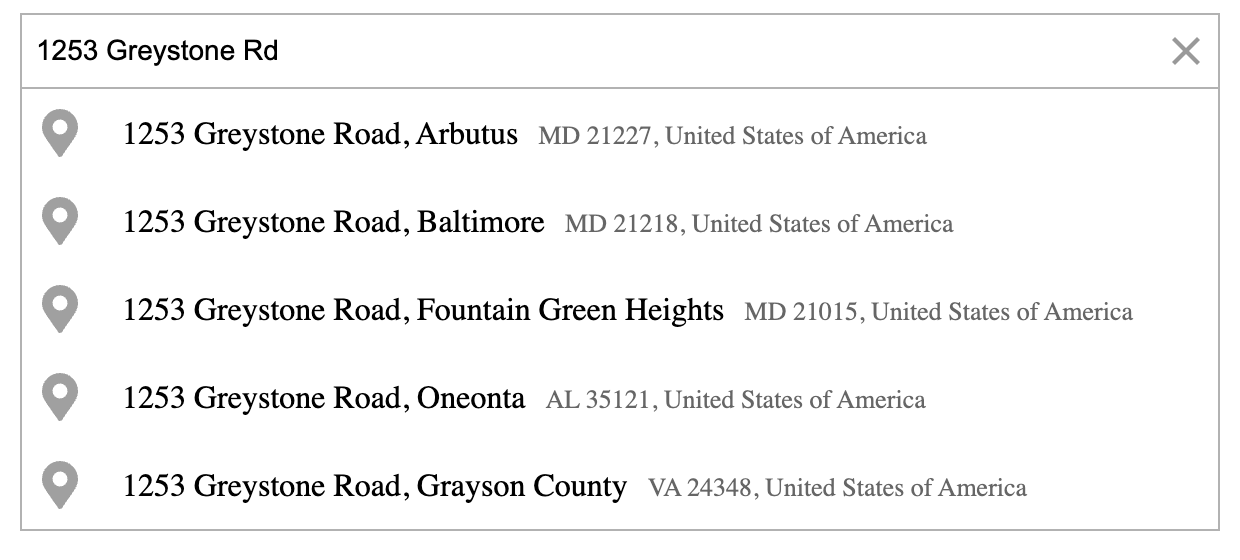
Table of Contents
Features
- Simple Angular integration with a ready-to-use component.
- Fast, responsive incremental search with built-in debounce.
- Localized suggestions with support for multiple languages and country filters.
- Flexible configuration: biasing, filtering, and bounding boxes.
- Customizable design: easily style or theme your component.
- Accessible with keyboard navigation and ARIA support.
- Rich results including coordinates, structured address, and metadata.
- Compatible with Angular 15–20.
Quick Start
You’ll need a Geoapify API key to use the component.
- Register for a free account at myprojects.geoapify.com.
- Create a project to obtain your API key.
- You can start for free — Geoapify offers a generous Freemium plan.
1. Install
npm install @geoapify/geocoder-autocomplete @geoapify/angular-geocoder-autocomplete
# or
yarn add @geoapify/geocoder-autocomplete @geoapify/angular-geocoder-autocomplete
Get a Geoapify API key: https://myprojects.geoapify.com
2. Import the module
// app.module.ts
import { BrowserModule } from '@angular/platform-browser';
import { NgModule } from '@angular/core';
import { AppComponent } from './app.component';
import { GeoapifyGeocoderAutocompleteModule } from '@geoapify/angular-geocoder-autocomplete';

@NgModule({
  declarations: [AppComponent],
  imports: [
    BrowserModule,
    GeoapifyGeocoderAutocompleteModule.withConfig('YOUR_GEOAPIFY_API_KEY')
  ],
  bootstrap: [AppComponent]
})
export class AppModule {}
Tip: Store your API key in environment.ts and reference it as environment.geoapifyKey for better maintainability.
3. Add styles
Option A: angular.json
"styles": [
  "node_modules/@geoapify/geocoder-autocomplete/styles/round-borders.css",
  "src/styles.scss"
],
...
Option B: global stylesheet (e.g., styles.scss)
@import "~@geoapify/geocoder-autocomplete/styles/minimal.css";Themes: minimal, round-borders, minimal-dark, round-borders-dark.
4. Use the component
Basic:
<geoapify-geocoder-autocomplete></geoapify-geocoder-autocomplete>With events and common options:
<geoapify-geocoder-autocomplete
  placeholder="Search for an address"
  [lang]="'en'"
  [limit]="8"
  [addDetails]="true"
  (placeSelect)="onPlaceSelected($event)"
  (suggestionsChange)="onSuggestionsChange($event)">
</geoapify-geocoder-autocomplete>
onPlaceSelected(feature: any) {
console.log('Selected:', feature?.properties?.formatted);
}
onSuggestionsChange(list: any[]) {
console.log('Suggestions:', list);
}Compatibility
| @geoapify/angular-geocoder-autocomplete | Angular Version | | --------------------------------------- | --------------- | | 1.0.x – 1.3.x | 9.x–14.x | | 2.0.0 – 2.0.2 | 15.x–18.x | | 2.0.3 - 2.2.x | 19.x–20.x | | 3.0.1+ | 21.x |
If you prefer to use the library directly without Angular bindings, check the Standalone Usage section.
Documentation
Full documentation — including configuration options, detailed examples, and migration instructions — is available online at:
On the documentation site you’ll find:
- A guided Quick Start to get the component running in minutes.
- A complete API Reference coverage of all
@Input()and@Output()properties. - A dedicated Examples section with real-world scenarios (filters, biasing, category search, hooks).
- A Migration Guide for versions 1.x → 2.x (and beyond).
- Guides for Standalone Usage of the underlying
@geoapify/geocoder-autocompletelibrary.
The component includes many options for configuration and customization. Below are the most commonly used properties that cover typical address autocomplete use cases:
| Property | Direction | Description |
| --------------------- | --------- | --------------------------------------------------------------------------------- |
| placeholder | Input | Sets the placeholder text for the input field. |
| type | Input | Defines the type of location to search for — e.g. city, street, or amenity. |
| lang | Input | Sets the language of suggestions and results. |
| limit | Input | Limits the number of suggestions displayed. |
| debounceDelay | Input | Adds a short delay before sending requests, improving performance. |
| filterByCountryCode | Input | Restricts search results to selected countries. |
| biasByProximity | Input | Prioritizes results near a specific location (latitude/longitude). |
| addDetails | Input | Returns detailed information such as boundaries and place metadata. |
| skipIcons | Input | Hides icons in the suggestion list for a minimal look. |
| placeSelect | Output | Triggered when a user selects an address from suggestions. |
| suggestionsChange | Output | Emits updated suggestions while typing. |
| userInput | Output | Fires on each user input change. |
Examples
1. Basic Address Search
<geoapify-geocoder-autocomplete
  placeholder="Search for an address"
  (placeSelect)="onPlaceSelected($event)">
</geoapify-geocoder-autocomplete>
onPlaceSelected(place: any) {
console.log('Selected place:', place?.properties?.formatted);
}Used properties:
placeholder, placeSelect
2. Restrict Results to Specific Country
<geoapify-geocoder-autocomplete
  [filterByCountryCode]="['US']"
  (placeSelect)="onPlaceSelected($event)">
</geoapify-geocoder-autocomplete>
Restricts suggestions to a list of countries using ISO country codes.
Used properties:
filterByCountryCode, placeSelect
3. Limit Search to Area (Berlin Example)
<geoapify-geocoder-autocomplete
  [filterByRect]="{ lon1: 13.0884, lat1: 52.3383, lon2: 13.7611, lat2: 52.6755 }"
  (placeSelect)="onPlaceSelected($event)">
</geoapify-geocoder-autocomplete>
This configuration restricts search results to the Berlin area.
Used properties:
filterByRect, placeSelect
4. Bias Results by User Location
ngOnInit() {
  navigator.geolocation.getCurrentPosition(pos => {
    this.biasByProximity = { lon: pos.coords.longitude, lat: pos.coords.latitude };
  });
}
<geoapify-geocoder-autocomplete
[biasByProximity]="biasByProximity"
(placeSelect)="onPlaceSelected($event)">
</geoapify-geocoder-autocomplete>Prioritizes nearby results without strictly limiting the search area.
Used properties:
biasByProximity, placeSelect
5. Using Hooks for Custom Input and Suggestions
<geoapify-geocoder-autocomplete
  [preprocessingHook]="preprocessInput"
  [suggestionsFilter]="filterSuggestions">
</geoapify-geocoder-autocomplete>
preprocessInput(value: string): string {
return `${value}, Berlin`;
}
filterSuggestions(suggestions: any[]): any[] {
return suggestions.filter(s => s.properties.result_type === 'street');
}Used properties:
preprocessingHook, suggestionsFilter
6. Add Details for Selected Place
<geoapify-geocoder-autocomplete
  [addDetails]="true"
  placeholder="Search for a city"
  (placeSelect)="onPlaceSelected($event)">
</geoapify-geocoder-autocomplete>
Adds boundary or geometry data (where available) to the selected feature.
Used properties:
addDetails, placeSelect
7. Enable Category (POI) Search
<geoapify-geocoder-autocomplete
  [addCategorySearch]="true"
  [showPlacesByCategoryList]="true"
  [placesByCategoryFilter]="{ categories: ['cafe', 'restaurant'] }"
  (placeByCategorySelect)="onPoiSelected($event)">
</geoapify-geocoder-autocomplete>
Displays nearby Points of Interest (POIs) below the input field, filtered by category.
Used properties:
addCategorySearch, showPlacesByCategoryList, placesByCategoryFilter, placeByCategorySelect
8. Show Loading Indicator While Searching
<div class="autocomplete-wrapper">
  <geoapify-geocoder-autocomplete
    (requestStart)="loading = true"
    (requestEnd)="loading = false"
    (placeSelect)="onPlaceSelected($event)">
  </geoapify-geocoder-autocomplete>

  <div *ngIf="loading" class="loading-spinner">Loading...</div>
</div>
Used properties:
requestStart, requestEnd
9. Clear Selection
<geoapify-geocoder-autocomplete
  (clear)="onClear()"
  placeholder="Search address">
</geoapify-geocoder-autocomplete>
onClear() {
console.log('Selection cleared');
}Used properties:
clear
10. Combine Filters and Bias
<geoapify-geocoder-autocomplete
  [filterByCountryCode]="['DE']"
  [biasByProximity]="{ lon: 13.405, lat: 52.52 }"
  [addDetails]="true"
  (placeSelect)="onPlaceSelected($event)">
</geoapify-geocoder-autocomplete>
Combines multiple parameters — country restriction, local bias, and detailed output — for refined search results.
Used properties:
filterByCountryCode, biasByProximity, addDetails, placeSelect
Learn More
- Geoapify Geocoding API Docs
- Place Details API Docs
- Geoapify API Playground
- Geoapify Address Autocomplete Overview
- @geoapify/geocoder-autocomplete on npm — includes more live demos and examples.
Contributions and Support
We welcome feedback, bug reports, and feature suggestions to improve the library.
Contributing
If you’d like to contribute:
- Fork the repository on GitHub.
- Create a feature branch (
git checkout -b feature/your-feature-name). - Make your changes and ensure the code follows Angular and TypeScript best practices.
- Submit a pull request with a clear description of your changes.
Before contributing, please review the existing issues and documentation to avoid duplicates.
Reporting Issues
If you encounter a bug or unexpected behavior, please open an issue on GitHub. When submitting an issue, include:
- A short description of the problem
- Steps to reproduce
- Expected vs. actual results
- Angular and package versions
Getting Support
- Visit the Geoapify Developer Portal for API documentation.
- Check the official documentation site for guides and examples.
- For general questions, contact the Geoapify support team via [email protected].