
@gogors/gitlab-analysis-wasm
v1.1.0
Published
GitLab analysis tool using WebAssembly
Maintainers
 coderliu2022
Readme
GitLab Analysis WASM
基于 WebAssembly 的 GitLab 代码分析工具,用于生成详细的GitLab代码统计报告。
功能特点
- 🚀 基于Rust开发,使用 WebAssembly 实现高性能分析
- 📊 统计代码提交数据(新增、删除、修改行数等)
- 👥 按作者统计项目贡献
- 📈 生成详细的代码统计报告
- 🔄 支持并发请求和自动重试机制
- ⚡ 支持分组代码仓库分析
安装
npm install @gogors/gitlab-analysis-wasm使用方法
1. 基本配置
const config = {
  // GitLab API 配置
  gitlab_api: 'http://gitlab.xxx.cn/api/v4',
  gitlab_token: "your-gitlab-token",
  group_id: 'your-group-id',

  // 时间范围配置
  start_date: '2024-11-01',
  end_date: '2024-12-31',

  // 项目配置
  projects_num: 100,
  excluded_projects: ['project1', 'project2'],

  // 文件类型配置,如前端常用配置
  valid_extensions: [
    '.js', '.cjs', '.ts', '.jsx', '.tsx',
    '.css', '.scss', '.sass', '.html',
    '.sh', '.vue', '.svelte'
  ],

  // 并发处理数
  max_concurrent_requests: 30,

  // 过滤配置
  ignored_paths: [
    "dist", "node_modules/", "build/",
    ".husky", "lintrc", "public/"
  ]
};
2. 使用
在构建工具中使用
在 vite 中使用,需要使用 vite-plugin-wasm 插件
参照:https://github.com/Menci/vite-plugin-wasm
npm install vite-plugin-wasmimport wasm from "vite-plugin-wasm";
import topLevelAwait from "vite-plugin-top-level-await";
export default defineConfig({
plugins: [
wasm(),
topLevelAwait()
]
});在webpack中使用,需要使用 @wasm-tool/wasm-pack-plugin 插件
参照:https://github.com/wasm-tool/wasm-pack-plugin#readme
npm install @wasm-tool/wasm-pack-pluginimport wasmPackPlugin from '@wasm-tool/wasm-pack-plugin';
export default defineConfig({
plugins: [wasmPackPlugin()],
});在rollup中使用,需要使用 rollup-plugin-esmwasm 插件
参照:https://github.com/Pursue-LLL/rollup-plugin-esmwasm
npm install rollup-plugin-wasmimport wasm from 'rollup-plugin-esmwasm';
export default {
plugins: [wasm()],
};在构建工具中使用时,引入 bundler 模式的包,可直接导入使用,无需手动初始化
// 可直接导入使用,无需手动初始化
import { analyze_gitlab_projects } from '@gogors/gitlab-analysis-wasm';

async function startAnalysis() {
  try {
    // 开始分析
    const result = await analyze_gitlab_projects(config);
    console.log(result);
  } catch (error) {
    console.error('分析失败:', error);
  }
}
在浏览器中使用
导入后需要先初始化再使用
es 模块
<script type="module">
  import init, { analyze_gitlab_projects } from 'https://unpkg.com/@gogors/gitlab-analysis-wasm/pkg/web/gitlab_analysis_wasm.js';
  init().then(() => {
    try {
      // 开始分析
      const result = await analyze_gitlab_projects(config);
      console.log(result);
    } catch (error) {
      console.error('分析失败:', error);
    }
  });
</script>
非模块
考虑不兼容esm的浏览器,使用非模块
wasm_bindgen 为wasm-bindgen库的初始化函数,在no-modules模式下,需要手动初始化wasm
<script src="https://unpkg.com/@gogors/gitlab-analysis-wasm/pkg/no-modules/gitlab_analysis_wasm.js"></script>
<script>
  (async () => {
      // 初始化wasm
      await wasm_bindgen();

      // 获取分析函数
      const { analyze_gitlab_projects } = wasm_bindgen;
      try {
        // 开始分析
        const result = await analyze_gitlab_projects(config);
        console.log(result);
      } catch (error) {
        console.error('分析失败:', error);
      }
  })();
</script>
unpkg 的使用参照 https://unpkg.com/
返回数据结构
分析完成后会返回包含以下信息的报告:
1. 代码统计 (codeStats)
interface CodeStat {
  key: string;            // 统计项唯一标识
  author: string;         // 作者名称
  email: string;         // 作者邮箱
  project: string;       // 项目名称
  commits: number;       // 提交次数
  additions: number;     // 新增行数
  deletions: number;     // 删除行数
  lines: number;         // 总行数变更
  files: number;         // 影响文件数
  size: number;          // 代码体积(KB)
  isTotal?: boolean;     // 是否为总计数据
  children?: CodeStat[]; // 子统计项
}
2. 提交统计 (commitStats)
interface CommitStat {
  author: string;        // 作者名称
  email: string;         // 作者邮箱
  project: string;       // 项目名称
  branch: string;        // 分支名称
  tag: string;          // 标签名称
  committedDate: string; // 提交时间
  message: string;       // 提交信息
}
3. 错误统计 (failureStats)
interface FailureRecord {
  url: string;           // 失败的请求URL
  projectName?: string;  // 相关项目名称
  author?: string;       // 相关作者
  operation: string;     // 操作类型
  error: string;         // 错误信息
}
注意事项
GitLab Token 权限要求:
- 需要
read_api权限 - 需要
read_repository权限
- 需要
性能优化建议:
- 根据接口qps适当调整
max_concurrent_requests值 - 使用
excluded_projects排除不需要分析的项目 - 使用
valid_extensions过滤不需要分析的文件类型
- 根据接口qps适当调整
错误处理:
- 内置自动重试机制
- 重试多次依旧失败的请求会记录在
failureStats中 - 可在控制台中查看错误详情
开发指南
# 安装依赖
npm install
# 构建 WASM
npm run build
# 启动示例
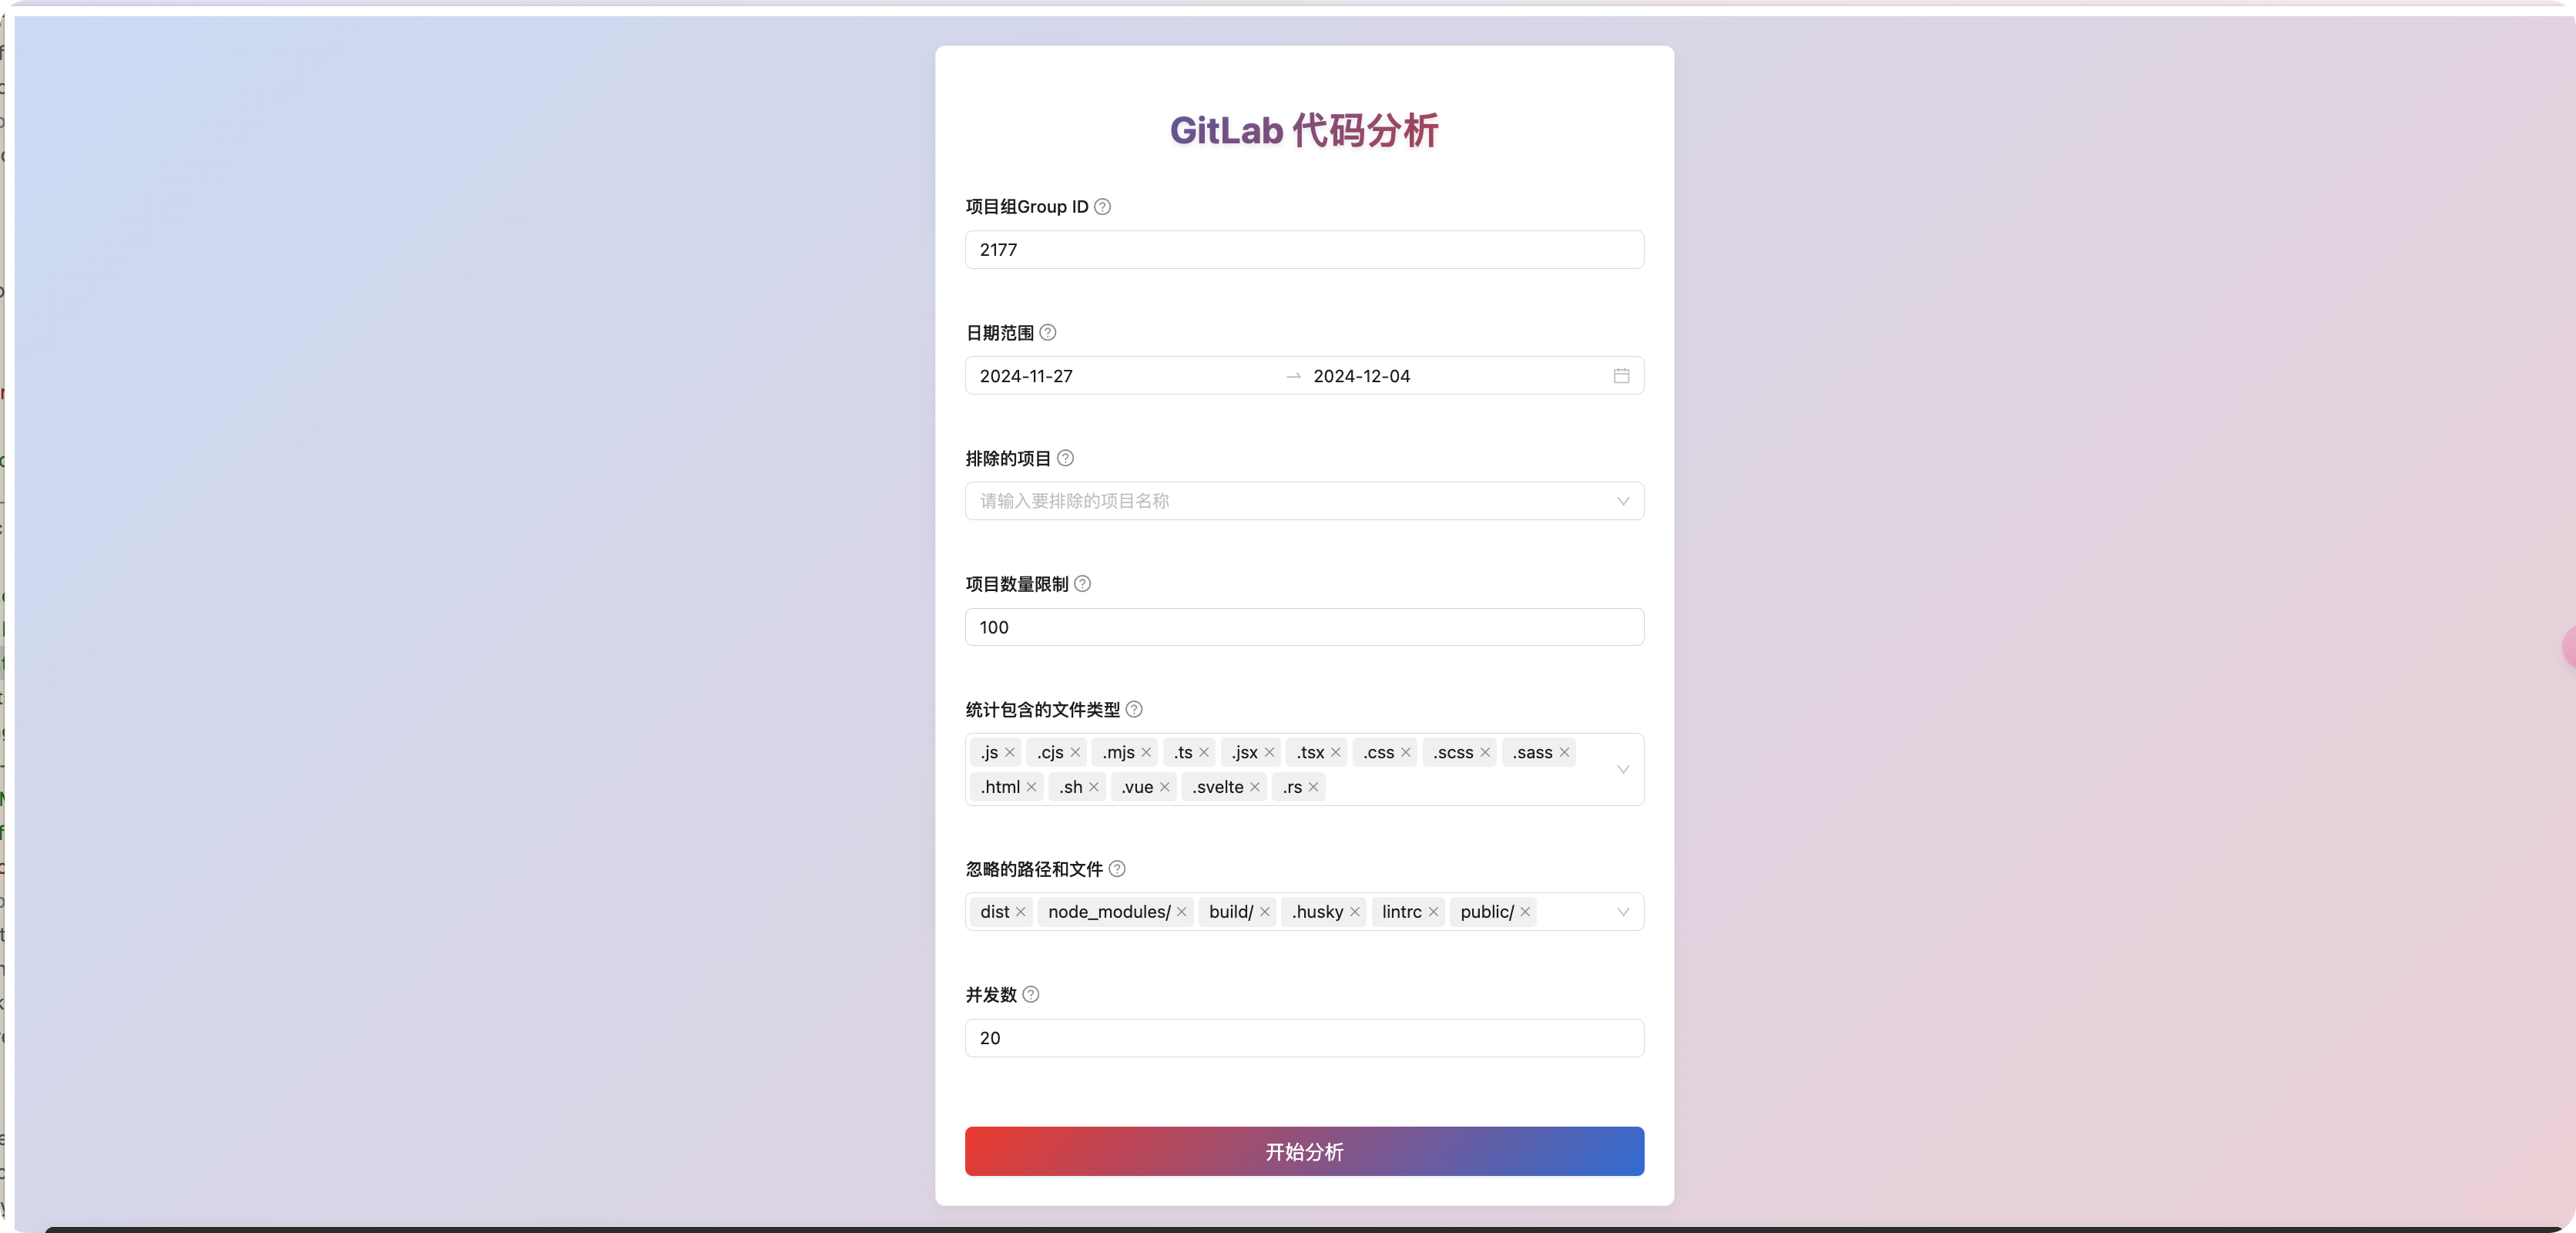
npm run test:html效果展示
结合前端框架可以搭建自己的分析页面
分析提交代码
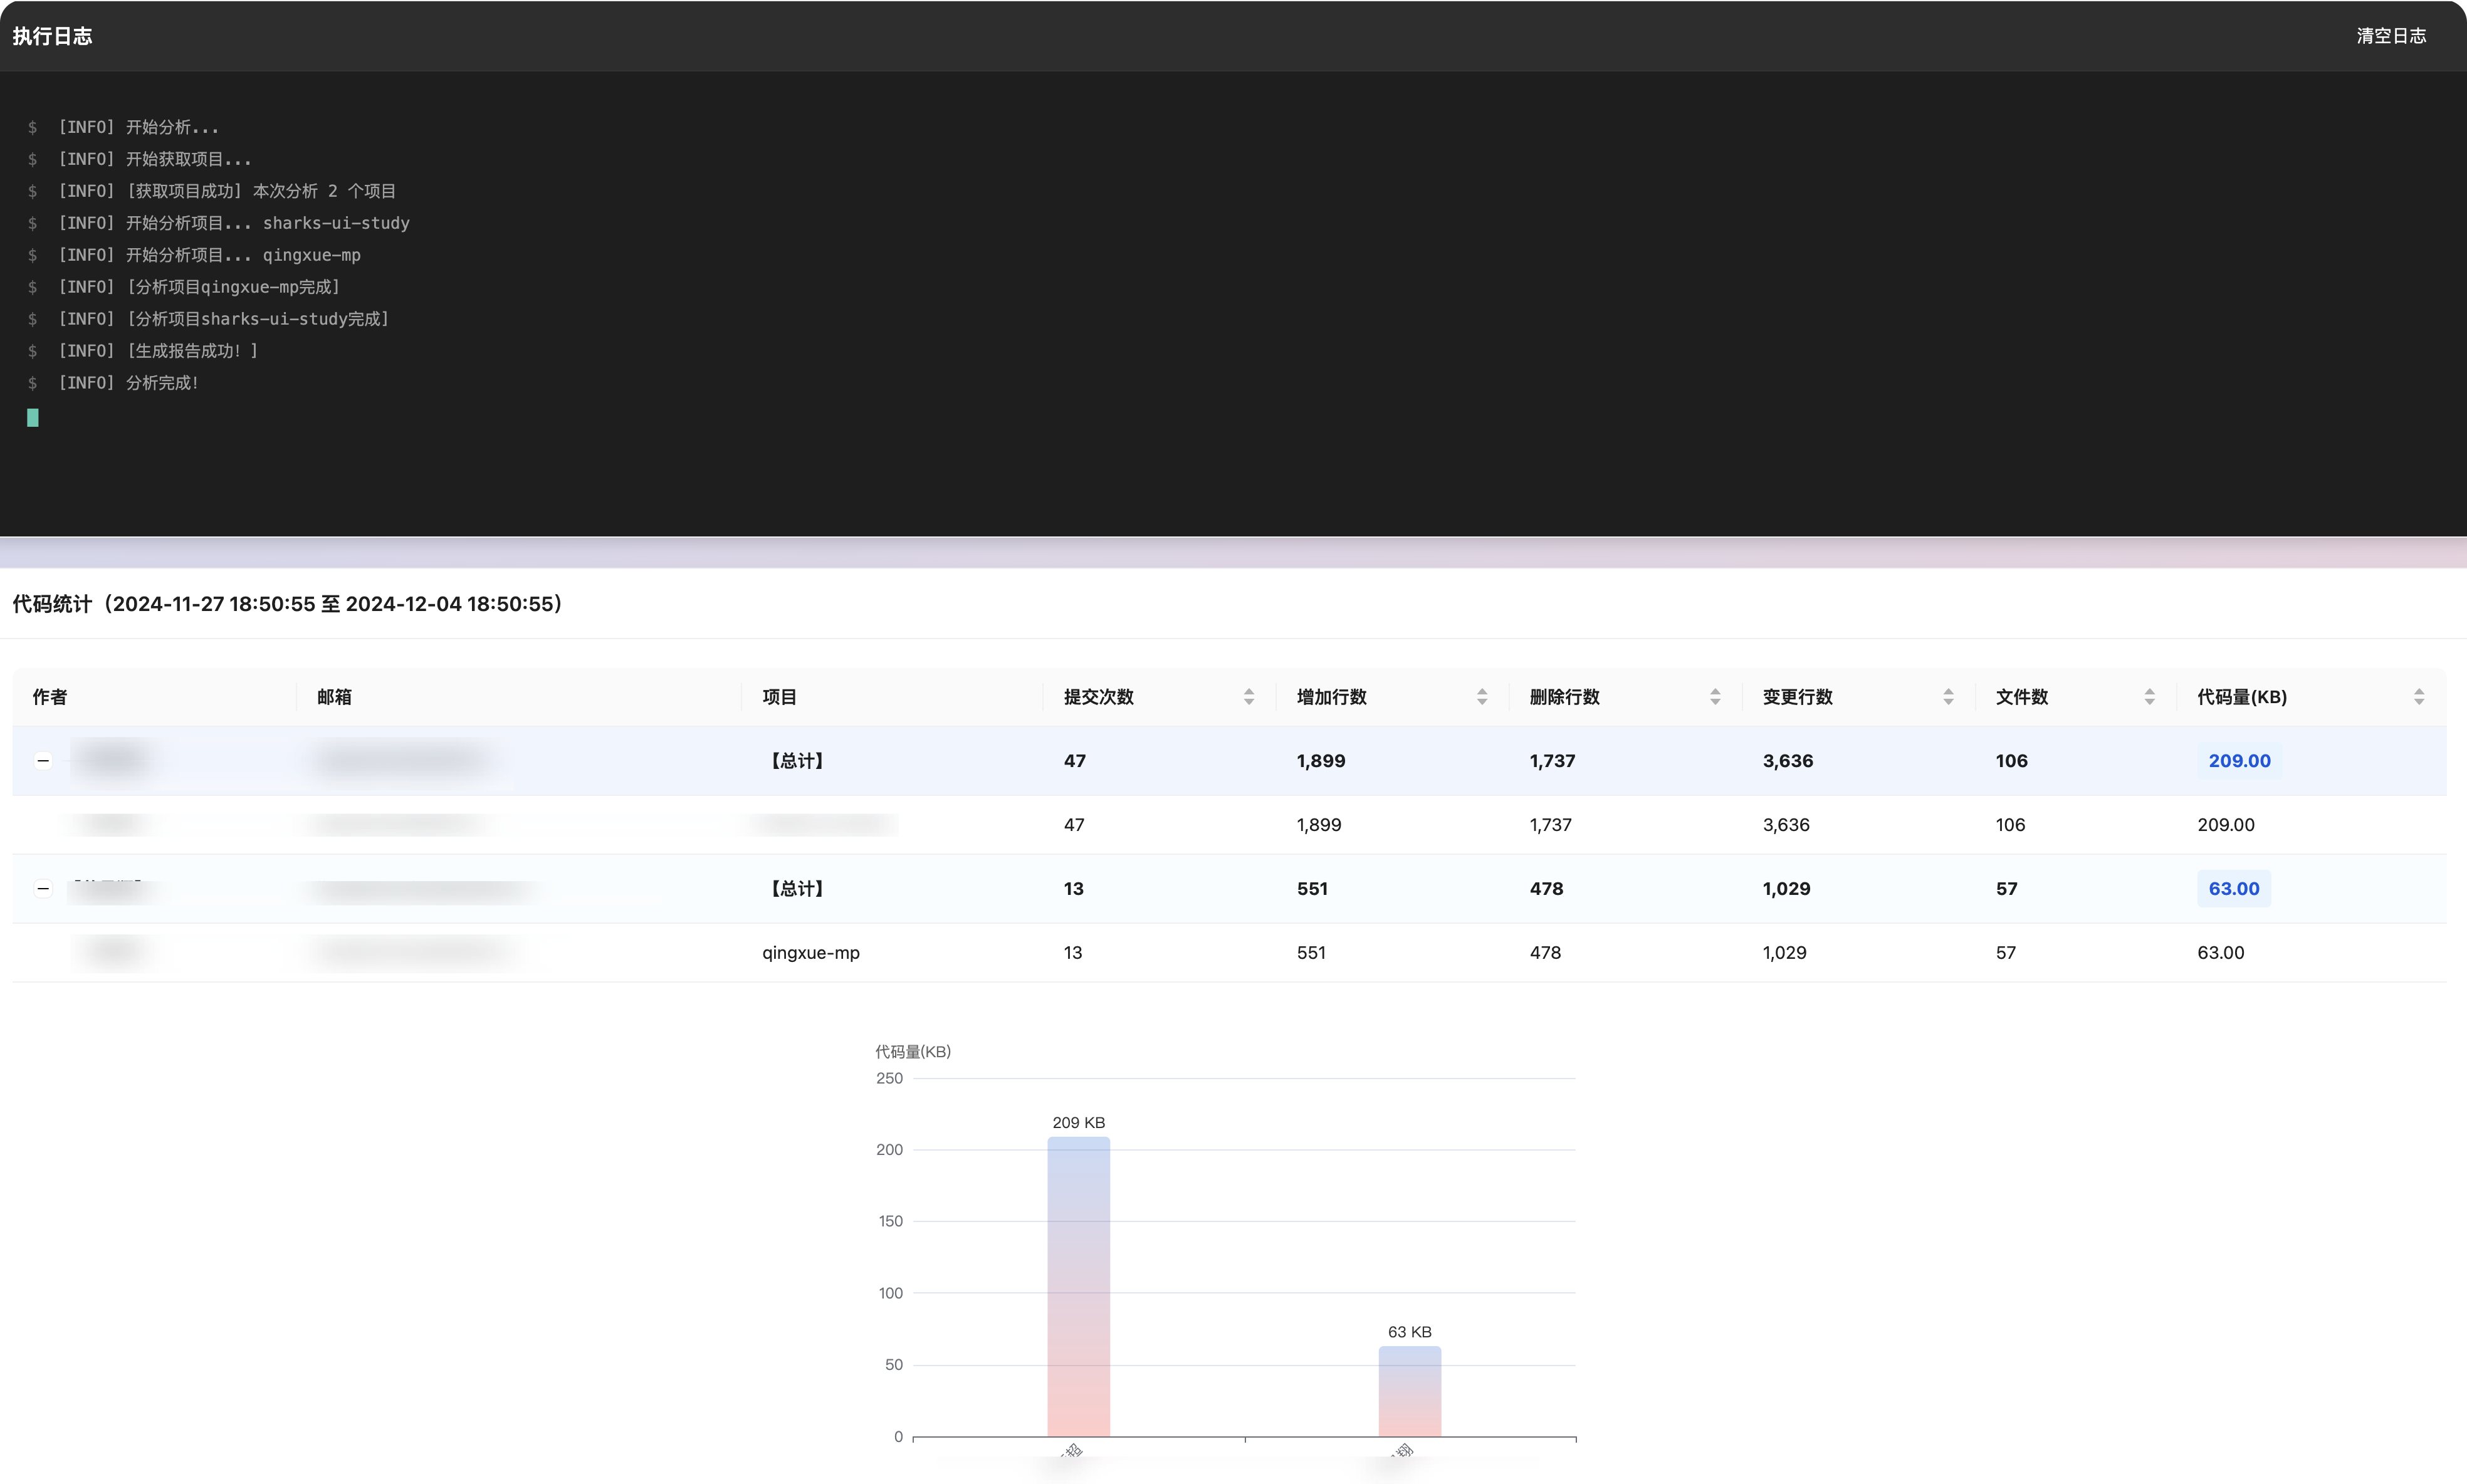
分析提交记录

注意事项
- 不支持nodejs