
@jv-k/claude-gauge
v1.8.0
Published
A status line and a token line for Claude Code: context, 5-hour and weekly usage with pace markers.


Readme
claude-gauge is a compact status line and token line for Claude Code, in the terminal, the VS Code extension and the desktop app.
- Pace, not only usage. A marker on the 5-hour and weekly bars shows whether you will reach the limit before the window resets.
- No configuration file. Setup asks which parts you want and writes switches into your settings. You can see each setting in the line's command.
- Everywhere you run Claude Code. The lines work in the terminal, and Claude adds them to its replies in VS Code and the desktop app.
- Local only. The lines read Claude Code's status line input, git and the session transcript on your machine. They make no network calls.
- One step from claude-hud. Setup finds claude-hud, replaces it, and can put it back.
How it looks
In the terminal, the status line sits under the prompt:
ctx 43% ▓▓░░░ 86.0k │ 5h 9% ░░┃░░ → 14:10 │ 7d 41% ▓▓░┃░ → 3d
11:10 │ 1h12m │ jv-k/claude-gauge │ ⎇ main* ↑1 │ Opus 5.5 │ effort high
The token line shows at the end of each turn:
11:10 │ 4 req │ out 3.4k (1.2k think) │ cache w6.5k r1.69M │ ctx 43% ▓▓░░░ 86.0kIn VS Code and the desktop app, Claude ends each reply with the same lines:
ctx 43% ▓▓░░░ 86.0k │ 5h 9% ░░┃░░ → 14:10 │ 7d 41% ▓▓░┃░ → 3d
11:10 │ 1h12m │ jv-k/claude-gauge │ ⎇ main* ↑1 │ Opus 5.5 │ effort high
4 req │ out 3.4k (1.2k think) │ cache w6.5k r1.69M
Getting started
You need Claude Code and Node.js 18 or later.
Install the plugin
In Claude Code, run these three commands:
/plugin marketplace add jv-k/claude-gauge
/plugin install claude-gauge@claude-gauge
/claude-gauge:setup
If Claude Code does not find /claude-gauge:setup, run /reload-plugins first. Setup asks which lines you want. Then it backs up ~/.claude/settings.json and adds the lines to it. Start a new session to see them.
Install from npm
In a terminal, run:
npx @jv-k/claude-gauge setupSetup shows the status line and asks which parts you want. In a terminal, each question is a choice. Use the arrow keys to move and Enter to accept. One question shows every row, each with its parts side by side and + after them. Use ← and → to move along a row, Tab and Shift+Tab to change row, and ↑ and ↓ to change the part there to another one. On +, ↑ and ↓ add a part. Shift with ← or → moves a part along its row, and Shift with ↑ or ↓ moves it to the row above or below. Space, then the arrow keys, then Space does the same. d or Backspace removes a part. The token line's parts work the same way, in one row. With two or more rows, you put the rows in order: select a row with ↑ and ↓, and press Tab to push it down or Shift+Tab to push it up. The status line redraws as the selection moves, before you accept it. While you edit a row, the preview marks that row with ❯ and the part at the cursor with [ ]. Press Esc to go back: setup lists the steps you answered, and you pick one to change. The answers after it stay. When you type the answers, as through a pipe, answer < to see that list. Ctrl+C stops setup and changes nothing:

VS Code and the desktop app
The VS Code extension and the desktop app show no custom status line and no token line. Instead, a SessionStart hook for each line tells Claude to end each reply with the lines. This costs one or two more short tool calls in each reply. In the terminal, the hooks do nothing.
First install claude-gauge with the plugin or with npm, as above. Then paste this prompt into a Claude Code session:
Set up claude-gauge for the VS Code extension and the desktop app.
Read ~/.claude/settings.json, or $CLAUDE_CONFIG_DIR/settings.json when that variable is set.
Make a backup copy of the file first.
Find the statusLine command that runs claude-gauge's statusline.js, and the Stop hook that runs its tokenline.js.
Add two entries to hooks.SessionStart and keep every entry that is there already:
one runs the same statusline.js with --instruct, and one runs the same tokenline.js with --instruct.
Put each line's existing switches after --instruct.
The status line already shows the time and the context, so give the token line hook a --show without time and ctx, such as --show req,out,cache.
Test each new command with CLAUDE_CODE_ENTRYPOINT=claude-vscode. It must print an instruction.
Then tell me to start a new session.
Open
~/.claude/settings.jsonand find thestatusLinecommand that setup wrote. Its folder is~/.claude/claude-gauge/runtime/after an npm install, or~/.claude/claude-gauge/launcher/after a plugin install.Add these two entries to the
SessionStartarray underhooks, with the folder from step 1. Keep the entries that are there already.{ "hooks": [ { "type": "command", "command": "node ~/.claude/claude-gauge/runtime/statusline.js --instruct" } ] }, { "hooks": [ { "type": "command", "command": "node ~/.claude/claude-gauge/runtime/tokenline.js --instruct --show req,out,cache" } ] }Start a new session.
Each reply then ends with the lines, as in How it looks. The token line leaves out its time and its context there, because the status line shows them. To change a line in the replies, put its switches after --instruct, for example --show 5h,7d. On a 1M-context model, add --window 1m to both hooks. Uninstall also removes these hooks.
Change or remove the lines
To change the parts and switches of the lines, run /claude-gauge:configure in Claude Code, or npx @jv-k/claude-gauge configure in a terminal.
To remove claude-gauge and put back the status line it replaced, run /claude-gauge:uninstall, or npx @jv-k/claude-gauge uninstall.
Update
Run:
npx @jv-k/claude-gauge updateIt finds how you installed claude-gauge, as the plugin, with npx, with npm install -g or as a git clone, and runs that tool's upgrade. Your switches stay. Add --dry-run to see the commands first. The reference has the details for each route.
What the lines show
The status line shows these parts by default:
| Part | Example | Shows |
| --- | --- | --- |
| ctx | ctx 43% ▓▓░░░ 86.0k | How much of the context window is in use. |
| 5h | 5h 9% ░░┃░░ → 14:10 | Your 5-hour usage, and the time the window resets. |
| 7d | 7d 41% ▓▓░┃░ → 3d | Your weekly usage, and the days until it resets. |
| time | 11:10 | The local time. |
| duration | 1h12m | How long the session has run. |
| repo | jv-k/claude-gauge | The repository, or the folder name. |
| branch | ⎇ main* ↑1 | The git branch. * means changes, and ↑1 means one commit ahead of the remote. |
| model | Opus 5.5 | The model. |
| effort | effort high | The reasoning effort. |
The pace marker ┃ shows how much of the window has passed. If the marker is ahead of the filled cells, you use less than an even pace. Its colour shows the usage that the current pace gives at the end of the window:
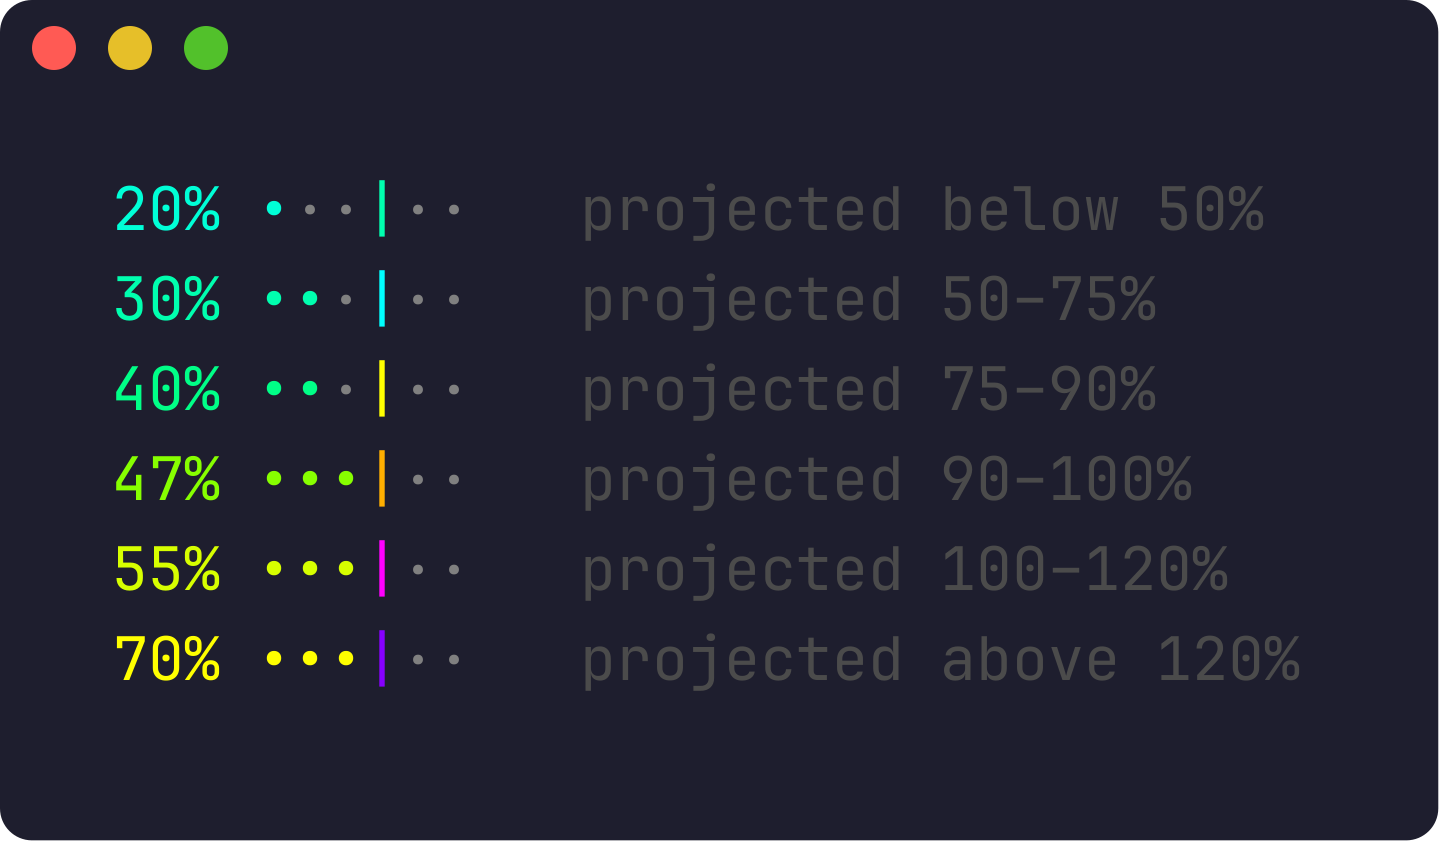
Red means that you will reach the limit a short time before the window resets. Purple means that you will reach it much earlier. In the first minutes of a window, the marker takes the colour of its bar, because the projection is not yet reliable.
Other parts show the tools and subagents in use, todos, git changes, pull requests, the cost per day and week, memory use and more.
[!TIP] The reference describes all 40 parts, with what each one shows and when.
Customise
Each line takes switches in its command in your settings. configure writes them for you. Two examples:
--show 5h,7d

5h 9% ░░┃░░ → 14:10 │ 7d 41% ▓▓░┃░ → 3d
--show ctx,5h,7d --show repo,branch,pr,lines --show model,effort,cost,cache
ctx 43% ▓▓░░░ 86.0k │ 5h 9% ░░┃░░ → 14:10 │ 7d 41% ▓▓░┃░ → 3d
jv-k/claude-gauge │ ⎇ main │ #12 approved │ +156 −23
Opus 5.5 │ effort high │ $1.23 │ cache 91% warmEach --show is one row. --theme picks one of thirteen themes, among them the Dracula, One Dark, Solarized Dark, Monokai and Nord schemes:
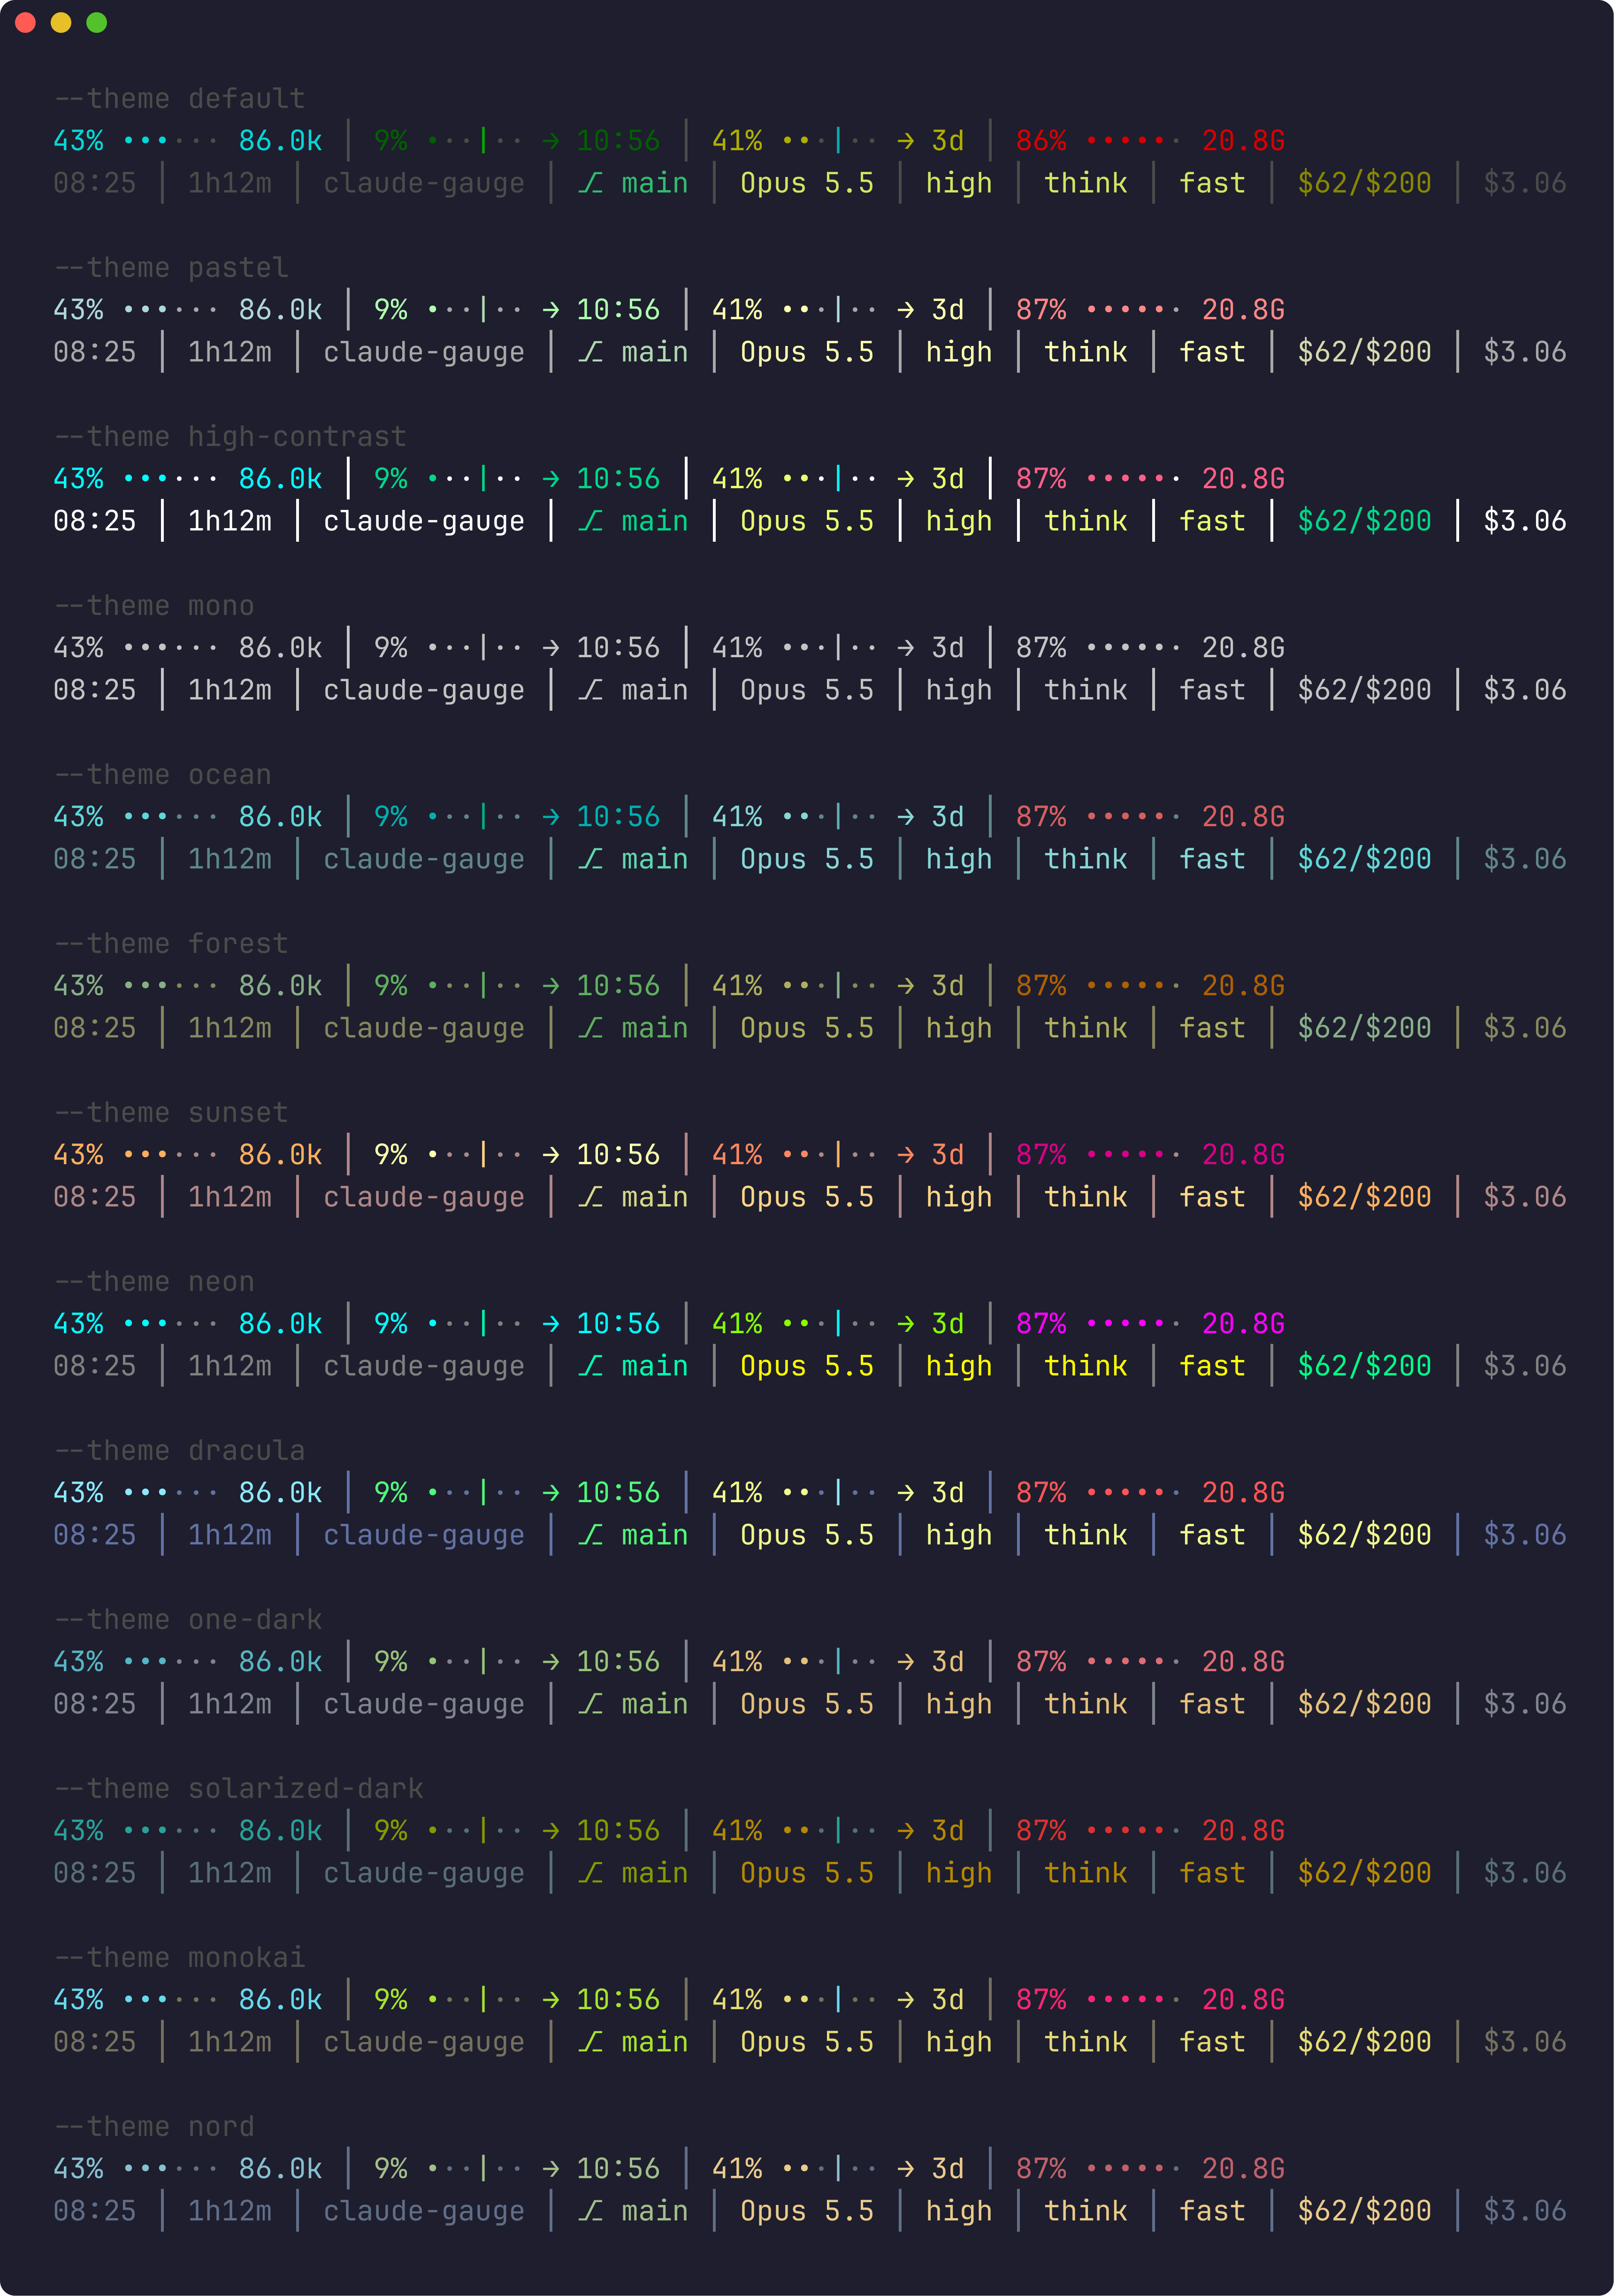
--bar-style draws every bar another way, on both lines. --bar-style steps gives 5h 9% ▅▁▁▁▁▁ → 14:10, and --bar-style hairline gives 5h 9% ━────╋── → 14:10. There are seven styles; setup shows each one moving before you choose. A bar can also have its own: --bar-style steps,ctx=rising draws ctx in rising and the other bars in steps.
[!TIP] The reference lists every switch, the themes, the bar styles and more examples.
Upgrading from claude-hud
If you use claude-hud, run setup as in Getting started. Setup finds claude-hud's status line, shows it, and asks before it replaces it. It saves claude-hud's command, so uninstall puts claude-hud back. Keep the claude-hud plugin installed until you are sure, because that command needs it.
claude-gauge has no configuration file. Each claude-hud option becomes a part or a switch in the line's command. The reference maps each option to claude-gauge.
Troubleshooting
The lines do not show. Start a new session, because Claude Code reads the status line at the start. After a plugin install, run /reload-plugins if Claude Code does not find /claude-gauge:setup.
Setup fails, or the lines print an error. Make sure that node --version gives 18 or later.
The 5h and 7d parts do not show. Claude Code sends these figures only for claude.ai Pro and Max plans. With an API key, Bedrock or Vertex, the parts stay out of the row.
Another status line comes back. A project's .claude/settings.json can set its own status line, and it wins over your user settings. Remove it there, or run setup again.
The lines do not show in VS Code or the desktop app. These apps need the hooks in VS Code and the desktop app.
Full reference
docs/reference.md has everything this page leaves out: all the parts and switches, the themes and colours, more examples, other install routes, and the details of update and uninstall.
Contributing
CONTRIBUTING.md gives the setup, the tests and the rules for a change. RELEASING.md gives the release steps.