
@locofy/mcp
v1.1.9
Published
Locofy MCP Server with Cursor

Readme
Locofy MCP Server
Locofy MCP (Model Context Protocol) allows Locofy.ai code to be integrated and extended with other AI code editors like Cursor. It not only improves the accuracy and relevance of generated code but also unlocks new possibilities for utilizing Locofy-generated frontend code more effectively.
Tools
getLatestComponentAndDependencyCode
- Scans directories to retrieve components and dependencies, comparing with current IDE code to offer intelligent updates. Prompts for user confirmation when code changes are detected.
- Inputs:
componentNames(array of string): The list of component or screen names to be retrievedworkspacePath(string): The full path to the workspace
- Returns: JSON object containing component code, dependencies, and change status indicating which files need updates
getLatestFileCode
- Retrieves individual file contents without component dependency management. Focuses on specific files by name rather than handling components as complete units with dependencies.
- Inputs:
fileNames(array of string): List of specific file names to retrieveworkspacePath(string): The full path to the workspace
- Returns:
- JSON object containing file code and change status indicating which files need updates
Getting Started with Locofy MCP
To get started with Locofy MCP, follow these steps:
- Open the Locofy plugin in Figma and create a project, if not created already.
- Convert your designs to code using Locofy. Make sure you have optimised your Figma designs correctly beforehand for high quality code.
- Sync your designs to Locofy Builder.
- Finally, generate your MCP tokens & start using it in your IDE.
NOTE: Always sync your designs to Locofy Builder before pulling code using MCP.
Generating MCP Token
To configure MCP for your project, follow these steps:
- Go to Locofy Dashboard and select the Locofy project for which you want to enable MCP.
- Next, click on the gear icon to go to the project settings.
- Locate the MCP Configuration tab.
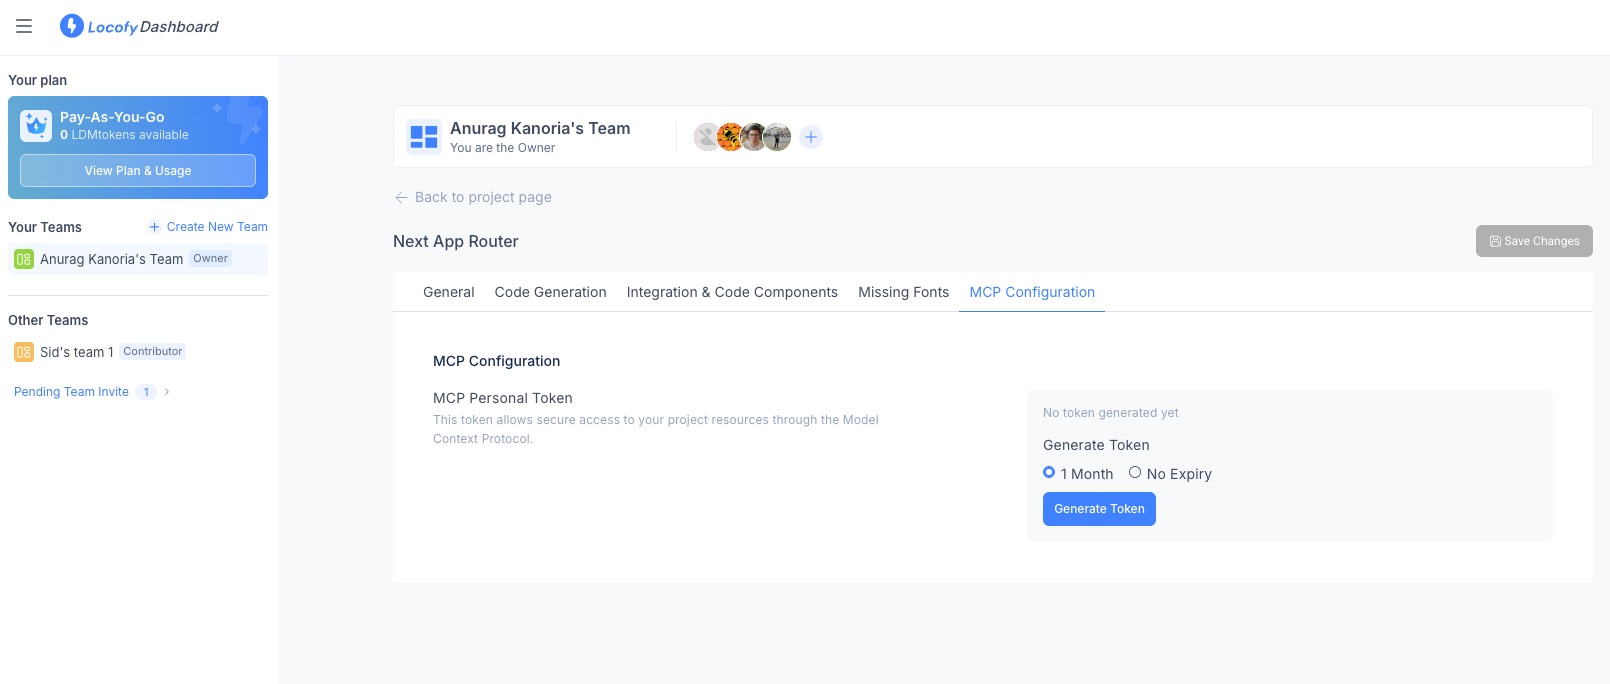
- Choose the desired token expiry option:
- 1 Month Expiry
- No Expiry
5.Click the Generate Token button and copy the mcp.json file.
You can now use this in any IDE that supports MCP servers.
Using Locofy MCP in Cursor
To use the mcp.json file generated above in Cursor, first we need to configure it as a server in Cursor before we start to use it.
Setting up Locofy MCP
- In your project’s root directory, create a
.cursorfolder if it doesn’t already exist. - Save the copied configuration file inside
.cursorasmcp.json. - Next, go to Cursor settings and click on MCP tab.
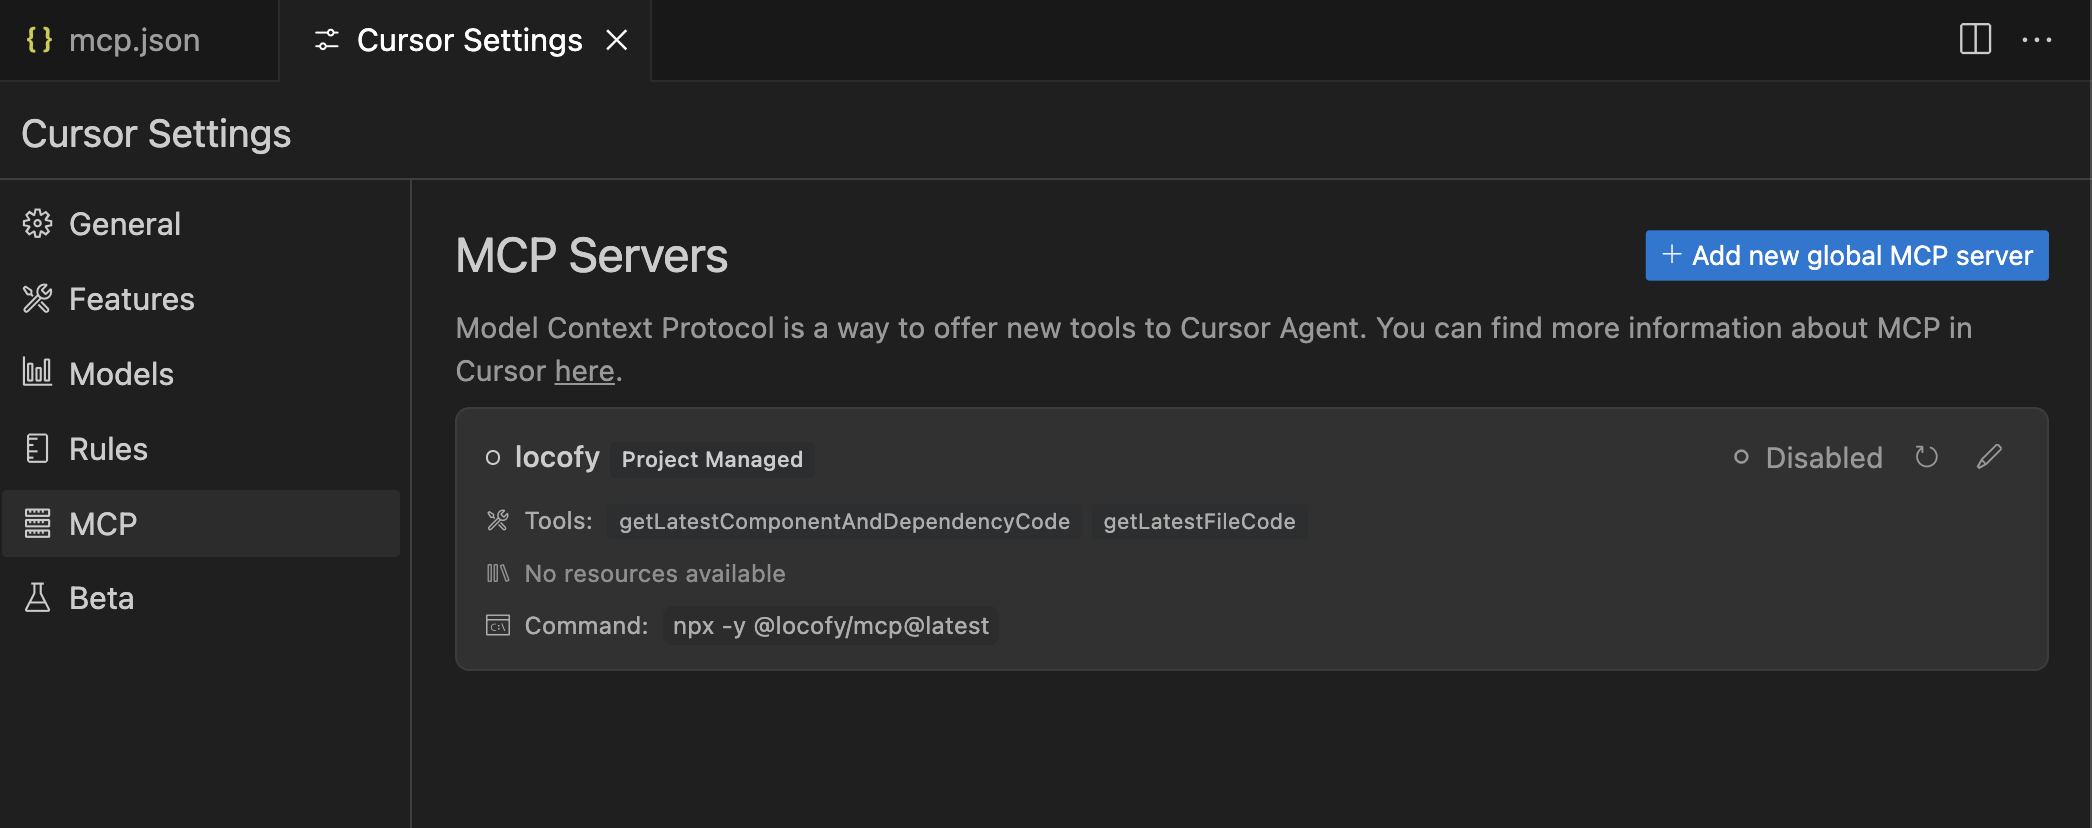
- Click on the MCP tab & you will find Locofy server as an option.
- Click "Disabled" to enable the server. It can take a few seconds to start the server.
NOTE: Hit the refresh icon next to the "Disabled" button if the server is not enabled after a couple of seconds.
Using Locofy MCP
- Go to any of your code files and open Cursor chat. You can also shortcut
⌘ + Ito open it. - Make sure you're using Agent mode and not in Ask or Edit mode in chat.
- You can now directly pull code from Locofy using natural language. You can also customise the code using the power of LLMs. For example:
- "Fetch the NavigationBar component from Locofy."
- "Pull Homepage from Locofy & replace the navbar with the one present in this project."
- "Get ListingCard component from Locofy & merge it with my code."
- Locofy will provide you with two tools to pull the code. Click on "Run tool" to execute the function required by the LLM to process your prompt.
- getLatestComponentAndDependencyCode: Retrieve code along with their dependencies, including any required components, styling files such as CSS, and other related assets to ensure seamless integration.
- getLatestFileCode: Retrieves specific files by name without their dependencies, making it useful when you need only a particular file's content.
Regenerating MCP Token
If your MCP token has expired or you need to generate a new one, follow these steps:
- Go to the Locofy Dashboard and select the project for which you need to regenerate the MCP token.
- Click on the geanr icon to access Project Settings.
- Navigate to the MCP Configuration tab.
- Click the Regenerate Token button to invalidate the previous token and create a new one.
- A popup will open where you can choose the desired token expiry option of your new tokens and confirm the decision to revoke existing one.
- Click Regenerate Token and download the updated
mcp.jsonfile. - Replace the old
mcp.jsonfile in your project with the newly generated one.
Your new MCP token is now active, ensuring continued access to Locofy MCP.
More Resources
For more information about Locofy and MCP, visit our official documentation.