
@milehimikey/em
v1.13.0
Published
AI-friendly Event Modeling — a slice-first text DSL rendered to a strict, self-contained Graphviz grid (SVG/PNG)
Downloads
2,663

Maintainers
 milehimikey
Readme
em — event modeling in plain text
em is a command-line tool for Event Modeling. You write a
model in a small, slice-first DSL and em renders it as a clean, deterministic diagram.
Because the source is plain text — diff-able, reviewable, unambiguous — it's as easy for an
AI to write and edit as it is for a person, and em validate keeps either one honest.
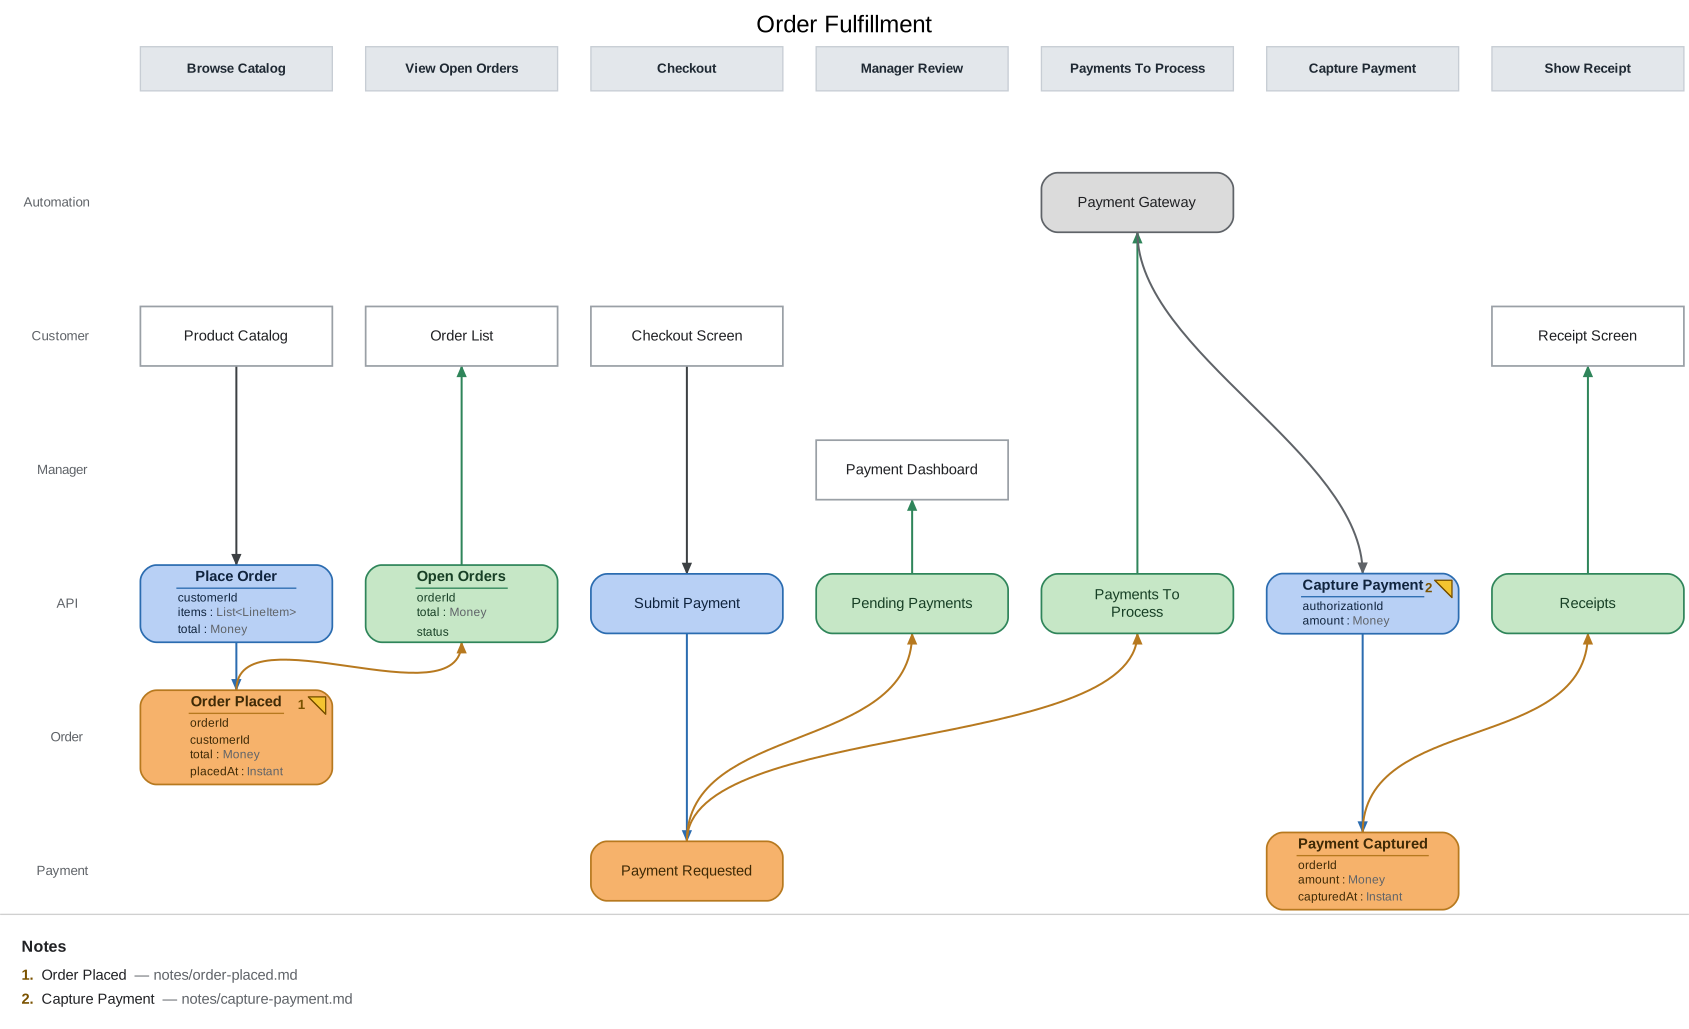
The source for that diagram is about 70 lines of text — or see it as a full project, slice docs and all, for a guided tour of the rest of the toolchain.
Install
npm install -g @milehimikey/emRequires Node ≥ 18. SVG, PNG, and PDF rendering are all fully self-contained (Graphviz runs as bundled WebAssembly); nothing else to install. Only rarer formats (ps, eps, ...) need an optional system dependency — see docs/dependencies.md.
Quickstart
em init model.em          # scaffold a starter model
em render model.em        # -> model.svg  (open it in a browser)
em watch model.em --serve # live browser view, re-renders on every save
em validate model.em      # check event-modeling rules
Once a model is real and committed, em keeps working on it over time:
em export model.em        # versioned JSON, for agents and tooling
em diff model.em --from HEAD~1   # what this change did to the model
em changelog model.em     # the model's git history as a business ledger
A system of several models — one per team or sub-department, each in its own directory — gets
the same treatment across model boundaries: a seam manifest (system.yaml) declares which
model's public event feeds which other model's Translation slice, and em system system.yaml
verifies every binding against the models' exports and emits the org-level context map
(docs/cli.md; worked example in
examples/multi-model/).
A model is a list of slices — vertical time steps, read left to right — whose elements land in swimlane rows:
model "Order Fulfillment"

persona Customer
context Order

slice "Browse Catalog" {
  ui Product Catalog @Customer
  command Place Order
  event Order Placed @Order
}

slice "View Open Orders" {
  view Open Orders from "Order Placed"
  ui Order List @Customer
}
The tutorial builds a complete model from an empty file in about twenty minutes, and docs/workflow.md picks up where it leaves off: how a model gets specified, gated in CI, handed to implementation, and checked against the code that implements it.
How it works
Model, gate, ratify, implement, check — repeat as the system evolves. Humans make the calls
that matter (build the model, ratify a slice, rule on drift); em and its agents handle the
mechanical parts in between. This is the loop in miniature — see
docs/workflow.md for the full seven-stage lifecycle and
docs/process.md for exactly who (or what) does each part.
flowchart LR
    Model["Model<br/>.em file"] --> Gate["Gate<br/>em validate in CI"]
    Gate --> Ratify["Ratify a slice<br/>a human signs off"]
    Ratify --> Implement["Implement<br/>agent or engineer builds it"]
    Implement --> Conform["Conform<br/>em conform checks the code"]
    Conform -->|drift found, ratified| Model
Model with AI
em ships a Claude Code skill bundle — one router skill plus five focused, SDLC-stage skills
(discover/extract, model/slice, implement, conform/validate, watch/review) — that runs a
facilitated Event Modeling session: the AI asks the questions, you supply the domain, and the
model renders live as it grows.
em skill install # copy the skill bundle into .claude/skills/Then run /event-modeling in Claude Code. The same bundle also runs the reverse direction:
extract derives a model from a system that already exists, and conform checks a model
against the code implementing it and reports where they've drifted. See
docs/ai-workflow.md for the phases and what a session produces, and the
em-with-ai repository for a ~50-slice model
built this way.
Documentation
| Doc | What it answers |
|---|---|
| docs/tutorial.md | Learn the tool by building a model from scratch |
| docs/workflow.md | The model lifecycle: specify, gate, hand off, track change, detect drift |
| docs/process.md | Who does what: where humans are required, where agents work with review |
| docs/patterns.md | The four Event Modeling patterns and their DSL shapes |
| docs/dsl.md | Full DSL reference: keywords, from, again, fields, notes |
| docs/cli.md | Every command and flag |
| docs/validation.md | Every rule em validate checks, and the fixes |
| docs/ci.md | Copy-paste CI recipes: validate .em changes, run conformance on a schedule |
| docs/upgrading.md | Bring a model repo forward across em releases: em upgrade, release by release |
| docs/timeline.md | The Two Laws of the Timeline |
| docs/ai-workflow.md | The Claude Code skill: install, phases, artifacts |
| docs/dependencies.md | What's bundled vs. what needs a system install |
| docs/usage-data.md | What usage data em captures, and how to roll it up for a retro |
| docs/architecture.md | How rendering works; why Graphviz, not PlantUML |
| docs/roadmap.md | What's planned |
| docs/decisions/ | Write-ups for open design questions (MIL-162, the stakeholder-portal decision; MIL-194, the seam manifest) |
Development
npm install
npm run build          # produces dist/, exposes the `em` bin
npm test               # vitest
npx tsx src/cli.ts <command> ...   # run straight from source
License
MIT © milehimikey