
@nextbridgehq/payload-block-builder
v0.1.9
Published
Block Builder for Payload CMS
Downloads
112

Maintainers
 nextbridge1
Readme
Payload Block Builder


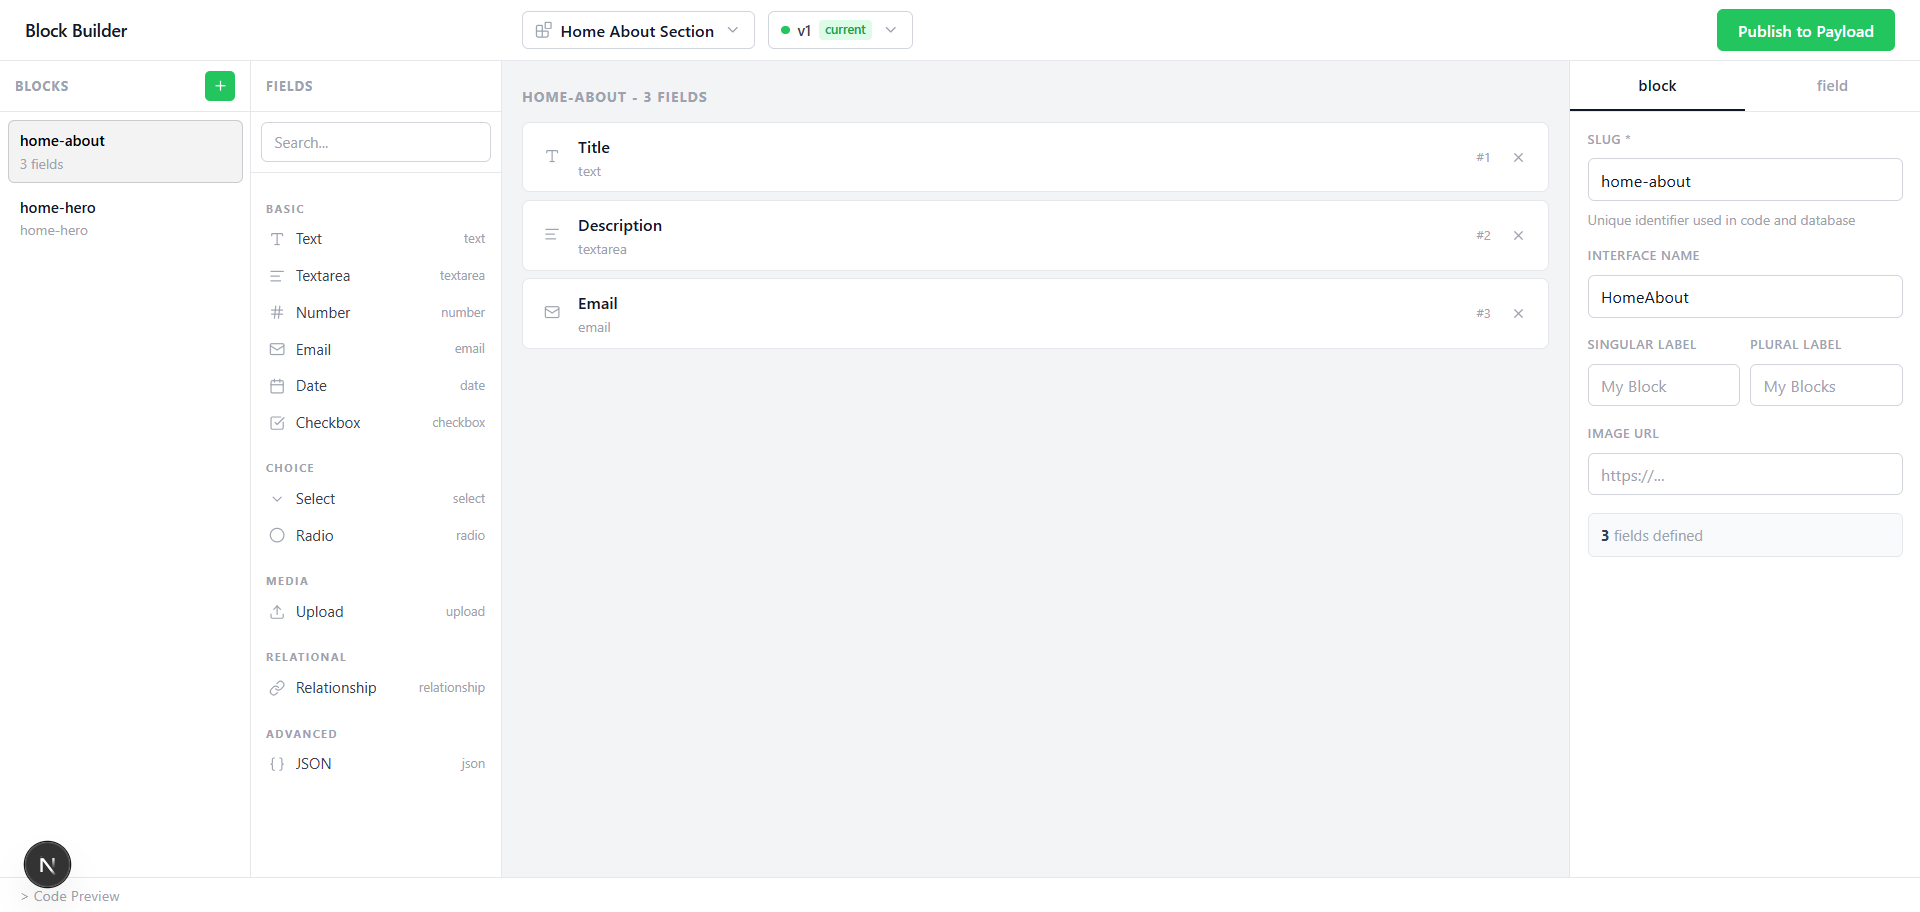
A visual block builder plugin for Payload CMS v3. Design content blocks through a drag-and-drop UI, store schemas in your database, and let editors build pages without waiting on a developer.
Developed and open-sourced by Nextbridge.
Screenshots
🎯 The Problem
Content editors need to manage flexible page layouts — but every new block type or layout change requires a developer to update code, redeploy, and migrate. This creates bottlenecks, slows down marketing teams, and turns simple content tasks into engineering tickets.
💡 The Solution
Payload Block Builder moves block schema definitions from code into your database. Editors design blocks visually, publish them instantly, and use them across any collection — all without touching code or triggering deployments.
✨ Features
- Visual drag-and-drop block designer — No code required to create new block types
- Database-stored schemas — Block definitions live in your DB, not your codebase
- Version snapshots — Every publish creates an immutable version; existing content never breaks
- Collection integration — Adds a "DB Layout" tab to any collection with one line of config
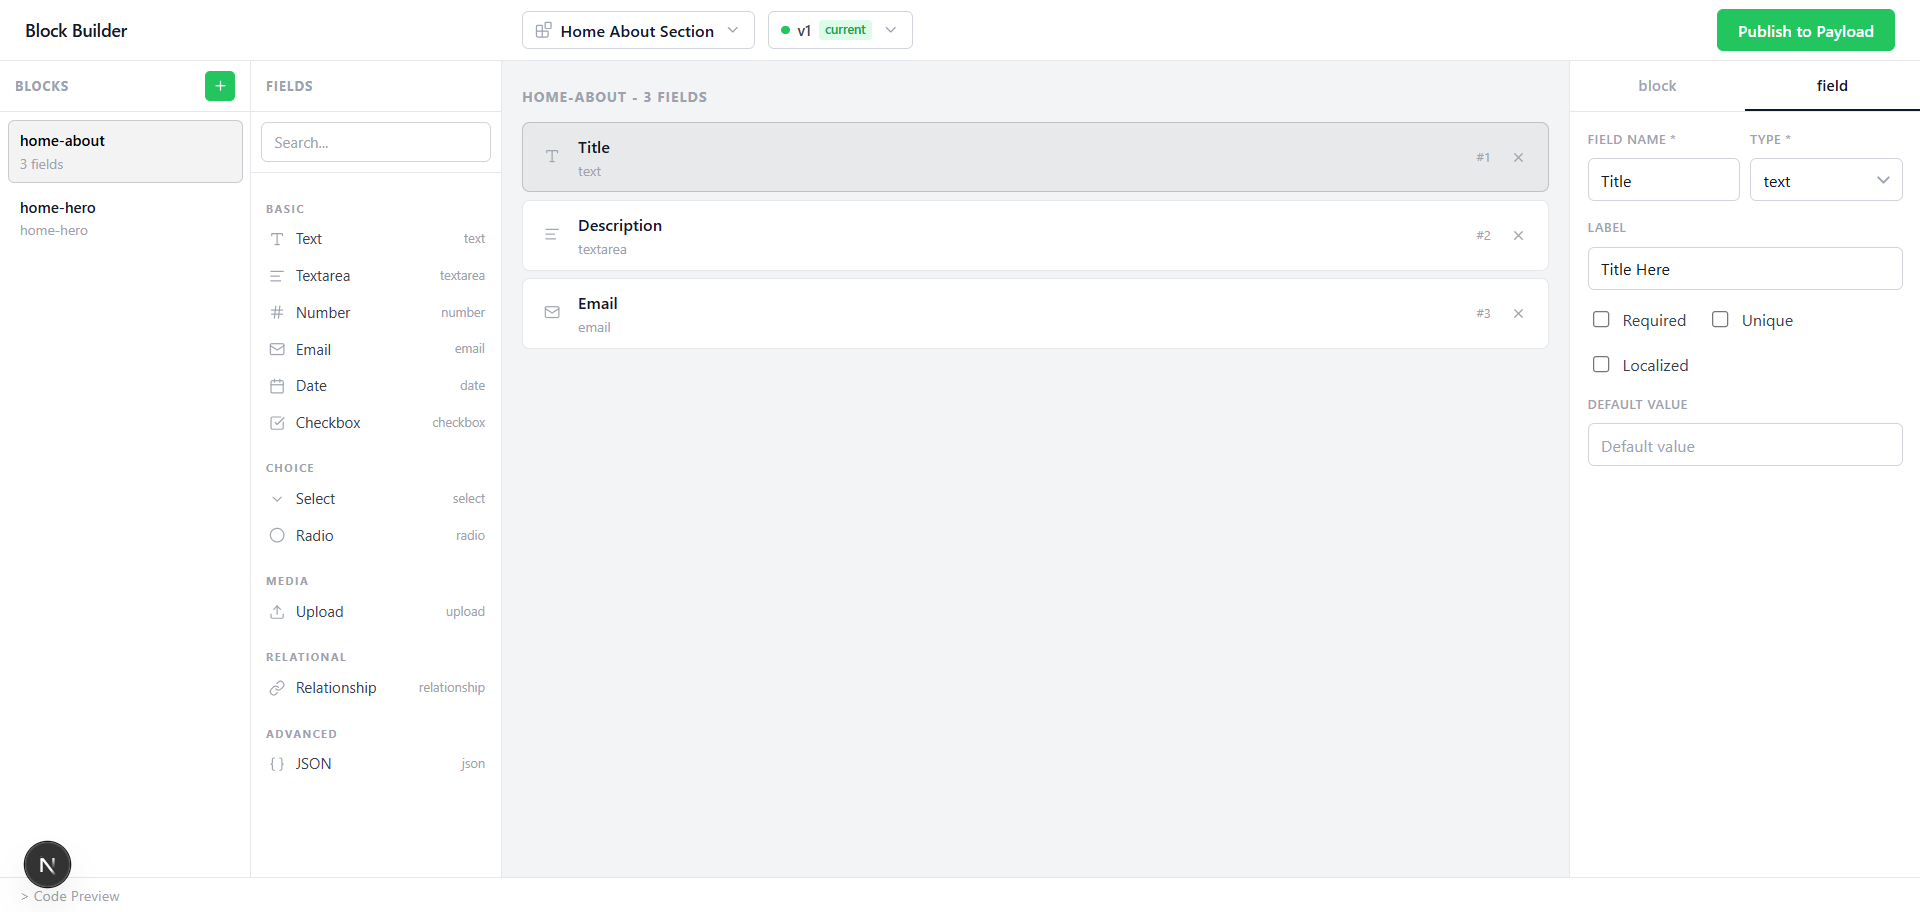
- 13 field types — text, textarea, number, email, date, checkbox, select, radio, upload, relationship, json, and more
- Multi-tenant ready — Each tenant can have its own block definitions without shared config changes
- Framework agnostic frontend — Fetch structured JSON and render with React, Vue, Svelte, or anything else
- Automatic init command — Get up and running in under 2 minutes
- Works with all Payload databases — PostgreSQL, SQLite, MongoDB — no database-specific code
📋 Compatibility
| Requirement | Version | |---|---| | Payload CMS | v3.x | | Node.js | ≥ 18 | | Next.js | ≥ 14 |
Database Support
| Database | Adapter |
|---|---|
| PostgreSQL / Supabase / Neon | @payloadcms/db-postgres |
| SQLite / Turso / LibSQL | @payloadcms/db-sqlite |
| MongoDB | @payloadcms/db-mongodb |
🚀 Quick Start
Option A — Automatic Setup (Recommended)
# Install
pnpm add @nextbridgehq/payload-block-builder
# or: npm install @nextbridgehq/payload-block-builder

# Initialize
npx payload-block-builder init
The init command automatically:
| What it does | File |
|---|---|
| Creates the builder UI page | src/app/block-builder/page.tsx |
| Creates a standalone layout | src/app/block-builder/layout.tsx |
| Injects admin field styles | src/app/(payload)/custom.scss |
| Adds plugin config | payload.config.ts |
Then regenerate the import map and start your dev server:
pnpm generate:importmap
pnpm dev
Visit https://your-domain.com/block-builder and you're ready to build.
PostgreSQL users: Payload will automatically push new schema tables on first startup in dev mode. For production migrations:
pnpm payload migrate:create --name=add_block_builder
pnpm payload migrate
1. Install:
pnpm add @nextbridgehq/payload-block-builder2. Add the plugin to payload.config.ts:
import { dynamicBlocksPlugin } from '@nextbridgehq/payload-block-builder'

export default buildConfig({
  plugins: [
    dynamicBlocksPlugin({
      collections: ['pages'],
    }),
  ],
})
3. Create src/app/block-builder/layout.tsx:
import React from 'react'
import { headers } from 'next/headers'
import { redirect } from 'next/navigation'
import { getPayload } from 'payload'
import config from '@payload-config'
import '@nextbridgehq/payload-block-builder/builder.css'

export const metadata = { title: 'Block Builder' }

export default async function BlockBuilderLayout({ children }: { children: React.ReactNode }) {
  const payload = await getPayload({ config })
  const { user } = await payload.auth({ headers: await headers() })
  if (!user) redirect('/admin/login')

  return (
    <html lang="en">
      <body style={{ margin: 0, padding: 0, height: '100vh', overflow: 'hidden' }}>
        {children}
      </body>
    </html>
  )
}
4. Create src/app/block-builder/page.tsx:
'use client'

import { BuilderShell } from '@nextbridgehq/payload-block-builder/client'

export default function BlockBuilderPage() {
  return <BuilderShell />
}
5. Add admin field styles to src/app/(payload)/custom.scss:
@import '@nextbridgehq/payload-block-builder/block-data-field.css';
@import '@nextbridgehq/payload-block-builder/schema-builder-field.css';
6. Regenerate the import map and start the dev server:
pnpm generate:importmap
pnpm dev
⚙️ Configuration Options
dynamicBlocksPlugin({
  enabled?: boolean,       // Disable without removing. Default: true
  collections?: string[],  // Collection slugs that get the DB Layout tab. Default: []
  fieldName?: string,      // Name of the layout array field. Default: 'dbLayout'
  tabLabel?: string,       // Label shown on the tab in the admin UI. Default: 'DB Layout'
})
| Option | Type | Default | Description |
|---|---|---|---|
| enabled | boolean | true | Toggle the plugin on/off without removing it from config |
| collections | string[] | [] | Collection slugs that receive the DB Layout tab |
| fieldName | string | 'dbLayout' | The field name for the layout array stored on documents |
| tabLabel | string | 'DB Layout' | Label displayed on the tab in the Payload admin UI |
The --collections flag is also supported in the init command:
npx payload-block-builder init --collections=pages,posts📖 Usage
Creating a Block
- Open
/block-builderin your browser. - Click "Add Block" and give it a name and slug.
- Drag fields from the panel on the right onto the canvas.
- Configure each field (label, name, required, options, etc.).
- Click Publish — the block schema is saved to your database and a version snapshot is created.
Using Blocks in a Collection
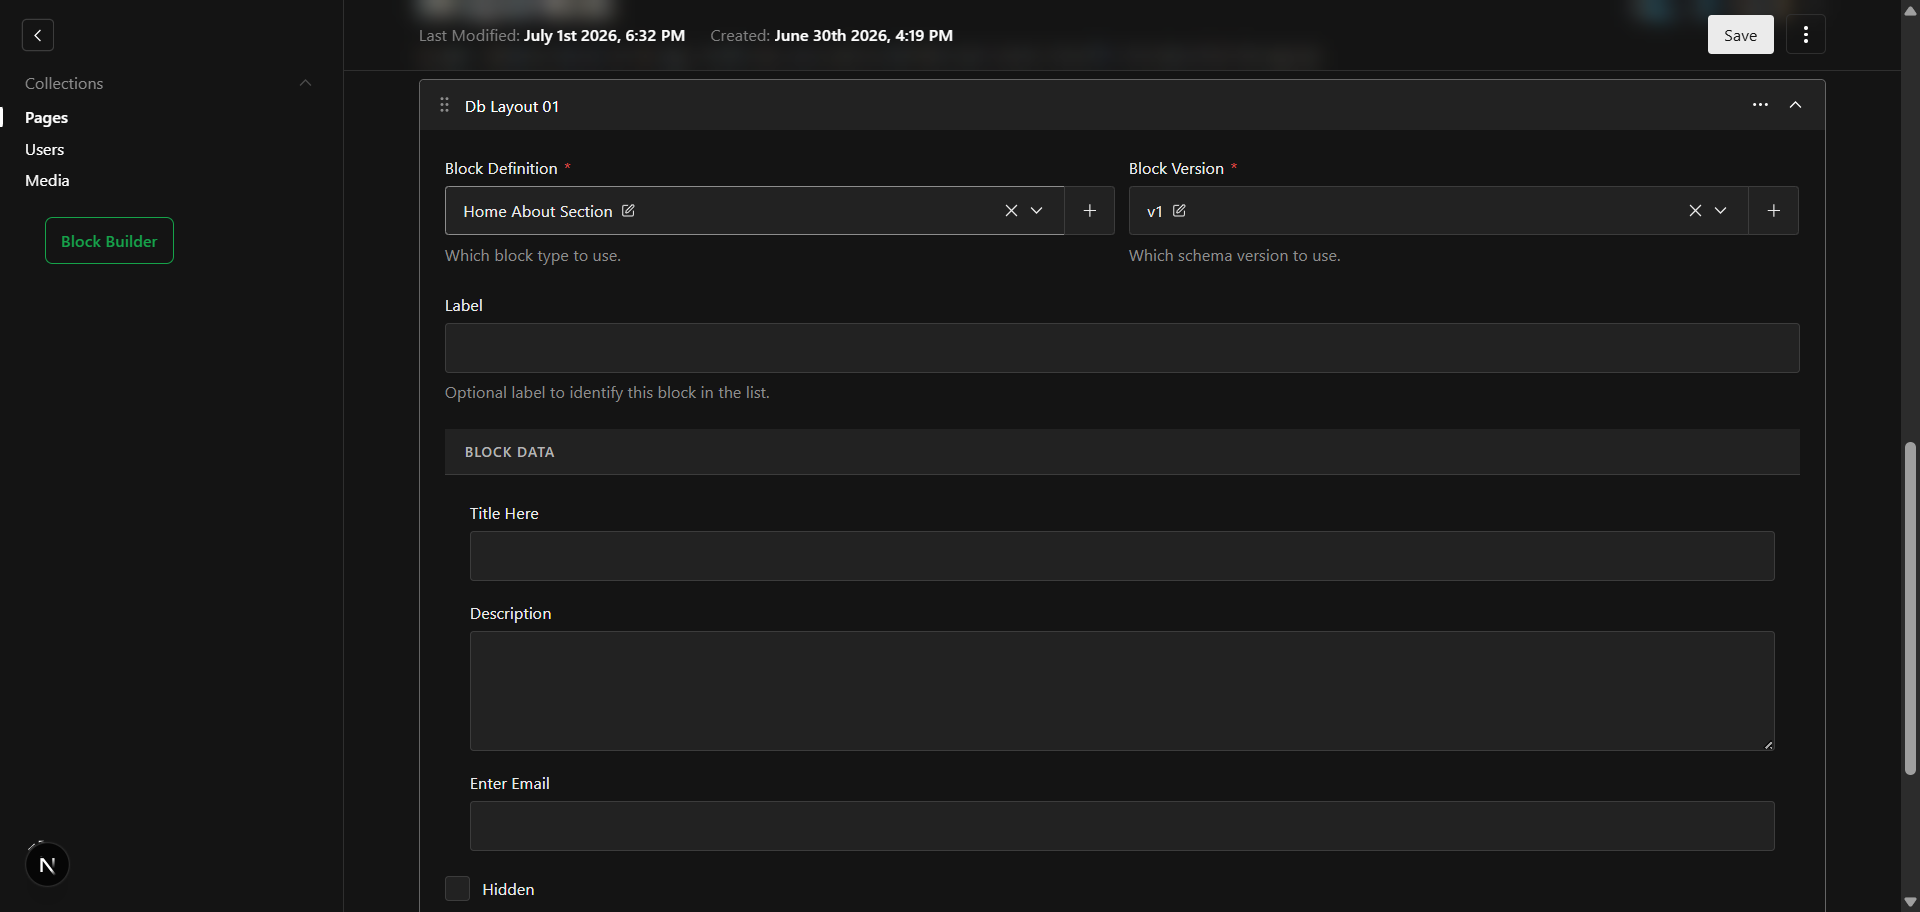
Any collection listed in the collections option gets a new "DB Layout" tab in the Payload admin. Editors can:
- Click "Add Row" to add a block instance.
- Select a block definition and the version of its schema to use.
- Fill in the fields — they render dynamically based on the selected schema.
- Reorder, hide, or add anchor IDs to individual block instances.
- Save the document as normal.
Reading Block Data on the Frontend
const res = await fetch('/api/pages/my-page?depth=2')
const page = await res.json()

for (const block of page.dbLayout) {
  const type = block.blockDefinition.slug   // e.g. "hero"
  const fields = block.data                 // { heading: '...', image: '...', ... }
  const isHidden = block.hidden
  const anchor = block.anchorId
}
Example: React Component Map
const blockComponents = {
  hero: HeroBlock,
  features: FeaturesBlock,
  testimonials: TestimonialsBlock,
  cta: CTABlock,
}

function PageRenderer({ blocks }) {
  return (
    <>
      {blocks
        .filter((block) => !block.hidden)
        .map((block, i) => {
          const Component = blockComponents[block.blockDefinition.slug]
          if (!Component) return null
          return (


          )
        })}
    </>
  )
}
Note: The inner JSX of the
return (in the React Component Map example is intentionally left blank in this snippet — fill in with your<section>/<Component>rendering as appropriate for your app.
🧩 Supported Field Types
| Type | Description | Admin UI |
|---|---|---|
| text | Single-line text input | Standard text field |
| textarea | Multi-line text input | Expandable textarea |
| number | Numeric input | Number field with validation |
| email | Email address | Email field with validation |
| date | Date picker | Calendar date picker |
| checkbox | Boolean toggle | Checkbox input |
| select | Dropdown with custom options | Select dropdown |
| radio | Radio button group | Radio buttons |
| upload | File/image picker | Media library picker |
| relationship | Document picker from any collection | Relationship field |
| json | Raw JSON data | JSON editor |
🏗️ Architecture
┌─────────────────────────────────────────────────────┐
│                   Block Builder UI                  │
│            /block-builder (drag & drop)             │
└──────────────────────────┬──────────────────────────┘
                           │ Publish
                           ▼
┌─────────────────────────────────────────────────────┐
│            block-definitions collection             │
│          (name, slug, field definitions)            │
└──────────────────────────┬──────────────────────────┘
                           │ Snapshot
                           ▼
┌─────────────────────────────────────────────────────┐
│        block-definition-versions collection         │
│      (immutable schema snapshots per publish)       │
└──────────────────────────┬──────────────────────────┘
                           │ Referenced by
                           ▼
┌─────────────────────────────────────────────────────┐
│           Your Collection (e.g. "pages")            │
│   dbLayout: [{ blockDefinition, version, data }]    │
└─────────────────────────────────────────────────────┘
Key design decisions:
- Block definitions are stored in a
block-definitionscollection. Each document is a named block type with a slug and a list of field definitions. - Versions are stored in a
block-definition-versionscollection. Every publish creates an immutable snapshot. - Documents in opted-in collections store a reference to the exact block version they were built against — updating a block schema later does not break existing content.
- The DB Layout tab is injected automatically into each collection you list. It renders a dynamic array field where editors pick a block and version.
- Four internal API endpoints power the builder UI and admin field components. You do not need to call them directly.
🔧 Advanced Usage
Using dbLayoutField Directly
If you prefer not to use the plugin's collections option, you can add the layout tab manually to any collection:
import { dbLayoutField } from '@nextbridgehq/payload-block-builder'

export const Pages: CollectionConfig = {
  slug: 'pages',
  fields: [
    {
      type: 'tabs',
      tabs: [
        { label: 'Content', fields: [/* your fields */] },
        dbLayoutField(),                           // fieldName='dbLayout', tab label='DB Layout'
        dbLayoutField('heroBlocks', 'Hero'),       // custom field name and tab label
      ],
    },
  ],
}
📦 CSS Imports Reference
| Import path | Purpose |
|---|---|
| @nextbridgehq/payload-block-builder/builder.css | Block Builder UI page styles |
| @nextbridgehq/payload-block-builder/block-data-field.css | DB Layout field styles in admin |
| @nextbridgehq/payload-block-builder/schema-builder-field.css | Schema Builder field styles in admin |
🗺️ Use Cases
| Use Case | How It Helps | |---|---| | Dynamic landing pages | Editors compose pages from a library of blocks (hero, features, testimonials, CTA) without code changes | | Multi-tenant platforms | Each tenant gets its own block definitions without touching shared config or triggering redeployments | | Marketing teams | Full control to create, update, and reorder blocks on any page, any time | | Evolving content schemas | Roll out new block versions without breaking content built against older ones | | Headless frontends | Fetch structured block data from the Payload API and render with any framework |
🤝 Contributing
Contributions are welcome! Please see our Contributing Guide for details.
- Fork the repository
- Create your feature branch (
git checkout -b feature/amazing-feature) - Commit your changes (
git commit -m 'Add amazing feature') - Push to the branch (
git push origin feature/amazing-feature) - Open a Pull Request
📄 License
MIT © Nextbridge
🔗 Links
Built with ❤️ by Nextbridge