
@owebeeone/click-reel
v0.2.1
Published
Browser-side interaction recorder - captures annotated screenshots into animated GIF/APNG

Readme
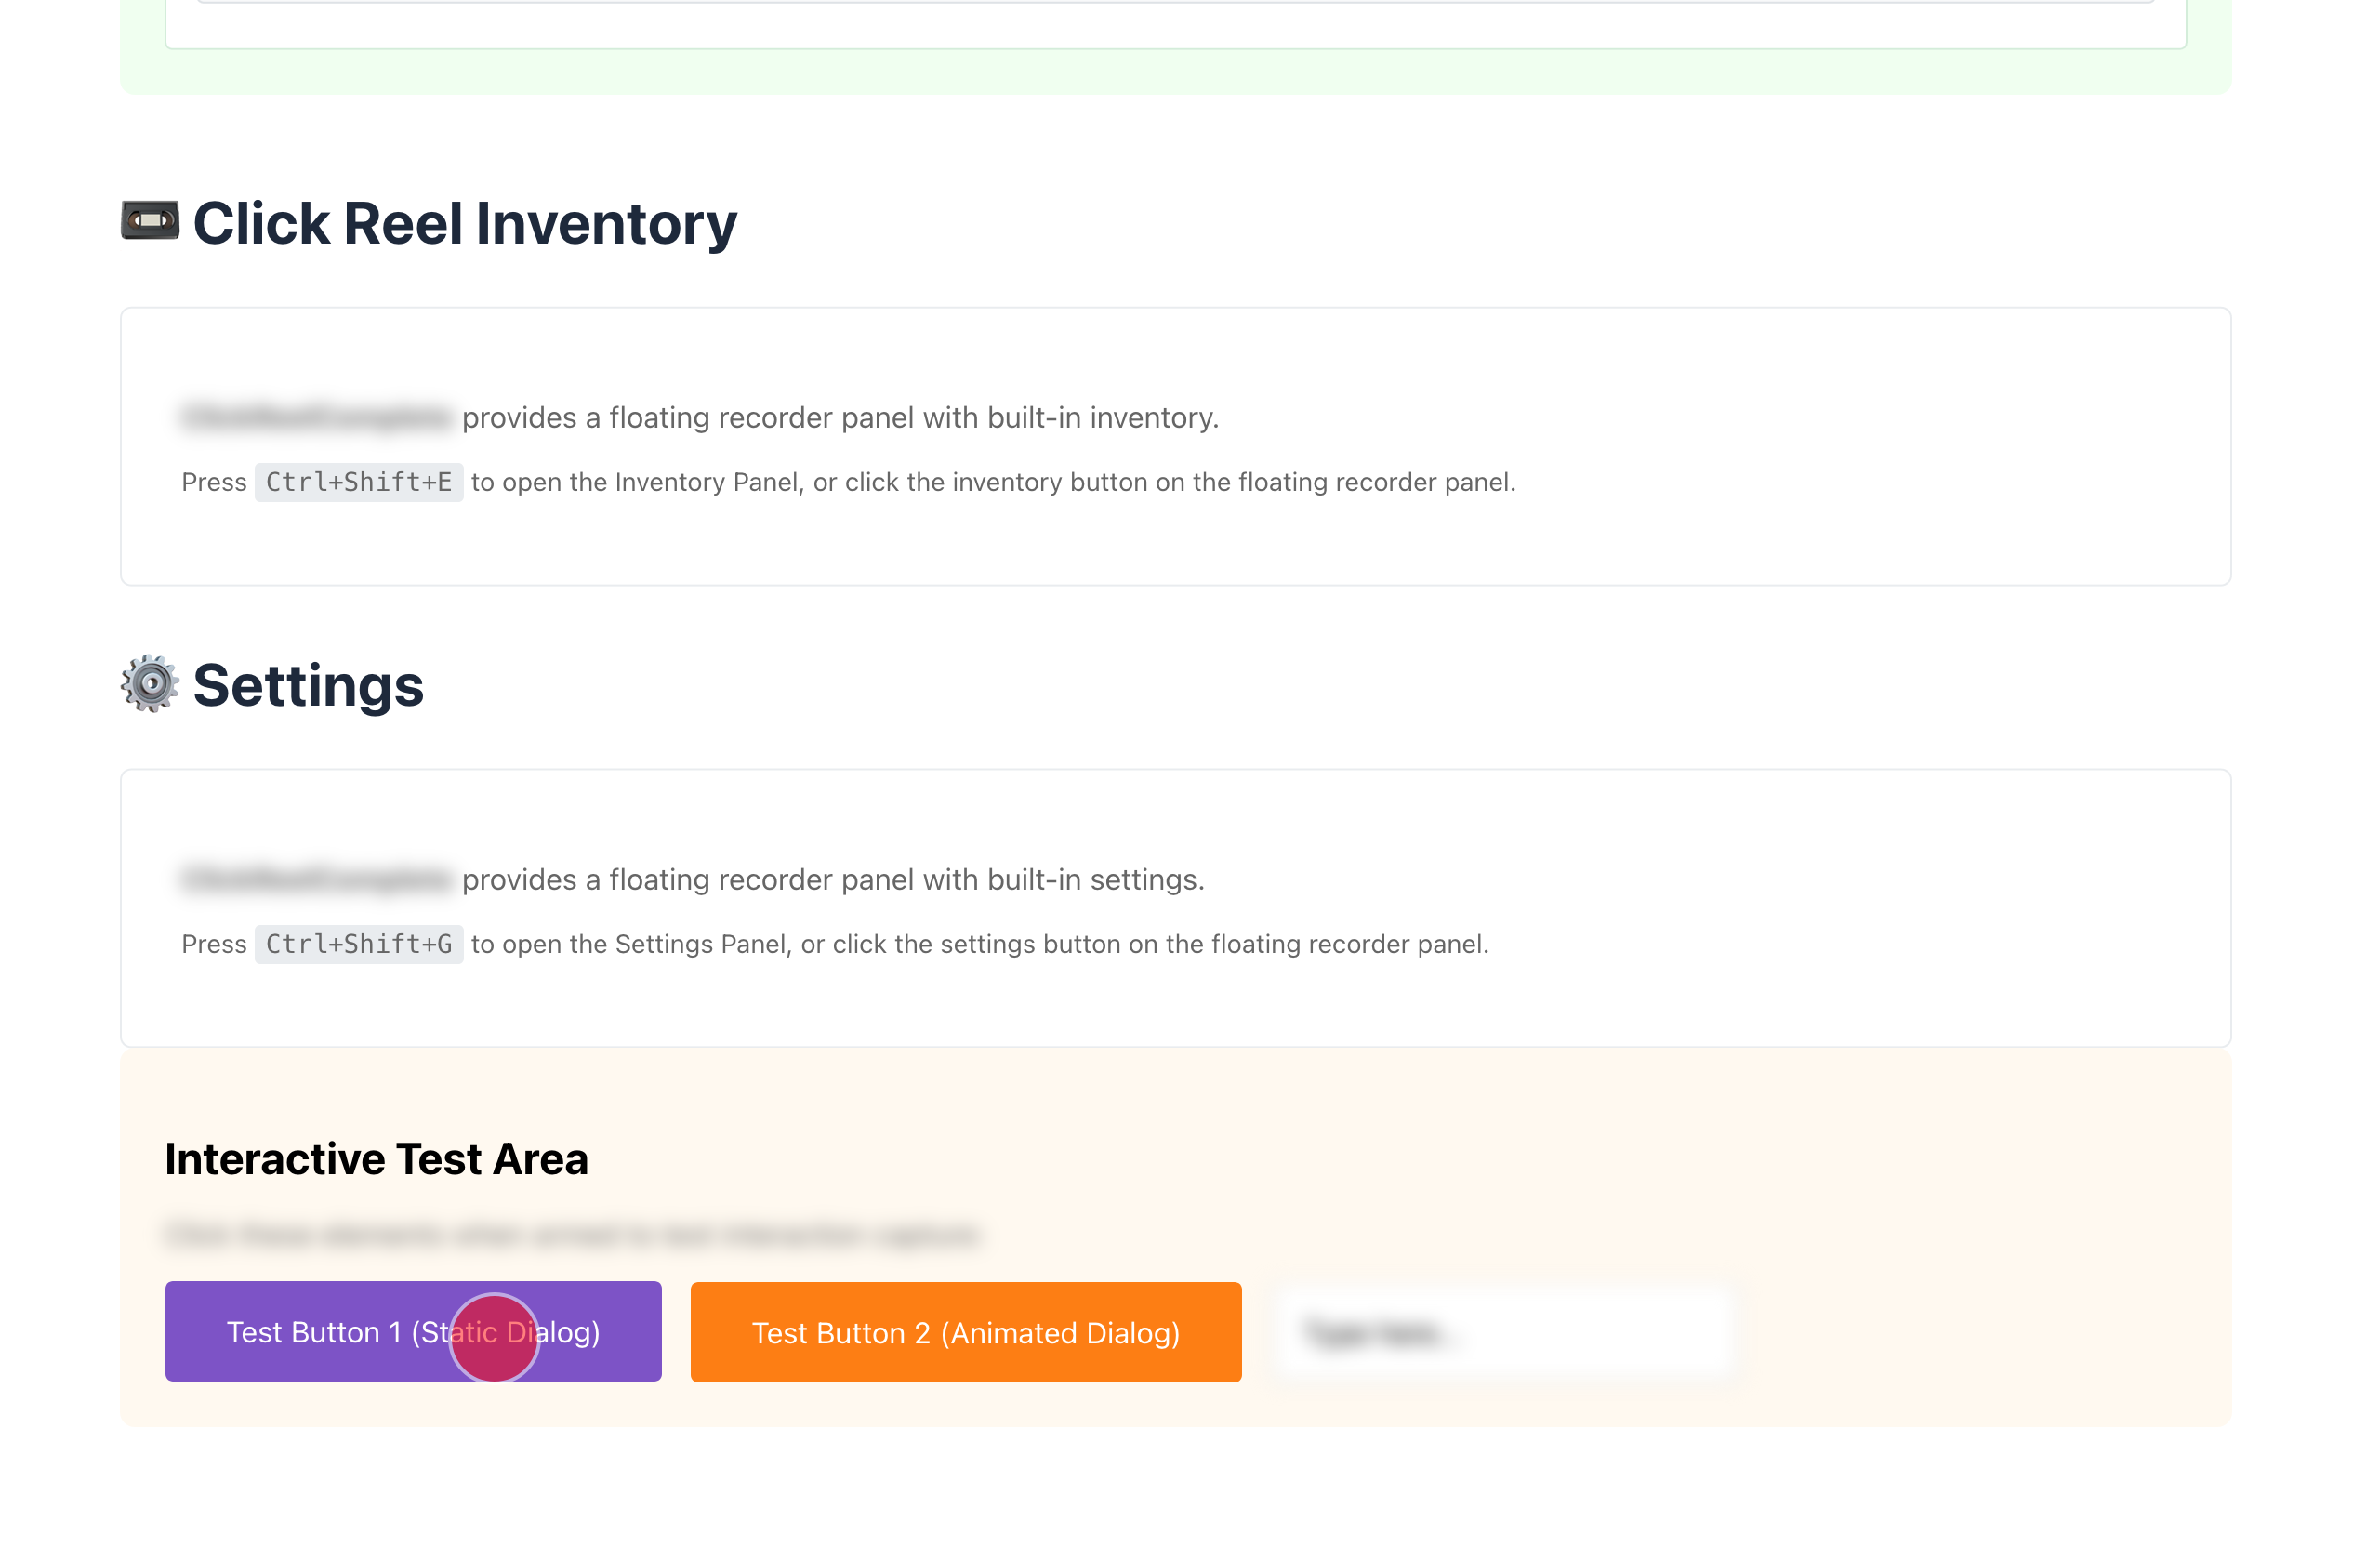
@owebeeone/click-reel
Browser-side interaction recorder with 2-line integration
Capture annotated screenshots of user interactions and export as GIF, APNG, or ZIP bundles. Includes draggable UI, PII obfuscation, and full keyboard control.
![]()
![]()
Status
🎉 MLP - Usable - Polish In Progress
The library is now feature-complete with all core functionality implemented! Currently in polish phase.
See It In Action
Here's an example recording captured with Click Reel, showing the before-click frame, the click marker, and the settled post-click state:
A 3-frame recording showing: initial state → click marker → final settled state
Features
- ✅ Smart Capture - Pre and post-interaction screenshots with intelligent settling detection
- ✅ Visual Markers - Annotated click locations with customizable styles
- ✅ Animated Output - Export as GIF, APNG, or ZIP with configurable quality
- ✅ Individual Frames - ZIP exports include both
pngs/andgifs/folders with individual frame files - ✅ Persistent Storage - Save recordings to IndexedDB with full CRUD operations
- ✅ Privacy Mode - Built-in PII obfuscation with CSS class-based control (
pii-enable/pii-disable) - ✅ Keyboard Shortcuts - Fully configurable hotkeys for all actions
- ✅ Metadata Export - Comprehensive JSON metadata with DOM paths, coordinates, and scroll positions
- ✅ Customizable UI - Draggable, minimizable recorder interface with modern design
- ✅ Inventory Management - View, search, sort, and manage saved reels
- ✅ Playback UI - Frame-by-frame playback with metadata display
- ✅ Settings Panel - User preferences with logarithmic time controls and persistence
- ✅ Auto-Named Recordings - Recordings automatically named with filesystem-safe YYYY-MM-DD format
Installation
npm install @owebeeone/click-reelQuick Start
Step 1: Install Dependencies
npm install @owebeeone/click-reel @dnd-kit/core @dnd-kit/utilitiesStep 2: Add to Your App
import { ClickReelProvider, ClickReelComplete } from '@owebeeone/click-reel';

function App() {
  return (
    <ClickReelProvider>
      <YourApp />
      <ClickReelComplete />
    </ClickReelProvider>
  );
}
That's it! ✨
This single component gives you everything:
- 🎯 Draggable recorder - Move it anywhere, position persists across reloads
- ⚙️ Settings panel - Customize timings, markers, and behavior
- 📚 Inventory - Manage and export saved recordings
- 🔒 Privacy mode - Built-in PII obfuscation
- ⌨️ Keyboard shortcuts - Control everything without the mouse
- 🪟 Smart positioning - Auto-adjusts when window resizes, never goes off-screen
Optional: Customize
<ClickReelComplete
  initialPosition={{ x: 100, y: 100 }}  // Custom starting position
  startMinimized={true}                 // Start collapsed
/>Note: To control visibility on startup, use the Settings panel (Ctrl+Shift+G) → Recorder UI → "Show on Startup"
When NOT to Use <ClickReelComplete />
99% of users should use <ClickReelComplete />. Only use alternatives if:
- You don't want
@dnd-kitdependencies → Use Basic Integration (fixed-position recorder) - You have a custom drag system → Use Manual Integration (full control)
- You're building a custom recorder UI → Use individual components
Comparison Table
| Feature | Complete ⭐ | Basic | Manual |
|---------|----------|-------|---------|
| Recording & Playback | ✅ | ✅ | ✅ |
| Settings & Inventory | ✅ | ❌ | ✅ |
| Draggable | ✅ | ❌ | ✅ |
| Position Persistence | ✅ | ❌ | ✅ |
| Auto Bounds Checking | ✅ | ❌ | ✅ |
| Setup Lines | ~5 | ~3 | ~60 |
| Dependencies | @dnd-kit/* | None extra | @dnd-kit/* |
Basic Integration (No Dragging)
Minimal setup with no extra dependencies:
import { ClickReelProvider, ClickReelRecorder } from '@owebeeone/click-reel';

function App() {
  return (
    <ClickReelProvider>
      <YourApp />
      <ClickReelRecorder />
    </ClickReelProvider>
  );
}
Limitations: Fixed position (top-right), no settings panel, no inventory.
Manual Integration
For advanced control, see Manual Integration section below.
Keyboard Shortcuts (Default)
Ctrl+Shift+R- Toggle recorder visibilityCtrl+Shift+S- Start/stop recordingCtrl+Shift+A- Arm capture mode (click to capture)Ctrl+Shift+F- Add frame manuallyCtrl+Shift+O- Toggle obfuscationCtrl+Shift+G- Open settingsCtrl+Shift+E- Open inventory/saved reels
PII Protection
Mark sensitive content with CSS classes:
<!-- Obfuscate this content and all children -->
<div class="pii-enable">
  <input type="text" placeholder="User's email" />
  <span>John Doe</span>
</div>

<!-- Exempt specific content from obfuscation -->
<div class="pii-enable">
  <h1>User Profile</h1>
  <div class="pii-disable">
    <!-- Buttons and labels won't be obfuscated -->
    <button>Save</button>
    <button>Cancel</button>
  </div>
  <input type="text" value="[email protected]" /> <!-- Will be obfuscated -->
</div>
Manual Integration (Advanced)
⚠️ Advanced Users Only - Most users should use
<ClickReelComplete />instead. This section is for edge cases where you need full control over drag behavior, position management, or custom recorder UI.
When You Need Manual Integration
Only use this if:
- ✅ You have an existing custom drag-and-drop system and can't use
@dnd-kit - ✅ You need to integrate recorder position with external state management
- ✅ You're building a custom recorder UI from scratch
If you just want to customize the recorder's behavior, use <ClickReelComplete /> props instead!
Common Pitfalls
If you proceed with manual integration, watch out for:
⚠️ Forgetting peer dependencies - Requires @dnd-kit/core and @dnd-kit/utilities
⚠️ Not wrapping with DndContext - Recorder won't be draggable
⚠️ React version conflicts - Ensure only one React version (npm list react)
⚠️ Missing position sanitization - Users can drag recorder off-screen
⚠️ No resize handling - Recorder stays off-screen after window resize
1. Install Peer Dependencies
Click Reel requires @dnd-kit for drag-and-drop functionality:
npm install @dnd-kit/core @dnd-kit/utilities2. Wrap Your App with Providers
import { ClickReelProvider, ClickReelRecorder, ClickReelSettings, ClickReelInventory } from '@owebeeone/click-reel';
import { DndContext, PointerSensor, useSensor, useSensors } from '@dnd-kit/core';
import { useState, useEffect } from 'react';

function App() {
  // 1. Configure drag sensors
  const sensors = useSensors(
    useSensor(PointerSensor)
  );

  // 2. Manage recorder position state
  const [recorderPosition, setRecorderPosition] = useState(() => {
    try {
      const stored = localStorage.getItem('click-reel-position');
      const position = stored
        ? JSON.parse(stored)
        : { x: window.innerWidth - 300, y: 20 };

      // Sanitize the loaded position
      return sanitizeRecorderPosition(position);
    } catch {
      return sanitizeRecorderPosition({ x: window.innerWidth - 300, y: 20 });
    }
  });

  // 3. Handle window resize - reposition recorder if it's now off-screen
  useEffect(() => {
    const handleResize = () => {
      setRecorderPosition((prev) => sanitizeRecorderPosition(prev));
    };

    window.addEventListener("resize", handleResize);
    return () => window.removeEventListener("resize", handleResize);
  }, []);

  // 4. Handle drag end
  const handleDragEnd = (event: any) => {
    if (event.active.id === 'click-reel-recorder') {
      const newPosition = sanitizeRecorderPosition({
        x: recorderPosition.x + event.delta.x,
        y: recorderPosition.y + event.delta.y,
      });
      setRecorderPosition(newPosition);
      try {
        localStorage.setItem('click-reel-position', JSON.stringify(newPosition));
      } catch (err) {
        console.warn('Failed to save recorder position:', err);
      }
    }
  };

  return (
    <ClickReelProvider>
      <YourApp />

      {/* Draggable recorder with DndContext */}
      <DndContext
        sensors={sensors}
        onDragEnd={handleDragEnd}
      >
        <ClickReelRecorder position={recorderPosition} />
      </DndContext>

      {/* Settings and Inventory panels */}
      <ClickReelSettings />
      <ClickReelInventory />
    </ClickReelProvider>
  );
}

/**
 * Sanitize recorder position to ensure it's within the viewport
 */
function sanitizeRecorderPosition(pos: { x: number; y: number }): {
  x: number;
  y: number;
} {
  const recorderWidth = 280; // Approximate width of the recorder
  const recorderHeight = 400; // Approximate height of the recorder
  const minMargin = 20; // Minimum margin from viewport edges

  // Ensure position is within viewport bounds
  const maxX = window.innerWidth - recorderWidth - minMargin;
  const maxY = window.innerHeight - recorderHeight - minMargin;

  return {
    x: Math.max(minMargin, Math.min(pos.x, maxX)),
    y: Math.max(minMargin, Math.min(pos.y, maxY)),
  };
}

export default App;
3. Component Options
ClickReelRecorder Props
interface ClickReelRecorderProps {
  /** Current position (controlled by parent for dragging) */
  position?: { x: number; y: number };
  /** Whether the recorder is visible */
  visible?: boolean;
  /** Initial collapsed state */
  initialCollapsed?: boolean;
  /** Callback when collapsed state changes */
  onCollapsedChange?: (collapsed: boolean) => void;
}
ClickReelInventory Props
interface ClickReelInventoryProps {
  /** Custom storage service (optional) */
  storageService?: StorageService;
  /** Callback when "Start Recording" is clicked */
  onStartRecording?: () => void;
  /** Additional CSS class name */
  className?: string;
  /** Additional inline styles */
  style?: React.CSSProperties;
}
4. Customization Examples
Custom Initial Position
<ClickReelRecorder position={{ x: 100, y: 100 }} />Start Minimized
<ClickReelRecorder initialCollapsed={true} />Control Visibility Programmatically
const [visible, setVisible] = useState(true);

<ClickReelRecorder
  visible={visible}
  position={recorderPosition}
/>
Custom Recorder State Handler
const handleCollapsedChange = (collapsed: boolean) => {
  console.log('Recorder collapsed:', collapsed);
  // Optionally save to localStorage or context
};

<ClickReelRecorder
  onCollapsedChange={handleCollapsedChange}
  position={recorderPosition}
/>
Usage Workflows
Recording Interactions
- Start Recording: Click "Start Recording" or press
Ctrl+Shift+S - Capture Interactions: Choose one of two modes:
- Arm Mode (
Ctrl+Shift+A): Click anywhere on the page to capture that interaction - Manual Mode (
Ctrl+Shift+F): Manually capture the current view
- Arm Mode (
- Stop Recording: Click "Stop Recording" or press
Ctrl+Shift+Sagain
Viewing Saved Recordings
- Open Inventory: Click the inventory icon or press
Ctrl+Shift+E - Browse Recordings: Scroll through your saved reels
- Play Recording: Click "Play" to view frame-by-frame playback
- Export: Choose GIF, APNG, or ZIP format
Managing Privacy
- Enable Obfuscation: Click the PII indicator on the recorder or press
Ctrl+Shift+O - Mark Sensitive Areas: Add
pii-enableclass to HTML elements - Preview: Use the "Preview PII" button to see what will be obfuscated
- Record: All new captures will obfuscate marked content
Customizing Settings
- Open Settings: Click the settings icon or press
Ctrl+Shift+G - Adjust Capture Timings: Configure post-click delays and settlement detection
- Marker Style: Customize size and color of click markers
- Recorder UI: Configure startup behavior and visibility preferences
- Save: Click "Save" to persist your preferences
Exporting Recordings
As Animated Files
- Select a recording from inventory
- Click "Export as GIF" or "Export as APNG"
- Wait for encoding (progress bar shows status)
- File downloads automatically
As ZIP Bundle
- Select a recording from inventory
- Click "Export as ZIP"
- Bundle includes:
- Animated GIF and APNG
- Individual PNG frames (
pngs/folder) - Individual GIF frames (
gifs/folder) - Metadata JSON
- Standalone HTML viewer
Keyboard Shortcuts Reference
| Action | Shortcut |
|--------|----------|
| Toggle Recorder | Ctrl+Shift+R |
| Start/Stop Recording | Ctrl+Shift+S |
| Arm Capture | Ctrl+Shift+A |
| Add Frame | Ctrl+Shift+F |
| Toggle Obfuscation | Ctrl+Shift+O |
| Open Settings | Ctrl+Shift+G |
| Open Inventory | Ctrl+Shift+E |
Note: These shortcuts work cross-platform with
Ctrl+Shifton both macOS and Windows/Linux.
Interface
Inventory Management
The inventory panel provides a clean interface for managing your saved recordings:

Features shown:
- Search & Sort - Find recordings by title or sort by date/name/frames
- Thumbnails - Visual preview of each recording's first frame
- Metadata Display - Duration, frame count, and timestamp for each reel
- Quick Actions - View, export, or delete directly from the list
- Bulk Operations - "Remove All" with confirmation for clearing storage
Access the inventory anytime with Ctrl+Shift+E or click the inventory button on the recorder panel.
Development
Prerequisites
- Node.js 18+
- npm 9+
Setup
# Install dependencies
npm install

# Start development server
npm run dev

# Run tests
npm test

# Build library
npm run build

# Type check
npm run typecheck

# Lint
npm run lint

# Format code
npm run format
Project Structure
click-reel/
├── src/              # Library source code
│   ├── types/        # TypeScript type definitions
│   ├── react/        # React components and hooks
│   ├── core/         # Core business logic (to be implemented)
│   ├── utils/        # Utility functions
│   └── index.ts      # Main entry point
├── demo/             # Development playground
├── dist/             # Built library files
└── docs/             # Documentation (to be created)
Advanced Integration
Vite Configuration
If you're using Vite and integrating a local development version of Click Reel, ensure React is deduplicated:
// vite.config.ts
import { defineConfig } from 'vite'
import react from '@vitejs/plugin-react'

export default defineConfig({
  plugins: [react()],
  resolve: {
    dedupe: ['react', 'react-dom']
  },
  optimizeDeps: {
    exclude: ['@owebeeone/click-reel']
  }
})
TypeScript Configuration
Add the library types to your tsconfig.json:
{
  "compilerOptions": {
    "types": ["@owebeeone/click-reel"]
  }
}
Troubleshooting
Recorder Not Draggable
Problem: The recorder panel appears but won't drag.
Solution: Ensure you've:
- Installed
@dnd-kit/coreand@dnd-kit/utilities - Wrapped
<ClickReelRecorder>with<DndContext> - Configured
PointerSensorcorrectly - Passed the
positionprop to<ClickReelRecorder>
React Context Errors
Problem: TypeError: Cannot read properties of undefined (reading 'ReactCurrentDispatcher')
Solution: This indicates React version conflicts. Make sure:
@dnd-kitpackages are peer dependencies (not bundled)- Your Vite config deduplicates React (see Vite Configuration)
- All React packages use the same version (check with
npm list react)
Keyboard Shortcuts Not Working
Problem: Pressing keyboard shortcuts has no effect.
Solution: Check that:
<ClickReelProvider>wraps your entire app- The keyboard shortcuts don't conflict with browser shortcuts
- The recorder is visible (hidden recorders don't respond to shortcuts except
Ctrl+Shift+R)
Position Not Persisting
Problem: Recorder position resets after page reload.
Solution: Ensure:
- The
handleDragEndfunction saves tolocalStorage localStorageis available (not disabled in browser settings)- The position is loaded and sanitized on mount
Recorder Off-Screen After Window Resize
Problem: After resizing the browser window, the recorder is partially or fully off-screen.
Solution: Add a window resize listener that calls sanitizeRecorderPosition():
useEffect(() => {
  const handleResize = () => {
    setRecorderPosition((prev) => sanitizeRecorderPosition(prev));
  };
  window.addEventListener("resize", handleResize);
  return () => window.removeEventListener("resize", handleResize);
}, []);
Technology Stack
- TypeScript 5.9 - Type-safe development
- React 18/19 - UI components and hooks (supports both versions)
- html-to-image - DOM-to-canvas rasterization
- gifenc - High-performance GIF encoding
- upng-js - APNG encoding
- jszip - ZIP archive creation for frame bundles
- idb - Promise-based IndexedDB wrapper
- @dnd-kit - Drag-and-drop for recorder UI
- lucide-react - Modern icon library
- react-hotkeys-hook - Keyboard shortcut management
- Vite - Lightning-fast build tooling
- Vitest - Unit testing framework
Browser Support
- Chrome/Edge 90+
- Firefox 88+
- Safari 14+
Contributing
This project is currently in active development. Contribution guidelines will be published after Phase 12 (documentation).
License
MIT License - see LICENSE file for details.
Specification
For detailed feature specifications, see CLICK-REEL-SPEC.md.
API Overview
Core Components
<ClickReelProvider>- Context provider for global state (required)<ClickReelComplete>⭐ - All-in-one component with full functionality (recommended)<ClickReelRecorder>- Main recorder UI with controls (for manual integration)<ClickReelInventory>- Saved reels browser and manager (for manual integration)<ClickReelSettings>- Settings panel wrapper (for manual integration)<SettingsPanel>- User preferences configuration (internal component)
Hooks
useRecorder()- Recording state and control functionsuseStorage()- IndexedDB operations (save, load, delete reels)usePreferences()- User settings with persistenceuseKeyboardShortcuts()- Configurable hotkey management
Core Functions
captureFrame()- Capture a screenshot with markersexportReel()- Export reel as GIF/APNG/ZIPobfuscateInPlace()- PII obfuscation for privacy
Export Formats
ZIP Bundle Contents
When exporting as ZIP, you get a complete package:
recording-YYYY-MM-DD_HH_MM_SS.zip
├── recording-YYYY-MM-DD_HH_MM_SS.gif          # Animated GIF
├── recording-YYYY-MM-DD_HH_MM_SS.png          # Animated APNG
├── pngs/                                       # Individual PNG frames
│   ├── frame-001.png
│   ├── frame-002.png
│   └── ...
├── gifs/                                       # Individual GIF frames
│   ├── frame-001.gif
│   ├── frame-002.gif
│   └── ...
├── recording-YYYY-MM-DD_HH_MM_SS-metadata.json
└── recording-YYYY-MM-DD_HH_MM_SS-viewer.html
Benefits:
- Animated files for immediate playback
- Individual PNGs for high-quality frame-by-frame analysis
- Individual GIFs for universal compatibility
- Metadata for programmatic access to recording details
- HTML viewer for standalone playback