
@pujan2412/notes-manager-cli
v2.4.2
Published
A simple notes manager that allows you to create, read, update and delete notes.

Readme
Notes Manager CLI
Table of Contents
Introduction
Notes Manager CLI is a command-line interface tool designed to help you manage your notes efficiently. It allows you to create, read, update, and delete notes directly from your terminal.
Features
- Create new notes
- List all notes
- View a specific note
- Update existing notes
- Delete notes
Installation
Method 1: Installation via npm
To install Notes Manager CLI via npm, run the following command:
npm install -g @pujan2412/notes-manager-cliMethod 2: Installation via github
To install Notes Manager CLI, follow these steps:
- Clone the repository:
git clone https://github.com/Pujan-khunt/Simple-Notes-Manager-CLI- Navigate to the project directory:
cd Simple-Notes-Manager-CLI- Install the required dependencies:
npm install- Link the CLI tool globally:
npm linkUsage
After installation, you can use the nman command followed by various subcommands to manage your notes.
Example:
nman create "My Linear Algebra Notes"
Note Created Successfully # Output of the above command
Commands
1. Creating Notes
The command to create a note is
nman create <name>
Note Created Successfully # Output of the above command
This will open the default editor which is set in your system, it will default to 'Visual Studio Code' if default editor is not set, and will default to 'Vim' if 'Visual Studio Code' doesn't exist, and if 'Vim' doesn't exist then it will choose 'Nano'.
After you enter the content just close the file to save it.
You will recieve the message 'Note created successfully' in green color.
You can also use the '-m' flag to provide the content directly while creating the note.
Syntax of creating a note using -m
nman create <name> -m "<content>"
Note Created Successfully # Output of the above command
2. Updating Notes
The command to update a note is
nman update <name>
Note Updated Successfully # Output of the above command
This will open the default editor which is set in your system, it will default to 'Visual Studio Code' if default editor is not set, and will default to 'Vim' if 'Visual Studio Code' doesn't exist, and if 'Vim' doesn't exist then it will choose 'Nano'.
After you update the content just close the file to save it.
You will recieve the message 'Note Updated Successfully' in green color.
You can also use the '-m' flag to provide the content directly while updating the note.
NOTE: if you use the -m flag the provided content will overwrite the existing content. So use only when necessary.
Syntax of updating a note using -m
nman update <name> -m "<content>"
Note Updated Successfully # Output of the above command
3. Reading Notes
1. Reading All the Notes
the command for reading all the notes is
nman listOutput Of the Above Command
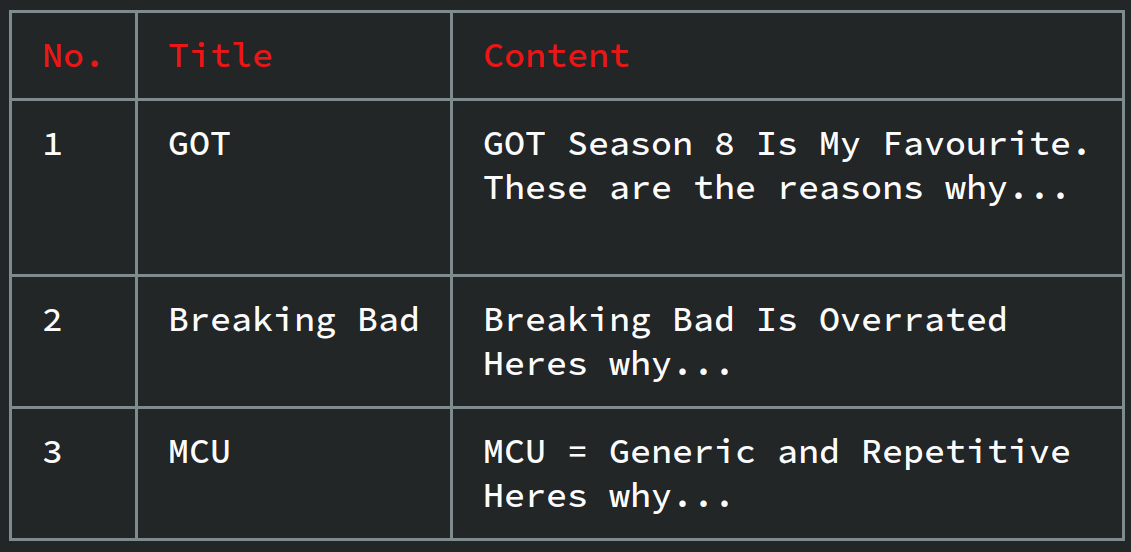
This command will list all the lists in a table format (No., Note, Content)
NOTE: This command is only meant to view which notes are present. To fully view note use the command mentioned below (Reading a specific note).
2. Reading a Specific Note
The command for reading a specific note is...
nman list <name>Output of the above command
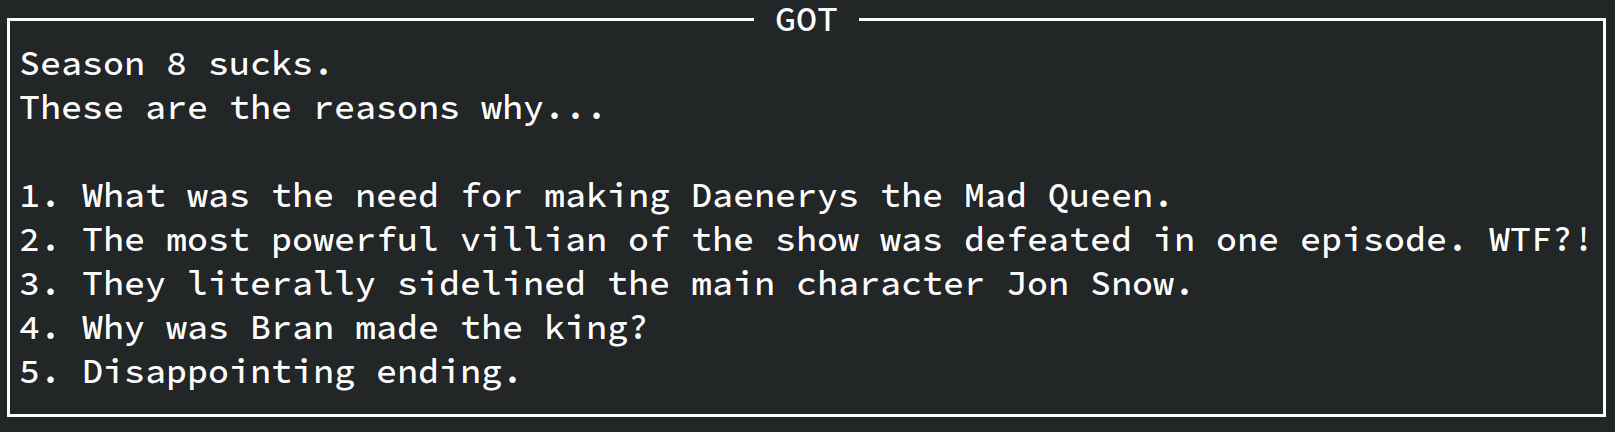
This command will display the contents of a specific note.
4. Deleting Notes
1. Deleting a Specific Note
The command to delete a specific note is...
nman delete <name>
Note Deleted Successfully # Output of the above command
This command will delete the note.
NOTE: This is an irreversible process. Once deleted it cannot be retrieved back.
2. Deleting All Notes
The command to delete all notes is
nman clear
Cleared All The Notes. # Output of the above command
This command will clear out every single note. NOTE: This is an irreversible process. Once deleted it cannot be retrieved back.