
@riconext/hermes-repo
v1.5.2
Published
跨编程助手的项目级记忆系统

Maintainers
 rico_next
Readme
产品介绍
 _
| |__   ___ _ __ _ __ ___   ___  ___        _ __ ___ _ __   ___
| '_ \ / _ \ '__| '_ ' _ \ / _ \/ __|      | '__/ _ \ '_ \ / _ \
| | | |  __/ |  | | | | | |  __/\__ \      | | |  __/ |_) | (_) |
|_| |_|\___|_|  |_| |_| |_|\___||___/      |_|  \___| .__/ \___/
                                                    |_|

repo-local memory for AI coding assistants
capture -> consolidate -> inject
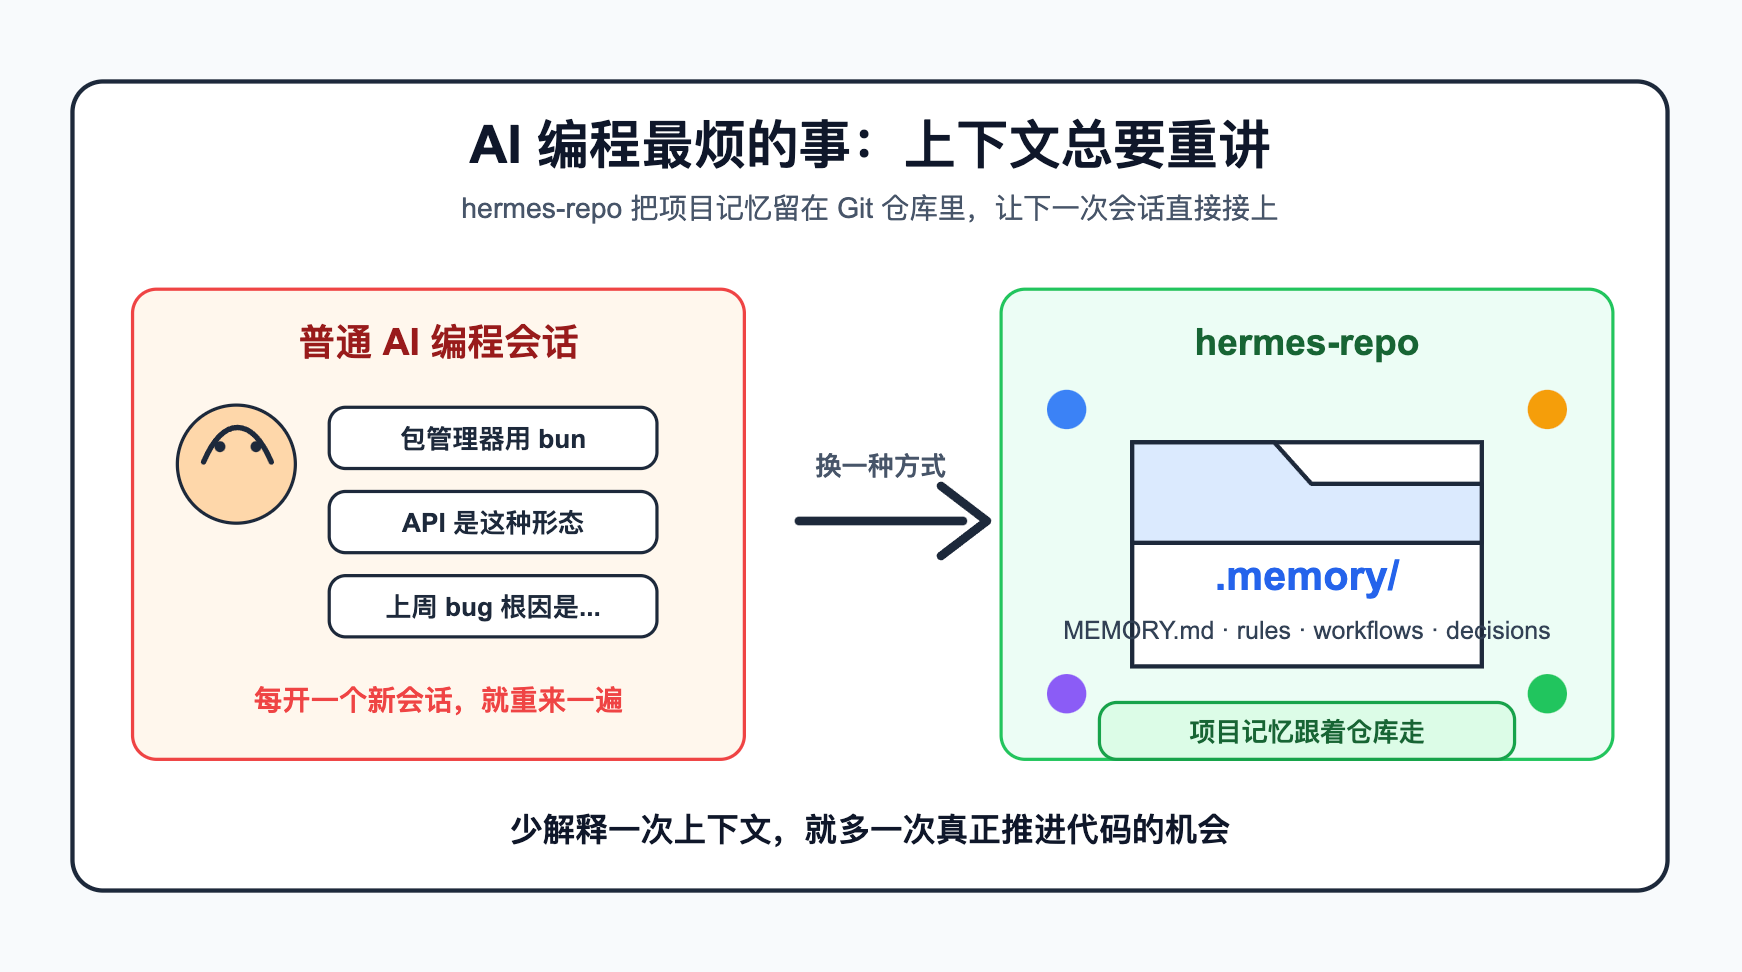
你有没有遇到过这种情况:打开一个新的 AI 编程会话,第一件事不是写代码,而是重新解释一遍项目约定。
“这个仓库用 bun。”
“API 客户端在这里。”
“上次那个 bug 的根因不是类型问题,是权限边界没处理好。”
这些信息明明已经在某次对话里讲过,但下一次会话又消失了。hermes-repo 想解决的就是这个问题:把 AI 编程助手的项目记忆放回 Git 仓库。
hermes-repo 是什么
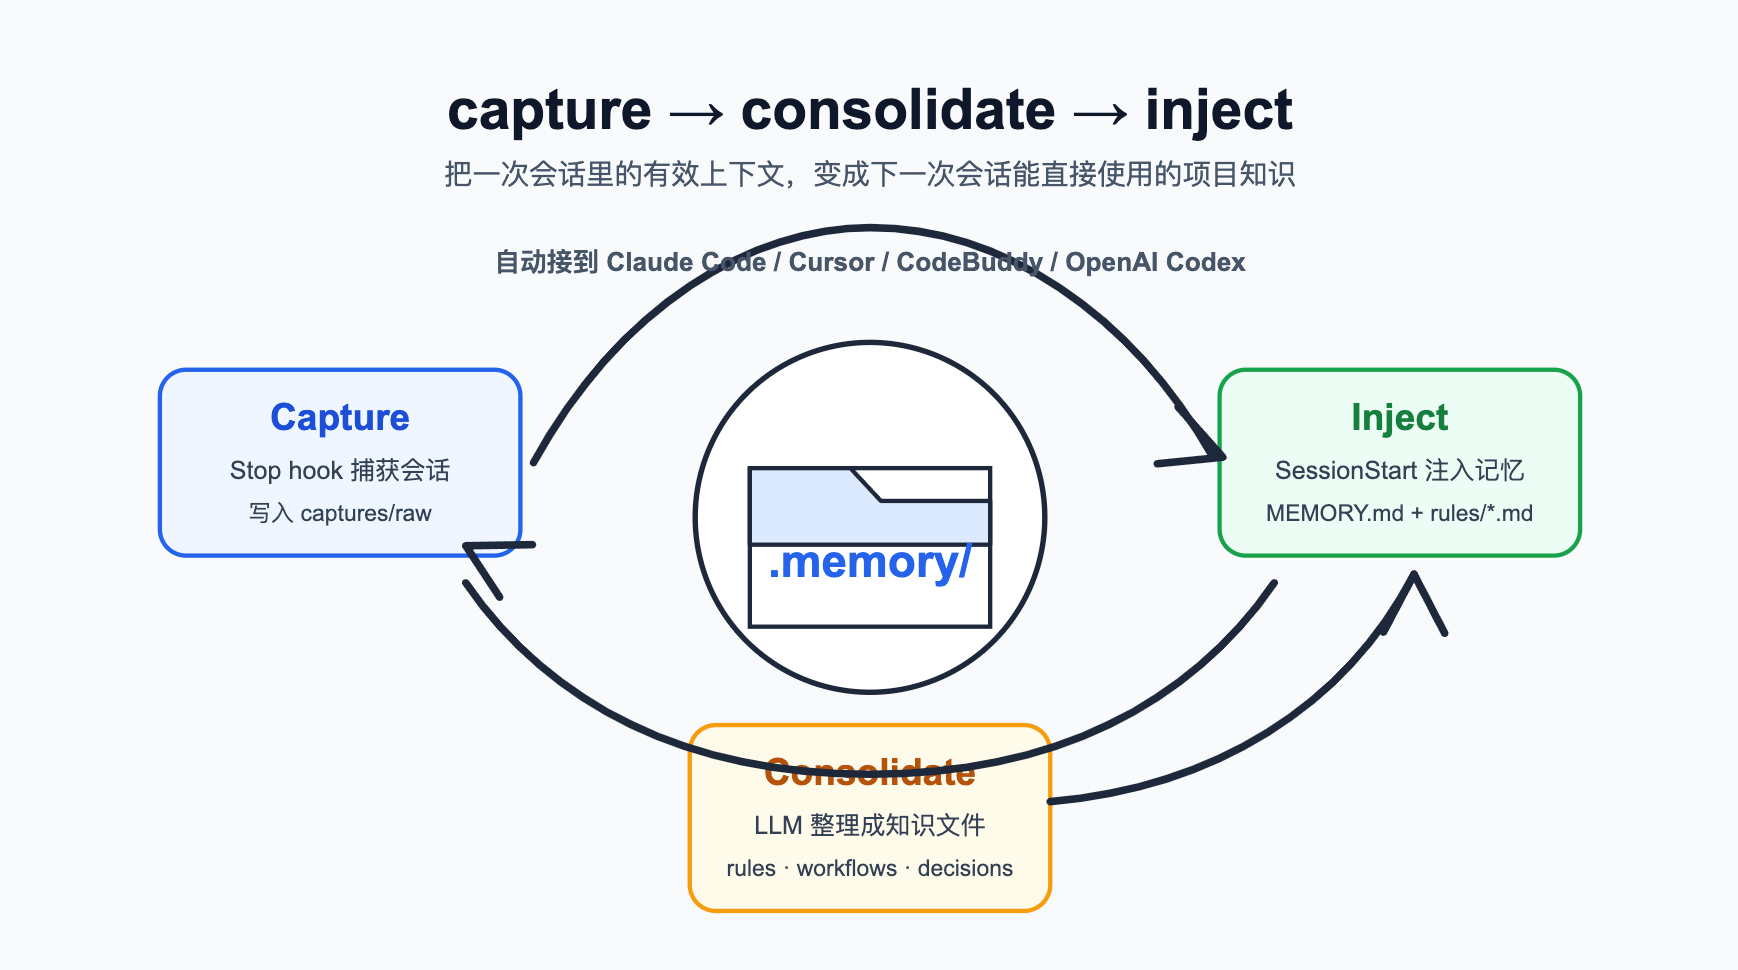
hermes-repo 是一个 repo-local memory 工具。它会把 Claude Code、Cursor、CodeBuddy、OpenAI Codex 等助手的 hook 接到当前仓库里,让项目上下文形成一个闭环:
- 会话结束时,捕获有价值的上下文。
- 需要整理时,用 OpenAI 兼容 LLM 把原始记录转成结构化知识。
- 下一次会话开始时,自动把项目记忆注入给助手。
一句话说:它让 AI 助手不只记住这一轮聊天,而是记住这个仓库。
相比工具自带记忆,它的优势在哪里
现在不少 AI 编程工具都有自己的记忆、规则或项目上下文能力,这些能力很有用,但通常会绑定在某一个产品、某一个账号或某一个编辑器环境里。hermes-repo 的思路不一样:它把记忆层从具体工具里抽出来,放到项目仓库本身。
这带来几个直接优势:
- 跨助手可用:同一份项目记忆可以服务 Claude Code、Cursor、CodeBuddy、OpenAI Codex,而不是被锁在单一工具里。
- 跟着 Git 仓库走:真正重要的项目规则、工作流、架构决策可以进入
.memory/,随代码一起演进。 - 可审计、可修改:记忆不是黑盒。你可以直接打开 Markdown 文件,看它记录了什么,也可以手动修正。
- 区分本地隐私和团队知识:密钥、原始 transcript、处理状态留在本地并默认忽略;沉淀后的结构化知识可以按需纳入版本控制。
- 适合长期项目:工具内置记忆更像“助手记住你”,
hermes-repo更像“项目记住自己”。成员换工具、换机器、换会话,核心上下文仍然留在仓库里。
所以它不是要替代各个工具的内置记忆,而是补上更底层的一层:让项目拥有一份独立、透明、可迁移的长期记忆。
它解决的不是“聊天记录保存”,而是“项目知识沉淀”
普通聊天记录的问题是:信息存在,但不可用。你要自己翻、自己总结、自己复制给下一轮会话。
hermes-repo 的设计更接近一个项目知识库:
.memory/MEMORY.md:下一次会话注入用的导航摘要。.memory/rules/:每次注入都会全文加载的规则。.memory/domains/:领域知识和业务背景。.memory/workflows/:可复用开发流程。.memory/decisions/:架构和产品决策。.memory/incidents/:踩坑记录和根因分析。
这些结构化知识默认可以跟着 Git 仓库走;而 .memory/config.json、原始 transcript、处理状态等本地敏感信息会被 gitignore。
为什么这件事重要
AI 编程的效率瓶颈,很多时候不在模型会不会写代码,而在它是否理解当前项目:
- 它知道你的包管理器、目录结构和命名风格吗?
- 它知道哪些方案之前试过、为什么放弃吗?
- 它知道某个 bug 的真实根因和修复边界吗?
- 它知道团队约定哪些文件能动、哪些文件不能随便改吗?
如果每次都靠人重新解释,AI 只是一次性外援。
如果上下文能被沉淀、整理、注入,它才更像项目里的长期协作者。
从个人仓库记忆,到团队级记忆系统
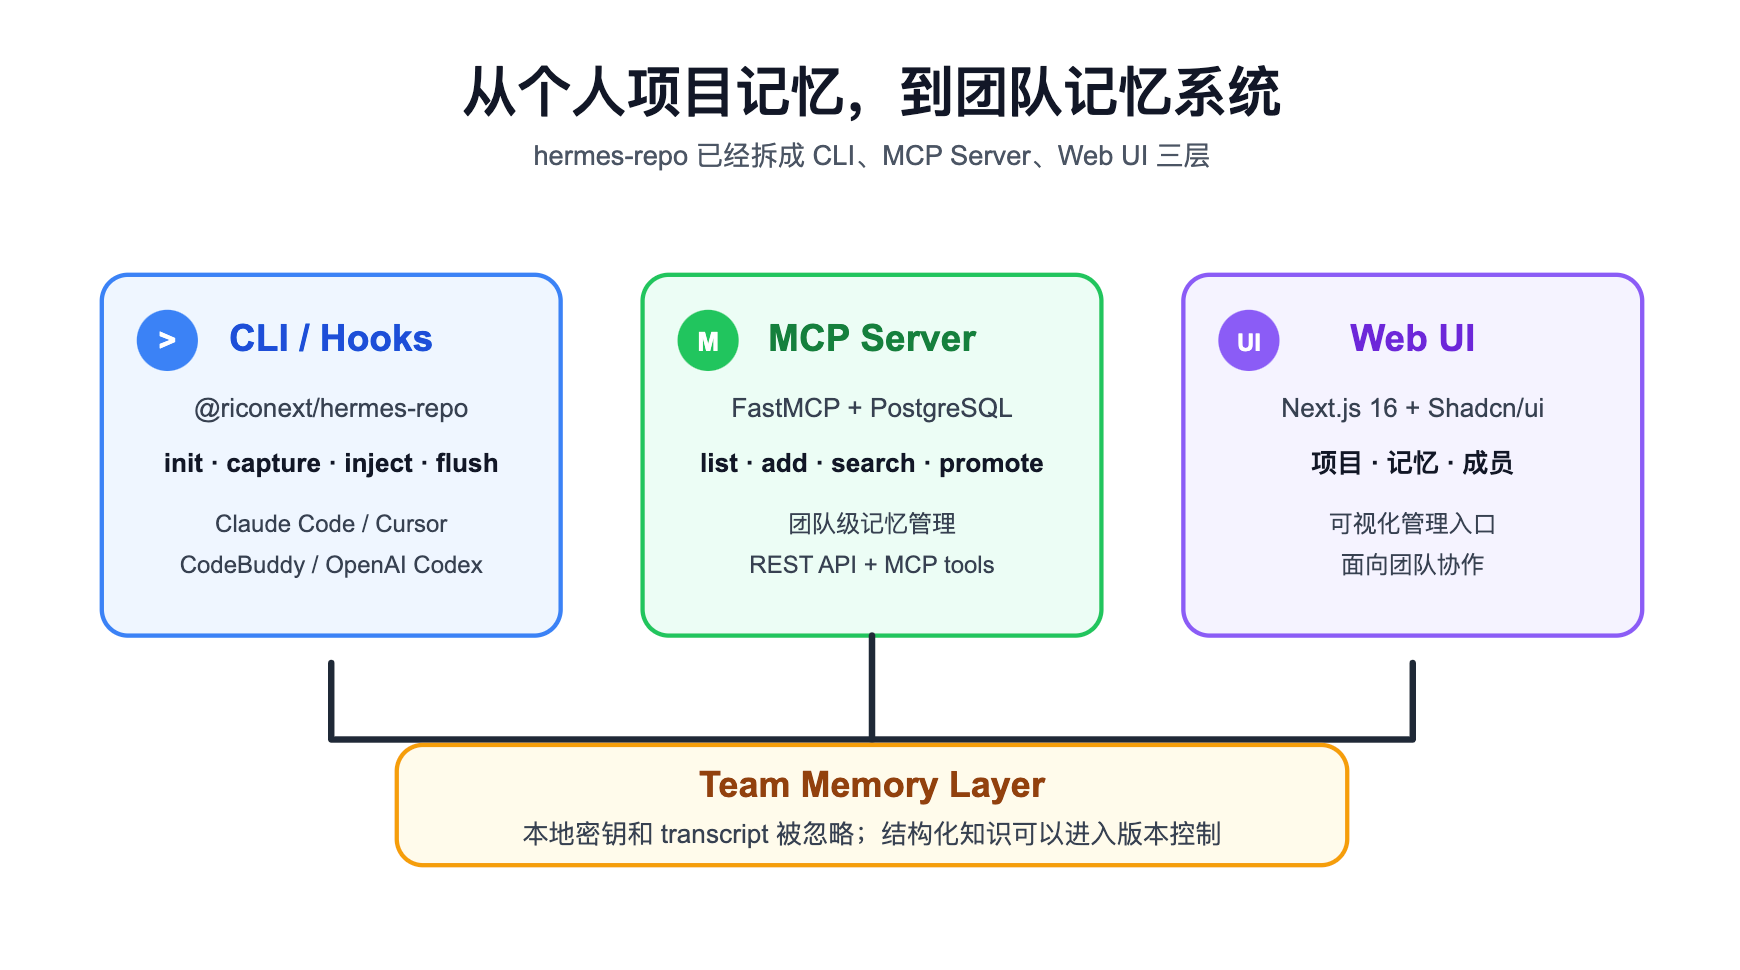
当前 monorepo 已经拆成三层:
@riconext/hermes-repo:CLI、hooks、本地.memory/工作流,已经发布 npm。@riconext/hermes-mcp-server:基于 FastMCP + PostgreSQL 的团队记忆 MCP 服务,提供 list/add/search/promote/delete memory 等工具。@riconext/hermes-ui:基于 Next.js 16 + Shadcn/ui 的 Web 管理界面,用来管理项目和记忆。
更重要的是,MCP 服务和 UI 不依赖某个第三方托管平台。你可以把它们部署在自己的机器、内网服务器或团队基础设施里,数据库、访问权限、记忆内容、升级节奏都由自己掌控。对于不希望项目知识散落在不同 SaaS 工具里的团队,这一点尤其关键。
这个方向很明确:先让每个仓库拥有自己的长期记忆,再把有价值的经验提升为团队共享知识。
适合谁
如果你经常在一个项目里使用 AI 编程助手,hermes-repo 适合你。
如果你的团队已经在 Claude Code、Cursor、CodeBuddy 或 Codex 之间切换,它更适合你。
如果你受够了“每次开新会话都像新人入职”,那它解决的正是这个问题。
项目地址:
https://github.com/ricoNext/hermes-repo安装入口:
npx @riconext/hermes-repo init整体架构
用户运行: npx @riconext/hermes-repo init
        |
        v
创建/合并:
  .memory/
    config.json              # 本地配置,包含 LLM key,gitignored
    MEMORY.md                # 会话注入用导航摘要
    rules/                   # 每次注入时全文加载
    domains/general/         # 领域知识
    workflows/               # 可复用流程
    decisions/               # 架构/产品决策
    incidents/               # 踩坑和根因记录
    captures/raw/            # 原始会话捕获,gitignored
    captures/archived/       # 已归档捕获,gitignored
    consolidate-state.json   # 本地处理状态,gitignored
  AGENTS.md                  # 共享助手引导
  assistant hook config      # .claude, .cursor, .codebuddy, .codex

运行时:
  SessionStart -> hermes-repo inject
    读取 MEMORY.md + rules/*.md
    按助手 hook 协议输出

  Stop -> hermes-repo capture
    解析当前助手 transcript
    追加到 captures/raw/session-{id}.md
    可选:排队后台 LLM 升级任务
    满足阈值时可能调度后台 flush(autoFlush)

  手动 -> hermes-repo flush
    需要已配置 LLM
    读取 pending/stale 原始会话
    写入 rules/domains/workflows/decisions/incidents
    重新生成 MEMORY.md
存储模型
| 层级 | 路径 | Git 行为 | 用途 |
|------|------|----------|------|
| 本地 | .memory/config.json、.memory/captures/、.memory/consolidate-state.json、.memory/.consolidate.lock | init 写入的 gitignore 块会忽略 | 密钥、会话记录、处理状态 |
| 知识库 | .memory/MEMORY.md、.memory/rules/、.memory/domains/、.memory/workflows/、.memory/decisions/、.memory/incidents/ | 默认纳入版本控制(除非你自行 gitignore) | 注入到后续会话的结构化记忆 |
| 助手引导 | AGENTS.md、已选择助手的配置文件 | 普通仓库文件 | 告诉助手如何使用记忆 |
上手指南
在项目 Git 根目录执行:
npx @riconext/hermes-repo init交互式 init 会询问:
- 目标仓库目录
- 要接入哪些助手
- 是否写入 capture 示例模板到
.memory/templates/ - 是否现在配置 OpenAI 兼容 LLM
如果在 init 阶段配置 LLM,hermes-repo 会写入 .memory/config.json,并在结束摘要中确认 flush 是否可用。LLM 不完整时,capture 和 inject 仍可用,但 flush / autoFlush 暂时无法整理记忆。
flush/autoFlush非常重要, 他是用大模型对原始对话记忆进行归纳总结,生成记忆地图索引, 并在下一次对话中将记忆地图索引注入到上下文中。
其他 init 参数:
| 参数 | 说明 |
|------|------|
| -y, --yes | 非交互模式,使用默认选项(跳过所有询问) |
| -f, --force | 覆盖已存在的脚手架文件(不删除 captures 等内容) |
| -C, --cwd <dir> | 目标目录,默认为当前工作目录 |
| --tools <ids> | 逗号分隔的助手 id,如 claude-code,cursor(必须与 -y 合用) |
| --mcp-project-id <id> | 非交互模式:启用 MCP 并绑定团队项目 UUID |
| --mcp-server-url <url> | 非交互模式:MCP 服务地址,默认 http://localhost:3000 |
| --mcp-user-id <id> | 非交互模式:MCP 用户 UUID,用于推送记忆时关联用户 |
使用示例:
# 交互式初始化
  hermes-repo init

  # 非交互模式,使用默认助手
  hermes-repo init -y

  # 非交互模式,指定多个助手
  hermes-repo init -y --tools claude-code,cursor

  # 非交互模式 + 启用 MCP
  hermes-repo init -y \
    --mcp-project-id "uuid-here" \
    --mcp-user-id "user-uuid-here" \
    --mcp-server-url "http://localhost:3000"

  # 强制覆盖已有文件
  hermes-repo init -y -f

  # 在指定目录初始化
  hermes-repo init -y -C /path/to/repo
注意:
- --tools 参数需要与 -y 一起使用,否则会报错
- MCP 相关参数只在非交互模式下有效
之后正常使用助手:
- 会话开始时,hook 运行
inject注入MEMORY.md导航摘要。 - 会话结束时,hook 运行
capture进行原始会话捕获。 - 积累了原始捕获且已配置 LLM 后,可等待
autoFlush自动整理,或手动执行:
npx @riconext/hermes-repo flushLLM 配置
配置 LLM 后才能启用整理能力。flush、capture-llm、autoFlush 都依赖 LLM。
hermes-repo 使用 OpenAI 兼容的 Chat Completions 接口:
{
  "llm": {
    "enabled": true,
    "provider": "openai",
    "baseUrl": "https://api.deepseek.com",
    "model": "deepseek-v4-flash",
    "apiKey": "你的密钥",
    "timeoutMs": 60000,
    "maxInputChars": 24000,
    "mode": "async"
  },
  "consolidate": {
    "autoFlush": {
      "enabled": true,
      "minPendingSessions": 3,
      "minIntervalMinutes": 30,
      "maxPendingChars": 20000
    }
  }
}
注意事项:
enabled、apiKey、baseUrl、model都必须完整配置,LLM 调用才会发生。baseUrl是服务根地址;hermes-repo 会请求{baseUrl}/chat/completions。- 不直接支持 Anthropic 或 Gemini 原生接口。需要通过 OpenAI 兼容网关使用。
.memory/config.json可能包含apiKey,默认会被 gitignore。- 新项目默认开启
consolidate.autoFlush.enabled。LLM 配置完整后,capture 达到阈值时可以后台自动触发flush。 - 如果关闭
autoFlush,需要在积累 capture 后手动运行npx @riconext/hermes-repo flush。
手动处理排队的捕获升级:
npx @riconext/hermes-repo capture-llm --flushMCP 服务器使用
hermes-repo 提供了 MCP 服务器(@riconext/hermes-mcp-server)用于团队级别的记忆管理。它暴露 MCP 工具用于列出项目、添加记忆、搜索和提升记忆,同时提供 REST API 供 Web UI 使用。
MCP 服务会在两个地方使用:
- 执行
flush时:程序会向 MCP 服务拉取团队记忆并推送个人记忆 - 对话中:可以直接在对话中让编程工具调用 MCP 服务提供的工具拉取团队记忆到项目中或者推送记忆到服务中等
为了能在 flush 环节能够推送和拉取团队记忆, 需要在 init 阶段配置 MCP 的服务。
有几个关键内容需要填写:
"serverUrl": "mcp 服务的地址",
"projectId": "在 mcp 上面录入的当前项目的projectId",
"userId": "在 mcp 上创建的当前项目的userId",
为了能够在对话中自动获取 MCP 服务的工具, 也可以手动添加 MCP 服务, 该服务提供一下工具:
MCP 工具
list_projects— 列出可用项目add_memory— 向项目添加新记忆search_memories— 按关键词搜索记忆promote_memory— 将记忆提升到团队级别delete_memory— 删除记忆
部署 MCP 服务器
MCP 服务需要自行部署,才能够使用, 将项目拉取到本地, 进行一下操作:
启动 PostgreSQL
在仓库根目录:
docker compose up -d配置环境变量
cd packages/mcp-server
cp .env.example .env
关键变量:
DATABASE_URL— PostgreSQL 连接字符串MCP_TRANSPORT—httpStream(默认)或stdioDEV_AUTH_BYPASS=true— 开发模式跳过 JWT 认证
初始化数据库
bun run db:push
bun run db:seed
默认管理员账号:
admin/admin(角色:SUPER_ADMIN)启动 MCP 服务
bun run dev:mcp   # 从仓库根目录
# 或
cd packages/mcp-server
bun run dev
服务运行在
http://localhost:3000。健康检查:http://localhost:3000/health。
接入 Claude Code
在 Claude Code 配置中添加 MCP 服务器:
{
  "mcpServers": {
    "hermes": {
      "url": "http://localhost:3000/mcp",
      "headers": {
        "X-User-Id": "00000000-0000-4000-8000-000000000001"
      }
    }
  }
}
请将 /path/to/hermes-repo 替换为实际的仓库路径。
部署 UI
Web UI(@riconext/hermes-ui)提供了用于浏览项目和记忆的仪表盘。
配置环境变量
cd packages/ui
cp .env.example .env.local
编辑
.env.local:NEXT_PUBLIC_API_URL=http://localhost:3000启动 UI
从仓库根目录:
bun run dev:ui或从 UI 包目录:
bun run dev访问 UI:
http://localhost:3001生产构建
cd packages/ui
bun run build
bun run start
MCP 服务不是必须的, 但是如果你需要在团队中使用
@riconext/hermes-repo的记忆管理能力, 就需要自行部署 MCP 服务了。