
@stag-build/phonebook
v0.1.11
Published
Storybook-style static gallery generated from Compose @Preview / SwiftUI #Preview screenshots
Downloads
1,872

Maintainers
 orelzion
Readme


Phonebook turns screenshots your team already has into a Storybook-style component gallery. No new test code, no design tokens to maintain by hand — it renders what's already in your codebase into a static site designers can open without installing anything. Each repo runs Phonebook independently; v1 is single-platform, so one Android repo (or one iOS repo) produces one bundle and one site.
Features
- Zero new test code — reuses
@Preview/#Previewyou've already written - No SaaS account — self-hosted, runs entirely in your CI or locally
- MCP-first — a coding agent can check setup, analyze coverage, add missing previews, and build the gallery for you
- Smart component grouping —
component / statecards inferred from preview names, no required annotation - Cross-platform — Android (Roborazzi + ComposablePreviewScanner, runs on the JVM, no emulator) and iOS (SnapshotPreviews, runs on a simulator)
- Version-aware setup —
init/doctorresolve library versions against your project's Kotlin version and catch Kotlin/Roborazzi metadata mismatches before they cause opaque compiler crashes
Demo
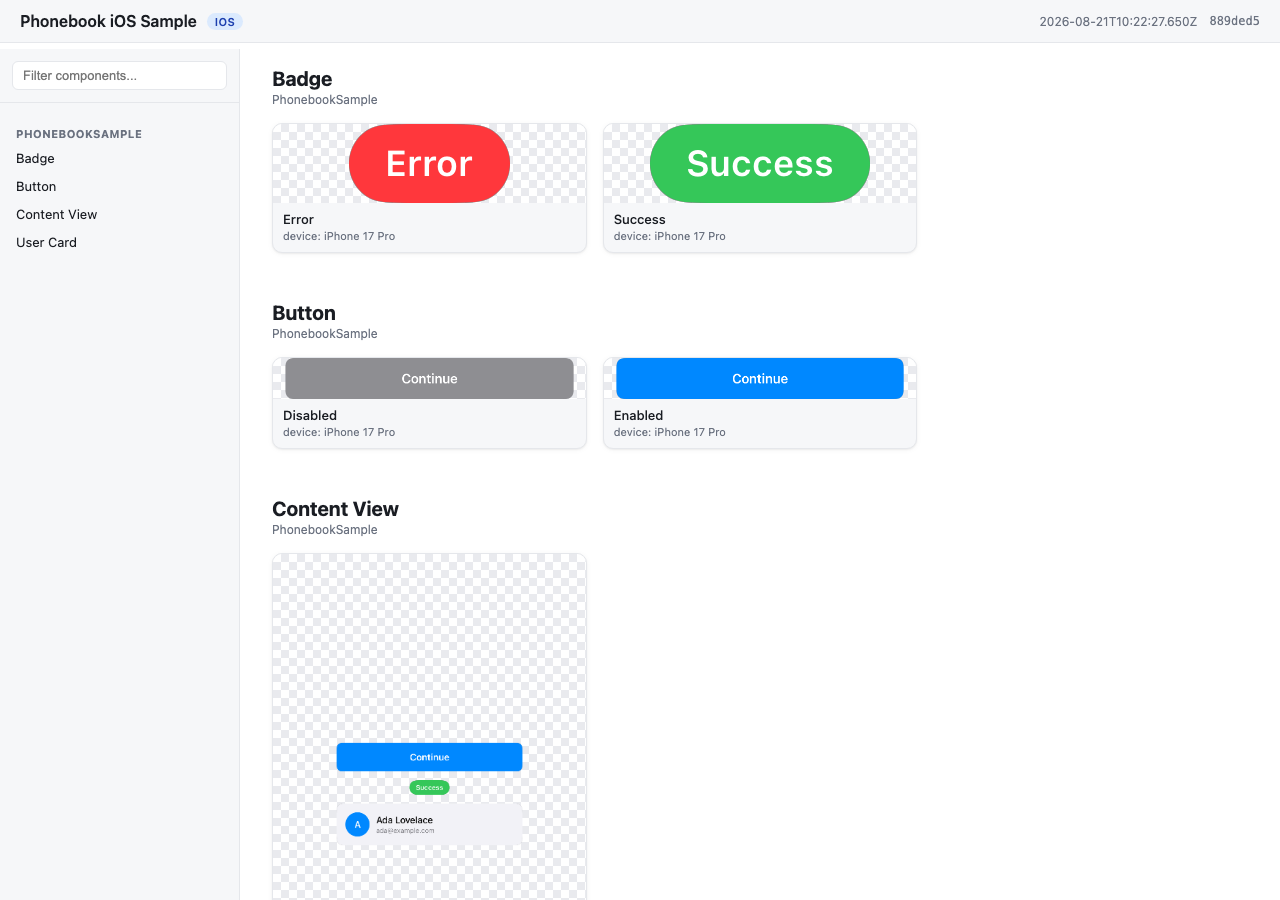
A gallery generated from samples/ios — component / state cards grouped from the app's own #Previews, no extra annotation.
How it works
phonebook generateruns your platform's preview-rendering engine and harvests the output into a bundle (manifest.json+images/).- Android: Roborazzi + ComposablePreviewScanner, run on the JVM via Robolectric. No emulator, works on Linux CI.
- iOS: SnapshotPreviews, run via
xcodebuild teston a simulator. Requires macOS.
phonebook buildturns that bundle into a static site — by default it writesindex.htmldirectly into the bundle directory (reusing the images already there, no copying), so the site lands at<bundle>/index.html. Pass-o <dir>to instead copy everything into a standalone site directory (for publishing elsewhere, or later merging multiple bundles). Plain HTML/CSS/JS, works fromfile://or any static host.
Installation
npm install -g @stag-build/phonebookbrew install stag-build/phonebook/phonebookOr tap first, then install:
brew tap stag-build/phonebook
brew install phonebook
Formula source: stag-build/homebrew-phonebook.
npx @stag-build/phonebook <cmd>Using it with a coding agent (recommended)
Most people won't run the CLI directly — Phonebook is built to be driven by a coding agent (Claude Code, Codex, etc.) through its MCP server. The agent adds previews, runs setup checks, and generates the gallery for you; the CLI underneath is the engine it calls.
The server runs via npx @stag-build/phonebook mcp — no install step needed. Pick your client below.
claude mcp add phonebook -- npx -y @stag-build/phonebook mcpAdd to ~/.codex/config.toml:
[mcp_servers.phonebook]
command = "npx"
args = ["-y", "@stag-build/phonebook", "mcp"]
Add to your Claude Desktop config (~/Library/Application Support/Claude/claude_desktop_config.json on macOS):
{
  "mcpServers": {
    "phonebook": {
      "command": "npx",
      "args": ["-y", "@stag-build/phonebook", "mcp"]
    }
  }
}
Add to .cursor/mcp.json (project) or ~/.cursor/mcp.json (global):
{
  "mcpServers": {
    "phonebook": {
      "command": "npx",
      "args": ["-y", "@stag-build/phonebook", "mcp"]
    }
  }
}
Add to .codex/config.toml at your project's workspace root. Xcode's agent runs with a minimal PATH, so the command wraps npx in a shell that adds the usual Homebrew/nvm locations first:
[mcp_servers.phonebook]
command = "/bin/zsh"
args = [
  "-lc",
  "PATH=/opt/homebrew/bin:/usr/local/bin:/usr/bin:/bin:/usr/sbin:/sbin; npx -y @stag-build/phonebook mcp"
]
enabled = true
Add the mcpServers block to ~/Library/Developer/Xcode/CodingAssistant/ClaudeAgentConfig/.claude.json:
{
  "mcpServers": {
    "phonebook": {
      "command": "/bin/zsh",
      "args": [
        "-lc",
        "PATH=/opt/homebrew/bin:/usr/local/bin:/usr/bin:/bin:/usr/sbin:/sbin; npx -y @stag-build/phonebook mcp"
      ]
    }
  }
}
Android Studio (Gemini Agent Mode): not supported yet — its MCP integration only connects to remote httpUrl servers, not local stdio processes like Phonebook's. Use one of the terminal-based clients above (Claude Code, Codex CLI) from the Android repo instead.
Then, from a chat in your Android or iOS repo, just ask:
"Use the phonebook MCP and create a catalog for my designer."
The agent figures out the rest — checking setup, filling in missing previews, generating, and building the site. For more targeted asks, it also exposes: check_setup (setup diagnosis, same as phonebook doctor), analyze_coverage (components missing previews or dark variants), get_preview_guidance, run_generate, and run_build.
Quickstart: Android
Run phonebook init first — it detects your project's Kotlin version and prints these instructions with library versions resolved to be compatible with it (e.g. Kotlin 2.0 projects get Roborazzi 1.60.0; Kotlin 2.2+ gets the latest). The versions below are what a current-Kotlin project gets (see samples/android/app/build.gradle.kts for a full working example):
// app/build.gradle.kts
plugins {
    id("io.github.takahirom.roborazzi") // root build.gradle.kts: version "1.72.0" apply false
}

roborazzi {
    generateComposePreviewRobolectricTests {
        enable = true
        packages = listOf("dev.stag.phonebook.sample") // your app's package
    }
}

dependencies {
    testImplementation("org.robolectric:robolectric:4.14.1")
    testImplementation("io.github.takahirom.roborazzi:roborazzi:1.72.0")
    testImplementation("io.github.takahirom.roborazzi:roborazzi-compose:1.72.0")
    testImplementation("io.github.sergio-sastre.ComposablePreviewScanner:android:0.9.3")
    testImplementation("io.github.takahirom.roborazzi:roborazzi-compose-preview-scanner-support:1.72.0")
    testImplementation("androidx.compose.ui:ui-test-junit4") // version from your Compose BOM, or pin one
}
Add a phonebook.config.json next to settings.gradle.kts:
{
  "appName": "My Android App",
  "platform": "android",
  "android": { "modules": [":app"], "variant": "debug" }
}
Then, from the repo containing Phonebook:
npx @stag-build/phonebook generate -C /path/to/your/android/repo
npx @stag-build/phonebook build -C /path/to/your/android/repo
Open phonebook-out/index.html.
generate --changed (or --files A.kt,B.kt) renders only the previews declared in those files, with no extra
setup. For that run only, Phonebook passes Gradle an init script that swaps in a preview tester which keeps the
requested previews and scans only their packages. Both files are written under build/phonebook/, never into
your sources. If your project configures its own testerQualifiedClassName, yours wins and the run renders
every preview in the module.
Quickstart: iOS
Add the SnapshotPreviews SPM package to your project and a small XCTest target that subclasses SnapshotTest (see samples/ios for a full working example):
// PhonebookSnapshotTests.swift
import Foundation
import SnapshottingTests

final class PhonebookSnapshotTests: SnapshotTest {
    override class func snapshotPreviews() -> [String]? {
        guard let raw = ProcessInfo.processInfo.environment["SNAPSHOTS_ONLY_FILTER"], !raw.isEmpty else {
            return nil // record every #Preview
        }
        return raw.components(separatedBy: "\n")
    }
}
Reading SNAPSHOTS_ONLY_FILTER is what lets phonebook generate --changed (or --files A.swift,B.swift)
render only the previews in the files you just edited; with the variable unset, every #Preview is recorded
as before.
Add phonebook.config.json next to your .xcodeproj:
{
  "appName": "My iOS App",
  "platform": "ios",
  "ios": {
    "project": "MyApp.xcodeproj",
    "scheme": "MyApp",
    "simulator": "iPhone 17 Pro"
  }
}
Your scheme must build and test the snapshot test target (see PhonebookSample.xcscheme in the sample). Then:
npx @stag-build/phonebook generate -C /path/to/your/ios/repo
npx @stag-build/phonebook build -C /path/to/your/ios/repo
Open phonebook-out/index.html.
Naming convention
Phonebook groups screenshots into component / state cards from your existing preview names — no required annotation. See docs/naming-convention.md for the full rules and examples.
Configuration
phonebook.config.json:
| Key | Type | Default | Notes |
| --- | --- | --- | --- |
| appName | string | — | Required. Shown in the gallery header. |
| platform | "android" | "ios" | — | Required. |
| output | string | "phonebook-out" | Bundle output directory, relative to the config file. |
| android.modules | string[] | [":app"] | Gradle modules to record. |
| android.variant | string | "debug" | Build variant; Phonebook runs <module>:recordRoborazzi<Variant>. |
| ios.project | string | — | Path to .xcodeproj, relative to the config file. One of project/workspace required. |
| ios.workspace | string | — | Path to .xcworkspace, relative to the config file. |
| ios.scheme | string | — | Required. Scheme that includes the SnapshotPreviews test target. |
| ios.simulator | string | "iPhone 17 Pro" | Simulator device name used for -destination. |
| ios.onlyTesting | string | auto-detected | -only-testing: filter so generate runs just the snapshot class, not the app's whole test suite. Auto-derived from the SnapshotTest subclass; set "" to run everything. |
Android previews render like Android Studio: a @Preview without its own size wraps its content, and full-screen (fillMaxSize) content fills the Robolectric screen, which Roborazzi defaults to a Pixel 4a. Setting robolectricConfig in the generateComposePreviewRobolectricTests block replaces that default, so include "qualifiers" to "RobolectricDeviceQualifiers.Pixel4a" (or "\"w411dp-h891dp-port\"" for Android Studio's phone). Otherwise full-screen previews render on a 320×470dp screen. phonebook doctor points this out.
Both generate and build accept -C <dir> (project directory containing phonebook.config.json). generate takes -o <dir> to override the bundle output and --allow-empty to tolerate a run that records no previews. build takes an optional bundle path — with none, it uses the project's bundle directory — and -o <dir> for the site output; without -o, build writes index.html straight into the bundle directory and reuses its images/ in place (no copying), which is what the quickstarts above do. Pass -o <dir> to instead copy the bundle's images into a separate, standalone site directory.
phonebook init and phonebook doctor
phonebook init detects your platform and scaffolds phonebook.config.json plus the dependency/setup snippets — with library versions resolved against your project's Kotlin version and your app package filled in. It never edits your build files for you.
For iOS, check installed devices with xcrun simctl list devices available, then run phonebook init --simulator "<device name>" to record the simulator you chose. The same command updates only ios.simulator when phonebook.config.json already exists, so it also works when setup is retried. --simulator is not used for Android.
phonebook doctor checks that everything generate needs is wired up: plugin and test dependencies (resolved through Gradle version catalogs when you use them), the scanner's packages value, Kotlin/Roborazzi compatibility, and the toolchain (JDK/Xcode/simulator). Add --deep to also compile the test sources — slower, but authoritative when a static check and reality disagree. On iOS, if SnapshotPreviews is linked but no SnapshotTest subclass exists yet, doctor names the exact target and folder to add it to (parsed from the .pbxproj), so you're never just told to "add the class" with no location.
phonebook init --write-snapshot-class is the one exception to init's hands-off rule: when doctor's iOS check identifies the linking target and that target's source folder is one of Xcode's filesystem-synchronized groups, it writes <folder>/PhonebookSnapshots.swift directly — safe because a synchronized folder is picked up by Xcode automatically, so no project.pbxproj edit is made. It refuses (with the reason) in every other case: no SnapshotPreviews wiring yet, a non-synchronized-group project, or a subclass that already exists.
phonebook mcp runs the MCP server — see "Using it with a coding agent" above for setup and example prompts.
Requirements
Android: JDK 17+. No emulator needed — Roborazzi renders on the JVM via Robolectric, so generate runs on Linux CI.
iOS: macOS with Xcode installed, plus a booted or bootable simulator (generate runs xcodebuild test against a named simulator destination). Requires a macOS runner in CI.
See docs/ci.md for CI recipes and docs/naming-convention.md for the naming rules.
Roadmap
Post-v1 (M5), not yet built:
- [ ] Search and filters in the generated gallery
- [ ] Multi-bundle merge with a side-by-side view (cross-platform sites)
- [ ] Version diffing between two runs (the manifest already carries commit + image hashes to enable this)
- [ ] Additional CI recipe docs
License
MIT — see LICENSE.