
@storyblok/react
v7.2.0
Published
SDK to integrate Storyblok into your project using React.
Downloads
402,170


Keywords
Readme
Kickstart a new project
Are you eager to dive into coding? Follow these steps to kickstart a new project with Storyblok and React, and get started in just a few minutes!
5-minute Tutorial
Are you looking for a hands-on, step-by-step tutorial? The React 5-minute Tutorial has you covered! It provides comprehensive instructions on how to set up a Storyblok space and connect it to your React project.
Ultimate Tutorial
Are you looking for a hands-on, step-by-step tutorial? The Next.js Ultimate Tutorial has you covered! It provides comprehensive instructions on building a complete, multilingual website using Storyblok and Next.js from start to finish.
Installation
Install @storyblok/react:
npm install @storyblok/react
// yarn add @storyblok/react
⚠️ This SDK uses the Fetch API under the hood. If your environment doesn't support it, you need to install a polyfill like isomorphic-fetch. More info on storyblok-js-client docs.
From a CDN
Install the file from the CDN:
<script src="https://unpkg.com/@storyblok/react"></script>Initialization
Register the plugin on your application and add the access token of your Storyblok space. You can also add the apiPlugin in case that you want to use the Storyblok API Client:
import { apiPlugin, storyblokInit } from "@storyblok/react";

/** Import your components */
import Page from "./components/Page";
import Teaser from "./components/Teaser";
// import FallbackComponent from "./components/FallbackComponent";

storyblokInit({
  accessToken: "YOUR_ACCESS_TOKEN",
  use: [apiPlugin],
  components: {
    page: Page,
    teaser: Teaser,
  },
  // bridge: false,
  // apiOptions: {},
  // richText: {},
  // enableFallbackComponent: false,
  // customFallbackComponent: FallbackComponent,
});
Note: This is the general way for initalizing the SDK, the initialization might be a little different depending upon the framework. You can see how everything works according to the framework in their respective sections below.
Add all your components to the components object in the storyblokInit function.
That's it! All the features are enabled for you: the Api Client for interacting with Storyblok CDN API, and Storyblok Bridge for real-time visual editing experience.
You can enable/disable some of these features if you don't need them, so you save some KB. Please read the "Features and API" section
Region parameter
Possible values:
eu(default): For spaces created in the EUus: For spaces created in the USap: For spaces created in Australiaca: For spaces created in Canadacn: For spaces created in China
Full example for a space created in the US:
import { apiPlugin, storyblokInit } from "@storyblok/react";

storyblokInit({
  accessToken: "YOUR_ACCESS_TOKEN",
  use: [apiPlugin],
  apiOptions: {
    region: "us",
  },
  components: {},
});
Note: For spaces created in the United States or China, the
regionparameter must be specified.
@storyblok/react does three actions when you initialize it:
- Provides a
getStoryblokApiobject in your app, which is an instance of storyblok-js-client. - Loads the Storyblok Bridge for real-time visual updates.
- Provides a
storyblokEditablefunction to link editable components to the Storyblok Visual Editor.
For every component you've defined in your Storyblok space, call the storyblokEditable function with the blok content:
import { storyblokEditable } from "@storyblok/react";

const Feature = ({ blok }) => {
  return (
    <div {...storyblokEditable(blok)} key={blok._uid} data-test="feature">
      <div>
        <div>{blok.name}</div>
        <p>{blok.description}</p>
      </div>
    </div>
  );
};

export default Feature;
Where blok is the actual blok data coming from Storyblok's Content Delivery API.
Note: The
storyblokEditablefunction works the same way for all the frameworks and components created.
Getting Started
This SDK provides you the support to work with React and all React Frameworks such as Next.js, Remix etc. Depending upon these different frameworks and versions, the way to use the SDK and the functionalities it provides differ.
Below is the guide and examples on how to use it with different frameworks -
React
The initalization remains the same when you work with React. You can intialze the SDK in the index.js file. Please refer to the 'Initialization' section above to read more.
Fetching Content and Listening to Storyblok Visual Editor events
Use useStoryblok to fetch the content as well as enable live editing. You need to pass the slug as the first parameter, apiOptions as the second parameter, and bridgeOptions as the third parameter, which is optional if you want to set the options for the bridge by yourself. Check the available apiOptions (passed to storyblok-js-client) and bridgeOptions (passed to the Storyblok Bridge).
import { StoryblokComponent, useStoryblok } from "@storyblok/react";

function App() {
  const story = useStoryblok("react", { version: "draft" });

  if (!story?.content) {
    return <div>Loading...</div>;
  }

  return <StoryblokComponent blok={story.content} />;
}

export default App;
StoryblokComponent renders the route components dynamically, using the list of components loaded during the initialization inside the storyblokInit function.
This is how you can pass the Bridge options as a third parameter to useStoryblok:
useStoryblok(
  story.id,
  { version: "draft", resolveRelations: ["Article.author"] },
  {
    resolveRelations: ["Article.author"],
    resolveLinks: "url",
    preventClicks: true,
  },
);
Check out our React Boilerplate here, or read on how to add Storyblok to React in 5 mins here You can also take a look at the React Playground in this repo.
Learn: Next.js 13 and 14 Data Fetching and Caching Behavior
When using Next.js 13 or 14 with the App Router, ensure that you include cache: "no-store" in your requests when fetching data from Storyblok. This prevents data caching, ensuring that you always receive the most up-to-date content from Storyblok.
For more details, refer to the Next.js documentation on opting out of caching.
Note: In Next.js 15, this will no longer be necessary, as the default caching behavior has been adjusted based on community feedback.
Example
Here's how you can fetch data from Storyblok with cache: "no-store":
export async function fetchData() {
  const sbParams: ISbStoriesParams = { version: "draft" };

  const storyblokApi: StoryblokClient = getStoryblokApi();

  return storyblokApi.get(`cdn/stories/home`, sbParams, {
    cache: "no-store", // This prevents Next.js 13, 14 default caching behaviour
  });
}
Choosing the Right Export
@storyblok/react provides three different exports to meet different deployment and framework requirements:
Export Types
| Export | Use Case | Live Editing | Static Export Support |
| ---------------------- | ----------------------------------- | ------------ | --------------------- |
| @storyblok/react | Client-side rendering, SPA | ✅ | ✅ |
| @storyblok/react/ssr | Server-side rendering, static sites | ❌ | ✅ |
| @storyblok/react/rsc | React Server Components | ✅ | ❌ |
When to Use Each Export
Use @storyblok/react for:
- Single Page Applications (SPA)
- Client-side rendered React apps
- When you need live editing in browser-based applications
Use @storyblok/react/ssr for:
- Next.js static exports (
output: 'export') - Static site generation without live editing
- Server-side rendering where live editing isn't required
- Performance-critical scenarios where bundle size matters
Use @storyblok/react/rsc for:
- Next.js App Router with React Server Components
- When you need live editing with server components
- Modern React applications with server/client component separation
Next.js Static Export Support
If you're using Next.js with output: 'export' for static site generation, you must use the @storyblok/react/ssr export. The RSC export includes server actions that are incompatible with static exports.
Static Export Configuration
// next.config.js
/** @type {import('next').NextConfig} */
const nextConfig = {
  output: "export", // Enables static export
};

module.exports = nextConfig;
Static Export Implementation
// lib/storyblok.js
import { apiPlugin, storyblokInit } from "@storyblok/react/ssr"; // Use SSR export
import Page from "@/components/Page";
import Teaser from "@/components/Teaser";

export const getStoryblokApi = storyblokInit({
  accessToken: "YOUR_ACCESS_TOKEN",
  use: [apiPlugin],
  components: {
    page: Page,
    teaser: Teaser,
  },
});
// app/page.js
import { StoryblokServerStory } from "@storyblok/react/ssr";
import { getStoryblokApi } from "@/lib/storyblok";
export default async function Home() {
const { data } = await fetchData();
return (
<div>
<StoryblokServerStory story={data.story} />
</div>
);
}
export async function fetchData() {
const storyblokApi = getStoryblokApi();
return storyblokApi.get(`cdn/stories/home`, { version: "draft" });
}[!NOTE] The SSR export does not include live editing capabilities. Live editing requires client-side JavaScript that's incompatible with static exports.
Next.js using App Router
The components in the app directory are by default React Server Side Components. The SDK provides different approaches depending on your deployment needs:
- For static exports: Use
@storyblok/react/ssr(no live editing) - For dynamic apps: Use
@storyblok/react/rsc(with live editing)
React Server Components with Live Editing
You can enable Storyblok Visual Editor's live editing with React Server Components by using the StoryblokStory component, which automatically handles both content rendering and live editing bridge loading. The SDK allows you to take full advantage of the Live Editing while maintaining the performance benefits of Server Components.
For live editing with RSC, always import
@storyblok/react/rsc.
Live Editing Bridge Loading
When is bridge loading automatic?
- ✅ Using
StoryblokStory: Automatically handles bridge loading and live editing - ✅ Client-Side Components: When using
StoryblokComponentor other client components that already load the bridge - ❌ Pure
StoryblokServerComponent: Manual bridge loading needed withStoryblokLiveEditing
Why does RSC need special handling?
In React Server Components environments where components are purely server-rendered, the Storyblok bridge script isn't automatically loaded on the client. The StoryblokStory component detects when running in the Visual Editor and loads the bridge script for you.
1. Initialize
Create a new file lib/storyblok.js and initialize the SDK. Make sure you export the getStoryblokApi function, which is an instance of storyblok-js-client that is shared by server components.
// lib/storyblok.js
import Page from "@/components/Page";
import Teaser from "@/components/Teaser";
import { apiPlugin, storyblokInit } from "@storyblok/react/rsc";

export const getStoryblokApi = storyblokInit({
  accessToken: "YOUR_ACCESS_TOKEN",
  use: [apiPlugin],
  components: {
    teaser: Teaser,
    page: Page,
  },
});
2. Fetch Content and Render Components
The getStoryblokApi function can now be used inside your Story components to fetch the data from Storyblok. In app/page.jsx, use it as follows:
import { StoryblokClient, ISbStoriesParams } from '@storyblok/react/rsc';
import { StoryblokStory } from '@storyblok/react/rsc';
import { getStoryblokApi } from '@/lib/storyblok';

export default async function Home() {
  const { data } = await fetchData();

  return (
    <div>
      <StoryblokStory story={data.story} />
    </div>
  );
}

export async function fetchData() {
  let sbParams: ISbStoriesParams = { version: 'draft' };

  const storyblokApi: StoryblokClient = getStoryblokApi();
  return storyblokApi.get(`cdn/stories/home`, sbParams);
}
The StoryblokStory component automatically:
- Renders your Storyblok content components on the server
- Loads the bridge script for live editing (when in Visual Editor)
- Handles live content updates via global cache
- Manages bridge registration and cleanup
Advanced: Bridge Options
You can pass bridge options for advanced configurations:
const bridgeOptions = { resolveRelations: ["article.author"] };

<StoryblokStory story={data.story} bridgeOptions={bridgeOptions} />;
Advanced: Manual Component Separation
For advanced use cases where you need more control, you can use the individual components:
import { StoryblokServerComponent, StoryblokLiveEditing } from '@storyblok/react/rsc';

// Manual approach (only use if you need special control)
<StoryblokServerComponent blok={data.story.content} />
<StoryblokLiveEditing story={data.story} bridgeOptions={bridgeOptions} />
[!NOTE] Most applications should use
StoryblokStoryfor the best developer experience and automatic live editing support.
Important: Individual Content Components
When creating your individual Storyblok content components (like Page, Teaser, etc.), you must use StoryblokServerComponent for nested components. Import it from the same export you're using:
For RSC (with live editing):
import {
  storyblokEditable,
  StoryblokServerComponent,
} from "@storyblok/react/rsc";

const Page = ({ blok }) => (
  <main {...storyblokEditable(blok)}>
    {blok.body.map((nestedBlok) => (
      <StoryblokServerComponent blok={nestedBlok} key={nestedBlok._uid} />
    ))}
  </main>
);

export default Page;
For SSR (static exports):
import {
  storyblokEditable,
  StoryblokServerComponent,
} from "@storyblok/react/ssr";

const Page = ({ blok }) => (
  <main {...storyblokEditable(blok)}>
    {blok.body.map((nestedBlok) => (
      <StoryblokServerComponent blok={nestedBlok} key={nestedBlok._uid} />
    ))}
  </main>
);

export default Page;
[!IMPORTANT] Always use
StoryblokServerComponentfor nested content components, even when you declare them as client components with"use client". This ensures proper server-side rendering.
[!NOTE] To use this approach (with
getStoryblokApi), you need to include theapiPluginmodule when callingstoryblokInitfunction. If you don't useapiPlugin, you can use your preferred method or function to fetch your data.
To try this setup, take a look at the Next.js RSC Playgrounds in this repo.
Next.js using Pages Router
In this section, we'll see how to use the React SDK with the pages directory approach.
The initalization remains the same when you work with Next.js. You can intialze the SDK in the _app.js file. Please refer to the 'Initialization' section above to read more.
1. Fetching Content
The SDK provides a getStoryblokApi object in your app, which is an instance of storyblok-js-client. This can be used to fetch the content from Storyblok. You can use it in functions like getStaticProps, getStaticPaths, getServerSideProps etc.
import { getStoryblokApi } from "@storyblok/react";

// At the required place
const storyblokApi = getStoryblokApi();
const { data } = await storyblokApi.get("cdn/stories", { version: "draft" });
Note: To use this approach, you need to include the
apiPluginmodule when callingstoryblokInitfunction. If you don't useapiPlugin, you can use your preferred method or function to fetch your data.
2. Listening to Storyblok Visual Editor events
The SDK also provides you with the useStoryblokState hook. It works similarly to useStoryblok for live editing, but it doesn't fetch the content. Instead, it receives a story object as the first parameter. You can also pass the Bridge Options as the second parameter.
import { StoryblokComponent, useStoryblokState } from "@storyblok/react";

export default function Home({ story: initialStory }) {
  const story = useStoryblokState(initialStory);

  if (!story.content) {
    return <div>Loading...</div>;
  }

  return <StoryblokComponent blok={story.content} />;
}
In this case, the story is being passed as a prop that can be coming from where the story is being fetched. A complete example would look like this-
import {
  getStoryblokApi,
  StoryblokComponent,
  useStoryblokState,
} from "@storyblok/react";

export default function Home({ story: initialStory }) {
  const story = useStoryblokState(initialStory);

  if (!story.content) {
    return <div>Loading...</div>;
  }

  return <StoryblokComponent blok={story.content} />;
}

export async function getStaticProps({ preview = false }) {
  const storyblokApi = getStoryblokApi();
  const { data } = await storyblokApi.get(`cdn/stories/react`, {
    version: "draft",
  });

  return {
    props: {
      story: data ? data.story : false,
      preview,
    },
    revalidate: 3600, // revalidate every hour
  };
}
StoryblokComponent renders the route components dynamically, using the list of components loaded during the initialization inside the storyblokInit function.
Check out the code for the first part of our Next.js + Storyblok Ultimate Tutorial. Or you can also read on how to add Storyblok to a Next.js project in 5 minutes here
3. Adding components per page
If you are using the pages router, you might want to load your components per page, instead of all in the _app file.
If you load all components in the _app file with storyblokInit funciton, the JavaScript for all of those components will be loaded on every page, even on pages where most of these components might not be used.
A better approach is to load these components on a per-page basis, reducing the JS bundle for that page, improving your load time, and SEO.
Simply execute storyblokInit in the _app file as you did before, but omit the components object and the component imports like so:
import { storyblokInit, apiPlugin } from "@storyblok/react";

/** Import your components */
-import Page from "./components/Page";
-import Teaser from "./components/Teaser";

storyblokInit({
  accessToken: "YOUR_ACCESS_TOKEN",
  use: [apiPlugin],
- components: {
-   page: Page,
-   teaser: Teaser,
- },
});
After that, use the setComponent method in each of your pages, to only load the components you need for that particular page:
import React from "react";
import Teaser from "../components/teaser";
import Grid from "../components/grid";
import Page from "../components/page";
import Feature from "../components/feature";

import {
  useStoryblokState,
  StoryblokComponent,
+  setComponents,
} from "@storyblok/react";

export default function Home({
  story: initialStory,
}: InferGetStaticPropsType<typeof getStaticProps>) {

+  setComponents({
+    teaser: Teaser,
+    grid: Grid,
+    feature: Feature,
+    page: Page,
+  })

  const story = useStoryblokState(initialStory);

  if (!story.content) {
    return <div>Loading...</div>;
  }

  return <StoryblokComponent blok={story.content} />;
}
Features and API
You can choose the features to use when you initialize the plugin. In that way, you can improve Web Performance by optimizing your page load and save some bytes.
Storyblok API
You can use an apiOptions object. This is passed down to the storyblok-js-client config object:
storyblokInit({
  accessToken: "YOUR_ACCESS_TOKEN",
  apiOptions: {
    // storyblok-js-client config object
    cache: { type: "memory" },
  },
  use: [apiPlugin],
  components: {
    page: Page,
    teaser: Teaser,
    grid: Grid,
    feature: Feature,
  },
});
If you prefer to use your own fetch method, just remove the apiPlugin and storyblok-js-client won't be added to your application.
storyblokInit({});Storyblok Bridge
If you don't use registerStoryblokBridge, you still have access to the raw window.StoryblokBridge:
const sbBridge = new window.StoryblokBridge(options);

sbBridge.on(["input", "published", "change"], (event) => {
  // ...
});
Rendering Rich Text
You can render rich text fields by using the StoryblokRichText component:
import { StoryblokRichText, useStoryblok } from '@storyblok/react';

function App() {
  const story = useStoryblok('home', { version: 'draft' });

  if (!story?.content) {
    return <div>Loading...</div>;
  }

  return (
    <div>
      <StoryblokRichText doc={story.content.richText} />
    </div>
  );
}
Or you can have more control by using the useStoryblokRichText hook:
import { useStoryblokRichText, convertAttributesInElement } from '@storyblok/react';
import Codeblock from './Codeblock';

function App() {
  const { render } = useStoryblokRichText({
    // options like resolvers
  });

  const html = render(doc);
  const formattedHtml = convertAttributesInElement(html as React.ReactElement); // JSX

  return (
    <div ref={ref}>
      {formattedHtml}
    </div>
  );
}
For a comprehensive list of options you can provide to the useStoryblokRichText, please consult the Full options documentation.
Overriding the default resolvers
You can override the default resolvers by passing a resolvers prop to the StoryblokRichText component, for example, to use NextJS Link component or add a custom codeblok component:
import { StoryblokRichText, useStoryblok, MarkTypes, type SbReactRichTextComponentMap, type SbReactRichTextProps } from '@storyblok/react';
import Link from 'next/link';
import CodeBlock from './components/CodeBlock';

function CustomLink({ children, attrs }: SbReactRichTextProps<"link">) {
  return (
    <Link href={attrs?.href ?? ""} target={attrs?.target ?? "_self"}>
      {children}
    </Link>
  );
}

function App() {
  const story = useStoryblok('home', { version: 'draft' });

  if (!story?.content) {
    return <div>Loading...</div>;
  }

  const components: SbReactRichTextComponentMap = {
    heading: CustomHeading,
    link: CustomLink,
    table: CustomTable,
    bold: ({ children }) => <b className="font-bold text-black">{children}</b>,
  };

  return (
    <div>
      <StoryblokRichText document={blok.richtext_field} components={components} />
    </div>
  );
}
Legacy Rich Text Resolver
[!WARNING]
The legacyrenderRichTextis soon to be deprecated. We recommend migrating to the new approach described above instead.
You can easily render rich text by using the renderRichText function that comes with @storyblok/react:
import { renderRichText } from "@storyblok/react";

const renderedRichText = renderRichText(blok.richtext);
You can set a custom Schema and component resolver globally at init time by using the richText init option:
import { RichTextSchema, storyblokInit } from "@storyblok/react";
import cloneDeep from "clone-deep";

const mySchema = cloneDeep(RichTextSchema); // you can make a copy of the default RichTextSchema
// ... and edit the nodes and marks, or add your own.
// Check the base RichTextSchema source here https://github.com/storyblok/storyblok-js-client/blob/main/src/schema.ts

storyblokInit({
  accessToken: "<your-token>",
  richText: {
    schema: mySchema,
    resolver: (component, blok) => {
      switch (component) {
        case "my-custom-component":
          return `<div class="my-component-class">${blok.text}</div>`;
        default:
          return "Resolver not defined";
      }
    },
  },
});
You can also set a custom Schema and component resolver only once by passing the options as the second parameter to renderRichText function:
import { renderRichText } from "@storyblok/react";

renderRichText(blok.richTextField, {
  schema: mySchema,
  resolver: (component, blok) => {
    switch (component) {
      case "my-custom-component":
        return `<div class="my-component-class">${blok.text}</div>`;
      default:
        return `Component ${component} not found`;
    }
  },
});
We also recommend using the Storyblok Rich Text Renderer for React by Claus for rendering your Storyblok rich text content to React elements and Next.js applications.
Using fallback components
By default, @storyblok/react returns an empty <div> if a component is not implemented. Setting enableFallbackComponent to true when calling storyblokInit bypasses that behavior, rendering a fallback component in the frontend instead. You can use the default fallback component, or create a custom React fallback component in your project and use it by setting customFallbackComponent: [YourFallbackComponent].
Efficiently Loading Storyblok Components in React
When using Storyblok with React, the general approach is to load all the Storyblok components when initializing Storyblok, usually in a layout page to ensure all pages have access to all of them:
storyblokInit({
  accessToken,
  use: [apiPlugin],
  components: {
    // all your React components
  },
});
Storyblok's React SDK automatically renders these predefined components based on your page content. While this is convenient, it can lead to larger bundle sizes and slower page speeds, especially for larger sites or when using heavy JavaScript libraries that are only needed on specific pages or a specific component.
Solutions
Storyblok's
setComponentsFunction: Storyblok SDK provides a function calledsetComponentsthat allows you to load only the components needed for each route instead of defining all components during initialization. This approach is useful but might not be practical if you use a catch-all route, which is common in many React frameworks.React's
react.lazy: React offers a built-in solution calledreact.lazyfor code splitting. Instead of directly importing components, you can do the following:"use client"; import { apiPlugin, storyblokInit } from "@storyblok/react/rsc"; import { lazy } from "react"; const lazyComponents = { page: lazy(() => import("./components/Page")), // other lazy-loaded components }; storyblokInit({ accessToken, use: [apiPlugin], components: lazyComponents, });This approach enables automatic code splitting and loads only the necessary JavaScript for each page. However,
react.lazyhas some limitations when used with SSR (Server-Side Rendering).Using
@loadable/component: For cases where SSR is needed, or in general, you can use the@loadable/componentlibrary, which offers similar functionality and better SSR support. This library is framework-agnostic and can be used with any React framework. Loadable Components DocumentationNext.js Dynamic Import: Next.js has a built-in
dynamicpackage that provides dynamic imports for lazy loading. Next.js Dynamic Import Documentation
By using these techniques, you can ensure that only the necessary components and dependencies are loaded for each page, improving your site's performance and speed.
Troubleshooting
"Server Actions are not supported with static export"
Error: When using Next.js with output: 'export', you might encounter:
Error: Server Actions are not supported with static exportSolution: Use @storyblok/react/ssr instead of @storyblok/react/rsc for static exports:
- import { StoryblokStory } from "@storyblok/react/rsc";
+ import { StoryblokServerStory } from "@storyblok/react/ssr";
Explanation: The RSC export includes server actions for live editing, which are incompatible with static exports. The SSR export provides server-side rendering without server actions.
Live Editing Not Working
Issue: Live editing doesn't work in the Visual Editor.
Possible Solutions:
Using SSR export: Live editing isn't available with
@storyblok/react/ssr. Use@storyblok/react/rscfor live editing.Missing bridge loading: Ensure you're using
StoryblokStory(RSC) which automatically loads the bridge, or manually addStoryblokLiveEditing.Development mode: Live editing only works in development mode or when the Visual Editor is active.
Component Not Found
Error: Seeing empty divs or "Component not found" instead of your content.
Solution: Ensure all your Storyblok components are registered during initialization:
storyblokInit({
  components: {
    page: Page, // Matches 'page' component in Storyblok
    teaser: Teaser, // Matches 'teaser' component in Storyblok
    // Add all your components here
  },
});
TypeScript Import Errors
Issue: TypeScript can't find the /ssr or /rsc exports.
Solution: Ensure you're using the latest version of @storyblok/react (v5.3.0+) which includes these exports.
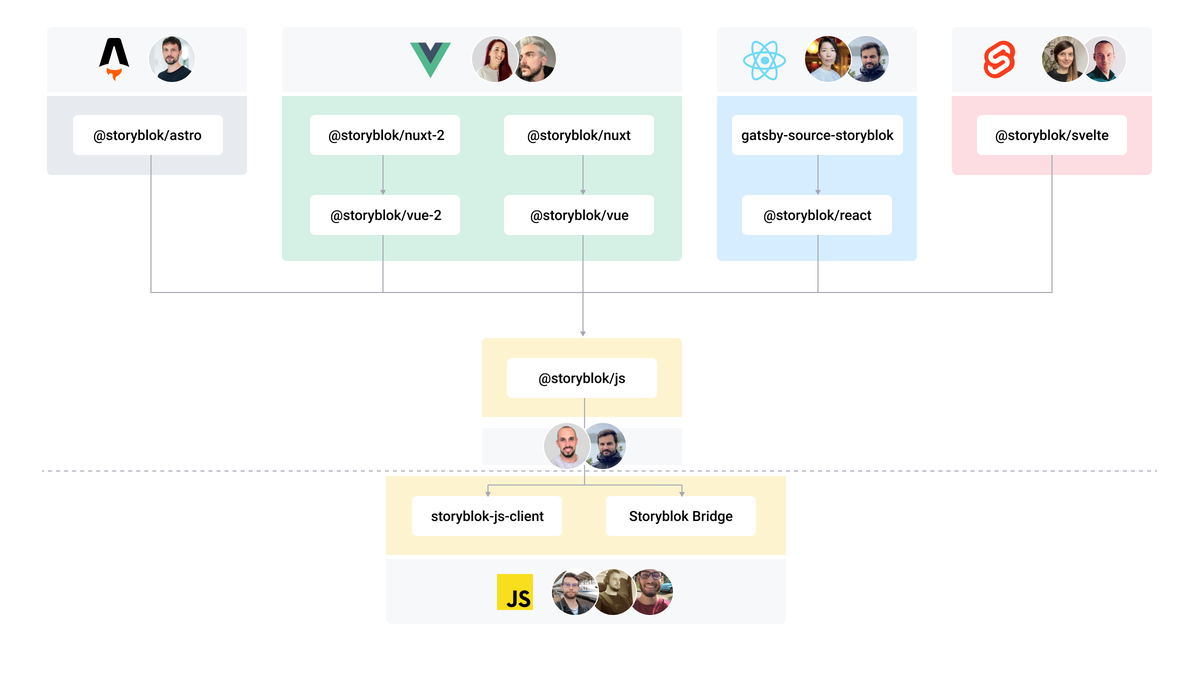
The Storyblok JavaScript SDK Ecosystem
Further Resources
Support
- Bugs or Feature Requests? Submit an issue.
- Do you have questions about Storyblok or you need help? Join our Discord Community.
Contributing
Please see our contributing guidelines and our code of conduct. This project use semantic-release for generate new versions by using commit messages and we use the Angular Convention to naming the commits. Check this question about it in semantic-release FAQ.
License
This project is licensed under the MIT License - see the LICENSE file for details.