
@tencentcloud/ai-desk-customer-vue
v1.7.6
Published
Vue2/Vue3 UIKit for AI Desk


Readme
介绍
智能客服用户端 Web UIKit。使用此 UIKit,您可以在一天内将智能客服的能力集成到您的 Web 或 Hybrid 项目。极简接入,用智能客服为您的产品增收提效,提升用户满意度和付费转化。
效果展示
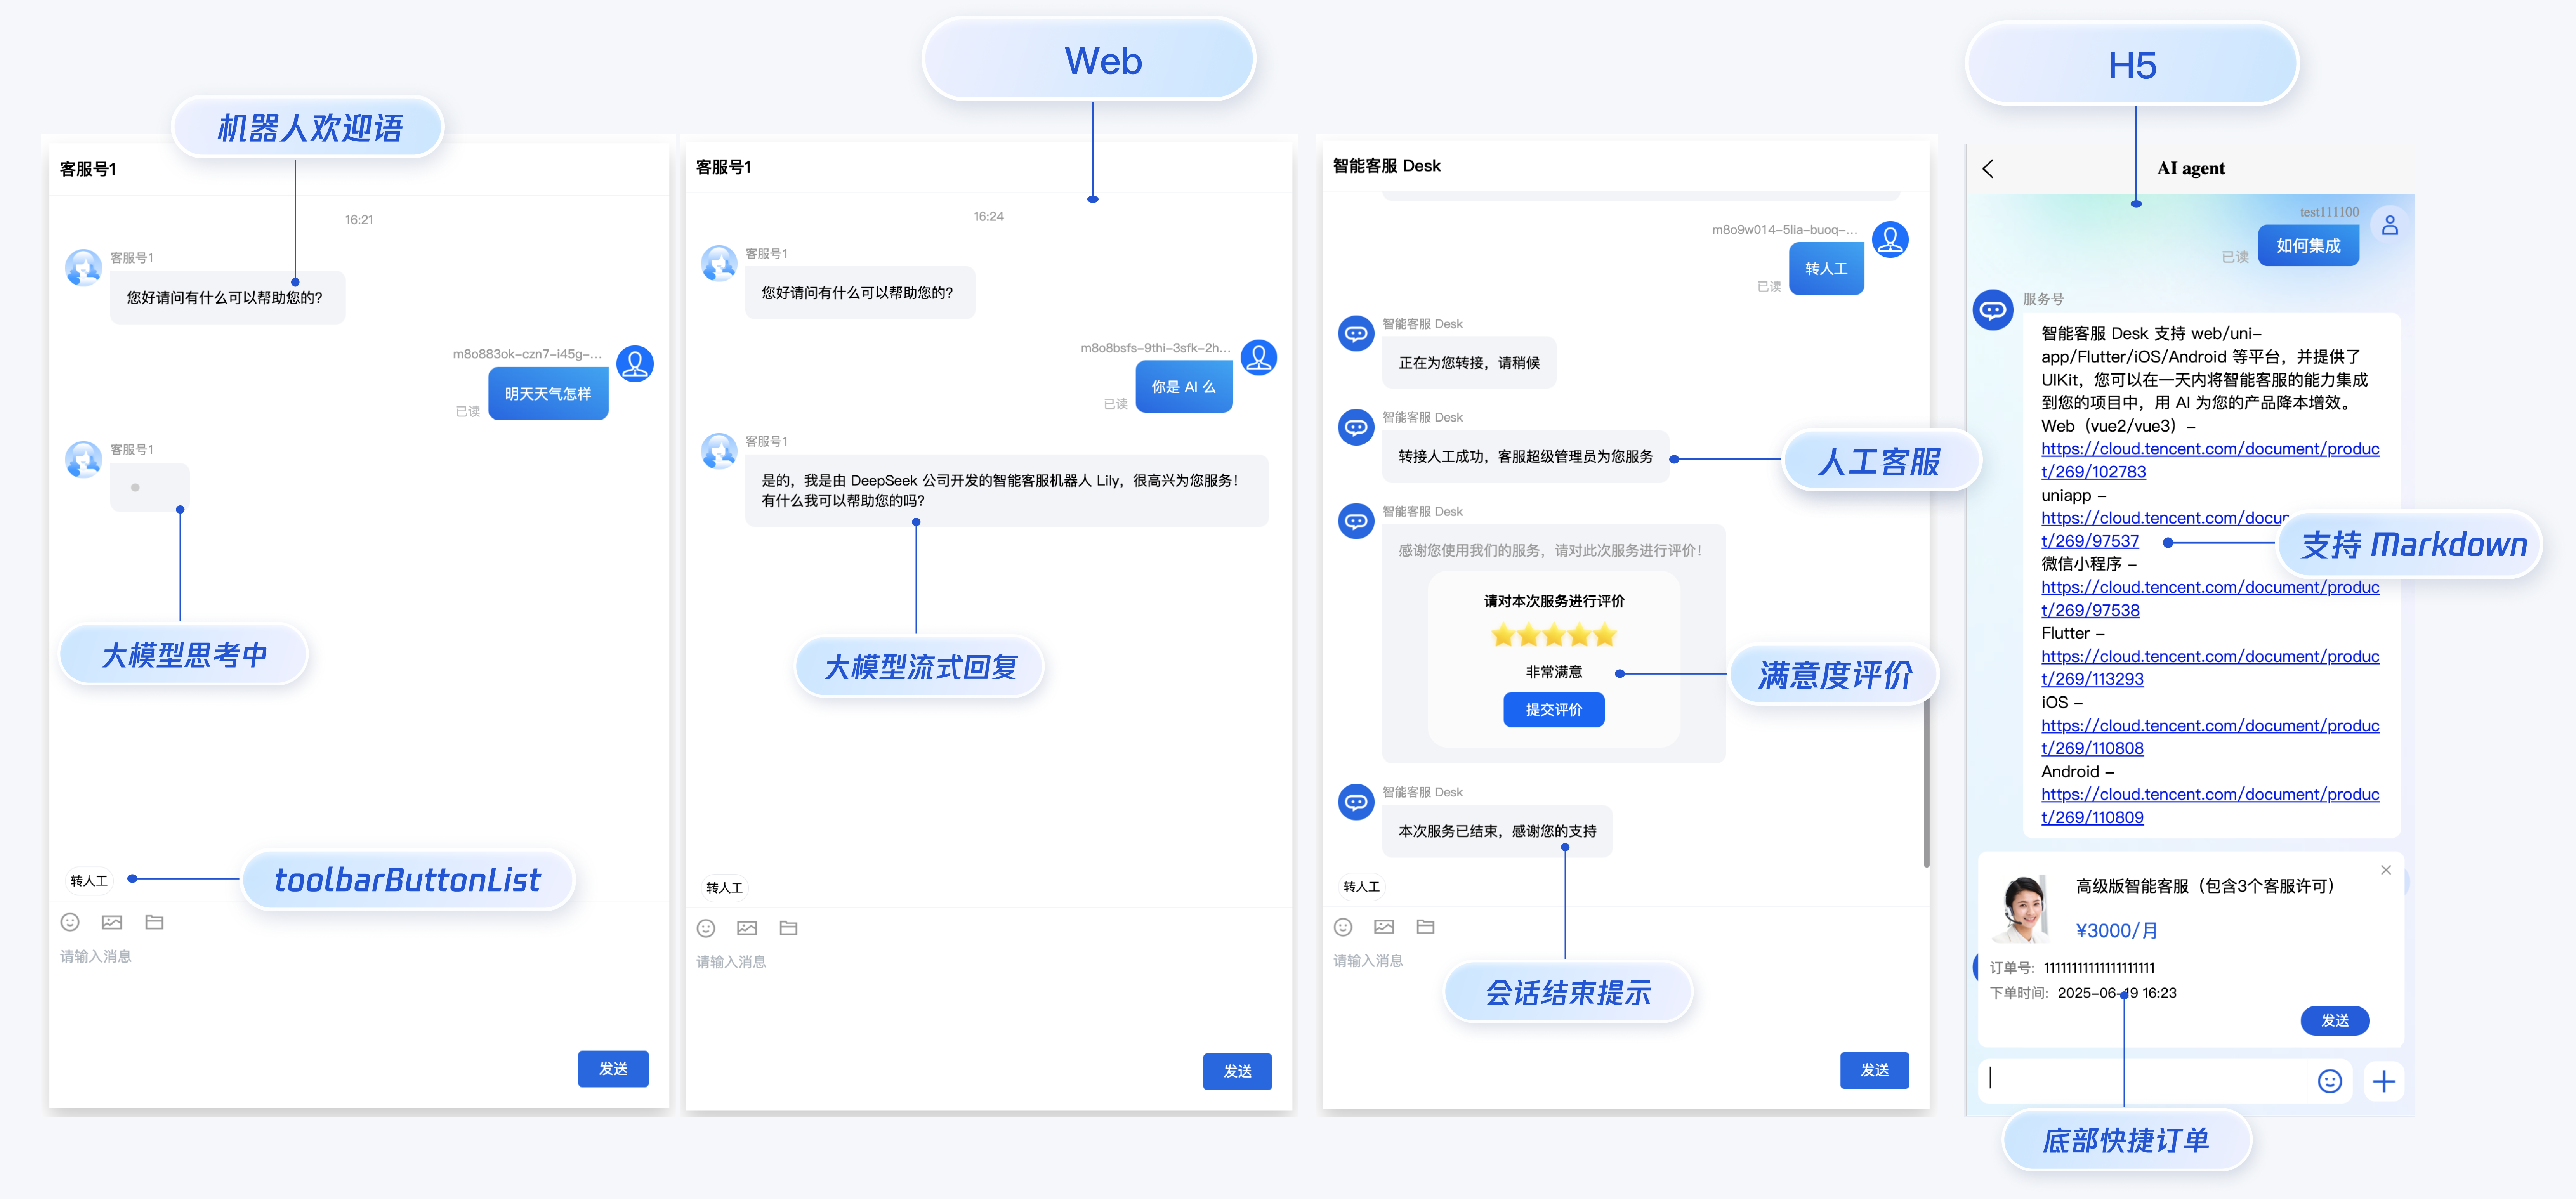
智能客服
如果您想要关于智能客服的更详细的内容,请访问腾讯云智能客服(Desk)。
开发环境要求
Vue ( 全面支持 Vue2 & Vue3 , 请您在下方接入时选择您所匹配的 Vue 版本接入指引进行接入)
TypeScript (如果您是 js 项目, 请参见 常见问题- js 工程如何接入 TUIKit 组件 进行配置 ts 渐进式支持)
sass(sass-loader 版本 ≤ 10.1.1)
node(node.js ≥ 16.0.0)
npm(版本请与 node 版本匹配)
UIKit 源码集成
步骤1:创建项目
支持使用 webpack 或 vite 创建项目工程,配置 Vue3 / Vue2 + TypeScript + sass。以下是几种项目工程搭建示例:
vue-cli
说明:
- 请确保您的
@vue/cli版本在 5.0.0 以上,您可使用以下示例代码升级@vue/cli版本至 v5.0.8。- 如果您的项目由较低版本的
@vue/cli创建,集成 UIKit 后运行项目如有报错,请查阅常见问题解决。
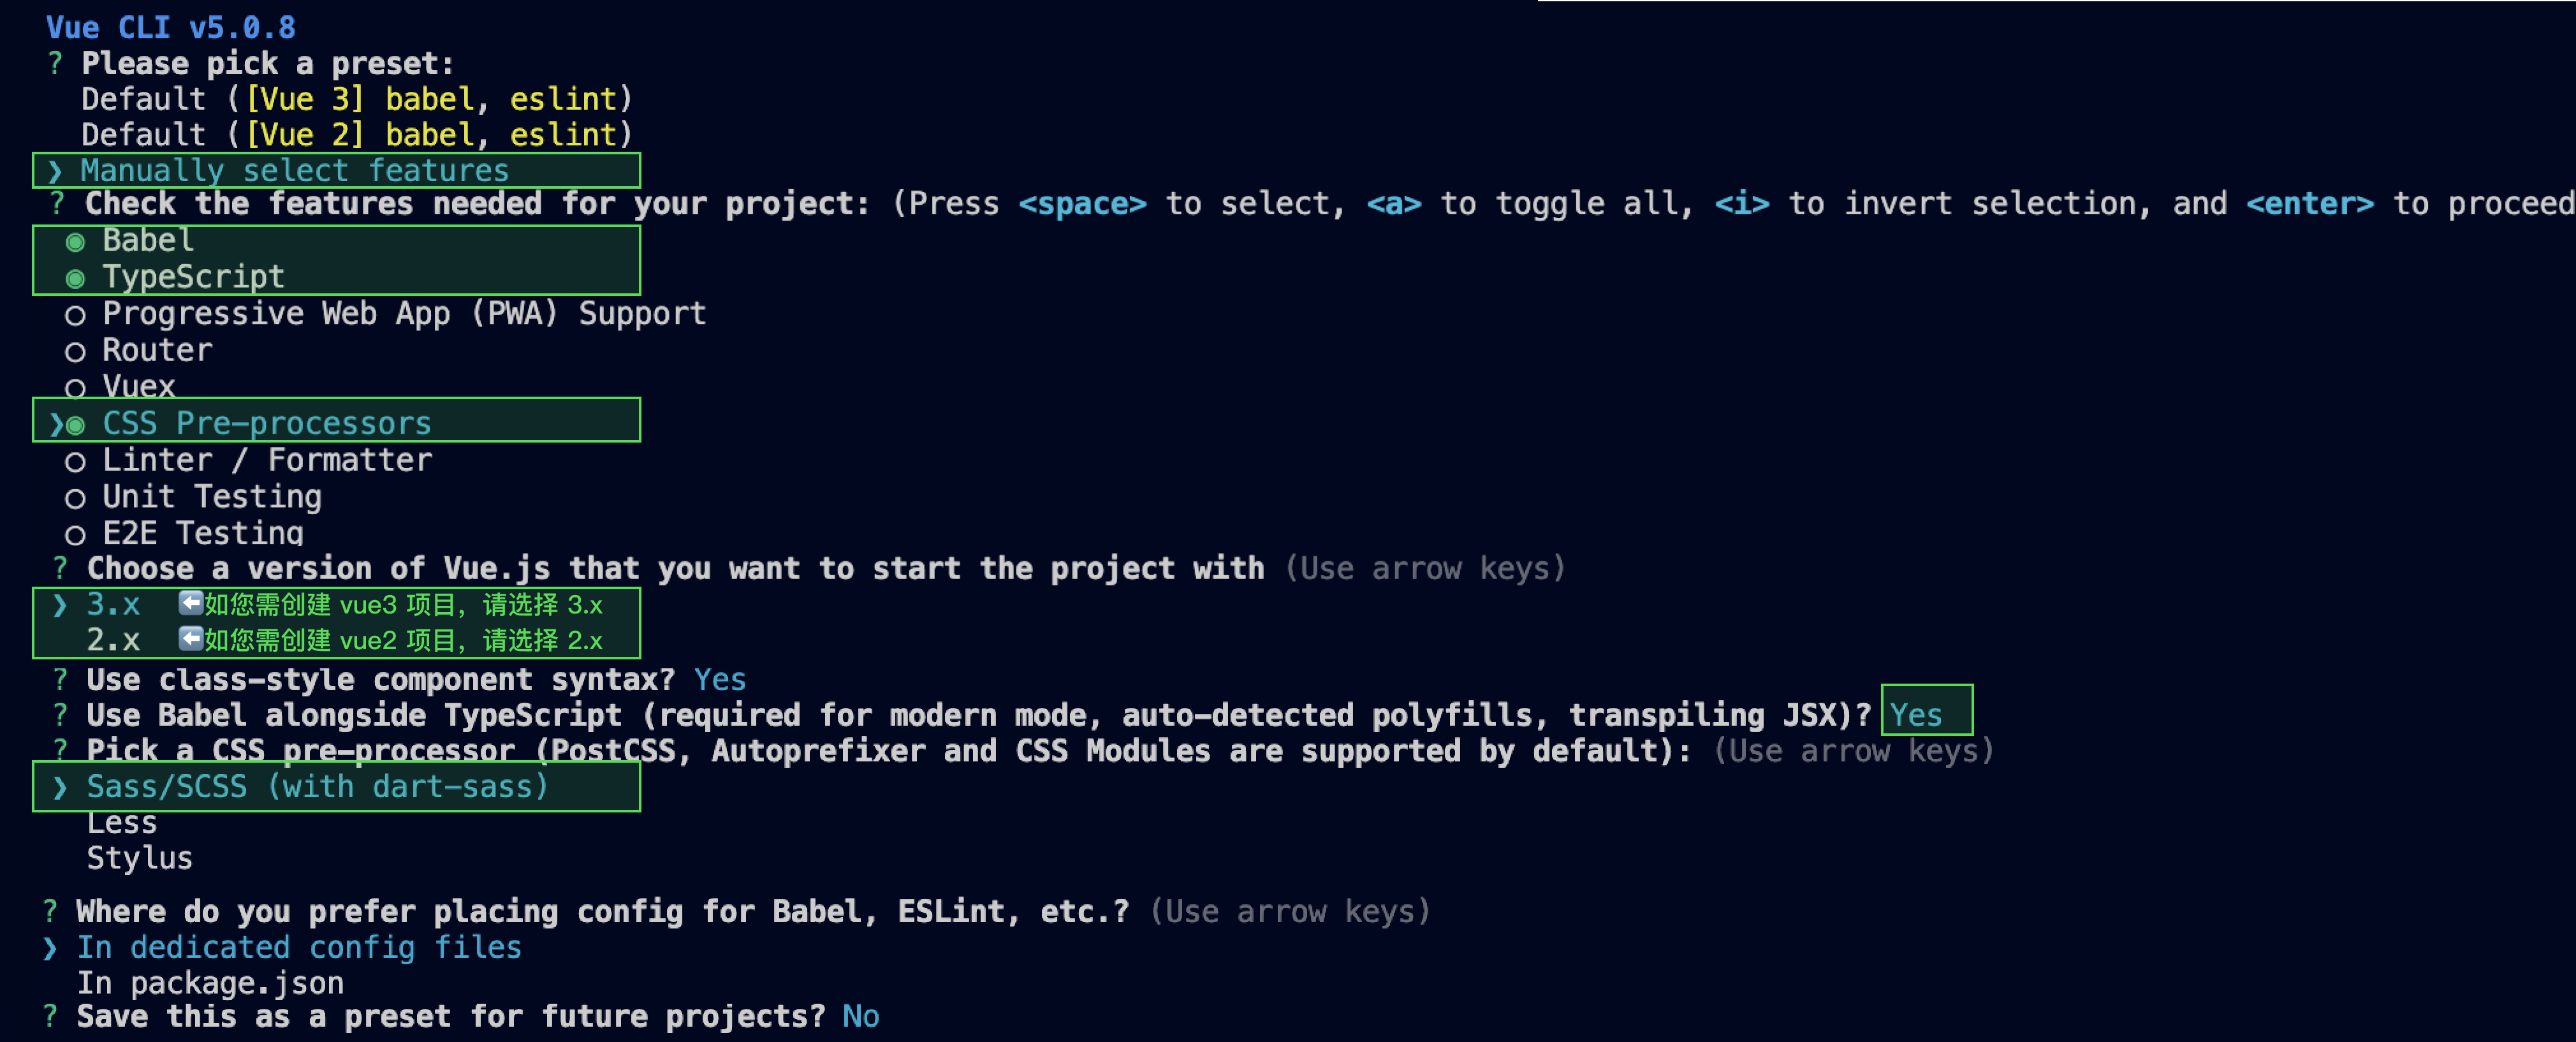
使用 vue-cli 方式创建项目, 配置 Vue2 / Vue3 + TypeScript + sass。
如果您尚未安装 vue-cli 或者 vue-cli 版本低于 5.0.0 ,可以在 terminal 或 cmd 中采用如下方式进行安装:
npm install -g @vue/[email protected] sass [email protected]通过 vue-cli 创建项目,并选择下图中所选配置项。
vue create ai-desk-example请务必保证按照如下配置选择:
创建完成后,切换到项目所在目录:
cd ai-desk-example如果您是 vue2 项目,请根据您所使用的 Vue 版本进行以下相应的环境配置, vue3 项目请忽略。
vue2.7
npm i [email protected] [email protected]vue2.6及以下
npm i @vue/composition-api unplugin-vue2-script-setup [email protected] [email protected]vite
说明:
Vite 需要Node.js** 版本 18+,20+。**当您的包管理器发出警告时,请注意升级您的 Node 版本,详情请参考 Vite 官网。
使用 vite 方式创建项目,按照下图选项配置 Vue + TypeScript 。
npm create vite@latest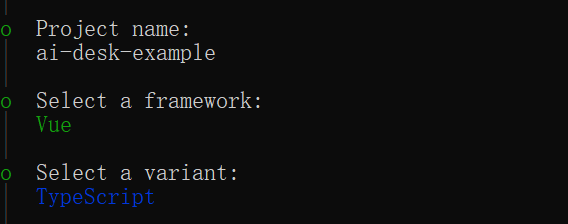
之后切换到项目目录,安装项目依赖:
cd ai-desk-example
npm install
安装插件所需 sass 环境依赖:
npm i -D sass sass-loader清除项目默认的样式,避免样式问题:
【macOS 端】
echo -n > src/style.css【Windows 端(PowerShell)】
Clear-Content -Path src/style.css【Windows 端(CMD)】
echo. > src\style.css步骤2:下载 UI 组件
通过 npm 方式下载 UI 组件,并将 UI 组件复制到自己工程的 src 目录下:
【macOS 端】
npm i @tencentcloud/ai-desk-customer-vue@latest
mkdir -p ./src/ai-desk-customer-vue && rsync -av --exclude={'node_modules','excluded-list.txt'} ./node_modules/@tencentcloud/ai-desk-customer-vue/ ./src/ai-desk-customer-vue
【Windows 端】
npm i @tencentcloud/ai-desk-customer-vue@latest
xcopy .\node_modules\@tencentcloud\ai-desk-customer-vue .\src\ai-desk-customer-vue /i /e /exclude:.\node_modules\@tencentcloud\ai-desk-customer-vue\excluded-list.txt
步骤3:引入 UI 组件
在需要展示的页面,引入 UI 的组件即可使用。
例如:在 App.vue 页面中实现以下代码,即可快速搭建客服咨询界面(以下示例代码同时支持 Web 端与 H5 端):
说明:
以下示例代码使用了 setup 语法,如果您的项目没有使用 setup 语法,请按照 Vue3/Vue2 的标准方式注册组件。
vue3
<template>
  <CustomerServiceChat
    :style="{ width: '600px', height: '80vh', margin: '10px auto', boxShadow: '0 11px 20px #ccc' }"
  />
</template>
<script setup lang="ts">
import TUICustomerServer, { CustomerServiceChat } from './ai-desk-customer-vue';
import { onMounted } from "vue";

onMounted(() => {
  const SDKAppID = 0; // Your SDKAppID,即开通了智能客服 Desk 的应用 ID
  const userID = ''; // Your userID,可复用您 app 的账号体系,或随机生成
  const userSig = ''; // Your userSig,接入阶段可控制台生成,生产阶段请务必由服务端生成
  TUICustomerServer.init(SDKAppID, userID, userSig);
});
</script>
<style scoped>
</style>
vue2.7
<template>
  <div id="app">
    <CustomerServiceChat
      :style="{ width: '600px', height: '80vh', margin: '10px auto', boxShadow: '0 11px 20px #ccc' }"
    />
  </div>
</template>
<script lang="ts" setup>
import TUICustomerServer, { CustomerServiceChat } from './ai-desk-customer-vue';
import vue from './ai-desk-customer-vue/adapter-vue';

const { onMounted } = vue;

onMounted(() => {
  const SDKAppID = 0; // Your SDKAppID
  const userID = ''; // Your userID
  const userSig = ''; // Your userSig
  TUICustomerServer.init(SDKAppID, userID, userSig);
});
</script>
<style lang="scss">
</style>
vue2.6及以下
<template>
  <div id="app">
    <CustomerServiceChat
      :style="{ width: '600px', height: '80vh', margin: '10px auto', boxShadow: '0 11px 20px #ccc' }"
    />
  </div>
</template>
<script lang="ts" setup>
import TUICustomerServer, { CustomerServiceChat } from './ai-desk-customer-vue';
import vue from './ai-desk-customer-vue/adapter-vue';

const { onMounted } = vue;

onMounted(() => {
  const SDKAppID = 0; // Your SDKAppID
  const userID = ''; // Your userID
  const userSig = ''; // Your userSig
  TUICustomerServer.init(SDKAppID, userID, userSig);
});
</script>
<style lang="scss">
</style>- 在
main.ts/main.js中引入 VueCompositionAPI。
import VueCompositionAPI from "@vue/composition-api";
Vue.use(VueCompositionAPI);- 在
vue.config.js中增加,若没有该文件请新建。
const ScriptSetup = require("unplugin-vue2-script-setup/webpack").default;
module.exports = {
  parallel: false, // disable thread-loader, which is not compactible with this plugin
  configureWebpack: {
    plugins: [
      ScriptSetup({
        /* options */
      }),
    ],
  },
  chainWebpack(config) {
    // disable type check and let `vue-tsc` handles it
    config.plugins.delete("fork-ts-checker");
  },
};- 在
src/ai-desk-customer-vue/adapter-vue-web.ts文件最后, 替换导出源:
// 初始写法
export * from "vue";
// 替换为
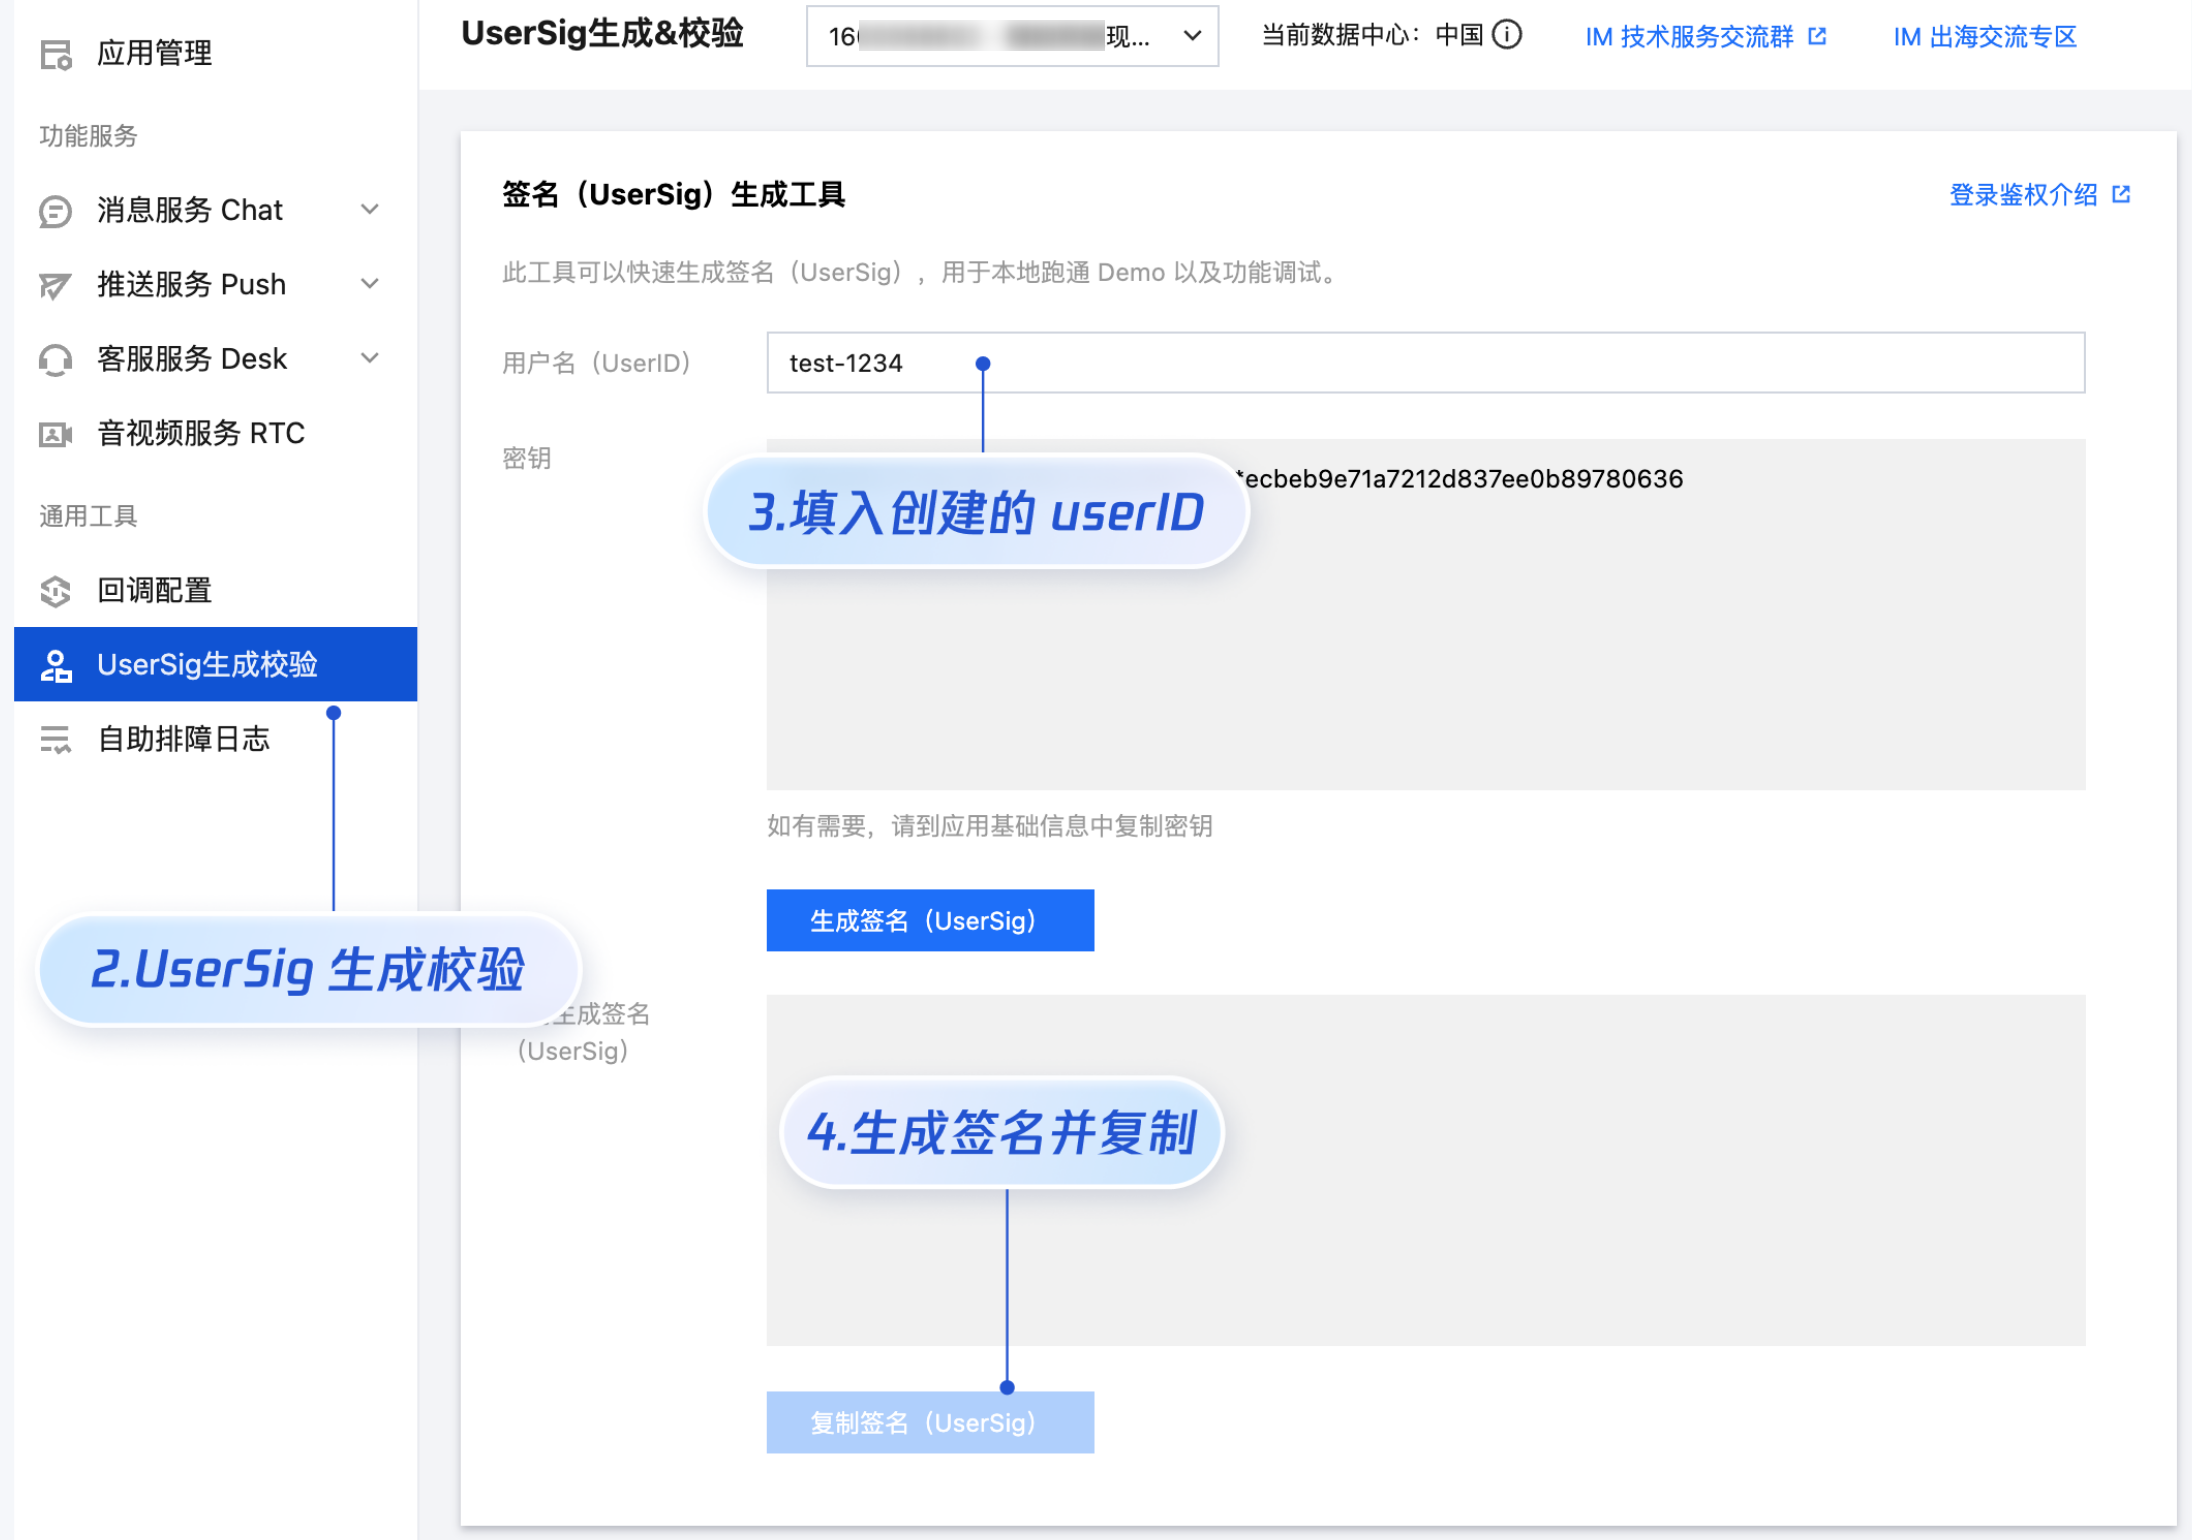
export * from "@vue/composition-api";步骤4: 获取 SDKAppID 、userID 、 userSig
设置App.vue中的 SDKAppID、userID、userSig 。
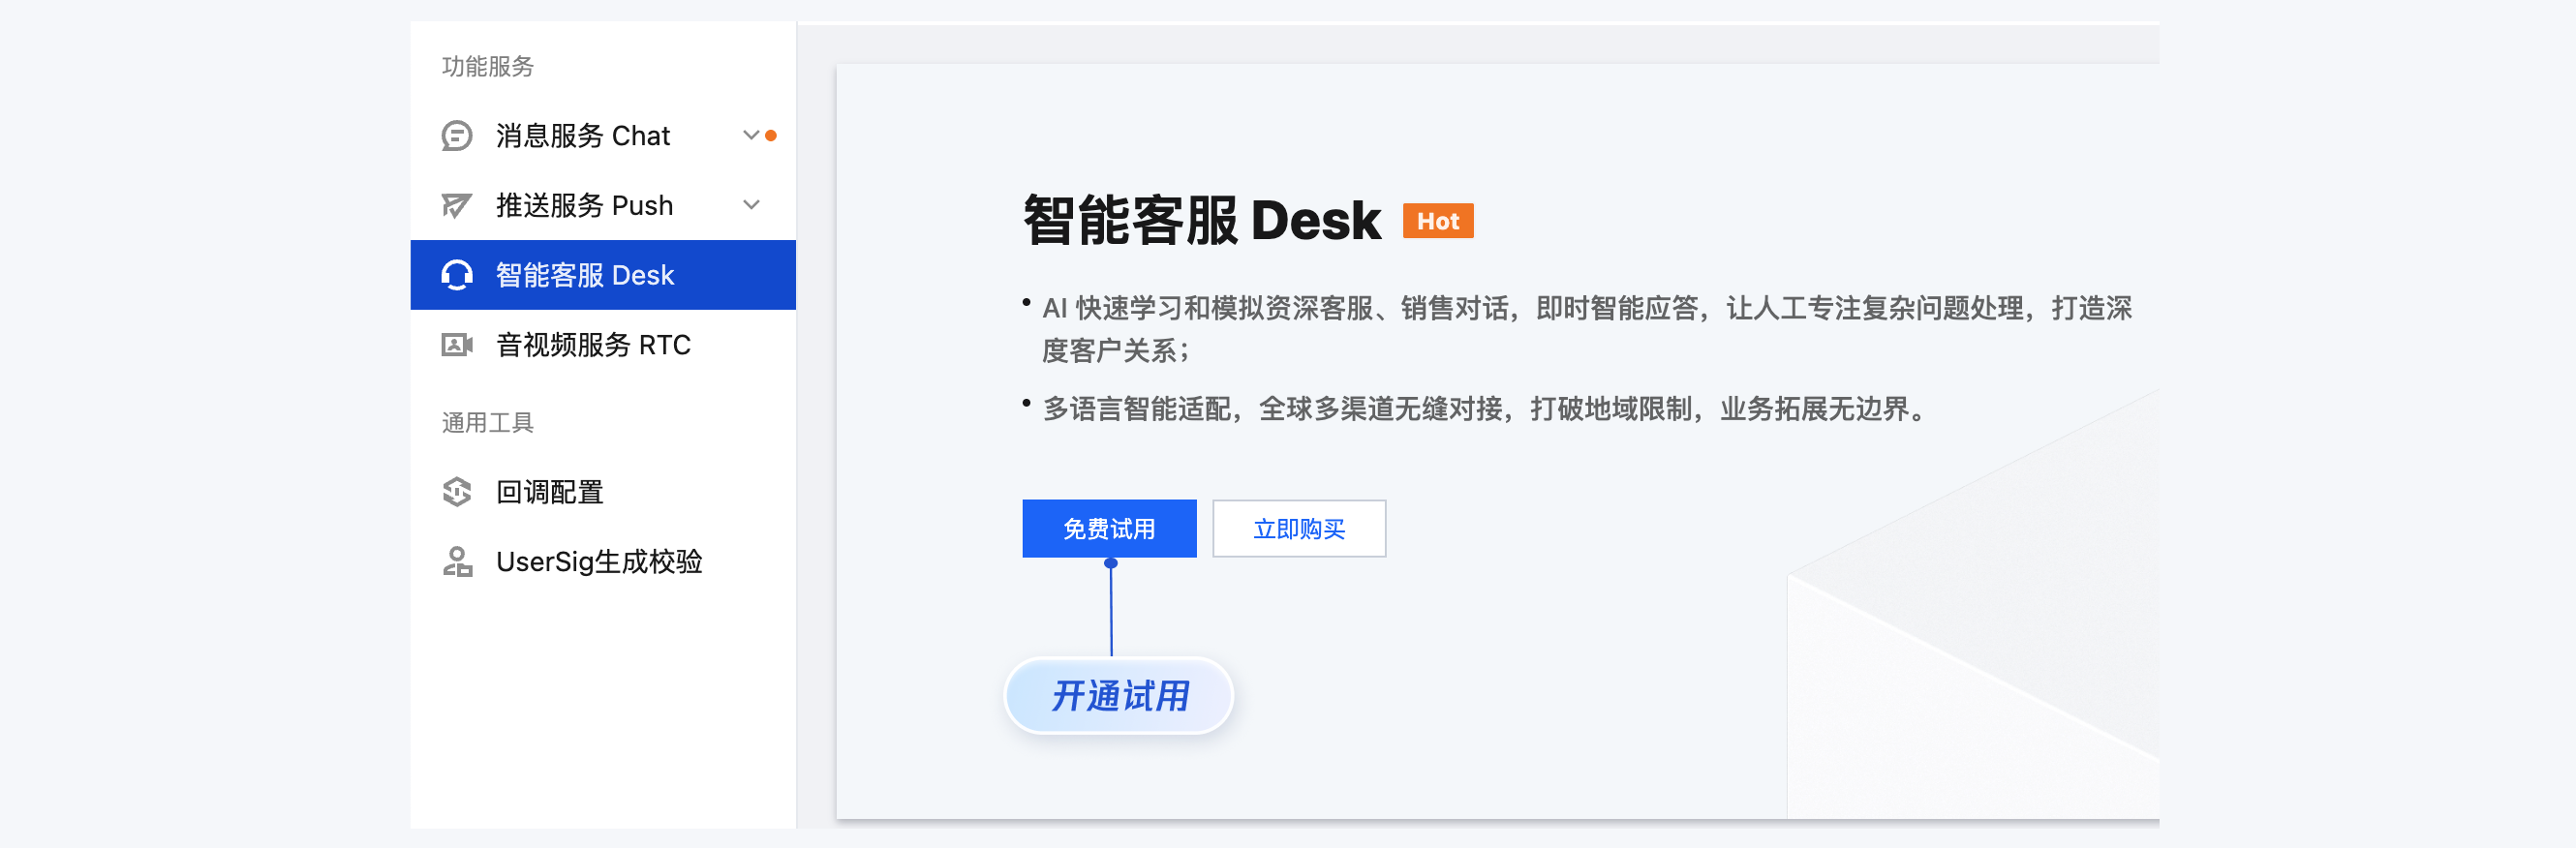
SDKAppID 信息,可在 即时通信 IM 控制台 单击应用管理 > 创建新应用,并选择智能客服 Desk, 开通智能客服 后获取。
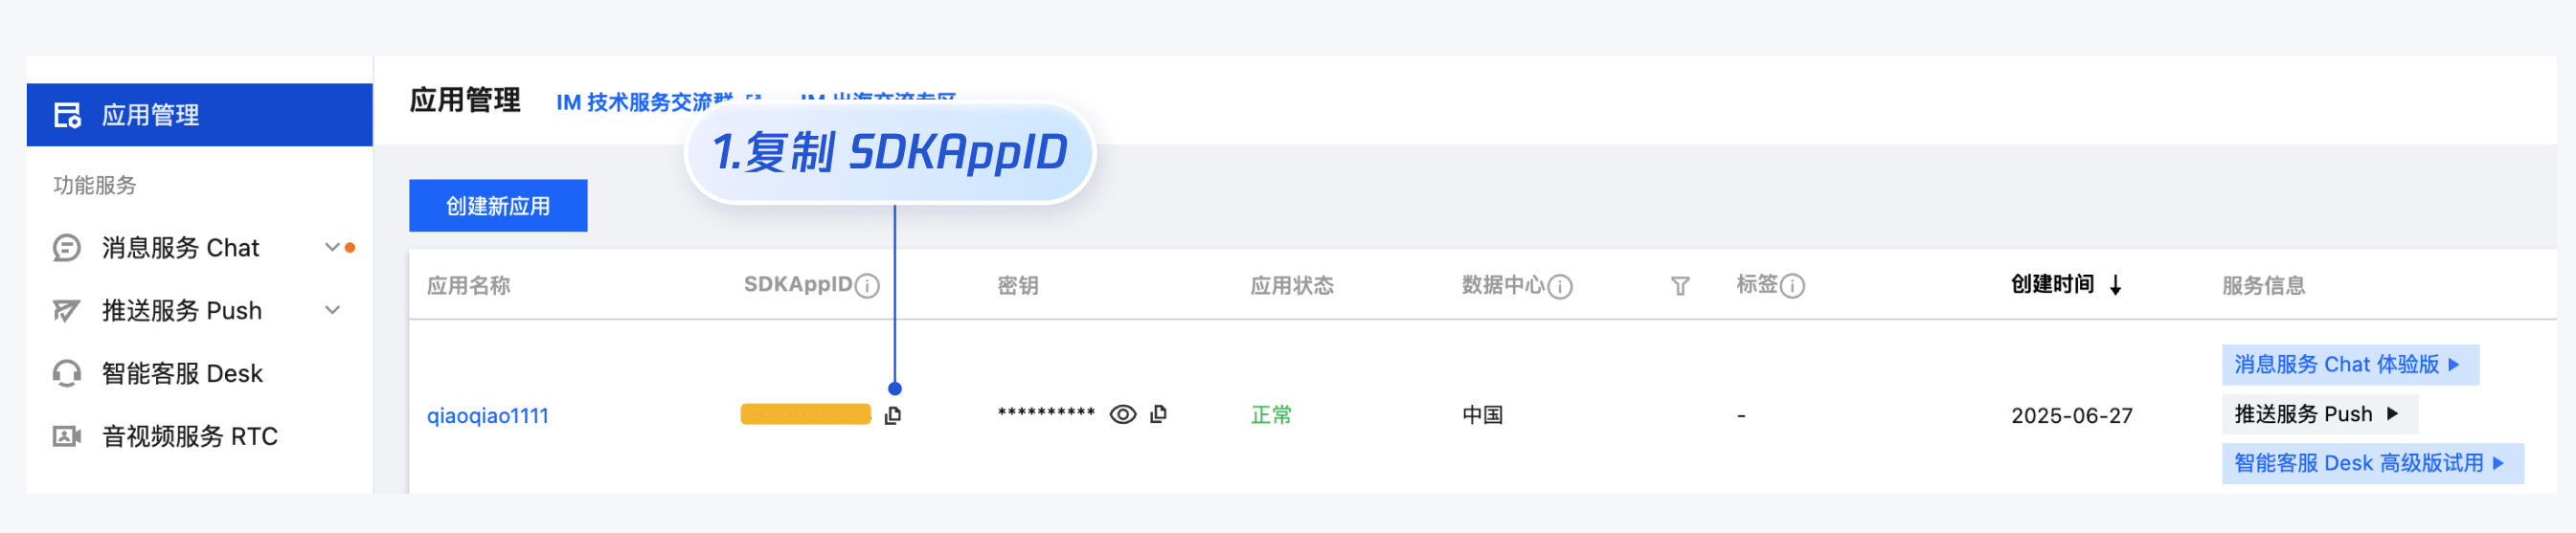
userID 信息,可本地生成一个随机的字符串,例如 test-1234。
userSig 信息,可单击 即时通信 IM 控制台 > UserSig生成校验,填写创建的 userID,即可生成 userSig。
步骤5:启动项目,发起您的第一条客服咨询
执行以下命令启动项目:
vue-cli
说明:
由于 vue-cli 默认开启 webpack 全局 overlay 报错信息提示,为了您有更好的体验,建议您关闭全局 overlay 报错提示。 在 vue.config.js 中添加以下代码
webpack4及以上
module.exports = defineConfig({devServer: {client: {overlay: false,},},});webpack3
module.exports = {devServer: {overlay: false,},};在 tsconfig.json 中关闭 ai-desk-customer-vue 的ts检测。
{"exclude": ["node_modules","src/ai-desk-customer-vue",]}
npm run servevite
npm run dev高级特性
国际化界面语言
UIKit 支持以下界面语言:
如果您的业务需要出海,且用户语言以英语为主,可在引入智能客服时设置userLang="en"。如果您不指定userLang, UIKit 会使用浏览器设置的语言。
<template>
  <CustomerServiceChat
    :style="{ width: '600px', height: '80vh', margin: '10px auto', boxShadow: '0 11px 20px #ccc' }"
    userLang="en"
  />
</template>如果您需要支持动态切换用户语言,可使用TUICustomerServer.changeLanguage接口,并通过切换 页面/组件 key 的方式,实现语言动态修改与展示。
<template>
  <CustomerServiceChat
    :style="{ width: '600px', height: '80vh', margin: '10px auto', boxShadow: '0 11px 20px #ccc' }"
    :key="locale"
    :userLang="locale"
  />
</template>
<script setup lang="ts">
import TUICustomerServer, { CustomerServiceChat } from './ai-desk-customer-vue';
import { onMounted, ref } from "vue";

const locale = ref('en');

const changeLanguage = (language: string) => {
  TUICustomerServer.changeLanguage(language).then(() => {
    locale.value = language;
  });
}
</script>
<style scoped lang="scss">
</style>
用户端带昵称和头像登录
如果人工客服在工作台接待用户咨询时,希望能看到用户的昵称、头像等信息以提升沟通效率,效果如下图所示:

请使用 initWithProfile 接口初始化,传入昵称和头像即可。
TUICustomerServer.initWithProfile({
  SDKAppID,
  userID,
  userSig,
  nickName: '张三 1852010****',
  avatar: 'https://im.sdk.qcloud.com/download/tuikit-resource/avatar/avatar_3.png'
})
工具栏快捷按钮
如果您想实现输入框上方增加快捷按钮,方便用户使用,例如增加“人工客服”,“发送订单消息”等,可在引入智能客服时设置 toolbarButtonList。效果如下所示:
toolbarButtonList 是一个包含了一个或多个配置的数组,配置的描述如下:
<template>
  <CustomerServiceChat
    :style="{ width: '600px', height: '80vh', margin: '10px auto', boxShadow: '0 11px 20px #ccc' }"
    :toolbarButtonList="toolbarButtonList"
  />
</template>
<script setup lang="ts">
import TUICustomerServer, { CustomerServiceChat } from './ai-desk-customer-vue';
import { onMounted } from 'vue';

const toolbarButtonList = [
  {"title":"人工服务","icon":"https://tccc-im-agent-avatar-1258344699.cos.ap-nanjing.myqcloud.com/toolbar_button_1.png","type":1,"content":"","isPreset":1,"presetId":"humanService","isEnabled":1},
  {"title":"服务评价","icon":"https://tccc-im-agent-avatar-sg-1258344699.cos.ap-singapore.myqcloud.com/toolbar_button_2.png","type":1,"content":"","isPreset":1,"presetId":"serviceRating","isEnabled":1},
  {"title":"结束对话","icon":"https://tccc-im-agent-avatar-sg-1258344699.cos.ap-singapore.myqcloud.com/toolbar_button_3.png","type":1,"content":"","isPreset":1,"presetId":"endHumanService","isEnabled":1},
  {"type":1,"title":"智能客服","content":"智能客服","isPreset":0,"isEnabled":1}
];

onMounted(() => {
  const SDKAppID = 0; // Your SDKAppID,即开通了智能客服 Desk 的应用 ID
  const userID = ''; // Your userID,可复用您 app 的账号体系,或随机生成
  const userSig = ''; // Your userSig,接入阶段可控制台生成,生产阶段请务必由服务端生成
  TUICustomerServer.init(SDKAppID, userID, userSig);
});
</script>
<style scoped>
</style>
底部快捷订单
说明:
请升级 ai-desk-customer-vue 到 v1.5.2 或更高版本。
如果您想实现打开客服会话时在聊天区域底部展示快捷订单,可以配置 bottomQuickOrder,效果如下所示:
bottomQuickOrder 的参数描述如下:
<template>
  <CustomerServiceChat
    :style="{ width: '600px', height: '80vh', margin: '10px auto', boxShadow: '0 11px 20px #ccc' }"
    :bottomQuickOrder="bottomQuickOrder"
  />
</template>
<script setup lang="ts">
import TUICustomerServer, { CustomerServiceChat } from './ai-desk-customer-vue';
import { onMounted } from 'vue';

const bottomQuickOrder = {
  header: "高级版智能客服(包含3个客服许可)",
  desc: "¥3000/月",
  pic: "https://cloudcache.tencent-cloud.com/qcloud/portal/kit/images/presale.a4955999.jpeg",
  url: 'https://cloud.tencent.com/document/product/269/97537',
  customField: [
    {
      name: '订单号',
      value: '11111111111111111111'
    },
    {
      name: '下单时间',
      value: '2025-07-02 16:23'
    }
  ]
};

onMounted(() => {
  const SDKAppID = 0; // Your SDKAppID,即开通了智能客服 Desk 的应用 ID
  const userID = ''; // Your userID,可复用您 app 的账号体系,或随机生成
  const userSig = ''; // Your userSig,接入阶段可控制台生成,生产阶段请务必由服务端生成
  TUICustomerServer.init(SDKAppID, userID, userSig);
});
</script>
<style scoped>
</style>
转指定坐席或客服分组
说明: 请升级 ai-desk-customer-vue 到 v1.5.6 或更高版本。
如果您的应用需要在用户登录后自动转指定坐席或客服分组,请参考以下代码实现。
【转指定坐席】
TUICustomerServer.initWithProfile({
  SDKAppID,
  userID,
  userSig,
  nickName: '张三 1852010****',
  avatar: 'https://im.sdk.qcloud.com/download/tuikit-resource/avatar/avatar_3.png'
}).then(() => {
  TUICustomerServer.transferToHuman({
    specificMemberList: ['agent_account_1', 'agent_account_2'], // 请替换为您应用的人工坐席账号
    description: 'your description'
  });
});
【转客服分组】
TUICustomerServer.initWithProfile({
  SDKAppID,
  userID,
  userSig,
  nickName: '张三 1852010****',
  avatar: 'https://im.sdk.qcloud.com/download/tuikit-resource/avatar/avatar_3.png'
}).then(() => {
  TUICustomerServer.transferToHuman({
    groupID: 0, // 请替换为您应用的客服分组 ID
    description: 'your description'
  });
});
触发指定任务流
说明: 请升级 ai-desk-customer-vue 到 v1.5.6 或更高版本。
如果您的应用需要在用户登录后自动触发指定任务流,请参考以下代码实现。
TUICustomerServer.initWithProfile({
SDKAppID,
userID,
userSig,
nickName: '张三 1852010****',
avatar: 'https://im.sdk.qcloud.com/download/tuikit-resource/avatar/avatar_3.png'
}).then(() => {
TUICustomerServer.transferToTaskFlow({
taskFlowID: 0, // 请替换为您应用的任务流 ID
description: 'your description'
});
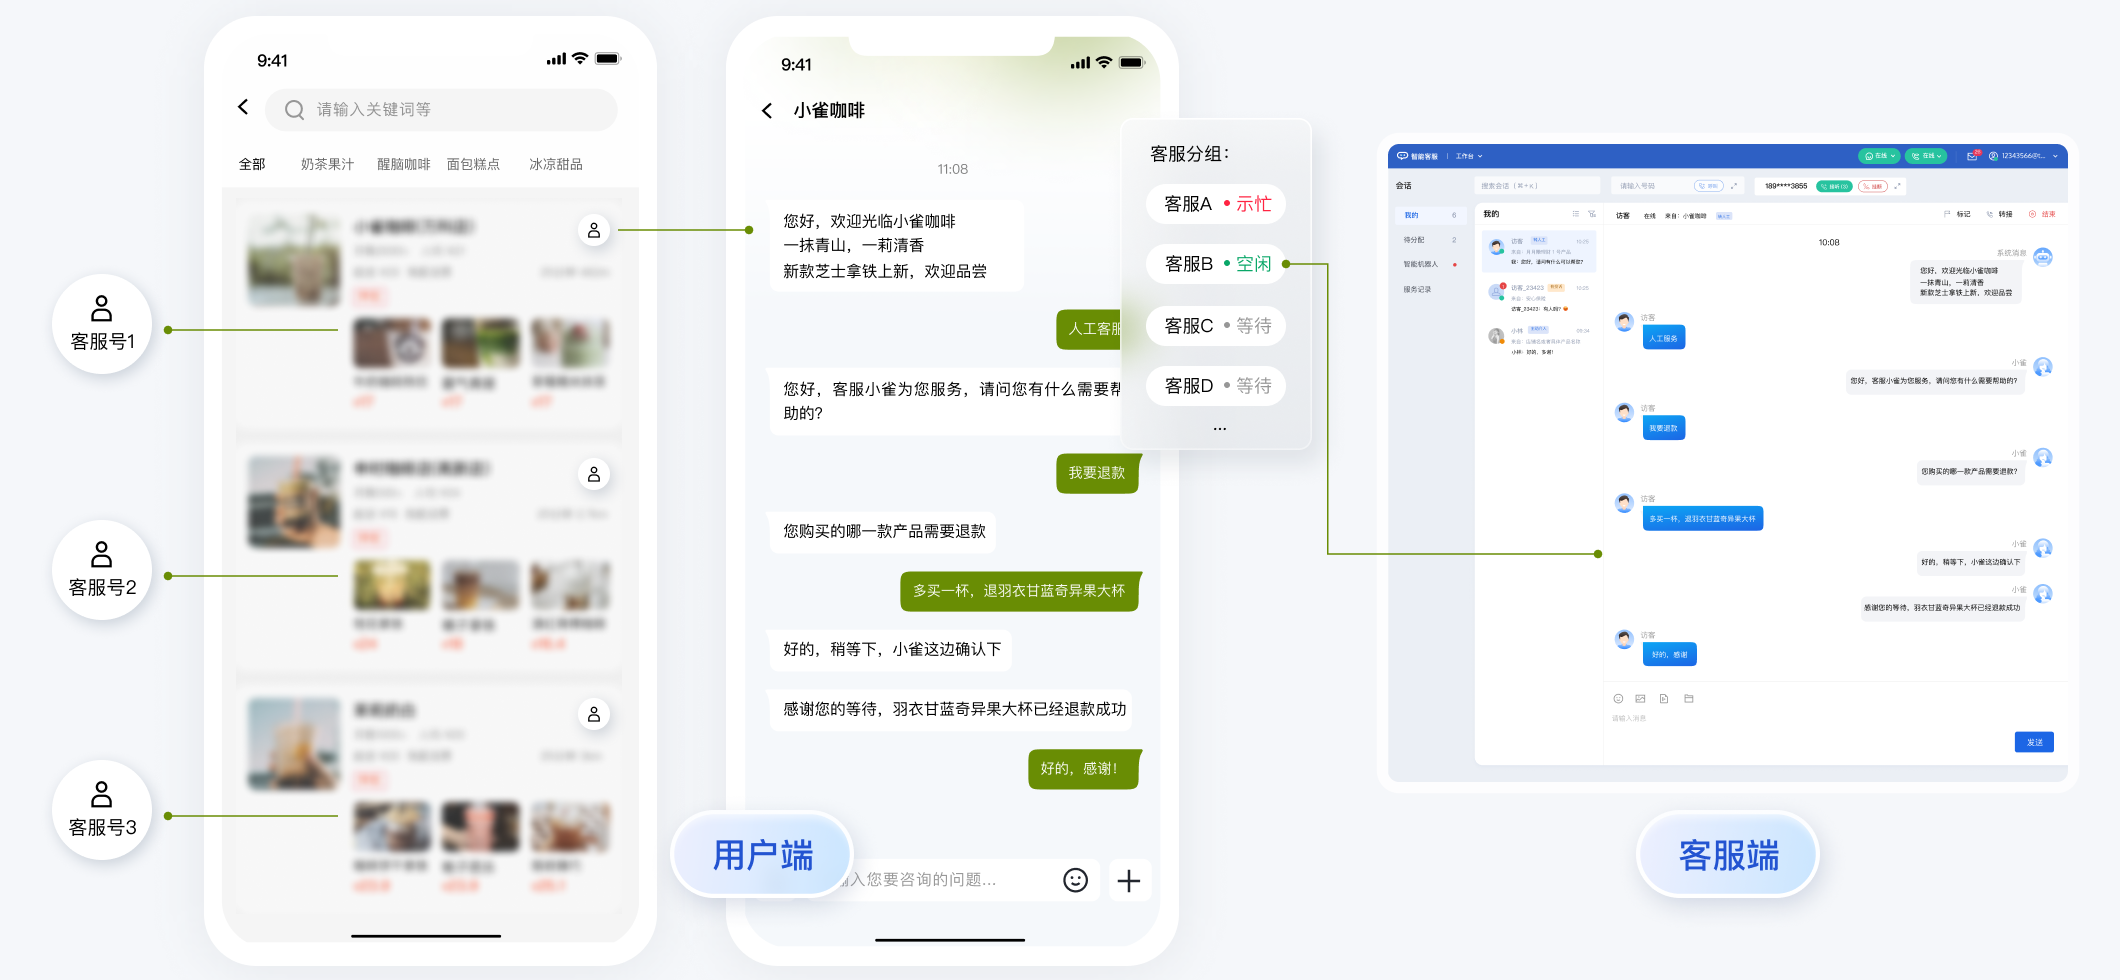
});多客服号
说明:
请升级 ai-desk-customer-vue 到 v1.5.3 或更高版本。
如果您的应用内需要多个客服号,为用户提供专属客服功能,以提高服务质量和响应速度,可用 UIKit 提供的多客服号功能实现。效果如下所示:
// 1. 初始化前将业务侧自定义的客服号 ID 传递给 UIKit
// 自定义客服号请使用 restapi - https://cloud.tencent.com/document/product/269/111798
TUICustomerServer.setCustomerServiceIDList(['customerServiceID_001', 'customerServiceID_002', 'customerServiceID_003']);
// 2. 初始化时,带上要发起会话的客服号 ID,比如 'customerServiceID_002'
// 如果不带上要发起会话的客服号 ID,则 UIKit 默认使用多客服号列表的第 1 个元素
TUICustomerServer.initWithProfile({
  SDKAppID,
  userID,
  userSig,
  nickName: '张三 1562010****',
  avatar: 'your avatar url',
  customerServiceID: 'customerServiceID_002',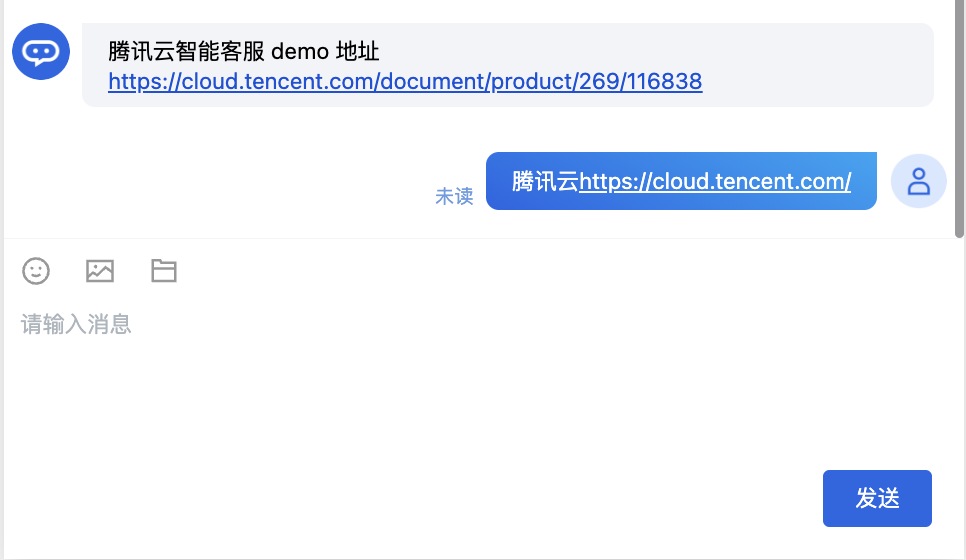
});识别文本消息超链接并支持点击
说明:
请升级 ai-desk-customer-vue 到 v1.5.9 或更高版本。
如果您的应用需要识别文本消息超链接并支持点击,请设置enableURLDetection值为 1,效果如下所示:
用户端主动结束会话
说明:
用户端可以通过发送自定义消息的方式实现主动结束会话,适用于以下 3 种情况:
- 用户转人工触发排队,发送此消息可以结束排队。
- 客服接待方式为手动接待,用户转人工分配客服成功后等待客服确认接待,发送此消息可以结束等待。
- 用户转人工且成功接入人工客服,发送此消息可以结束本次会话。
TUICustomerServer.sendCustomMessage({
  to: '@customer_service_account',
  conversationType: 'C2C',
  payload: {
    data: JSON.stringify({
      src: '27',
      customerServicePlugin: 0,
    }),
  },
}, { onlineUserOnly: true });
常见问题
什么是 UserSig?如何生成 UserSig?
UserSig 是用户登录即时通信 IM 的密码,其本质是对 UserID 等信息加密后得到的密文。
UserSig 签发方式是将 UserSig 的计算代码集成到您的服务端,并提供面向项目的接口,在需要 UserSig 时由您的项目向业务服务器发起请求获取动态 UserSig。更多详情请参见 服务端生成 UserSig。
JS 工程如何接入 TUIKit 组件?
UIKit 仅支持 ts 环境运行,您可以通过渐进式配置 typescript 来使您项目中已有的 js 代码 与 UIKit 中 ts 代码共存。
vue-cli
请在您 vue-cli 脚手架创建的工程根目录执行:
vue add typescript之后按照如下进行配置项进行选择(为了保证能同时支持原有 js 代码 与 UIKit 中 ts 代码,请您务必严格按照以下五个选项进行配置)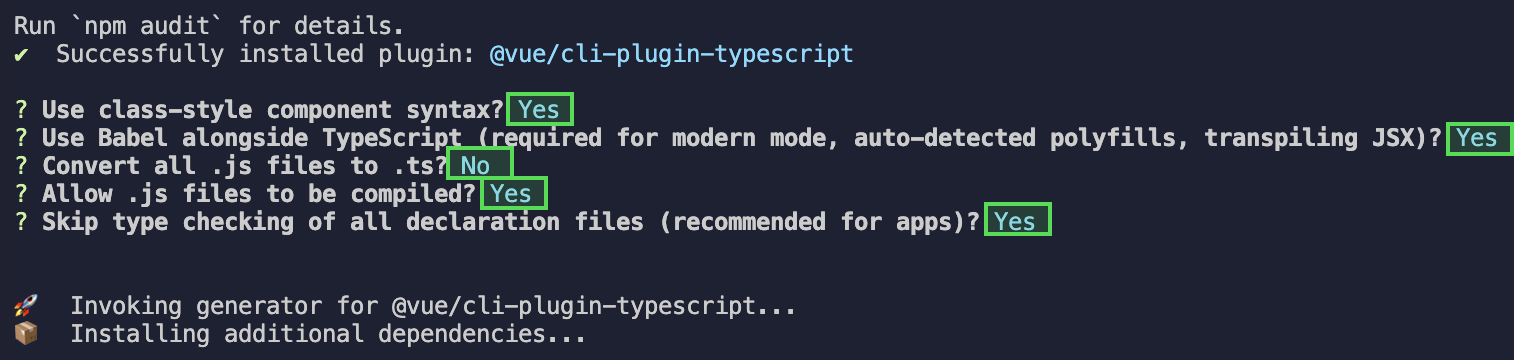
完成以上步骤后,请重新运行项目!
Vite
请在您 vite 创建的工程根目录执行:
npm install -D typescript运行报错:Uncaught TypeError: marked__WEBPACK_IMPORTED_MODULE_0_ Marked is not a constructor
如果您运行过程中出现如下错误,说明您当前 Vue CLI 构建的项目环境版本较低,需要降低 uikit 中使用的 marked 版本至 5.1.2。
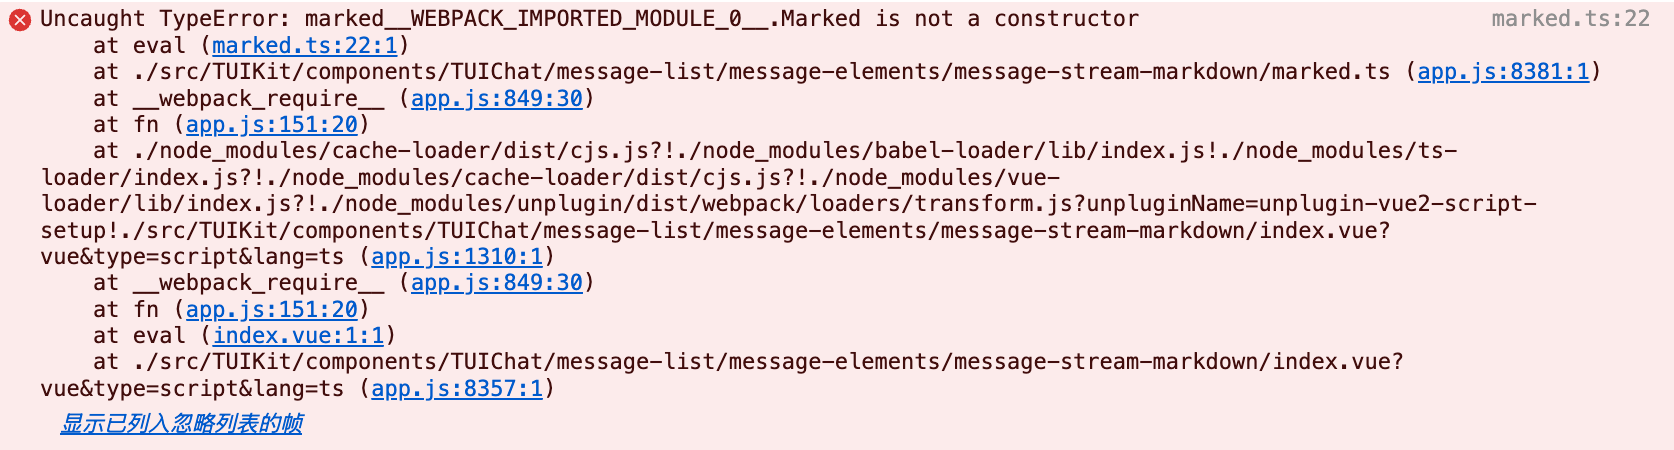
请在您项目的 根目录 使用以下脚本降低 marked 版本:
npm i [email protected] --legacy-peer-deps编译报错 node_modules/marked/lib/marked.esm.js: Class private methods are not enabled.
如果您运行过程中出现如下错误,说明您当前使用的 marked 版本过低,请升级 marked 版本至 6.0.0。

请在您项目的根目录使用以下脚本升级 marked 版本:
npm i [email protected] --legacy-peer-deps