
@tencentcloud/chat-uikit-react-native
v2.0.0
Published
Build In-App Chat & Audio/Video Call & Live Streaming in minutes with UIKit components for react-native.


Readme
About chat-uikit-react-native
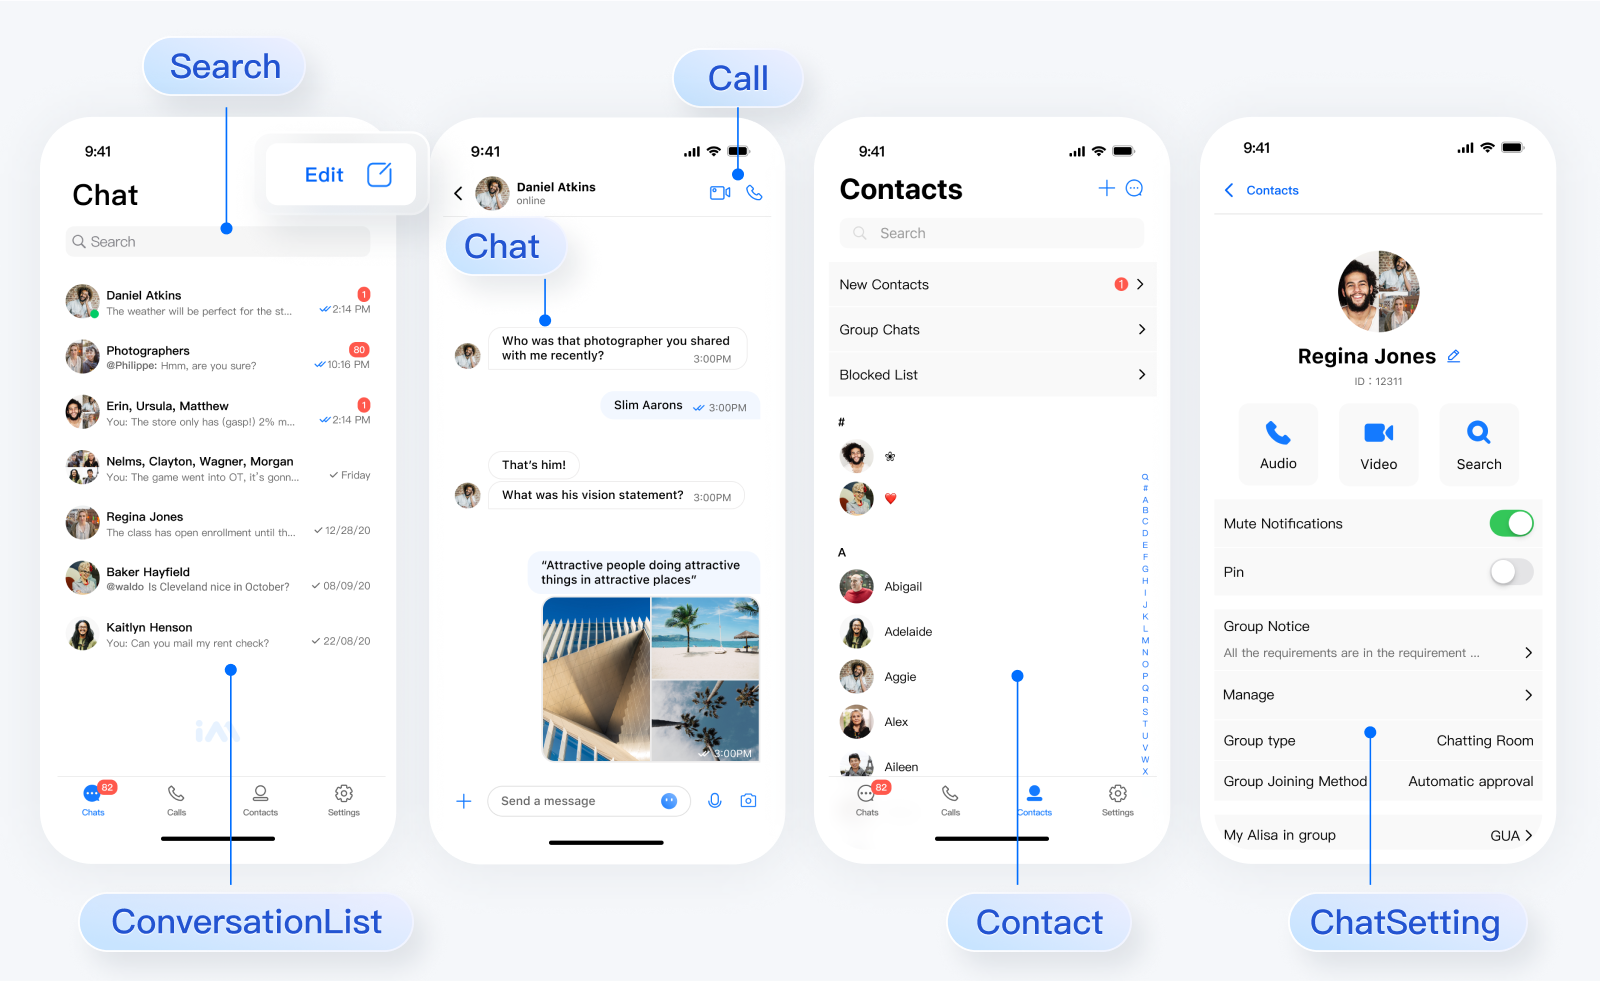
chat-uikit-react-native is a React Native UI component library based on Tencent Cloud Chat SDK. It provides universally used UI components that include ConversationList, Chat, and Group components. Leveraging these meticulously crafted UI components, you can quickly construct an elegant, reliable, and scalable Chat application.
In respect for the copyright of the emoji design, the Chat Demo/TUIKit project does not include the cutouts of large emoji elements. Please replace them with your own designed or copyrighted emoji packs before the official launch for commercial use. The default small yellow face emoji pack is copyrighted by Tencent Cloud and can be authorized for a fee. If you wish to obtain authorization, please submit a ticket to contact us.
Integrating chat-uikit-react-native
In this tutorial, you can build a free chatting application in just 10 minutes by integrating chat uikit using react native
Before getting started
This section shows the prerequisites you need to check to use @tencentcloud/chat-uikit-react-native.
Requirements
- React Native ≥ 0.76.9
- Nodejs 18 or newer
- JDK 17 or newer
- Xcode version 14.0 or newer
- Android Studio
More details, please see https://reactnative.dev/docs/environment-setup
Getting started
This section gives you information you need to get started with chat-uikit-react-native.
Create a project
npx npx create-expo-app ChatAppNavigate to the app directory and initialize it.
cd ChatApp && npm run reset-projectInstall chat-uikit-react-native
chat-uikit-react-native can be installed through either yarn or npm
use npm
npm install @tencentcloud/chat-uikit-react-nativeuse yarn
yarn add @tencentcloud/chat-uikit-react-nativeInstall media library Dependencies
npx expo install expo-image-picker expo-document-picker expo-videoConfigure app.json for Media Features
After installing the media library dependencies, you need to configure both plugins and permissions in your app.json file to ensure media features work properly:
{
  "expo": {
    "plugins": [
      "expo-router",
      [
        "expo-image-picker",
        {
          "photosPermission": "The app accesses your photos to let you share them with your friends.",
          "colors": {
            "cropToolbarColor": "#000000"
          },
          "dark": {
            "colors": {
              "cropToolbarColor": "#000000"
            }
          }
        }
      ],
      [
        "expo-document-picker",
        {
          "iCloudContainerEnvironment": "Production"
        }
      ],
      "expo-video"
    ],
    "android": {
      "permissions": [
        "android.permission.READ_MEDIA_IMAGES",
        "android.permission.READ_MEDIA_AUDIO",
        "android.permission.READ_MEDIA_VIDEO",
        "android.permission.READ_EXTERNAL_STORAGE",
        "android.permission.WRITE_EXTERNAL_STORAGE"
      ]
    },
    "ios": {
      "infoPlist": {
        "NSCameraUsageDescription": "This app needs access to camera to take photos and videos for sharing.",
        "NSMicrophoneUsageDescription": "This app needs access to microphone to record audio messages.",
        "NSPhotoLibraryUsageDescription": "This app needs access to photo library to select images and videos for sharing.",
        "NSPhotoLibraryAddUsageDescription": "This app needs access to save photos to your photo library."
      }
    }
  }
}
Login chat-uikit-react-native
Now you can use TUILogin login to chat-uikit-react-native.
The options parameter is of the Object type. It contains the following attribute values:
| Name | Type | Description |
| --- | --- | --- |
| SDKAppID | number | Required, SDKAppID of the chat app |
| userID | string | Required, user ID|
| userSig |string | Required, the password with which the user logs in to the Chat console. It is essentially the ciphertext generated by encrypting information such as the UserID. For the detailed generation method, see Generating UserSig |
| useUploadPlugin | boolean | Optional, whether to use the upload plugin, the default is false |
| framework | string | undefined | Required, UI framework type, optional values: rn、undefined |
import { TUILogin } from '@tencentcloud/tui-core';
TUILogin.login(options);
Integration with navigation library
The example below shows how to integrate using expo-router (which is already included in your Expo project).
Register screens to navigator
Replace the content in app/index.tsx, or you can create a new component to import it.
import { TUITranslateService } from '@tencentcloud/chat-uikit-engine';
import { TUILogin } from '@tencentcloud/tui-core';
import React, { useState } from 'react';
import {
  Image,
  StyleSheet,
  Text,
  TouchableOpacity,
  View,
} from 'react-native';
import { ChatScreen, ChatSettingScreen, ConversationListScreen } from './Screens';
import { UIKitProvider } from '@tencentcloud/chat-uikit-react-native';
import resources from '@tencentcloud/chat-uikit-react-native/i18n';

type ScreenType = 'login' | 'conversation-list' | 'chat' | 'chat-setting';

const App = () => {
  const [currentScreen, setCurrentScreen] = useState<ScreenType>('login');
  const [screenStack, setScreenStack] = useState<ScreenType[]>(['login']);

  // Init localization
  TUITranslateService.provideLanguages(resources);
  TUITranslateService.useI18n('en-US');

  const navigateTo = (screen: ScreenType) => {
    setScreenStack(prev => [...prev, screen]);
    setCurrentScreen(screen);
  };

  const navigateBack = () => {
    if (screenStack.length > 1) {
      const newStack = screenStack.slice(0, -1);
      setScreenStack(newStack);
      setCurrentScreen(newStack[newStack.length - 1]);
    }
  };

  // Login
  const Login = () => {
    TUILogin.login({
      SDKAppID: 0, // Your SDKAppID
      userID: '', // Login UserID
      userSig: '', // Login userSig
      useUploadPlugin: true,
      framework: 'rn',
    }).then(() => {
      navigateTo('conversation-list');
    });
  };

  const LoginScreen = () => (
    <UIKitProvider>
      <View style={styles.container}>
        <Image
          style={styles.logo}
          source={{uri:'https://web.sdk.qcloud.com/im/assets/images/tencent_rtc_logo.png'}}
        />
        <TouchableOpacity style={styles.buttonContainer} onPress={Login}>
          <Text style={styles.buttonText}>Log in</Text>
        </TouchableOpacity>
      </View>
    </UIKitProvider>
  );

  const renderScreen = () => {
    switch (currentScreen) {
      case 'login':
        return <LoginScreen />;
      case 'conversation-list':
        return <ConversationListScreen navigateTo={navigateTo} />;
      case 'chat':
        return <ChatScreen navigateTo={navigateTo} navigateBack={navigateBack} />;
      case 'chat-setting':
        return <ChatSettingScreen navigateTo={navigateTo} navigateBack={navigateBack} />;
      default:
        return <LoginScreen />;
    }
  };

  return renderScreen();
};

const styles = StyleSheet.create({
  container: {
    flex: 1,
    justifyContent: 'center',
    alignItems: 'center',
    backgroundColor: '#FFFFFF',
  },
  logo: {
    width: 232,
    height: 80,
  },
  buttonContainer: {
    width: '80%',
    justifyContent: 'center',
    alignItems: 'center',
    paddingVertical: 11,
    borderRadius: 5,
    backgroundColor: '#2F80ED',
  },
  buttonText: {
    fontSize: 18,
    lineHeight: 24,
    color: '#FFFFFF',
  },
});

export default App;
Create a fragments and screens
Create a new Screens.tsx file in the same directory as the app/index.tsx file.
import React from 'react';
import { Chat, ChatSetting, ConversationList, UIKitProvider } from '@tencentcloud/chat-uikit-react-native';

type ScreenType = 'login' | 'conversation-list' | 'chat' | 'chat-setting';

interface NavigationProps {
  navigateTo: (screen: ScreenType) => void;
  navigateBack?: () => void;
}

// Conversation List Screen Component
export const ConversationListScreen = ({ navigateTo }: NavigationProps) => {
  const onPressConversation = () => {
    navigateTo('chat');
  };

  return (
    <UIKitProvider>
      <ConversationList onPressConversation={onPressConversation} />
    </UIKitProvider>
  );
};

// Chat Screen Component
export const ChatScreen = ({ navigateTo, navigateBack }: NavigationProps) => {
  const handleNavigateBack = () => {
    navigateBack?.();
  };

  const navigateToChatSetting = () => {
    navigateTo('chat-setting');
  };

  return (
    <UIKitProvider>
      <Chat
        navigateBack={handleNavigateBack}
        navigateToChatSetting={navigateToChatSetting}
      />
    </UIKitProvider>
  );
};

// Chat Setting Screen Component
export const ChatSettingScreen = ({ navigateTo, navigateBack }: NavigationProps) => {
  // Navigate to Chat when you click header back button.
  const handleNavigateBack = () => {
    navigateBack?.();
  };

  // Navigate to Chat when you click the send message button.
  const navigateToChat = () => {
    navigateBack?.();
  };

  // Navigate to ConversationList when you disband group or leave group.
  const navigateToConversationList = () => {
    navigateTo('conversation-list');
  };

  return (
    <UIKitProvider>
      <ChatSetting
        navigateBack={handleNavigateBack}
        navigateToChat={navigateToChat}
        navigateToConversationList={navigateToConversationList}
      />
    </UIKitProvider>
  );
};
Compile and Run ChatApp
To compile and run the project, you need to use a real device or an emulator.A real device is recommended. You can refer to the React Native official website running-on-device to connect a real device for debugging.
Android
- Enable Developer Mode on your phone, and turn on theUSB Debugging switch.
- Connect your phone via USB. It's recommended to select the Transfer files option, do not choose the Charging only option.
- After confirming the successful connection of your phone, execute npm run android to compile and run the project.
- npm
npm run android- yarn
yarn androidiOS
- Connect your mobile phone with a USB cable, and open the ios directory of the project using Xcode.
- Configure the signing information according to the React Native official website running-on-device.
- Go to the ios directory and install dependencies.
- npm
npm run ios- yarn
yarn ios