
@tensorflow-models/pose-detection
v2.1.3
Published
Pretrained pose detection model


Keywords
Readme
Pose Detection
This package provides multiple state-of-the-art models for running real-time pose detection.
Currently, we provide 3 model options:
MoveNet
MoveNet is an ultra fast and accurate model that detects 17 keypoints of a body. It can run at 50+ fps on modern laptops and phones.
BlazePose:
MediaPipe BlazePose can detect 33 keypoints, in addition to the 17 COCO keypoints, it provides additional keypoints for face, hands and feet.
PoseNet
PoseNet can detect multiple poses, each pose contains 17 keypoints.
Table of Contents
How to Run It
In general there are two steps:
You first create a detector by choosing one of the models from SupportedModels,
including MoveNet, BlazePose and PoseNet.
For example:
const model = poseDetection.SupportedModels.MoveNet;
const detector = await poseDetection.createDetector(model);
Then you can use the detector to detect poses.
const poses = await detector.estimatePoses(image);The returned poses list contains detected poses for each individual in the image. For single-person models, there will only be one element in the list. Currently, only PoseNet supports multi-pose estimation. If the model cannot detect any poses, the list will be empty.
For each pose, it contains a confidence score of the pose and an array of keypoints. PoseNet and MoveNet both return 17 keypoints. MediaPipe BlazePose returns 33 keypoints. Each keypoint contains x, y, score and name. In addition, MediaPipe BlazePose also returns an array of 3D keypoints and a segmentation mask.
Example output:
[
  {
    score: 0.8,
    keypoints: [
      {x: 230, y: 220, score: 0.9, score: 0.99, name: "nose"},
      {x: 212, y: 190, score: 0.8, score: 0.91, name: "left_eye"},
      ...
    ],
    keypoints3D: [
      {x: 0.65, y: 0.11, z: 0.05, score: 0.99, name: "nose"},
      ...
    ],
    segmentation: {
      maskValueToLabel: (maskValue: number) => { return 'person' },
      mask: {
        toCanvasImageSource(): ...
        toImageData(): ...
        toTensor(): ...
        getUnderlyingType(): ...
      }
    }
  }
]
For the keypoints, x and y represent the actual keypoint position in the image.
If you need normalized keypoint positions, you can use the method
poseDetection.calculators.keypointsToNormalizedKeypoints(keypoints, imageSize) to
convert x and y to [0, 1] range.
For the keypoints3D, x, y and z represent absolute distance in meters in a
2 x 2 x 2 meter cubic space. The range for each axis goes from -1 to 1 (therefore
2m total delta). The z is always perpendicular to the xy plane that passes the
center of the hip, so the coordinate for the hip center is (0, 0, 0).
The score ranges from 0 to 1. It represents the model's confidence of a keypoint. Usually, keypoints with low confidence scores should not be used. Each application may require a custom confidence threshold. For applications that require high precision, we recommend a larger confidence value. Conversely, applications that require high recall may choose to lower the threshold. The confidence values are not calibrated between models, and therefore setting a proper confidence threshold may involve some experimentation.
The name provides a label for each keypoint, such as 'nose', 'left_eye', 'right_knee', etc.
The mask key of segmentation stores an object which provides access to the underlying mask image using the conversion functions toCanvasImageSource, toImageData, and toTensor depending on the desired output type. Note that getUnderlyingType can be queried to determine what is the type being used underneath the hood to avoid expensive conversions (such as from tensor to image data).
The semantics of the RGBA values of the mask is as follows: the image mask is the same size as the input image, where green and blue channels are always set to 0. Different red values denote different segmentation labels (see maskValueToLabel key below, currently only foreground/background segmentation is performed). Different alpha values denote the probability of pixel being a foreground pixel (0 being lowest probability and 255 being highest).
maskValueToLabel key of segmentation maps the mask key's foreground pixel’s red value to the name of that pixel. Should throw error for unsupported input values. BlazePose will always return 'person' since it is a binary segmentation.
Refer to each model's documentation for specific configurations for the model and their performance.
BlazePose MediaPipe Documentation
Keypoint Diagram
See the diagram below for what those keypoints are and their index in the array.
COCO Keypoints: Used in MoveNet and PoseNet
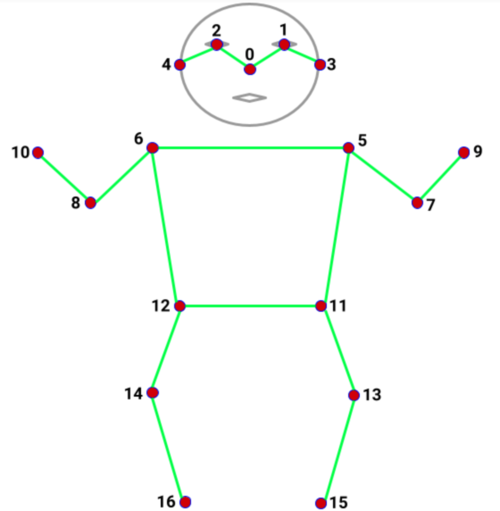
0: nose
1: left_eye
2: right_eye
3: left_ear
4: right_ear
5: left_shoulder
6: right_shoulder
7: left_elbow
8: right_elbow
9: left_wrist
10: right_wrist
11: left_hip
12: right_hip
13: left_knee
14: right_knee
15: left_ankle
16: right_ankle
BlazePose Keypoints: Used in MediaPipe BlazePose
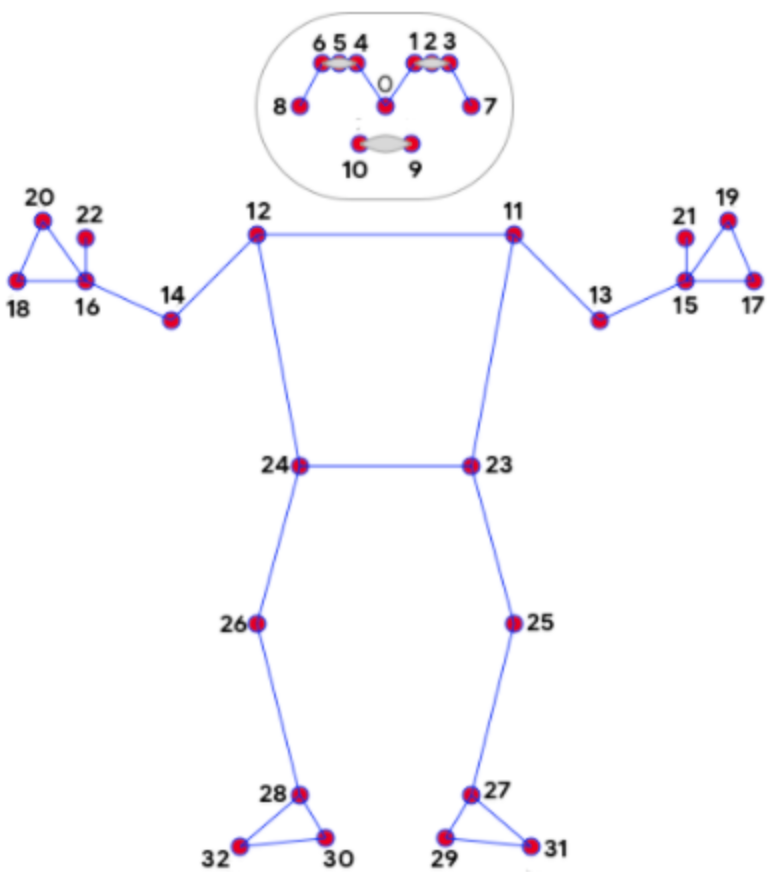
0: nose
1: left_eye_inner
2: left_eye
3: left_eye_outer
4: right_eye_inner
5: right_eye
6: right_eye_outer
7: left_ear
8: right_ear
9: mouth_left
10: mouth_right
11: left_shoulder
12: right_shoulder
13: left_elbow
14: right_elbow
15: left_wrist
16: right_wrist
17: left_pinky
18: right_pinky
19: left_index
20: right_index
21: left_thumb
22: right_thumb
23: left_hip
24: right_hip
25: left_knee
26: right_knee
27: left_ankle
28: right_ankle
29: left_heel
30: right_heel
31: left_foot_index
32: right_foot_index
33: bodyCenter
34: forehead
35: leftThumb
36: leftHand
37: rightThumb
38: rightHand \
Example Code and Demos
You may reference the demos for code examples. Details for how to run the demos
are included in the demos/
folder.