
@tibame201020/queqiao
v0.9.15
Published
One secure bridge between AI clients and multiple coding environments.

Maintainers
 tibame201020
Readme
Queqiao
English | 繁體中文


Queqiao 是 AI client 與本機開發環境之間的安全橋接層。公開 Gateway 負責 MCP ingress、驗證、路由與 Worker membership;Windows、WSL、Linux 或遠端環境各自執行自己的 Worker,讓檔案系統與程序操作留在實際擁有它們的環境內。
安裝
需求:Node.js >=22.19 <25、npm >=9。
npm install --global @tibame201020/queqiao
queqiao --version
你要建立的是什麼
AI client
   ↓ HTTPS / MCP
Gateway
   ↓ enrolled Worker
Worker
   ↓ authorized root
Workspace- Gateway — 公開 MCP endpoint、OAuth、routing、Worker membership。
- Worker — 單一 OS/環境的 native execution host。
- Workspace — Worker 擁有的 authority boundary,限制 filesystem root、Tools 與 executable commands。
- Access Profile — 可重複使用的 Workspace authority template。
- Extension — 額外能力;安裝到主機 Extension Hub,再 attach 到 Worker。
開始前
若 AI client 不在 Gateway 主機上,請先準備一個可以連到 Gateway 的 HTTPS URL。Gateway setup 會要求輸入這個 public URL,後續複製到 ChatGPT 或其他 AI client 的 MCP endpoint 也會以它為基礎。
先決定 Worker connectivity:
| Topology | Gateway 設定 | Worker 行為 | | --- | --- | --- | | Gateway 與 Worker 同一台主機 | Local only | Gateway 直接連本機 Worker。 | | Worker 在另一台機器 | Remote workers | Worker 主動 outbound 連到 Gateway 的 pinned-TLS gRPC session listener。 |
Remote Worker 不需要暴露 inbound execution port。
Quick Start — Workstation
第一次完整跑通:
queqiao workstation請照下面順序完成。每一張錄製畫面只負責示範該 step 名稱所描述的單一任務。
1. 設定 Gateway
進入 Gateway (1) → Set up Gateway。輸入 public URL、Gateway service port、本機 management port,以及上面選好的 Worker connectivity mode。

完成條件: Gateway inventory 中已出現 configured Gateway。
2. 啟動 Gateway
選取剛設定好的 Gateway,執行 Start。
完成條件: Gateway runtime 顯示 running/healthy。若 Start 失敗,先依 Workstation result/remediation 修正,不要繼續下一步。
3. 設定 Worker
進入 Worker (2) → Set up Worker。這個 setup 任務會同時建立 Worker 與它的第一個 Workspace authority。

完成條件: Worker inventory 中已有 Worker,且 Workspace (3) 可看到它的 Workspace。
4. 啟動 Worker
選取剛設定好的 Worker,執行 Start。
完成條件: Worker runtime healthy。若是 remote Worker,此時還沒有 enrollment;下一步才處理加入 Gateway。
5. 建立 Join Code
回到 Gateway (1),選取 running Gateway,執行 Create join code。
產生後請立即使用。Remote Worker 的 self-contained join code 會包含 pinned Gateway certificate 與 Worker-session target。
完成條件: Workstation 顯示 join code 已建立/複製。
6. 讓 Worker 加入 Gateway
進入 Worker (2) → Join Gateway。同機可直接選本機 Gateway;跨主機則貼上另一台主機產生的 join code。

完成條件: Gateway 可以看到 Worker 已 enrolled 且 reachable。
7. 驗證整條路徑
回到 Gateway Inspector,按 i 開啟 Detailed Info。在加入 AI client 前,確認以下項目全部成立:
- Gateway runtime healthy;
- Worker 已 enrolled 且 reachable;
- Worker transport 符合預期:Local only 或 Remote · TLS gRPC;
- 公開 Gateway 已有 connector information。
只要其中一項缺少,就先執行 Diagnostics (6)。不要用修改 ChatGPT connector 設定來掩蓋 Gateway/Worker 本身尚未跑通的問題。
8. 在 ChatGPT 新增 Queqiao
在 Gateway Inspector:
- 按
c— Copy MCP URL; - 按
p— Copy approval secret; - 在 ChatGPT 建立 custom app/connector,貼上 MCP URL,驗證方式選 OAuth;
- 連線後,只在 Queqiao OAuth approval 頁貼上 approval secret。
不要把 approval secret 放進文件、log、repository 或 issue。
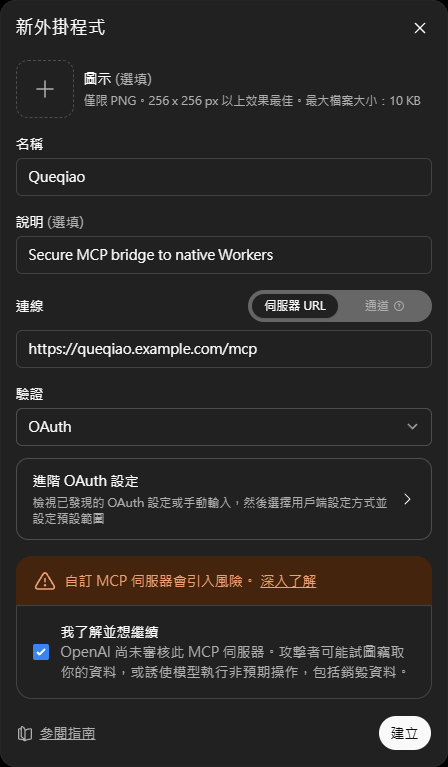
完成條件: AI client 能連到 Queqiao,而且一個 Worker-backed tool call 能抵達預期 Workspace。
完成後的完整路徑應為:
AI client → HTTPS Gateway → enrolled Worker → Workspace若未來版本修改公開 MCP tool schema,請在 ChatGPT 使用 Refresh,並從新對話驗證。Reconnect 是 connection/OAuth recovery,不負責 schema discovery。
接下來做什麼
- 在 Workspace (
3) / Access Profile (4) 調整 Workspace authority。 - 從 Extension (
5) 安裝並 attach 額外 Worker capability。請見 Extensions。 - topology、membership 或 Extension 改動後,執行 Diagnostics (
6)。 - script/CI 請使用 Classic / leaf CLI,不要驅動 TUI。
Workstation 操作:1..6 切換 domain;方向鍵移動/選取;Enter inspect 或執行 action;i 開 Detailed Info;? 開 Help;, 開 Appearance Settings;沒有 modal 取得 input 時可按 q 離開。
Root README 只保留「真的需要動態畫面才能說清楚」的任務。各 control、Appearance 與 Detailed Info 的完整 reference 請見 Workstation 詳細指南。
Configuration 與 Persistence
Queqiao 將 config、durable data、operational state 與 ephemeral runtime files 分離。Named Gateway/Worker 設定不放在 repository;Workspace 直接持久化在各 Worker 的 config.yaml,不是另一份 production workspaces.json。
queqiao doctor pathsWindows/Linux/WSL 路徑、secrets、membership、Extension Hub、logs/PID、backup 與 QUEQIAO_* overrides,請見 Configuration & Persistence。
文件
- Workstation — operator UI、controls、Appearance、Detailed Info、actions/modal 與實際錄製畫面。
- Classic / leaf CLI — command-oriented workflows 與 real PTY recordings。
- CLI reference — 完整 command surface、selector、JSON output 與 shell completion。
- Configuration & Persistence — on-disk model、secrets、backup 與 cross-OS paths。
- Workspace authority · Extensions · Operations · Architecture
- Validation evidence · Contributing · Security
Queqiao 受到 Waishnav DevSpace 啟發,但為獨立實作,與 DevSpace 無隸屬或背書關係。