
@zenera/cli
v1.1.23
Published
Command-line front end for @zenera/neo: agentic projects you can run, share and commit.

Maintainers
 andrey.v.ryabov
Readme


@zenera/cli
zen - build specialist agents. Share them. Run them from the command line.
@zenera/cli is the command-line package in the
ZeneraNeo toolkit. It creates,
runs, tests and improves the specialized agent systems defined by a project.
Not one general assistant that is passable at everything - a team built for the work you actually keep doing, under a name you can type:
zen run accountant "Q3 - match the receipts drawer to the ledger, then update the return"
zen run accountant "this MSA against our playbook - redlines, and what I must not sign"
zen run analyst    "why churn doubled in the EU accounts - the exports are in this folder"
zen run analyst    "what changed in EU battery regulation this year, with sources"
zen run devops     "this week's advisories - which of them actually reach our code"
zen run devops     "the 03:12 outage - timeline, contributing factors, owners"
Three agents there, six things asked of them: an agent you have built is not a script with one job, it is a specialist you keep going back to. And it is work that comes back - every quarter, every sprint, every deal - which is exactly the work nobody has shipped you a product for.
Once the agent exists it is a command: it works on the files you are standing in, runs real commands in a container, searches the web when it has to, and records every token it spent doing it.
Getting there is three beats:
- Describe it. You write
SPECIFICATION.md- what the system is for, which specialists it needs, what each may reach for, what done means. The rest of the folder is built to implement it. - Test it.
zen checkvalidates the project and every file it names,zen runexercises it for real,zen inspectopens the record of what it actually did. When it comes out wrong you fix the specification, not the prompts, and go round again. - Share it. It is a folder - commit it, review it in a pull request, send
it. One
zen init <dir>on a project that arrived by clone registers it without touching a thing, and it is their command now too.
Part of ZeneraNeo. This is an open-source side project for experimentation and chore work - not the official Zenera AI Platform. It carries no support or stability promises.
What you build
Half a page of specification turns into a system like one of these. Nothing here ships with the CLI - each is a folder somebody wrote, and could send you.
| Project | The team inside it | | -------------- | ------------------------------------------------------------------------------------------------------------------------------------------------------------------------------------------------------------------------------------------------------------------------------------------------------------------------------- | | accountant | A bookkeeper that reads and classifies every receipt, statement, invoice and agreement in the folder; a reconciler that holds each against a ledger line or a playbook position and lists what has no pair; a preparer that fills the return or drafts the redlines; a checker that refuses anything no document substantiates. | | analyst | A planner that splits the question into branches; researchers that run in parallel over your files and the web; a statistician that writes and runs Python in the sandbox; an editor that joins it into one answer where every claim carries its source. | | devops | A gatherer that pulls advisories, logs, alerts and deploys into one picture; a tracer that works out whether a vulnerable path is reachable at all, or which change actually broke it; an engineer that plans the fix, applies it a step at a time, and stops the moment a check fails. |
Build one, commit it, and it runs the same on anyone else's machine - on whichever models they prefer, and without carrying your keys.
What makes it different
Most tools give you one agent, or a framework and an empty file. This is a factory: it designs the system for you, then keeps it honest.
- You state the problem; a meta-agent designs the system. Specialists, prompts, tool grants, hand-offs, where it fans out - all of it drawn from what you wrote, and checked before it ever runs.
- A self-improving loop, not a one-off build. Build, run, read the record, change what was wrong, run again - and the system can drive that loop on itself. Failures come back as findings with a cause and a fix, so the next version is written rather than debugged.
- It watches itself work. Every run is recorded against the architecture it declared - the agent nobody called, the skill that never fired, where the tokens went. Nothing to instrument, nothing to sign up for.
- Customisable all the way down. Live in the specification and never look lower. Or set the model, tools and memory of a single agent. Or take the kernel itself and manage the trajectory turn by turn. No layer is sealed.
- Your documents, searchable. Hybrid retrieval over your files and your API descriptions, plus a memory that is a graph rather than a bucket of rows - so what an agent learned in March is still there in September.
- Integrations it writes itself. No MCP server to find, no connector to wait for. If it has to reach your ERP, your database or a twenty-year-old SOAP endpoint, it writes the call and runs it in a sandbox.
Install
Node.js 24+. One command - the OpenAI, Anthropic, Google and OpenRouter SDKs all ship with the CLI, so any provider works out of the box.
npm i -g @zenera/cliOr without installing anything:
npx @zenera/cli --helpQuickstart
From nothing to a specialized agent system:
npm i -g @zenera/cli         # every vendor SDK comes with it
zen key add openai           # asks for the key without showing it; stored in ~/.zenera
zen init my-project          # scaffolds a project and registers it
zen open my-project          # open the specification and project in your editor
In the editor, describe the job in SPECIFICATION.md, then send this in the
agent chat:
/spec-sync-projectIt creates the specialists, responsibilities, tool access and handoffs the job needs. Back in the terminal, validate the generated system and run it against a real workspace:
zen check my-project
cd ~/code/some-repo
zen run my-project "summarise this repo and write NOTES.md"
Then, day to day:
zen run my-project              # no prompt given: opens a full-screen terminal app (a TUI)
zen check my-project            # validate the project and every file it names
zen inspect                     # open the last run's report.html
zen list --sessions             # every project, its sessions and last run
echo "triage this" | zen run my-project --json | jq
Standing inside the project, the name is optional: a bare zen run, zen check
or zen inspect means the one you are in.
Giving a prompt on the command line skips every question: it starts a fresh
session and uses the current directory as the workspace, with write access.
--session, --workspace and --read-only override that.
To change what the system does, update SPECIFICATION.md and send
/spec-sync-project again. The next section explains that workflow in detail.
You write the specification; a coding agent writes the system
zen init writes SPECIFICATION.md first, and everything else in the folder
implements it. Where the two disagree the specification wins, so a change to
what the system does starts there and not in agents.yaml.
The one zen init writes is not a heading list - it is a true specification of
the project just scaffolded, so you can read it against the files beside it
before changing a word:
## Agents

One agent, `default`, which is the entry point and the whole system. It has
nobody to hand work to, because there is no second job to hand on.

## Done means

- The change asked for is in the workspace, or the question is answered from
  what is actually in it.
- Everything the agent claims a command did, that command actually did - it was
  run, and its output was read.
- The reply names what changed, file by file, and says what it deliberately did
  not do.
How you actually edit it
SPECIFICATION.md is ordinary Markdown, so any editor will do - but the loop is
meant to be driven from a coding agent's chat, and zen init installs the
prompts that make each step a single command:
zen open my-project # or, standing in the folder: zen openThat launches the editor you already use: the one this terminal belongs to, or
$ZENERA_EDITOR, or the first of VS Code, Cursor, Windsurf, Zed, Sublime Text
or IntelliJ it can find. --editor <cmd> names one outright.
In the window that opens:
- Edit
SPECIFICATION.md- what the system is for, which agents exist, what each may reach for, and what done means. - Open the chat panel and send
/spec-sync-project. It reads the specification and every file implementing it, works out the difference in both directions, and changes the smallest thing that closes each gap. - Answer
SPECIFICATION-FEEDBACK.md, which it writes for anything it could not do without guessing. Every question carries two to four written-out answers, each with a[ ]box: tick one, delete the ones you do not want, or write your own in their place. - Send
/spec-apply-feedback. It folds the answers you chose intoSPECIFICATION.md- never into a prompt - and then/spec-sync-projectagain.
Back in the terminal: zen check, then zen run.
They are prompt files under .github/prompts/, which VS Code and its forks
offer as chat slash-commands. Both zen init and zen open write them fresh,
so they never go stale - and edits to them do not survive.
| In chat | Does |
| ---------------------- | ---------------------------------------------------------------- |
| /spec-sync-project | Makes every file match SPECIFICATION.md, both directions. |
| /spec-apply-feedback | Folds your answers in SPECIFICATION-FEEDBACK.md into the spec. |
| /project-review | Reads the project as a reviewer would, and reports. |
| /new-agent | Adds an agent - prompt, wiring and hand-offs. |
| /new-skill | Adds a skill under agents/skills/. |
In an editor that does not support prompt files, paste the contents of
.github/prompts/spec-sync-project.prompt.md into its chat instead - it is only a
prompt. Alongside them, .github/copilot-instructions.md is the standing brief
that explains this runtime to whatever agent is reading, and
.github/skills/zen-cli/ is the CLI's own reference for it.
The self-improving loop
edit SPECIFICATION.md → /spec-sync-project → zen check → zen run
        ↑                                                  ↓
        └───── refine the spec <-──── zen inspect <-───────┘
zen inspect makes the record visible: the run trace, timing and token
statistics, agent architecture, and memory used during the run.
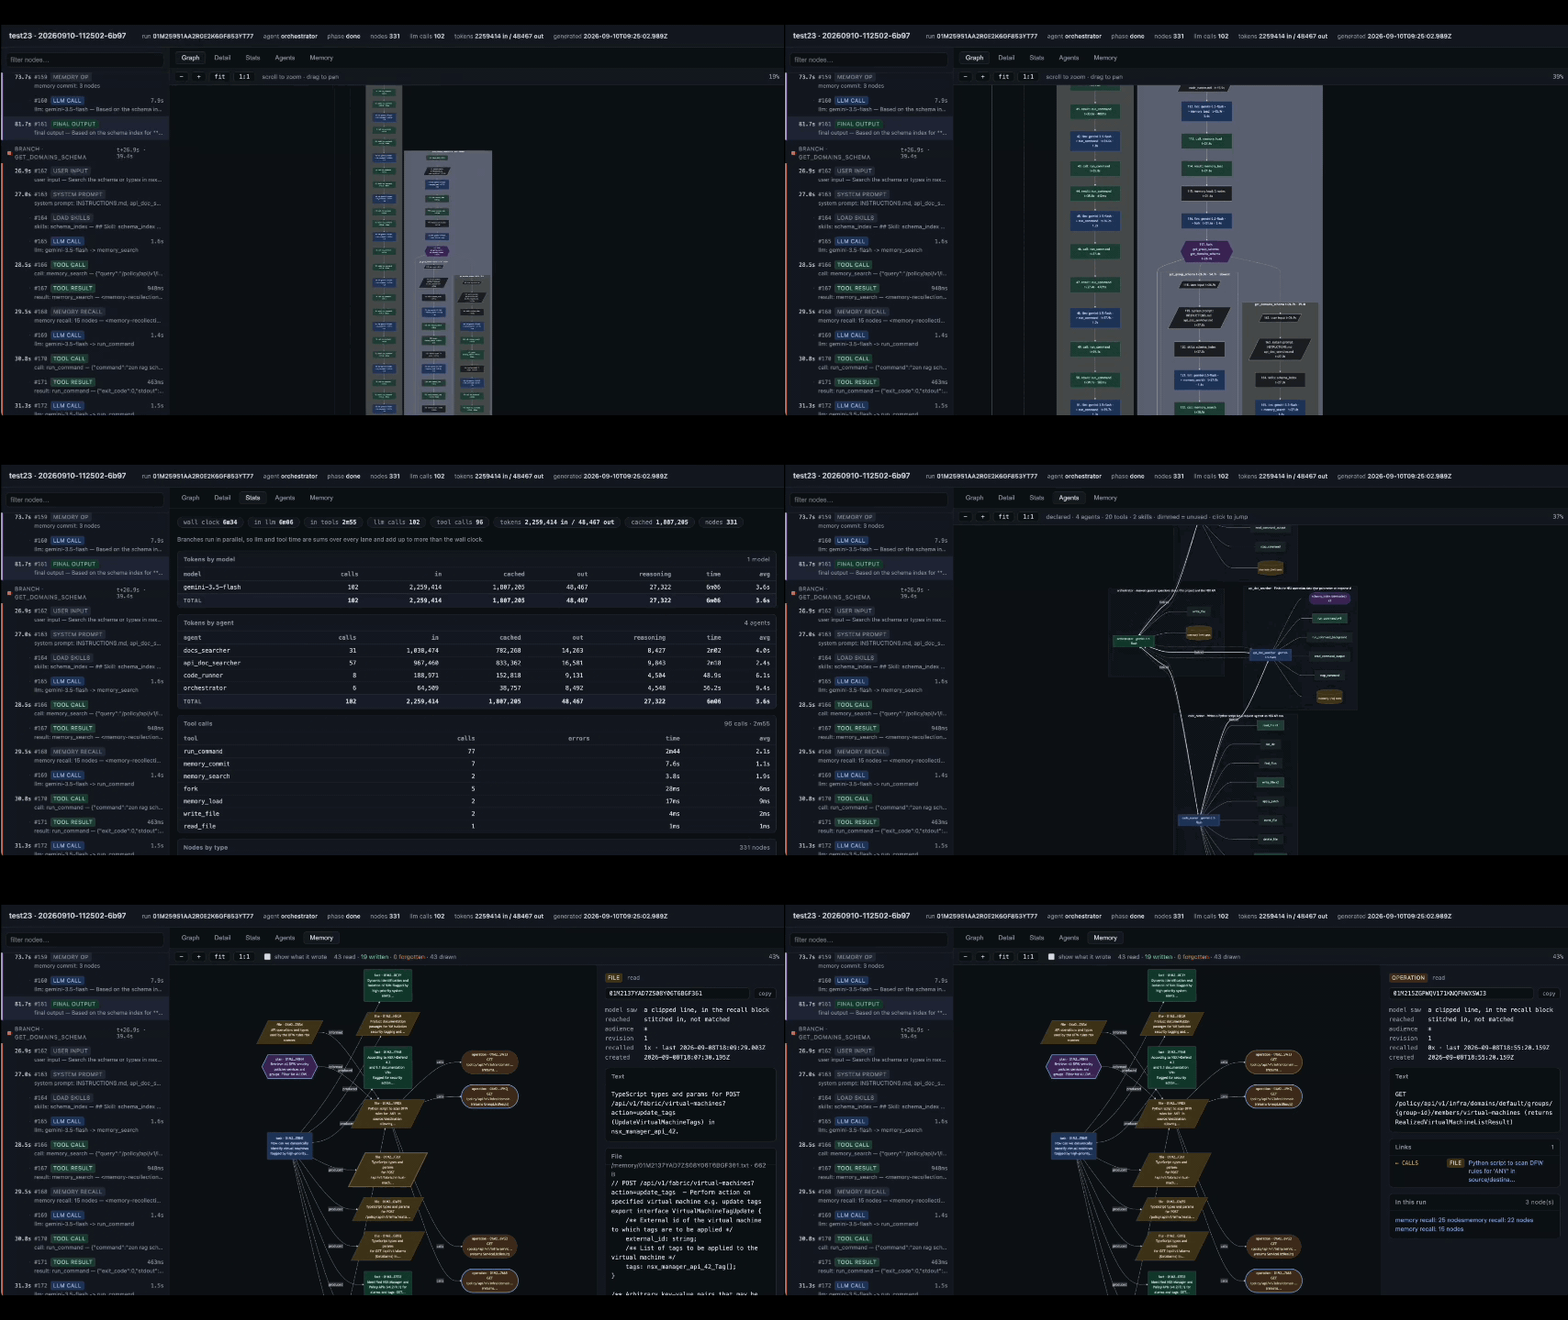
Every step is a command, and everything each one reads or writes is a plain
file: the specification, the findings zen check prints with a code, a location
and a fix, the record zen inspect renders of what the run actually did. So the
loop does not need you standing in it. Hand the whole cycle to the agent in your
editor and it runs on the system it just built - test it, read the failure,
change the sentence in the specification that caused it, rebuild, run again.
"Fix my project" is one instruction. (The first time round, scripts/_setup.sh
prepares the container the tools run in.)
The last turn is the one that matters. When a run comes out wrong the fix is the sentence that was missing from the specification, and the prompt edit follows from that. Prompts patched directly drift away from the document meant to describe them, and a project whose specification is no longer true is a project with no specification.
Full guide: docs/specification.md.
A worked example
From a sentence to a working two-agent system, without hand-writing any wiring.
zen init repo-notes && cd repo-notes
zen open                      # opens this folder in your editor
Replace SPECIFICATION.md with what you want. This is the whole input - no
YAML, no prompt files:
# Specification

## Purpose

Read a codebase and leave a short written note about it in the workspace.

## Agents

- `reader` - explores the workspace and forms a picture of it. May read files
  and list directories, and nothing else. Hands off to `writer`.
- `writer` - turns that picture into `NOTES.md`. May write to the workspace.

## Done means

- `NOTES.md` exists, is Markdown, and is under 40 lines.
- Every claim in it comes from a file that was actually read.
Send /spec-sync-project in the editor's chat. It writes agents.yaml - who
exists, and what each may reach for:
default: reader
model: openai:gpt-5.4-mini

agents:
    - name: reader
      description: Reads the workspace and summarises what is in it.
      system: agents/prompts/reader.md
      tools: [files:read_file, files:list_dir, files:find_files]
      handoffs: [writer]

    - name: writer
      description: Turns a summary into a file on disk.
      system: agents/prompts/writer.md
      tools: [files:*]
handoffs: [reader] # a hand-off does not return by itself; give it a way back- and one prompt file per agent.
agents/prompts/reader.md:
You explore a codebase and describe it plainly: what it is, how it is laid out,
how it is built and tested. Read before you conclude. When you have a picture,
hand off to `writer`.agents/prompts/writer.md:
You write the summary you were handed to `NOTES.md`, in Markdown, under 40
lines. Then say where you put it and stop.
| Key | Is |
| ------------- | --------------------------------------------------------------------- |
| name | how everything else refers to this agent |
| description | what it is for - read by the other agents when deciding to hand off |
| system | its own brief, in prose, at agents/prompts/<name>.md |
| model | this agent's model; the top-level one otherwise |
| tools | what it may reach for - files:* (or workspace:*), sandbox:* |
| handoffs | who it may pass the work to |
| skills | knowledge pulled in mid-run instead of carried in every prompt |
The file is validated strictly at load: an unknown tool, a handoff to nobody, a missing prompt file - each fails immediately, naming the offending key, rather than surfacing three turns into a run as a confused model. Full reference: docs/agents-yaml.md.
Check it, then point it at a real directory:
zen check                                  # every file it names, validated
cd ~/code/some-repo
zen run repo-notes "summarise this repo"   # this directory is the workspace
zen inspect --project repo-notes --open    # what it actually did
That is the end of it: repo-notes is now a command like any other, in any
directory, for as long as the folder exists. Commit the folder and whoever
clones it types zen init repo-notes once - a directory that is already a
project is registered, not rebuilt, and nothing in it is touched - and the name
is a command on their machine too.
When a newer zen is installed, zen check --fix brings a project's copies of
our files up to date: the memory and tool house rules under agents/, and the
.vscode/ and .github/ trees. They restate how the version in hand behaves,
so a copy left behind by an upgrade is worse than none. Nothing that describes
your project is touched.
A project is a folder
Prompts, agent wiring, skills and tool selections are all files - Markdown and
YAML - rather than code buried inside an application. So the folder can be
committed, copied to another machine, reviewed in a pull request, and handed to
someone else who runs it with one command. Model credentials live in $HOME,
never in the project, and anything the project itself needs goes in a
git-ignored .env - so there is no secret to strip before sharing it.
my-project/
    SPECIFICATION.md             what this is for - the intent
    agents.yaml                  who exists, what they may reach for
    agents/
        instructions.md          house rules, prepended to every agent
        <topic>-instructions.md  more of them, one subject at a time
        prompts/<name>.md        each agent's own brief
        skills/<name>/           knowledge loaded on demand, not always-on
    assets/                      reference material, read-only at /assets
    sandbox/Dockerfile           the container commands run in
    scripts/_setup.sh            the one command that initialises the project
    .spec-sync/                  what the last sync with the spec applied
    .env                         this project's environment - git-ignored
    sessions/                    one workspace, memory and trajectory each
        <id>/
            workspace/           what the agents can read and write
            runs/<id>/           input, output, state, report.html, meta
Everything above the sessions/ line is the system; everything below it is what
happened when it ran. Nothing here is tied to the machine it was written on,
which is the point of the CLI: it makes agentic systems shareable the way
repositories are shareable.
zen init also writes .vscode/ and a .github/ tree - a standing brief that
explains this runtime to whatever coding agent you open the folder with, plus
the prompts and skills it needs to keep the project matching its specification.
Concepts
- Project - a named directory holding a complete agent definition and the
sessions that have run against it. It is self-describing:
agents.yamlis what makes a directory a project, so moving or cloning it loses nothing. - Session - a context that persists across runs: one workspace, one memory, one store for large files, and a record of everything that happened, added to as it goes. Resumable.
- Run - one prompt in, one answer out, inside a session. Recorded in full, whether or not you were watching.
- Workspace - the directory the agents may read and write. A prompt given on the command line uses the current directory; the TUI offers the session's own empty folder instead, and asks before using anything outside it.
- Keyring -
~/.zenera/neo, readable only by you. See Credentials. - Cache -
~/.zenera/neo/cache, one place for work already done: vectors, parses, model listings, generated mocks. Shared by every project on the machine, and never emptied by anything but you. See Cache.
Sandbox commands
Agents use an isolated container when a project grants them command-line tools.
zen run prepares it automatically before the first command, but these commands
make setup, diagnostics and cleanup explicit - useful on a new machine or when
you want to validate a project's execution environment before a run.
zen sandbox status                    # engine, project image and active containers
zen sandbox up                        # prepare the execution environment for this project
zen sandbox pull                      # pull or build this project's image only
zen sandbox status --project my-app   # inspect a named project from anywhere
zen sandbox disk                      # storage used by the engine and known projects
zen sandbox clean # remove containers created by zenstatus, up and pull use the project in the current directory, or accept
--project <name|dir>. --image <ref> selects an image explicitly. clean and
disk are machine-wide operations, so use them when you mean to inspect or
remove resources beyond the current project.
Sharing a project
A project is a directory, so sending one somewhere else is a zip - except that
half of the directory belongs to this machine rather than to the project.
zen export writes the other half.
zen export                            # ./<project>-<stamp>.zip, from inside the project
zen export my-project --out /tmp/a.zip
zen export --no-vectors               # much smaller; needs a restore step on arrival

zen import a.zip                      # unpacks into ./<project> and registers it
zen import a.zip ~/code/theirs --name theirs
It carries agents.yaml, the agents/ tree, the specification and its
feedback, assets/, memory/, sandbox/, scripts/ and the editor files.
It leaves behind sessions/, .tmp/, .git/, node_modules/, lock files, any
*.zip at the top of the project - and .env. The values in .env never
travel, behind no flag; the names do, as a .env.example with every value
blank, because knowing which credentials a project needs is the first thing you
want on the other end.
The vectors travel by default. A rag index without its lance/ tree looks built
and cannot search, and memory has no other source at all - a graph without its
vectors recalls by term overlap until every node is written again. --no-vectors
leaves both out for a much smaller archive, and the import tells you to run
zen rag <subject> restore.
zen import treats the archive as something a stranger sent: every path is
checked against escaping the target directory, symbolic-link entries are
refused, and the size it unpacks to is bounded. Nothing inside is executed -
not scripts/_setup.sh, not the Dockerfile, not a line of the .github/ tree.
The commands to run next are printed for you to read and type.
Commands
| Command | Does |
| --------- | -------------------------------------------------------------------- |
| init | Creates a project here, or in <dir>, and registers it. |
| list | Every known project: sessions, last run, whether one is live. |
| open | Opens a project in your editor. |
| key | The credential keyring - add, check, switch, remove. |
| models | What this machine can use - list, search, test, pick. |
| run | Runs the project - the TUI on a terminal, a single answer otherwise. |
| meta | Runs the meta agent over the project - the one that edits it. |
| inspect | Opens or rebuilds a run's report.html. |
| memory | What the agents remember - size, listing, one node, or a whole page. |
| check | Validates the project and every file it names, and asks the models. |
| export | Writes the project to a shareable zip archive. |
| import | Unpacks one, registers it, and runs nothing in it. |
| sandbox | Checks and prepares the container that command-line tools run in. |
| cache | What work has been kept, and getting rid of it. |
| version | CLI, library and Node versions. |
Commands from other packages
A command can also come from a package installed alongside this one, so a new
capability arrives as a subcommand instead of another binary to remember: one
thing on your path, one keyring, one name. zen --help lists these whether or
not they are installed, and tells you what to install if not. Nothing is
imported until you type the command, so an uninstalled one costs you nothing and
an installed one costs nothing until it is used.
| Command | Package | Does |
| ------- | --------------- | ---------------------------------------------- |
| faker | @zenera/faker | A mock API from an openapi/swagger document. |
| rag | @zenera/rag | Search an openapi/swagger document as a graph. |
zen faker turns an OpenAPI or Swagger description into a working mock
server. It generates behavior for each route, checks the result against the
response contract, and reuses the generated implementation on later requests.
npm i -g @zenera/faker
zen faker serve api/openapi.yaml --port 8787   # a working mock, bodies written by a model

curl -s localhost:8787/users/12324
# { "user_id": 12324, "email": "[email protected]", … }
zen rag adds advanced retrieval for the knowledge an agent needs to work
from: documentation and API schemas. Document indexes support semantic,
full-text and hybrid search with passages returned alongside their source lines.
Schema indexes add graph-aware retrieval across operations, types, fields,
requests and responses, so an answer can include the connected API context
rather than an isolated match.
npm i -g @zenera/rag
zen rag schema index --embedding openai:text-embedding-3-small ./specs/*.yaml
zen rag schema search --output-property "user billing history" --format ts

zen rag docs index ./handbook --embedding openai:text-embedding-3-small
zen rag docs search "how does failover work when the primary is unreachable"
Use @zenera/rag for its complete retrieval capabilities and examples. Details: @zenera/faker · @zenera/rag.
Conventions
The binary is installed under three names: zen, zn and zenera.
Global flags: -h/--help, -v/--version, --json, -C <dir>.
stdout carries the answer and stderr carries the narration, and --json
works on every command - so zen run … | jq is a supported way to use this, not
an accident.
| Exit code | Meaning |
| --------- | -------------------- |
| 0 | ok |
| 1 | the run failed |
| 2 | bad invocation |
| 3 | invalid project |
| 4 | no usable credential |
| 5 | sandbox unavailable |
The meta agent - the agent that works on the project
zen run runs the agents your project describes. zen meta runs an agent over
the project: a coding agent rooted at the project directory, which reads
SPECIFICATION.md, changes agents.yaml, the prompts and the skills, and runs
whatever commands it needs to check itself - on the keys already in your
keyring, and not on anybody's subscription. It is the loop your editor's chat
panel drives, as a command you can put in a script.
zen meta run "what does this project do?"
zen meta run acme "review the last commit"
zen meta prompts                             # which /<name> prompts this project has
zen meta run /project-review                 # .github/prompts/project-review.prompt.md
zen meta run acme /spec-sync-project agents/triage.md
git diff | zen meta run "what broke?" --allow-tool read
zen meta run --dry-run "hello"               # what would run, secrets masked
Every prompt goes through run, whether you typed it or it is a file: the
alternative was a verb that appeared only sometimes, and a bare word after
zen meta that was a subcommand on Tuesdays and a question on Wednesdays.
It uses every tool without asking. The prompts it runs were written for an
editor, where reading files, writing them and running commands is the whole
point, and a -p run has nobody sitting there to answer the question - so the
alternative is not a safer run but a stalled one. --allow-tool read,
--allow-tool 'shell(git:*)' narrow it to what a particular run needs, and
--ask puts the question back. It is your own checkout and your own key either
way, so treat it as you would git push: fine on a project you own, worth
narrowing on one you do not.
The answer goes to stdout and the progress to stderr, like everything else here,
so zen meta run "…" > out.md keeps the answer alone.
Progress is a small window that rewrites itself rather than a transcript
scrolling past, because only the last few steps say what it is doing now. The
whole of it - the prompt, every tool call, the answer - is written as it happens
to .tmp/logs/meta.<when>.log, whose path is printed before the run starts, so
tail -f in another terminal follows a run already going. The answer alone is
kept beside it as .tmp/logs/meta.<when>.md, named again once it has printed -
a terminal turns that into something you click.
zen meta run /<name> is the part an editor cannot do for you from a script.
The prompts under .github/prompts/ - /spec-sync-project, /project-review -
are what a chat panel offers as slash commands, and nothing outside an editor
reads them. zen reads one, drops the frontmatter and sends the body - so the
same prompt runs from the editor, from a terminal and from CI.
A terminal has no menu dropping down as you type a slash, so
zen meta prompts lists what this project holds, each with its description.
zen meta run with nothing to say asks the same question interactively.
Which model it runs on
zen meta model                            # the whole chain, with the winner marked
zen meta model vertex/gemini-3.8-flash    # for every project on this machine
zen meta model --local openai/gpt-5.6-sol # for this project only, via its .env
zen meta model --pick                     # choose from providers you hold a key for
Highest first: --model, ZENERA_META_MODEL in the shell, the same variable in
the project's .env, zen meta model, then the project's agents.yaml
model:. When none of them answers, a key does: the best model zen knows of
for the first provider you hold one for, named on stderr as it starts, so a
fresh machine needs a key and nothing else.
The store is separate from agents.yaml on purpose - the model a coding agent
runs on is a personal choice about a tool, like a key, where agents.yaml is a
committed decision about the project's own agents.
Not every model works. The meta agent declares its tools in a form only the
reasoning APIs accept, so use a reasoning model - gpt-5.6-sol,
claude-opus-5, gemini-3.8-flash. Those three are also what it falls back
to, and what zen meta model --pick offers.
Setting one asks it a one-word question before storing it, so a model that will
not answer is refused with the provider's own words rather than at the start of
the next run. A typed prefix that names no provider - vertes/... - is caught
before that, because it would otherwise be sent whole to a vendor you never
named. --force stores a ref without asking.
Credentials
One keyring serves every provider, and a key goes in the same way whatever it is for:
zen key add <provider>              # asks for the key without showing it
zen key add <provider> < key.txt    # or pipe it in
The value is never passed as an argument. A command line is visible to anyone listing running processes, is saved in your shell history and is captured in CI logs - so the hidden prompt and piping it in are the only two ways.
Entries live in ~/.zenera/neo/keys.json, in a file only you can read. They are
copied into the environment just before a run, which has two consequences worth
knowing: an environment variable you set yourself always wins, and a project
checked out on a machine without zen still runs.
| Provider | The value is | Exported as |
| ------------ | ------------------------------------- | -------------------------------- |
| openai | a secret | OPENAI_API_KEY |
| anthropic | a secret | ANTHROPIC_API_KEY |
| google | a secret - AI Studio | GEMINI_API_KEY |
| vertex | a path to a service-account JSON file | GOOGLE_APPLICATION_CREDENTIALS |
| openrouter | a secret | OPENROUTER_API_KEY |
| exa | a secret - for the search tool | EXA_API_KEY |
zen key add verifies the credential against the provider before it finishes,
but stores it either way: a key that cannot be checked right now - offline,
behind a proxy - is not a key that is wrong. --no-check skips the call.
Which key a model uses
A model reference is [provider[/api]:]model, and the first segment names a
provider, not a vendor. So vertex:gemini-3.5-flash and
google:gemini-3.5-flash are the same model reached through two different
services, needing two different credentials; a bare gpt-5.4-mini goes to the
default provider, openai.
zen check resolves every reference in a project against what is stored and
says which credential each one needs. It then spends a few tokens asking each
model to answer, which is the only way to catch a model id this account is not
served. --no-models stops before that.
Which models you can use
zen check answers does my project work. zen models answers what can I
use, needs no project, and asks the providers themselves:
zen models                                  # who has a credential, and what is cached
zen models openai                           # everything OpenAI serves this account
zen models search haiku --tools --free      # narrow it
zen models show openrouter:anthropic/claude-haiku-4.5
zen models test vertex:gemini-embedding-001 # one real call, one verdict
zen models pick --embedding                 # the first ref that answers, on stdout
Listings are cached for a day in ~/.zenera/neo/cache. If a provider cannot be
reached, the last listing is used and marked stale; only when there has never
been one does a short built-in list stand in.
zen models test separates three kinds of failure, because each calls for a
different action:
- refused - the provider rejected the credential. Fix or replace the key.
- blocked - the credential was accepted and the account then said no: an API switched off, an empty balance, a model this key was never granted. The key is fine; the account needs changing, and the command that changes it is printed with the error.
- unknown - the question never arrived (offline, proxy, timeout). Nothing is wrong with the key; try again.
$ zen models test vertex:gemini-embedding-001
vertex:gemini-embedding-001  blocked  Vertex AI API has not been used in project my-proj …
vertex:gemini-embedding-001: gcloud services enable aiplatform.googleapis.com --project my-proj
error 1 of 1 did not answer
        find one that does: zen models pick --embedding
zen models pick tries a short list of candidates one at a time, stops at the
first that works, and prints the bare reference on stdout. So recovering from
the above is a single substitution, whether a person or an agent is doing it:
zen rag schema index --embedding "$(zen models pick --embedding)" ./specs/*.yamlSetting up each provider
The shape is the same everywhere - zen key add <provider>, then answer the
prompt. Open the one you need for its specifics.
zen key add openaiopenai is the default provider, so a reference with no prefix comes here:
gpt-5.4-mini and openai:gpt-5.4-mini are the same model.
zen key add anthropic
zen run --model anthropic:claude-sonnet-4-5 "summarise this repo"
One credential for many vendors' models. The model id keeps its own vendor
prefix, after the openrouter: one:
zen key add openrouter
zen models search haiku --tools --free
zen run --model openrouter:anthropic/claude-haiku-4.5 "summarise this repo"
One key and nothing else to configure: the shortest way to a working Gemini model.
zen key add google
zen check                         # google:gemini-3.5-flash now resolves
The same Gemini models are also served by Vertex AI, under a different credential. Both can be configured at once - they are separate entries for separate services, and the prefix on the model reference decides which is used:
zen run --model google:gemini-3.5-flash "summarise this repo"
zen run --model vertex:gemini-3.5-flash "summarise this repo"
Vertex accepts two kinds of credential, and you never declare which one you are
giving: if the value is a path to a file that exists it is treated as a
service-account key, otherwise as an API key. The name you give the entry has no
bearing on this - vertex/express is just an entry called express, exactly as
vertex/prod is one called prod, and either name can hold either kind.
A service-account JSON file is the usual one, and what production normally runs on. Give its path, not its contents. Run the command with nothing piped and it asks:
zen key add vertex --gcp-location us-central1
# Paste the key, or a path to the file: /Users/you/keys/vertex-sa.json
The prompt is read by zen, not by your shell, so give a full path there - ~
is not expanded. In a script, pipe the path in instead:
echo ~/keys/vertex-sa.json | zen key add vertex --gcp-location us-central1The file is copied into ~/.zenera/neo/keys/, where only you can read it, so
moving or cleaning up the original later cannot break it.
--gcp-location <region>is worth setting, because the file says which project it belongs to but never which region to call. It takes a concrete region, or one of the endpoints that route across regions:usandeupool capacity while keeping processing inside that territory, andglobaltakes whatever is free and promises no residency.globalcosts about ten seconds of cold start on the first request each process makes; a named region answers in about two.Which models a location serves varies per model and is not guessable. In one project,
gemini-embedding-2answered atusbut 404'd atus-central1, whilegemini-2.5-flashdid the opposite. New models often reachglobal,usandeufirst.zen models test vertex:<model>is what settles it -zen key addonly establishes that the credential itself works.--gcp-project <id>is only needed when theproject_idinside the file is not the project you want to bill:echo ~/keys/vertex-sa.json \ | zen key add vertex --gcp-project other-project --gcp-location europe-west4
An express-mode API key is the alternative: a single secret, stored under
VERTEX_API_KEY. It is the Vertex console's way of granting access without a
service account, and it needs neither a project nor a region, so --gcp-project
and --gcp-location mean nothing there and are not stored.
zen key add vertex # paste the key at the prompt; no flags applyAn existing gcloud login counts too. If you have run
gcloud auth application-default login, Vertex works with nothing stored at
all: zen key ls shows that login as adc, marked ~ because it came from
outside the keyring. Anything already set in GOOGLE_APPLICATION_CREDENTIALS,
VERTEX_API_KEY or GEMINI_API_KEY is listed the same way and wins over the
keyring, so it is always visible which credential a run will actually use.
Not a model provider: this is what backs the search tool an agent reaches for when it has to look something up on the web.
zen key add exaEntries are named, so a provider can hold several, one of which is active:
zen key add openai/work         # a second entry
zen key use openai/work         # the one that runs will use
zen key ls --check              # everything stored, and whether it still works
zen key show vertex/default     # masked - --reveal prints the secret
zen key env openai              # shell exports, for other tools
zen key rm openai/work
It is the same for Vertex, where holding several at once is the ordinary case:
echo ~/keys/prod-sa.json | zen key add vertex/prod --gcp-location us-central1
echo ~/keys/dev-sa.json  | zen key add vertex/dev  --gcp-location global
zen key add vertex/express      # the express key, same provider

zen key use vertex/dev          # which one the next run uses
zen key ls marks the active entry with *, and anything it found outside the
keyring - in your environment, or in a gcloud login - with ~, so it is always
clear where a working provider actually comes from.
Cache - work you have already paid for
Embedding a paragraph, parsing a document, asking a provider what it serves: all
of these are slow or costly, and all of them give the same answer every time. So
the answers are kept in ~/.zenera/neo/cache/<kind>/, under a key built from
every input that produced them. Change any input and the key changes, so you get
a fresh answer rather than a stale one. That is why entries are never
invalidated: one that no longer matches anything is simply never read again.
zen cache ls                          # what is kept, by kind
zen cache ls --kind vectors           # and what is in one of them
zen cache prune --older-than 30d      # drop what has gone unread for a month
zen cache prune --max-size 2GB        # or keep it under a ceiling
zen cache clear --kind docs-parse     # throw one kind away
Age means when an entry was last read, not when it was written, so a vector that a weekly rebuild keeps using never counts as old.
Nothing is ever evicted automatically. A store that quietly deletes things is only noticed once it has deleted the wrong one, so every removal is something you ask for. Nothing in the cache is precious either: every entry is work that can be done again, and the only cost of deleting one is paying for it a second time.
The library underneath
This is a shell over
@zenera/neo - agents, models,
tools, skills, memory and a running record of everything that happened. Use it
directly when you want the runtime inside your own application rather than on a
terminal:
its README.
Documentation
- docs/specification.md
- writing the specification the project implements.
- docs/projects.md
- what the project folder contains, file by file.
- docs/agents-yaml.md
- every key in the configuration file.
- docs/knowledge.md
- building a searchable document index.
- docs/integrations.md
- making an API description searchable and mockable.
- docs/memory.md
- what agents keep between sessions.
License
Early days and moving fast - issues, questions and pull requests are welcome. MIT.