
autoqa-agent
v0.0.11
Published
Automated QA testing agent powered by Claude and Playwright
Maintainers
 terryso
Readme
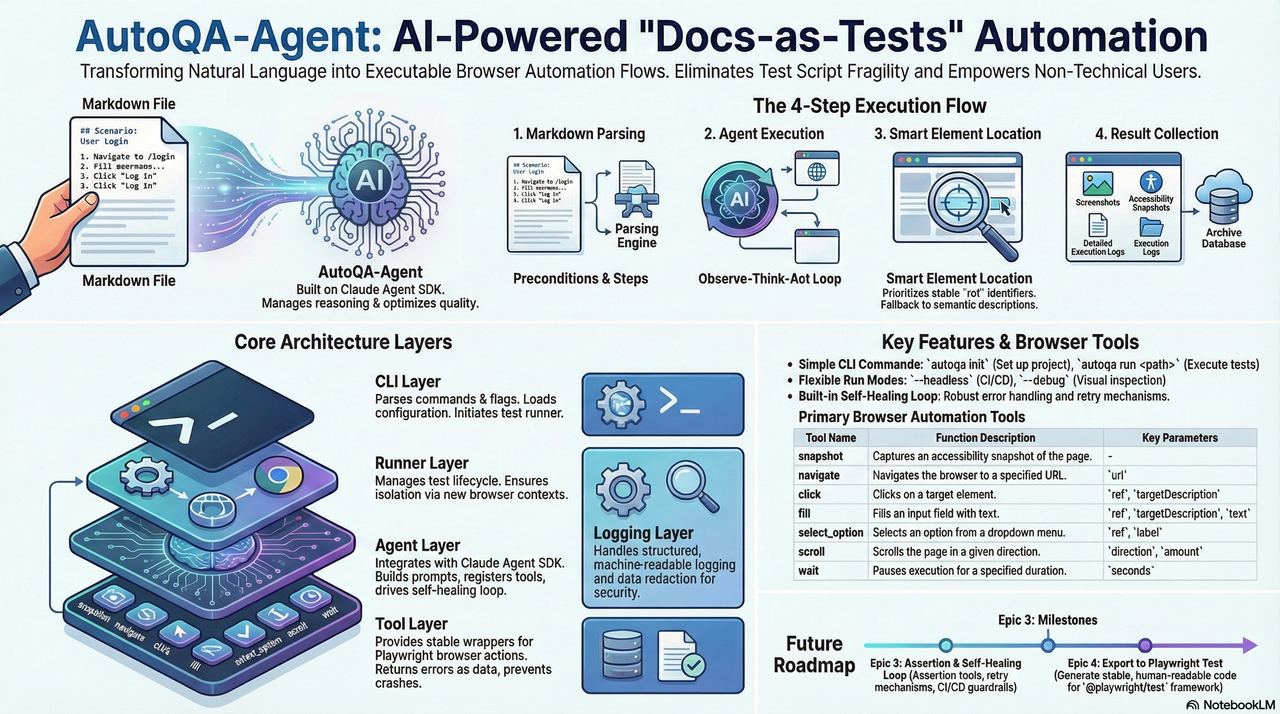
AutoQA-Agent


基于 Claude Agent SDK + Playwright 的"文档即测试"(Docs-as-Tests)自动化验收测试 CLI 工具。
当前状态:Epic 1-7 的核心能力已实现:
autoqa init初始化、autoqa run执行闭环、断言 + 自愈护栏、动作 IR 记录与自动导出@playwright/test用例、智能 Web 应用探索(autoqa plan-explore)、自动化测试计划生成(autoqa plan-generate),以及完善的配置支持和增强的 CLI。
📖 目录
概述
采用 BMAD-METHOD 构建:本项目采用 突破性敏捷 AI 驱动开发方法 开发,具有 21 个专业 AI 代理和结构化工作流,可从错误修复扩展到企业级平台。
AutoQA-Agent 是一个创新的自动化测试工具,让 QA 和产品经理能够用自然语言 Markdown 编写验收测试,直接转换为可执行的测试流程。
更详细的架构边界与约束说明请参考 docs/architecture.md。
核心目标
- 消除脚本脆弱性:通过智能定位策略,减少 UI 微小变动导致的测试维护成本
- 文档即测试:用 Markdown 编写测试用例,让非技术人员也能参与测试编写
- 轻量级 Agent 架构:依托 Claude Agent SDK 管理推理循环,专注优化浏览器工具质量
快速开始
环境要求
- Node.js >= 20
- npm 或 yarn
- Claude Code 已授权(推荐)或设置
ANTHROPIC_API_KEY
安装
# 选项 1:从 NPM 安装(推荐)
npm install -g autoqa-agent

# 选项 2:从源码安装
git clone https://github.com/terryso/AutoQA-Agent.git
cd AutoQA-Agent

# 安装依赖
npm install

# 构建项目
npm run build

# 全局安装(可选)
npm link
初始化项目
# 初始化配置
autoqa init

# 这将创建:
# - autoqa.config.json - 配置文件
# - specs/ - 测试用例目录
# - specs/login-example.md - 示例 Markdown 用例(如果不存在则创建)
运行第一个测试
# 运行单个测试(内置示例)
autoqa run specs/saucedemo-01-login.md --url https://www.saucedemo.com/

# 运行目录中的所有测试
autoqa run specs/ --url https://www.saucedemo.com/

# 调试模式(显示浏览器界面)
autoqa run specs/saucedemo-01-login.md --url https://www.saucedemo.com/ --debug
工作原理
flowchart TD
    A["Markdown 测试用例"] --> B["解析器<br/>提取前置条件和步骤"]
    B --> C["Claude Agent SDK<br/>ReAct 循环执行"]
    C --> D["MCP 浏览器工具<br/>snapshot/navigate/click/fill"]
    D --> E["Playwright 引擎<br/>实际浏览器操作"]
    E --> F["产物<br/>截图/快照/日志/追踪"]
    E --> G["动作 IR<br/>.autoqa/runs/<runId>/ir.jsonl"]
    G --> H["导出代码<br/>tests/autoqa/*.spec.ts"]

    style A fill:#e3f2fd,stroke:#2196f3,color:#0d47a1
    style B fill:#f3e5f5,stroke:#9c27b0,color:#4a148c
    style C fill:#e8eaf6,stroke:#3f51b5,color:#1a237e
    style D fill:#fff3e0,stroke:#ff9800,color:#e65100
    style E fill:#e8f5e9,stroke:#4caf50,color:#1b5e20
    style F fill:#fce4ec,stroke:#e91e63,color:#880e4f
    style G fill:#f1f8e9,stroke:#7cb342,color:#33691e
    style H fill:#e0f7fa,stroke:#00acc1,color:#004d40
执行流程
- Markdown 解析:提取前置条件和测试步骤
- Agent 执行:Claude Agent SDK 管理"观察-思考-行动"循环
- 智能定位:优先使用稳定的 ref 引用,失败时回退到语义描述
- 断言与自愈:为 Verify/Assert 步骤执行断言工具;失败时回传错误上下文进行重试,受护栏限制
- 结果收集:自动记录截图、快照、追踪和结构化日志
- 持久化与导出:记录动作 IR,测试成功后自动导出
@playwright/test用例到tests/autoqa/
架构概览
flowchart TD
    %% 主 CLI 层
    CLI["autoqa CLI"] --> Plan["Plan 命令"]
    CLI --> Run["Run 命令"]
    CLI --> Init["Init 命令"]

    %% Plan 命令架构
    Plan --> Explore["explore"]
    Plan --> Generate["generate"]
    Plan --> Full["explore + generate"]

    %% 探索流程
    Explore --> Config["配置加载"]
    Config --> Browser["浏览器创建"]
    Browser --> ExploreAgent["探索 Agent"]
    ExploreAgent --> ExploreTools["规划工具"]
    ExploreTools --> ExploreOutput["探索产物"]

    %% 生成流程
    Generate --> ExploreOutput
    Generate --> PlanAgent["计划 Agent"]
    PlanAgent --> TestPlan["测试计划生成"]
    TestPlan --> SpecOutput["Markdown 规格"]

    %% 配置层
    Config --> ConfigFile["autoqa.config.json"]
    Config --> CliOptions["CLI 选项"]
    Config --> Defaults["默认值"]

    %% 浏览器和工具层
    Browser --> Playwright["Playwright 引擎"]
    ExploreTools --> BrowserTools["浏览器工具"]
    ExploreTools --> PlannerTools["规划器工具"]

    %% 输出层
    ExploreOutput --> ExploreGraph["导航图"]
    ExploreOutput --> Elements["元素清单"]
    ExploreOutput --> Transcript["探索记录"]

    SpecOutput --> MarkdownFiles["*.md 测试文件"]
    SpecOutput --> TestPlanJson["test-plan.json"]

    %% 样式
    style CLI fill:#e3f2fd,stroke:#2196f3,color:#0d47a1
    style Plan fill:#f3e5f5,stroke:#9c27b0,color:#4a148c
    style Run fill:#e8f5e9,stroke:#4caf50,color:#1b5e20
    style Init fill:#fff3e0,stroke:#ff9800,color:#e65100
    style Explore fill:#e8eaf6,stroke:#3f51b5,color:#1a237e
    style Generate fill:#f1f8e9,stroke:#7cb342,color:#33691e
    style Config fill:#fce4ec,stroke:#e91e63,color:#880e4f
    style Browser fill:#e0f7fa,stroke:#00acc1,color:#004d40
    style ExploreAgent fill:#fff8e1,stroke:#ffc107,color:#f57c00
    style PlanAgent fill:#f9fbe7,stroke:#cddc39,color:#827717
    style ExploreOutput fill:#f3e5f5,stroke:#9c27b0,color:#4a148c
    style SpecOutput fill:#e8f5e9,stroke:#4caf50,color:#1b5e20
Plan 命令结构
flowchart LR
    subgraph "Plan 命令"
        Direction["输入选择"]

        subgraph "探索阶段"
            StartURL["起始 URL"]
            ExploreDepth["深度:1-10"]
            PageLimit["最大页面数"]
            Navigation["导航图"]
            ElementDiscovery["元素发现"]
        end

        subgraph "生成阶段"
            TestTypes["测试类型"]
            PlanGeneration["测试计划"]
            MarkdownSpecs["Markdown 规格"]
        end

        subgraph "输出产物"
            GraphFile["navigation-graph.json"]
            ElementsFile["elements.json"]
            TranscriptFile["transcript.jsonl"]
            TestPlanFile["test-plan.json"]
            SpecFiles["specs/*.md"]
        end
    end

    Direction --> ExplorePhase
    Direction --> GeneratePhase

    ExplorePhase --> OutputArtifacts
    GeneratePhase --> OutputArtifacts

    style Direction fill:#e3f2fd,stroke:#2196f3,color:#0d47a1
    style ExplorePhase fill:#f3e5f5,stroke:#9c27b0,color:#4a148c
    style GeneratePhase fill:#e8f5e9,stroke:#4caf50,color:#1b5e20
    style OutputArtifacts fill:#fff3e0,stroke:#ff9800,color:#e65100
AutoQA Agent vs Playwright Codegen
AutoQA Agent 代表了自动化测试的下一个演进,超越了传统的代码生成工具如 Playwright 的 codegen:
| 特性 | Playwright Codegen | AutoQA Agent | 评估 | |------|------------------|-------------|------| | 选择器优先级 | 5层优先级策略 | 7层优先级策略 | 🏆 AutoQA 更全面 | | AI 集成 | 基础 AI 辅助 | Claude Agent SDK | 🏆 AutoQA 更先进 | | 事件捕获 | 浏览器注入监听 | Agent 主动探索 | 🏆 AutoQA 更智能 | | 测试规划 | 无规划功能 | AI 驱动规划 | 🏆 AutoQA 独有功能 | | 自愈能力 | 有限的智能重试 | 完整的 guardrail | 🏆 AutoQA 更健壮 |
关键优势
- 智能测试规划:不同于 Playwright 的录制回放方法,AutoQA Agent 主动探索并规划全面的测试套件
- 卓越的选择器策略:7层优先级系统,优先考虑可访问性,对比 Playwright 的 5层系统
- 完整的 AI 集成:基于 Claude Agent SDK 的真正自主推理,对比 Playwright 的基础 AI 辅助
- 高级自愈能力:全面的护栏系统和智能重试机制
- 结构化探索:自动发现应用结构和关系
已实现功能
CLI 命令
测试规划与探索命令
autoqa plan- 完整的探索和测试用例生成(默认命令)- 自动探索目标 Web 应用
- 生成全面的测试计划和 Markdown 规格
- 支持单次运行中的探索和生成
autoqa plan-explore- 仅 Web 应用探索- 探索目标应用并捕获页面结构
- 生成导航图和元素清单
- 创建探索产物供后续测试生成使用
autoqa plan-generate- 从已有探索生成测试用例- 使用之前生成的探索产物
- 创建 Markdown 测试规格
- 支持可配置的测试类型生成
测试执行命令
autoqa init- 初始化项目配置autoqa run <path> --url <baseUrl>- 执行测试用例(--url是必需的)autoqa run --debug- 调试模式运行autoqa run --headless- 无头模式运行(默认)
浏览器工具
| 工具 | 描述 | 参数 |
|------|-------------|------------|
| snapshot | 捕获可访问性快照 | - |
| navigate | 导航到指定页面 | url |
| click | 点击元素 | ref, targetDescription |
| fill | 填充输入字段 | ref, targetDescription, text |
| select_option | 选择下拉选项 | ref, label |
| scroll | 滚动页面 | direction, amount |
| wait | 显式等待 | seconds |
| assertTextPresent | 断言页面包含指定文本且至少有一个可见匹配 | text |
| assertElementVisible | 断言目标元素可见(支持语义描述解析) | targetDescription |
使用指南
编写测试用例
测试用例使用 Markdown 格式,需要包含以下结构:
# 测试用例标题

## 前置条件

- 基础 URL:https://example.com
- 测试账户已创建
- 浏览器支持 JavaScript

## 步骤

1. 导航到 /login
2. 验证登录表单可见
3. 使用 testuser 填充用户名字段
4. 使用 password123 填充密码字段
5. 点击"登录"按钮
6. 验证用户被重定向到仪表板
注意:当前版本中,基础 URL 由 autoqa run --url <baseUrl> 提供;## 前置条件 中的基础 URL 仅用于可读性,不参与解析。
断言语句
以以下内容开头的步骤将被识别为断言:
Verify/Assert
最佳实践
- 保持步骤独立:每个步骤应该是独立的操作
- 使用清晰的描述:避免模糊的操作描述
- 合理使用断言:在关键验证点添加断言
- 管理测试数据:使用前置条件声明所需的测试数据
配置
配置文件支持
AutoQA Agent 通过 autoqa.config.json 支持全面的配置。此文件允许您:
- 定义默认的目标 URL 和认证
- 配置探索限制和护栏
- 指定测试类型和包含/排除模式
- 设置浏览器和执行偏好
完整配置架构
{
  "schemaVersion": 1,
  "guardrails": {
    "maxToolCallsPerSpec": 200,
    "maxConsecutiveErrors": 8,
    "maxRetriesPerStep": 5
  },
  "exportDir": "tests/autoqa",
  "plan": {
    "baseUrl": "https://example.com",
    "maxDepth": 3,
    "maxPages": 50,
    "includePatterns": ["/dashboard", "/settings"],
    "excludePatterns": ["/admin", "/billing"],
    "testTypes": ["functional", "form", "navigation", "responsive", "boundary", "security"],
    "auth": {
      "loginUrl": "https://example.com/login",
      "username": "[email protected]",
      "password": "password123"
    },
    "guardrails": {
      "maxAgentTurnsPerRun": 1000,
      "maxSnapshotsPerRun": 500,
      "maxPagesPerRun": 100,
      "maxTokenPerRun": 5000000
    }
  }
}
配置选项
全局设置
schemaVersion:配置文件版本(必需)guardrails:run命令的全局执行护栏exportDir:导出测试用例的目录(默认:"tests/autoqa")
Plan 配置(plan)
baseUrl:探索的默认目标 URLmaxDepth:最大探索深度(1-10,默认:3)maxPages:最大访问页面数(默认:50)includePatterns:探索中要包含的 URL 模式excludePatterns:探索中要排除的 URL 模式testTypes:要生成的测试类型:functional:核心功能测试form:表单提交和验证测试navigation:导航和路由测试responsive:响应式设计测试boundary:边界情况和错误边界测试security:基础安全测试
认证(plan.auth)
loginUrl:登录页面 URL(如果与目标不同)username:登录用户名(或使用usernameVar指定环境变量)password:登录密码(或使用passwordVar指定环境变量)usernameVar:用户名的环境变量名passwordVar:密码的环境变量名
Plan 护栏(plan.guardrails)
maxAgentTurnsPerRun:每次探索的最大 Agent 工具调用次数(默认:1000)maxSnapshotsPerRun:最大捕获的快照数(默认:500)maxPagesPerRun:最大探索页面数(默认:100)maxTokenPerRun:最大消耗的令牌数(默认:5,000,000)
CLI 覆盖优先级
CLI 参数优先于配置文件设置:
# 配置文件值被 CLI 选项覆盖
autoqa plan --url https://override.com --depth 5 --max-pages 20
配置加载优先级:
- CLI 选项(最高)
autoqa.config.json文件- 内置默认值(最低)
使用示例
示例 1:基础 Web 应用探索
# 快速探索公共网站
autoqa plan-explore --url https://example.com --depth 2 --max-pages 10

# 输出:
# Exploration completed for runId: abc123...
# Pages visited: 8
# Max depth reached: 2
# Results written to: .autoqa/runs/abc123.../plan-explore/
示例 2:带认证的完整测试规划
# 创建带认证的 autoqa.config.json
cat > autoqa.config.json << 'EOF'
{
  "schemaVersion": 1,
  "plan": {
    "baseUrl": "https://app.example.com",
    "maxDepth": 3,
    "auth": {
      "loginUrl": "https://app.example.com/login",
      "username": "[email protected]",
      "password": "password123"
    },
    "testTypes": ["functional", "form", "navigation"],
    "guardrails": {
      "maxAgentTurnsPerRun": 50,
      "maxPagesPerRun": 20
    }
  }
}
EOF

# 运行完整探索和测试生成
autoqa plan

# 输出:
# Starting exploration...
# Exploration completed
# Pages visited: 15
# Exploration results: .autoqa/runs/abc123.../plan-explore/
#
# Generating test cases...
# Test plan generated
# Test cases created: 12
# Test specs: .autoqa/runs/abc123.../plan/specs/
示例 3:带模式的定向测试
# 专注于特定应用区域
autoqa plan \
  --url https://app.example.com \
  --include-patterns "/dashboard,/settings,/profile" \
  --exclude-patterns "/admin,/billing" \
  --test-types "functional,form,navigation" \
  --depth 4 \
  --max-pages 30

# 结果只专注于面向用户的区域探索
示例 4:CI/CD 集成
# 自动化管道的无头探索
autoqa plan \
  --config ./ci/autoqa.config.json \
  --headless \
  --depth 2 \
  --max-pages 15 \
  --test-types "functional,navigation"

# 退出码:
# 0:成功
# 1:运行时错误
# 2:配置错误
# 10:护栏违规
示例 5:两阶段工作流
# 阶段 1:仅探索(每个版本可以执行一次)
autoqa plan-explore \
  --url https://app.example.com \
  --depth 4 \
  --max-pages 50 \
  --login-url https://app.example.com/login \
  --username [email protected] \
  --password $CI_PASSWORD

# 阶段 2:从相同探索生成不同测试类型
autoqa plan-generate \
  --run-id abc123... \
  --test-types "functional,form"

# 稍后:无需重新探索生成其他测试类型
autoqa plan-generate \
  --run-id abc123... \
  --test-types "security,boundary"
生成的测试结构
运行 plan 命令后,您将得到:
.autoqa/runs/<runId>/
├── plan-explore/
│   ├── navigation-graph.json     # 站点导航结构
│   ├── elements.json            # 发现的交互元素
│   └── transcript.jsonl         # 探索记录
├── plan/
│   ├── test-plan.json          # 结构化测试计划
│   └── specs/
│       ├── dashboard-login.md   # 生成的测试用例
│       ├── user-profile.md
│       └── settings-form.md
└── plan-summary.json           # 执行摘要
生成的测试用例示例
生成的 Markdown 测试用例遵循此格式:
# 仪表板登录测试

## 前置条件

- 用户已登录应用
- 仪表板页面可访问

## 步骤

1. 导航到 /dashboard
2. 验证用户资料部分可见
3. 点击设置导航链接
4. 验证设置页面加载成功
5. 使用"测试用户"更新用户名字段
6. 点击保存按钮
7. 验证成功通知出现
8. 返回仪表板
9. 验证更新的名称已显示
运行产物
执行完成后,测试产物和导出结果主要包括:
.autoqa/runs/2024-01-01T12-00-00/
├── run.log.jsonl    # 结构化执行日志
├── ir.jsonl         # 动作 IR(用于导出 Playwright Test)
├── screenshots/     # 页面截图(取决于 AUTOQA_ARTIFACTS)
├── snapshots/       # 可访问性快照(取决于 AUTOQA_ARTIFACTS)
└── traces/          # Playwright 追踪(取决于 AUTOQA_ARTIFACTS)
此外,成功运行的规格将自动导出 @playwright/test 用例到:
tests/autoqa/*.spec.ts开发指南
项目结构
src/
├── agent/           # Claude Agent SDK 集成、护栏
├── auth/            # 认证检测
├── browser/         # 截图/快照
├── cli/             # CLI 参数解析和命令路由
├── config/          # autoqa.config.json 读取和验证
├── ir/              # 动作 IR、定位器候选和导出依赖的数据结构
├── markdown/        # Markdown 规格解析
├── runner/          # 规格生命周期、追踪/导出编排
├── specs/           # 规格发现
└── tools/           # Playwright 适配器 + 断言
构建和测试
# 开发模式
npm run dev

# 运行测试
npm test

# 构建生产版本
npm run build
路线图
已完成(Epic)
- [x] Epic 1:零配置上手(项目初始化)
- [x] Epic 2:执行闭环(从 Markdown 驱动浏览器到完整流程)
- [x] Epic 3:验收判断和自愈闭环(断言 + 失败重试 + 护栏)
- [x] Epic 4:沉淀和导出(动作 IR + 自动导出 Playwright Test)
- [x] Epic 5:可配置的探索策略(智能 Web 应用发现)
- [x] Epic 6:测试计划生成(从探索自动创建测试用例)
- [x] Epic 7:与现有工具链集成(配置文件、CLI 增强)
待办(可选方向)
- [ ] 增强测试用例生成,支持更复杂的测试类型
- [ ] 视觉测试和 UI 回归检测
- [ ] 与 UI 测试一起的 API 测试集成
- [ ] 测试执行调度和并行执行
- [ ] 高级报告和分析仪表板
- [ ] 与热门 CI/CD 平台集成
- [ ] 支持移动端和响应式测试模式
- [ ] 性能测试能力
- [ ] 丰富导出功能(更语义化的步骤解析和更完整的断言映射)
- [ ] 添加更多示例规格和端到端演示项目
- [ ] 持续改进文档和架构图
Star History
贡献指南
我们欢迎所有形式的贡献!
提交 Issues
- 使用 Issue 模板报告错误或建议功能
- 提供详细的复现步骤和环境信息
提交 Pull Requests
- Fork 项目
- 创建功能分支:
git checkout -b feature/amazing-feature - 提交更改:
git commit -m 'Add amazing feature' - 推送分支:
git push origin feature/amazing-feature - 创建 Pull Request
开发指南
- 遵循现有代码风格
- 添加适当的测试
- 更新相关文档
许可证
本项目基于 MIT 许可证 授权。
致谢
- Claude Agent SDK - Agent 框架
- Playwright - 浏览器自动化
- Mermaid - 图表支持
FAQ
使用 --debug 参数运行测试并查看浏览器界面。检查 .autoqa/runs/<runId>/run.log.jsonl 获取详细的执行日志。
是的,可以通过 --headless 参数在 CI 环境中运行。退出码约定:0=成功,1=测试失败,2=配置错误。
Agent 会自动重试失败的操作。建议使用 wait 工具等待动态内容加载。
如有任何问题,请提交 Issue 或加入我们的讨论。