
bisma-ui
v0.3.25
Published
Bisma UI Created with create-react-app

Readme
Background
Motivasi pengembangan bisma-ui dilakukan untuk mempercepat pengembangan UI serta memudahkan koordinasi antar developer baik dari internal developer maupun eksternal. Template bisma-ui dibuat menggunakan Mazer yang dimodifikasi sedemikian rupa agar sesuai dengan desain UI bisma.
Instalasi
Bisma-ui tersedia di npm dan dapat di install dengan perintah command line. Berikut adalah tahapan instalasi dan penggunaan :
Install bisma-ui
npm i bisma-uiTambahkan baris css dibawah pada file css yang di import di nextjs / react. Misalnya terdapat komponen
sidebar.jsyang mengimport file css bernamastyle.module.css, maka pada filestyle.module.csstambahkan baris dibawah :@import url('https://firecek.com/cdn-bisma/assets/css/main.css');Installasi sudah selesai.
Dokumentasi
a. Layout
b. UI Blocks
c. Full example
Building Block
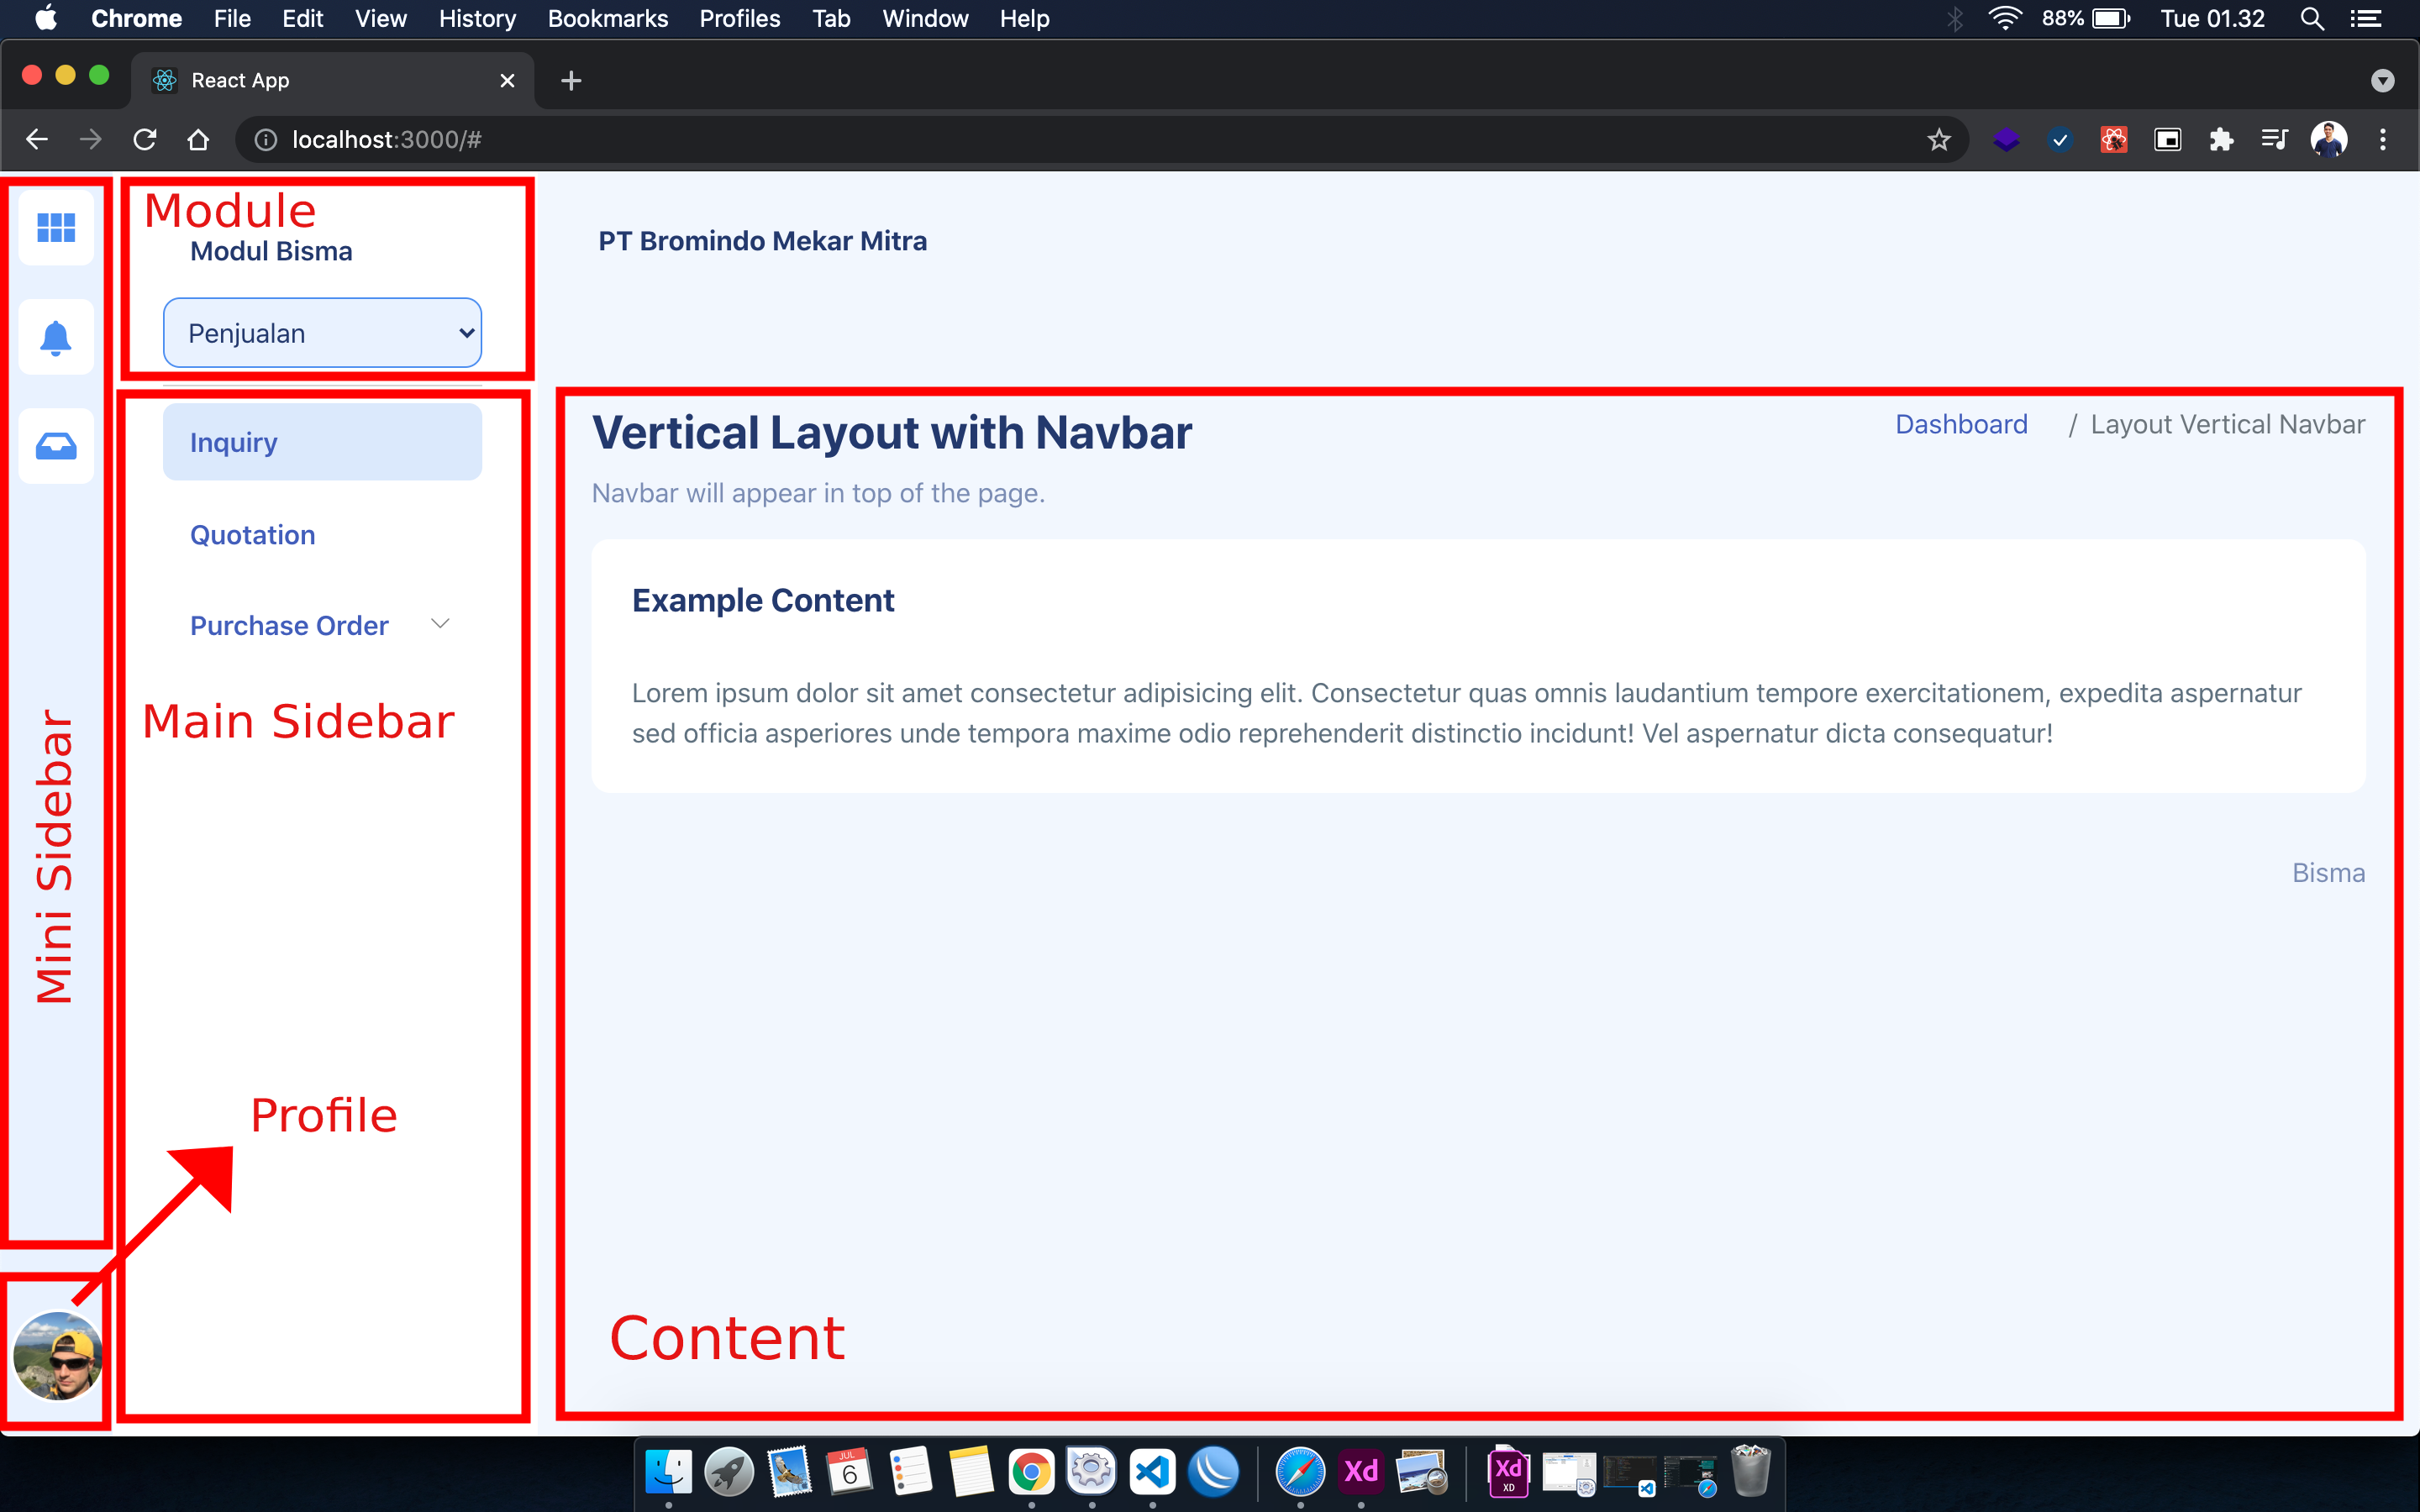
Sebelum ke implementasi kode, dibawah adalah gambar building block yang membangun bisma-ui menjadi satu kesatuan.
Layout 1 (<Template1/>)
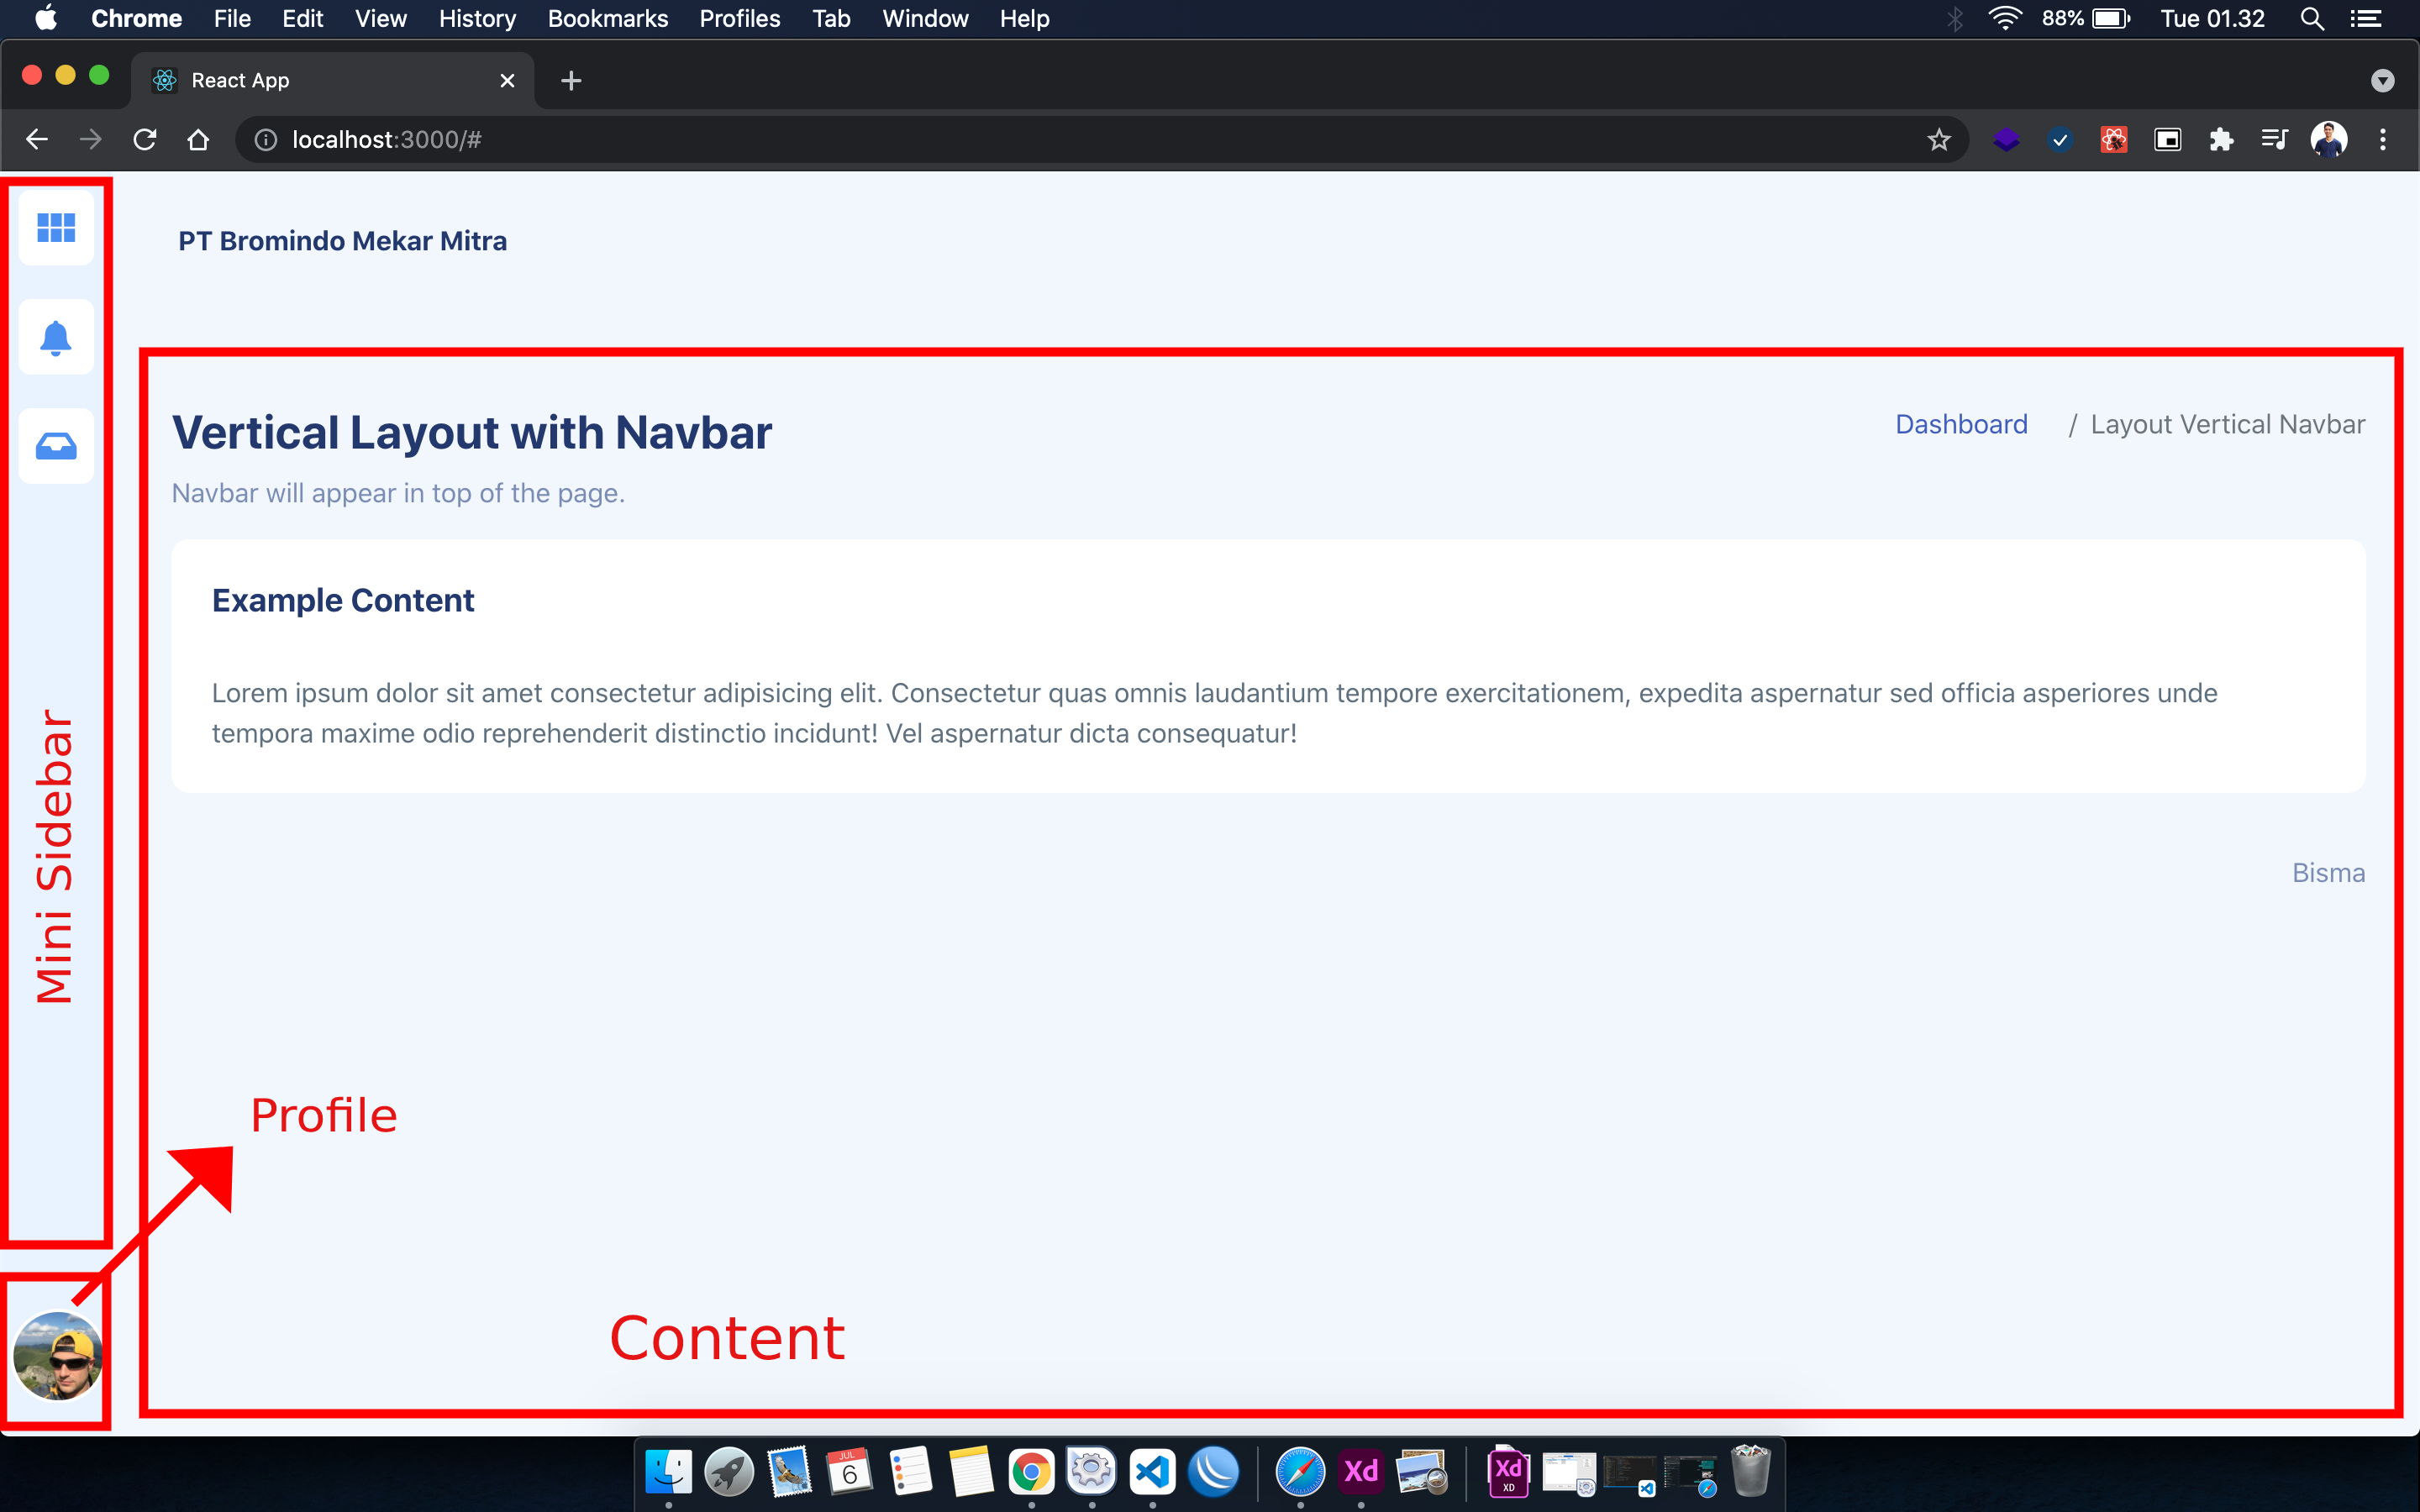
Layout 2 (<Template2/>)
Komponen UI
Layout
Template1
<Template1
  miniSidebar={
    <MiniSidebar></MiniSidebar>
  }

  profile={
    <a href="/some-icon">
        <img src={Avatar} alt="avatar" />
    </a>
  }

  module={[
    {
      title: "Penjualan",
      url: "/sales"
    }
  ]}

  mainSidebar={
    <MenuList></MenuList>
  }

  content={
    <div className="page-heading"></div>
  }
/>
Template2
<Template1
  miniSidebar={
    <MiniSidebar></MiniSidebar>
  }

  profile={
    <a href="/some-icon">
        <img src={Avatar} alt="avatar" />
    </a>
  }

  module={[
    {
      title: "Penjualan",
      url: "/sales"
    }
  ]}

  content={
    <div className="page-heading"></div>
  }
/>
UI Blocks
Buidling block bisma-ui terdiri dari :
Mini sidebar
Contoh kode :
<MiniSidebar>
    <a href="/">
        <img src={Dashboard} alt="Dashboard" width="45px" style={{ margin: '10px' }} />
    </a>
    <a href="/notification">
        <img src={Notification} alt="Notification" width="45px" style={{ margin: '10px' }} />
    </a>
    <a href="/some-icon">
        <img src={SomeIcon} alt="" width="45px" style={{ margin: '10px' }} />
    </a>
</MiniSidebar>
Main sidebar
Contoh kode :
<MenuList>
    <Menu url="/" content={
        <a href="/">Dashboard</a>
    } />
    <Menu url="/sample-1" content={
        <a href="/sample-1">Sample 1</a>
    } />
    <Menu url="#" content={
        <a href="#">OKOKO</a>
    }>
        <SubMenu url="/okoko/submenu-1">
            <a href='/okoko/submenu-1'>
                Submenu 1
            </a>
        </SubMenu>
        <SubMenu url="/okoko/submenu-2">
            <a href='/okoko/submenu-2'>
                Submenu 2
            </a>
        </SubMenu>
    </Menu>
</MenuList>
Module
Contoh kode :
[
    {
        title: "Penjualan",
        url: "/sales"
    },
    {
        title: "Pengadaan",
        url: "/pengadaan"
    }
]
Profile
Contoh kode :
profile={
    <a href="/some-icon">
        <img src={'./assets/icons/avatar.svg'} alt="avatar" />
    </a>
}
Content
Contoh kode :
<div className="page-heading">
    <div className="page-title">
        <div className="row">
            <div className="col-12 col-md-6 order-md-1 order-last">
                <h3>Vertical Layout with Navbar</h3>
                <p className="text-subtitle text-muted">Navbar will appear in top of the page.</p>
            </div>
            <div className="col-12 col-md-6 order-md-2 order-first">
                <nav aria-label="breadcrumb" className="breadcrumb-header float-start float-lg-end">
                    <ol className="breadcrumb">
                        <li className="breadcrumb-item"><a href="index.html">Dashboard</a></li>
                        <li className="breadcrumb-item active" aria-current="page">Layout Vertical Navbar
                        </li>
                    </ol>
                </nav>
            </div>
        </div>
    </div>
    <section className="section">
        <div className="card">
            <div className="card-header">
                <h4 className="card-title">Example Content</h4>
            </div>
            <div className="card-body">
                Lorem ipsum dolor sit amet consectetur adipisicing elit. Consectetur quas omnis
                laudantium tempore
                exercitationem, expedita aspernatur sed officia asperiores unde tempora maxime odio
                reprehenderit
                distinctio incidunt! Vel aspernatur dicta consequatur!
            </div>
        </div>
    </section>
</div>
Full code example
import { Template1, Menu, MenuList, SubMenu, MiniSidebar } from 'bisma-ui'

import Dashboard from './lib/component/assets/icons/dashboard.svg';
import Notification from './lib/component/assets/icons/notification.svg';
import SomeIcon from './lib/component/assets/icons/some-icon.svg';

function App() {
  return (
    <div className="App">
      <Template1
        miniSidebar={
          <MiniSidebar>
            <a href="/">
              <img src={Dashboard} alt="Dashboard" width="45px" style={{ margin: '10px' }} />
            </a>
            <a href="/notification">
              <img src={Notification} alt="Notification" width="45px" style={{ margin: '10px' }} />
            </a>
            <a href="/some-icon">
              <img src={SomeIcon} alt="" width="45px" style={{ margin: '10px' }} />
            </a>
          </MiniSidebar>
        }

        module={[
          {
            title: "Penjualan",
            url: "/sales"
          },
          {
            title: "Pengadaan",
            url: "/pengadaan"
          }
        ]}

        profile={
            <a href="/some-icon">
                <img src={'./assets/icons/avatar.svg'} alt="avatar" />
            </a>
        }

        mainSidebar={
          <MenuList>
            <Menu url="/" content={
              <a href="/">Dashboard</a>
            } />
            <Menu url="/sample-1" content={
              <a href="/sample-1">Sample 1</a>
            } />
            <Menu url="#" content={
              <a href="#">OKOKO</a>
            }>
              <SubMenu url="/okoko/submenu-1">
                <a href='/okoko/submenu-1'>
                  Submenu 1
                </a>
              </SubMenu>
              <SubMenu url="/okoko/submenu-2">
                <a href='/okoko/submenu-2'>
                  Submenu 2
                </a>
              </SubMenu>
            </Menu>
          </MenuList>
        }

        content={
          <div className="page-heading">
            <div className="page-title">
              <div className="row">
                <div className="col-12 col-md-6 order-md-1 order-last">
                  <h3>Vertical Layout with Navbar</h3>
                  <p className="text-subtitle text-muted">Navbar will appear in top of the page.</p>
                </div>
                <div className="col-12 col-md-6 order-md-2 order-first">
                  <nav aria-label="breadcrumb" className="breadcrumb-header float-start float-lg-end">
                    <ol className="breadcrumb">
                      <li className="breadcrumb-item"><a href="index.html">Dashboard</a></li>
                      <li className="breadcrumb-item active" aria-current="page">Layout Vertical Navbar
                      </li>
                    </ol>
                  </nav>
                </div>
              </div>
            </div>
            <section className="section">
              <div className="card">
                <div className="card-header">
                  <h4 className="card-title">Example Content</h4>
                </div>
                <div className="card-body">
                  Lorem ipsum dolor sit amet consectetur adipisicing elit. Consectetur quas omnis
                  laudantium tempore
                  exercitationem, expedita aspernatur sed officia asperiores unde tempora maxime odio
                  reprehenderit
                  distinctio incidunt! Vel aspernatur dicta consequatur!
                </div>
              </div>
            </section>
          </div>
        }
      />
    </div>
  );
}

export default App;
API
Template1
Wrapper / pembungkus utama dari UI yang menggunakan layout pertama
| Property | Deskripsi | Tipe | Default |
| ------------ | ------------ | ------------ | ------------ |
| miniSidebar | Element UI yang akan mengisi mini sidebar | <MiniSidebar> | - |
| mainSidebar | Element UI yang akan mengisi main sidebar | <MenuList> | - |
| profile | Element UI yang akan mengisi profil | HTML/JSX | - |
| module | Element UI yang akan mengisi main module | JSON | - |
| content | Element UI yang akan mengisi main content | HTML/JSX | - |
Template2
Wrapper / pembungkus utama dari UI yang menggunakan layout kedua
| Property | Deskripsi | Tipe | Default |
| ------------ | ------------ | ------------ | ------------ |
| miniSidebar | Element UI yang akan mengisi mini sidebar | <MiniSidebar> | - |
| content | Element UI yang akan mengisi main content | HTML/JSX | - |
| profile | Element UI yang akan mengisi profil | HTML/JSX | - |
MenuList
Digunakan untuk membungkus <Menu> dan <Submenu>
| Property | Deskripsi | Tipe | Default |
| ------------ | ------------ | ------------ | ------------ |
| children | Element yang akan dimasukkan sebagai menu / submenu | <Menu> | - |
Menu
Digunakan untuk membungkus <Menu> dan <Submenu> didalam sidebar
| Property | Deskripsi | Tipe | Default |
| ------------ | ------------ | ------------ | ------------ |
| url | URL yang dituju ketika menu di klik | String | - |
| content | Element UI yang akan ditampilkan | HTML/JSX | - |
SubMenu
Sebagai submenu / children dari <Menu>
| Property | Deskripsi | Tipe | Default |
| ------------ | ------------ | ------------ | ------------ |
| url | URL yang dituju ketika menu di klik | String | - |
| children | Element UI yang akan ditampilkan | HTML/JSX | - |
MiniSidebar
Wrapper / pembungkus mini sidebar dalam UI
| Property | Deskripsi | Tipe | Default |
| ------------ | ------------ | ------------ | ------------ |
| children | Element UI yang akan ditampilkan | HTML/JSX | - |