
busybar-dual-timer
v1.1.3
Published
Two configurable countdowns on a BUSY Bar. START starts and pauses, the dial switches A/B, double-click resets, and turning it sets the time.

Maintainers
 ip2k
ip2kReadme
busybar-dual-timer


Two countdowns on a BUSY Bar, switched with the dial.
Timer A for work, timer B for a break. Click the dial to switch between them; each one remembers where it was. Turn the dial to set the time without touching a config file.
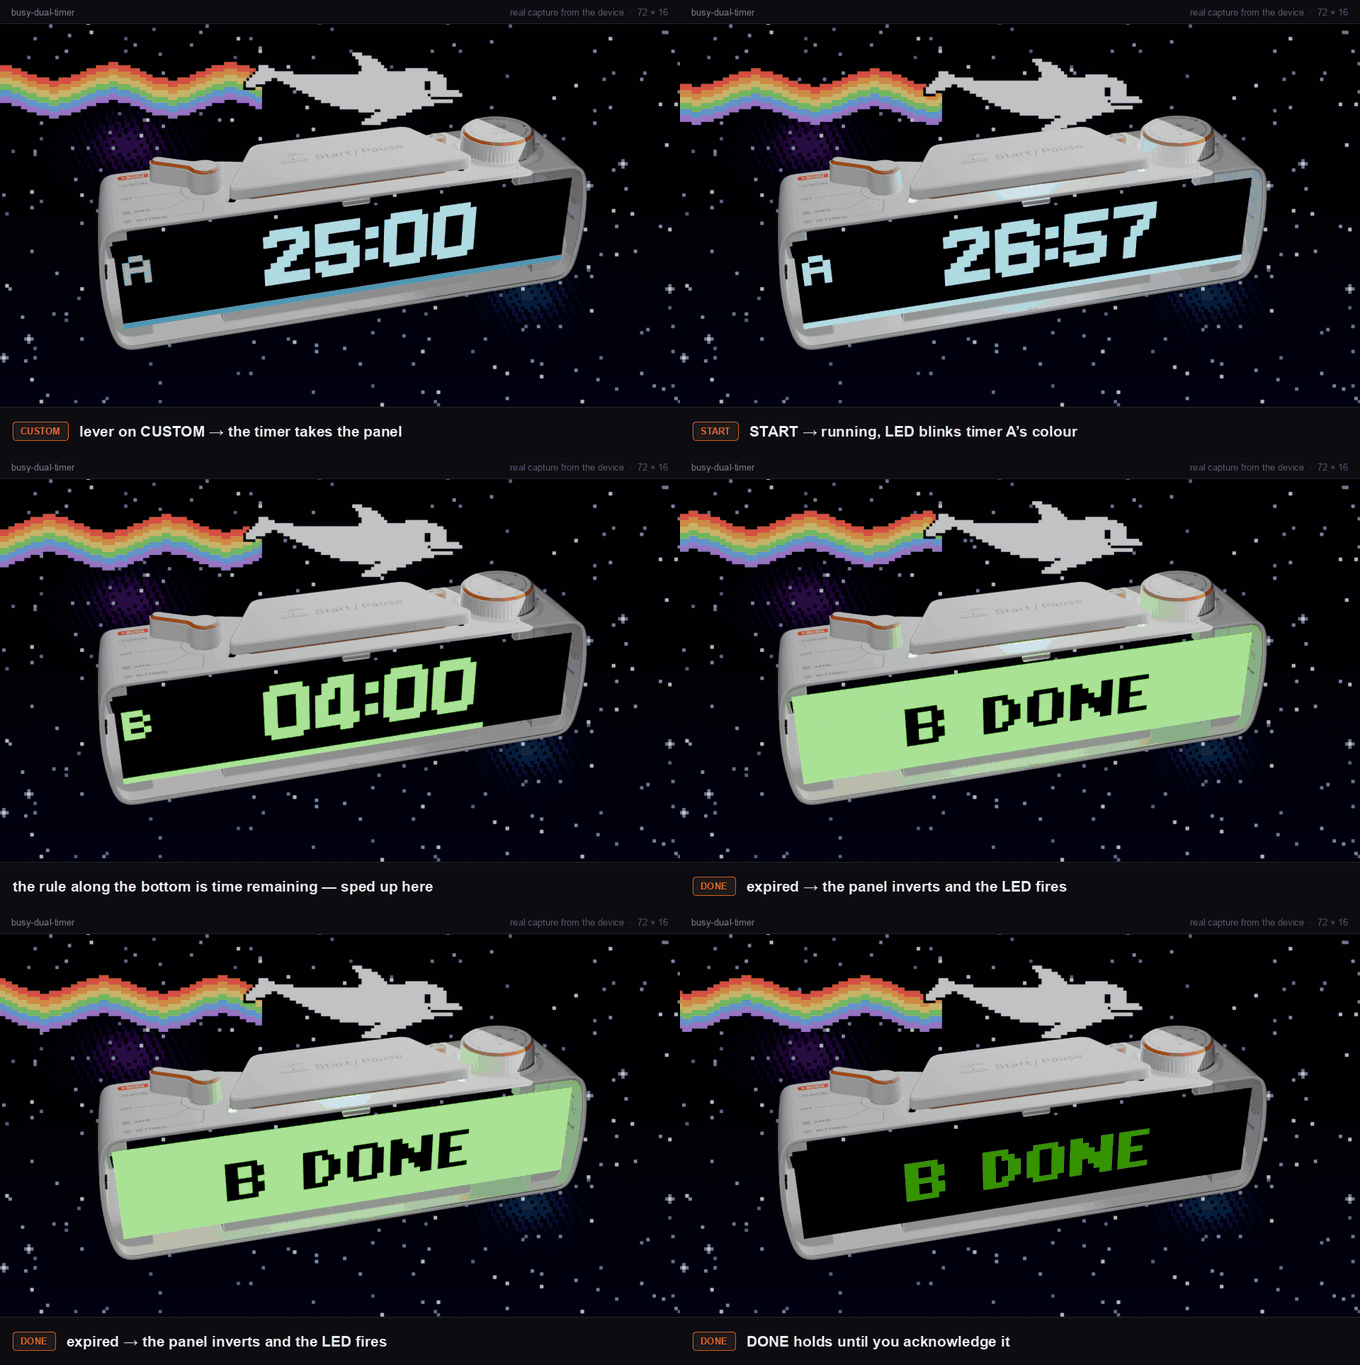
Every panel frame above is a real photograph of the device: built by this
project's own renderer, drawn to a Bar, and read back with
GET /api/screen, then projected onto BUSY's published 3D model. The flying
dolphin is Flipper's, used under GPL-3.0 — so docs/demo.gif carries that
licence rather than this project's MIT. See
tools/vendor/README.md.
Real frames captured off the device: timer A counting, a dial click switching to
B, switching back to find A exactly where it was, and the finished timer holding
DONE.
Nothing is installed on the Bar. This runs on any machine on the same network and drives the device over its local HTTP API, so there is no firmware to flash and nothing to undo — stop the program and the Bar goes back to normal.
Zero runtime dependencies. Node and nothing else.
On-device is the plan. Running off-device is a consequence of what's available today, not the end state. When BUSY ship their JS SDK for real on-device apps, the intent is to port this into a proper BUSY Bar app. What that changes →
Controls
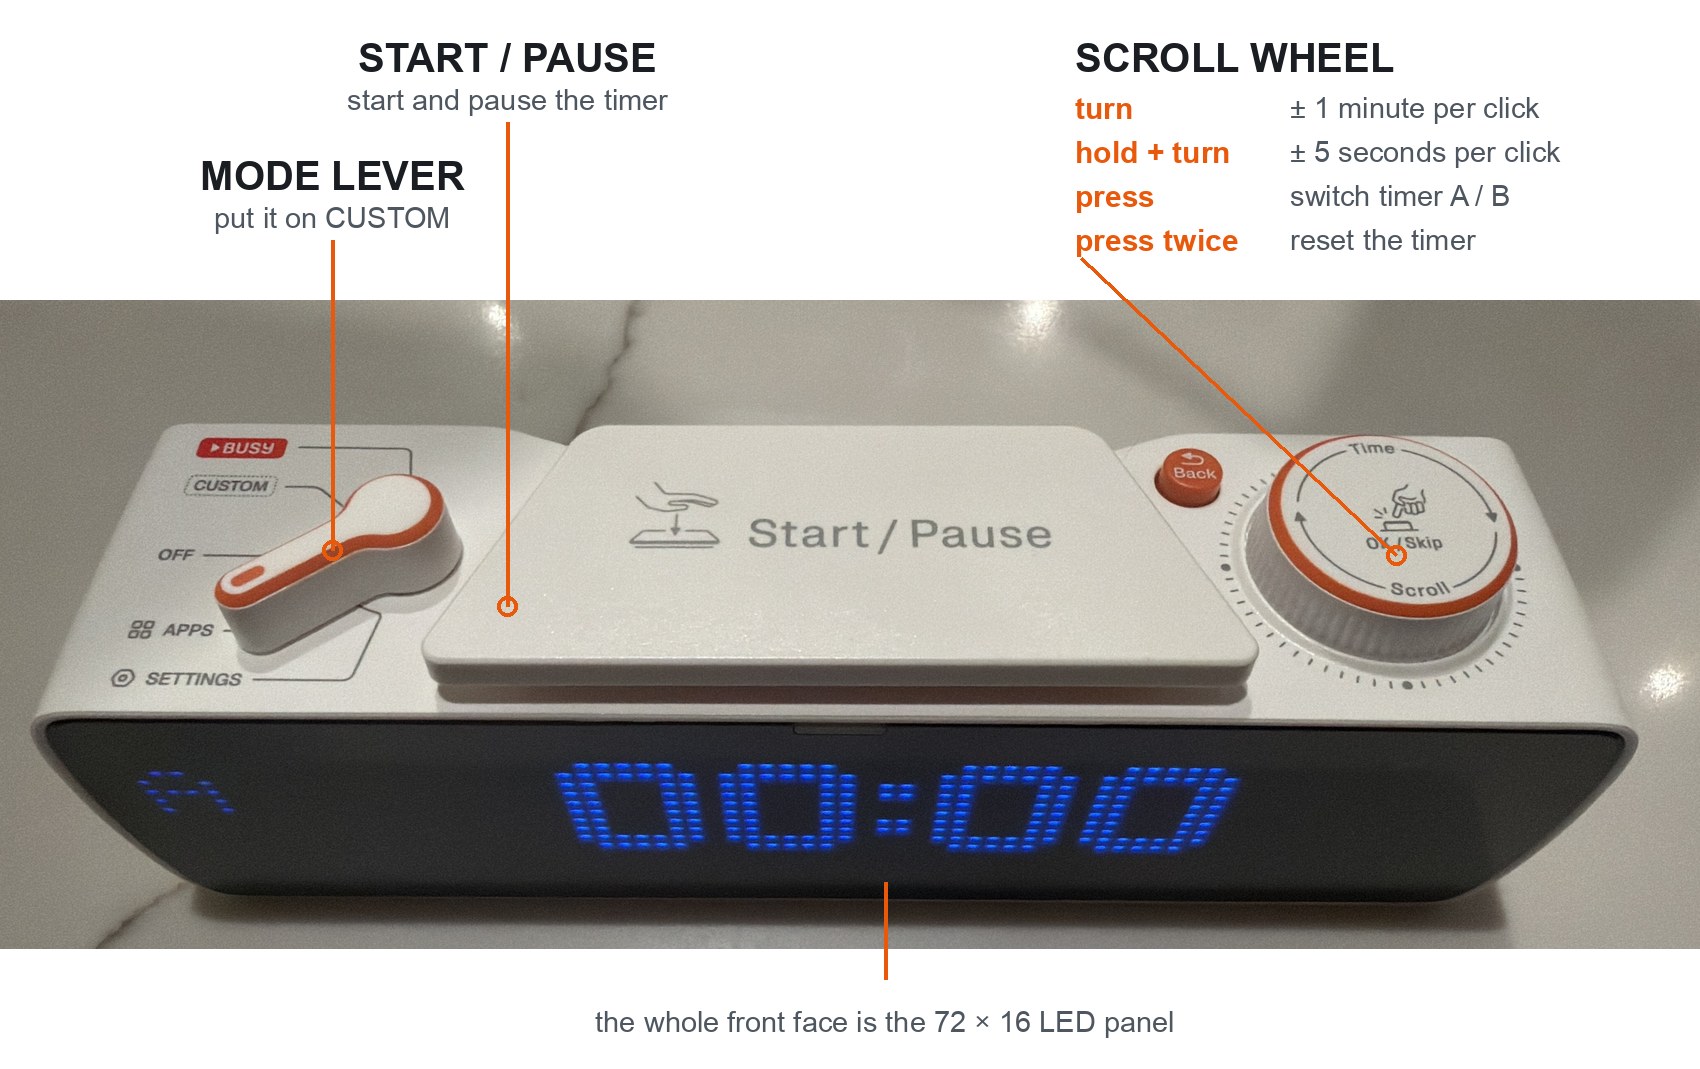
| Control | Action | | --- | --- | | Start / Pause | start / pause | | Scroll wheel — click | switch between timer A and B | | Scroll wheel — double-click | reset the current timer | | Scroll wheel — turn | ±1 minute | | Scroll wheel — hold + turn | ±5 seconds |
The wheel is labelled OK / Skip on the device — which is why a click arrives as
the ok button — and the lever's printed positions are exactly the ones the API
reports: BUSY, CUSTOM, OFF, APPS, SETTINGS.
BACK does nothing, deliberately. The Bar's firmware uses it to navigate its own UI, which can throw this widget off the screen. See Why BACK is unbound.
Put the lever on CUSTOM. With the switch on APPS, the firmware's own BACK navigation can knock the widget off the panel; on CUSTOM it can't, because there's nothing to navigate back to. Measured: 0 interruptions in 6 presses on CUSTOM, versus reliably on APPS. The widget recovers either way, but CUSTOM means it never happens.
Switching stops the clock. Two defined behaviours, not accidents:
- The timer you leave is banked at whatever was left on it, so you can flip back and forth without losing your place.
- Neither timer runs after a switch. Press START to begin the new one.
That second one is deliberate. Switching is how you change what you're doing, so starting a countdown you didn't ask for would be quietly wrong — you'd be timing a break against a clock you never started. It also means the two timers can never both be draining, so time is never charged to the wrong one.
Just want to run it?
npx busybar-dual-timerThat's the whole thing over USB — the defaults target the Bar's fixed USB
address (10.0.4.20), which needs no password and no network setup. Plug it in,
run that, put the mode lever on CUSTOM.
To keep it, or to run it over Wi-Fi:
npm install -g busybar-dual-timer
busybar-dual-timer --init      # writes config.json in the current directory
busybar-dual-timer             # runs using it
--init writes a fully commented starting point. Set device.host to your
Bar's IP and device.apiToken to the password you set when enabling the HTTP
API. Config is looked for in this order:
| | |
| --- | --- |
| --config <path> | an explicit file |
| $BUSY_TIMER_CONFIG | environment override |
| ./config.json | the directory you run from |
| ~/.config/busybar-dual-timer/config.json | per-user |
| (none) | built-in defaults — works over USB |
Node 22 or newer is the only requirement. There are no dependencies, so there is no build step and nothing to compile.
Prefer no npm at all? Every release also ships a tarball on the
Releases page — unpack
it and run node dist/index.js. Each one has a .sha256 beside it.
Everything below is for running from source or contributing.
Requirements
- Node 22 or newer (
node --version). Nothing else — no npm packages are needed at runtime. - A BUSY Bar with its local HTTP API enabled (below).
- A machine on the same network as the Bar, or connected to it by USB.
- Optional:
ffmpeg, only if you want a custom sound in a compressed format.
Setup
1. Enable the Bar's local HTTP API
Wi-Fi access is off by default, for good reason. Per the official instructions:
- Connect the Bar to a computer by USB.
- Open http://10.0.4.20/ in a browser — that's the Bar's own web interface.
- Go to the Network tab.
- Under HTTP API, click set password and enable, and choose a password.
That password is your API token. Over USB no token is needed at all.
2. Find your Bar's address
Over USB it is always 10.0.4.20. This needs no setup and no token, so it's
the easiest way to try things first.
Over Wi-Fi, on the device: Settings → Wi-Fi → [your network] → View IP Address.
Check it answers:
curl http://10.0.4.20/api/version
# {"api_semver":"25.0.0"}
3. Install and configure
git clone <this-repo>
cd busybar-dual-timer
npm install          # dev-only: typescript + @types/node
cp config.example.json config.json
Edit config.json:
{
  "device": { "host": "10.0.4.20", "apiToken": null }
}
Over Wi-Fi, use your Bar's IP and the password you set:
{
  "device": { "host": "192.0.2.42", "apiToken": "your-password" }
}
config.json is gitignored, so your address and token stay out of version
control.
4. Run it
npm test             # offline checks; no device needed
npm run dev
You should see:
[bar] 10.0.4.20 firmware API 25.0.0
[sound] uploaded chime.wav (47628 bytes) to app 'dual_timer'
[stream] connected
[ready] A=25:00 B=05:00 — start start/pause · dial click switches · ...
and the timer on the Bar's front display. Press START.
Ctrl-C clears the display and hands the screen back to the device.
5. Set the lever to CUSTOM
The physical lever on the side of the Bar decides what the firmware does with your button presses, and it matters more than you'd expect.
Use CUSTOM. On APPS, the firmware has its own UI to navigate, so a BACK press pops that stack and knocks the widget off the panel — it looks exactly like the program crashed, though it hasn't. On CUSTOM there's nothing to navigate back to, so the press is inert and the widget is left alone.
Measured on hardware, same build, six presses each:
| Lever | BACK steals the screen | | --- | --- | | APPS | yes, reliably | | CUSTOM | no — 0 of 6 |
The widget redraws itself either way (see reassertEveryMs), so APPS is
survivable — it just flickers back to the device UI for a second or two. CUSTOM
avoids it entirely.
The lever is the on/off switch for the timer
By default the lever is the app switcher: CUSTOM shows the timer, every other position leaves the Bar completely alone. Move away from CUSTOM and the widget is taken down, revealing whatever the device was showing — the calendar on APPS, a session on BUSY; move back and it returns.
That is "behavior": { "activeSwitchPosition": "custom" }. Set it to null
to show the timer whatever the lever is doing, which only makes sense on a Bar
that does nothing else — before 1.1.3 that was the default, and it meant the
timer drew over the calendar on APPS.
One thing to know: the Bar only reports the lever when it moves. Nothing exposes the current position, so at startup the timer does not know where the lever is and stays hidden until it moves once, even if it is already on CUSTOM. The log says so. Flick it away and back.
The controls go inert too. With the lever elsewhere, START, the dial and BACK do nothing to this app — presses aren't just ignored on screen, they're never acted on. Verified on hardware: with the lever on APPS, pressing START, clicking the dial three times, rotating it, and using BACK to navigate the device's clock view produced zero events in this app, and the device behaved exactly as it does without the timer running. Running this should not change how your Bar works when you're not using it.
Timers keep counting while hidden — you don't lose time by glancing at another
app — but they expire silently. No chime, no LED, no display. You'll see
DONE when you come back. Hiding a widget that still makes noise would defeat
the point.
One caveat. The lever position is only reported when it changes; no
endpoint exposes the current position (checked /api/status and
/api/busy/snapshot). So on startup the position is unknown, and the widget
stays hidden until you move the lever at least once — even if it's already on
CUSTOM. Hiding is the safe default: covering an app you're using would be worse
than making you flick a switch. The log says so on startup:
[display] waiting for the lever — the widget shows only on 'custom'
[display] the position is only reported when it changes, so flip the lever to begin
Configuration
Every key is optional — your config.json is merged over the defaults, so you
only write what you want to change.
Display brightness
"display": { "brightness": "auto" }| Value | Effect |
| --- | --- |
| "auto" (default) | hand it to the Bar's ambient light sensor |
| 0–100 | pin it |
| null | leave the device's own setting completely alone |
Why auto is the default. A timer is only useful if you can read it, and a
fixed brightness is wrong half the time — a value that suits a bright office is
glaring in a dark room, and one that suits evening is invisible under overhead
lights. The Bar has an ambient light sensor, so let it decide.
This is not a placebo: the firmware's brightness handler calls
brightness_control_set_auto_brightness() and pulls in light_sensor.h, with a
whole light_sensor service behind it.
Two things to know before leaving it on. Brightness is a device-wide
setting, not a per-app one — so this app changes something that outlives it.
Whatever was set before is read at startup and restored on a clean shutdown, but
a hard kill (kill -9, power loss) skips that and leaves the device on auto.
If the app must never touch the device's settings, set null.
Also worth checking what yours is set to before blaming this app for a dim
panel — a Bar sitting at 5 looks dim under normal room lighting:
curl http://<bar>/api/display/brightnessTimers — lengths, labels and colours
"timers": [
  { "label": "A", "seconds": 1500, "color": "#3BA7FFFF" },
  { "label": "B", "seconds": 300,  "color": "#33D17AFF" }
]
Colours are #RRGGBBAA — eight digits, alpha included. The label is drawn in
the top-left corner; short is better on a 72×16 panel.
ledColor blinks the status LED in the START button while that timer runs,
so you can tell A from B across the room without reading the panel. It defaults
to the timer's own colour. Turn it off with "behavior": { "ledWhileRunning":
false }, which limits the LED to expiry.
The firmware exposes a colour and nothing else — the blink pattern is the device's own and cannot be configured. See What the LED can't do.
Each timer can also have its own expiry sound, so you know which one finished without looking:
{ "label": "A", "seconds": 1500, "color": "#3BA7FFFF",
  "sound": { "tones": [ { "freq": 880, "ms": 110 }, { "freq": 1760, "ms": 320 } ] } }
Give it "sound": { "file": "gong.mp3" } to use a file from assets/ instead.
With neither, each slot gets a distinct built-in chime — A rises, B falls a
fourth lower, so they differ in contour as well as pitch.
These are starting values. Turning the dial changes a timer's length while the program runs, but does not rewrite this file — restart and you're back to these numbers.
Controls
"gestures": {
  "toggleButton": "start",
  "switchButton": "ok",
  "resetButton": null,
  "doubleTapMs": 300,
  "coarseStepSeconds": 60,
  "fineStepSeconds": 5,
  "maxSeconds": 86400
}
| Key | Meaning |
| --- | --- |
| toggleButton | button for start/pause — start, ok or back |
| switchButton | button that switches timers; ok is the dial click |
| resetButton | optional extra reset button. null by default — see below |
| doubleTapMs | two dial clicks within this are a reset, not two switches |
| coarseStepSeconds | step for a plain dial turn |
| fineStepSeconds | step for a turn with the dial held |
| maxSeconds | most the dial can wind a timer to |
The three button bindings must all be different. Lower doubleTapMs makes
switching feel snappier at the cost of needing a faster double-click; measured
rapid clicks run 147–182 ms apart, so much below ~220 ms gets hard to hit.
Behaviour
"behavior": {
  "resetOnSwitch": false,
  "autoAdvanceOnExpiry": false,
  "startPaused": true,
  "streamFrames": true,
  "reassertEveryMs": 2000,
  "maxEventsPerMessage": 8
}
| Key | Meaning |
| --- | --- |
| resetOnSwitch | switching refills the timer you leave instead of banking it |
| autoAdvanceOnExpiry | when A finishes, start B automatically |
| startPaused | wait for a press rather than starting on launch |
| reassertEveryMs | redraw this often to reclaim the screen if the device takes it |
| maxEventsPerMessage | drop suspiciously large input bursts (why) |
Expiry — flash and sound
"expiry": {
  "flashSeconds": 10,
  "flashHz": 3,
  "ledColor": "#FF3B30FF",
  "sound": { "mode": "asset", "file": "chime.wav", "repeat": 3, "repeatEveryMs": 1200 }
}
With no sound file present, a chime is synthesised at startup — there's nothing
to install. To use your own, drop a file in assets/:
cp ~/Music/ding.mp3 assets/chime.wavMP3, FLAC, OGG, M4A and AIFF need ffmpeg installed; WAV in any bit depth or
sample rate is handled with no external tools. Full guide, including
troubleshooting →
An expiry has three stages:
| Stage | Lasts | Looks like |
| --- | --- | --- |
| alarm | flashSeconds | the panel inverts at flashHz — a solid field of the timer's colour with DONE knocked out black, alternating with DONE lit on black |
| hold | holdSeconds | DONE stays up, dimmed |
| released | — | back to the timer |
Inverting the whole 72×16 field is far more noticeable across a room than
blinking text, which is the entire job of an alarm. Set flashHz: 0 to hold the
inverted field steady instead.
The hold matters because a finished timer that reverted straight to 00:00
looks identical to one that was never started. But holding forever is worse — it
squats the panel and the Bar stops being useful for anything else — so the
screen is handed back after holdSeconds (default 300). Set it to null to
hold until acknowledged. Pressing anything dismisses it immediately either way.
If the timer expires while the lever is elsewhere, the whole announcement is deferred rather than spent, so you get it when you come back.
Set "mode": "none" for a silent flash, or use one of the device's own sounds
with "mode": "stock", "stockPath": "shared/volume_change.snd".
Running it as a service
To keep the timer up on an always-on machine, busybar-dual-timer.service is a
systemd template:
npm run build
sudo cp -r . /opt/busybar-dual-timer
sudo cp busybar-dual-timer.service /etc/systemd/system/
sudo systemctl daemon-reload
sudo systemctl enable --now busybar-dual-timer
journalctl -u busybar-dual-timer -f
Edit User= and WorkingDirectory= in the unit file first.
Things worth knowing about the hardware
Some of this is not in the official docs, and cost real time to find. The full set is in docs/busy-bar-api.md, with each claim marked verified or inferred.
Why BACK is unbound
The firmware acts on every button press regardless of what you have drawn, and you cannot suppress it. For START and the dial that's harmless. BACK pops the device's own navigation stack, which throws the widget off the panel — it looks exactly like the program crashed, though it's still running perfectly.
Worse, it's contextual: at the root of the device's UI, BACK does nothing. So it presents as an intermittent fault.
Reset therefore lives on a dial double-click. You can set
"resetButton": "back", but that is opting into the above.
The widget re-asserts itself
Nothing tells you when the device takes the screen, and a paused timer's drawing
never changes, so the widget would simply stay gone. It redraws every
reassertEveryMs regardless, reclaiming the panel within a couple of seconds.
Anything drawing a persistent widget on this hardware needs to do this.
Audio: 200 OK means nothing
POST /api/audio/play returns 200 {"result":"OK"} for files that do not
exist. It never returns the 404 its own spec documents. The only way to
verify audio is for a person to listen to the Bar. Don't trust the status code —
it cost this project a wrong "verified" entry.
What the LED can and can't do
Answered from the firmware source, not guesswork. The firmware has six light presets — off, static colour, fade, rainbow, blink, and notification — and the HTTP API reaches exactly one:
status_lights_run_preset(status_lights, StatusLightsPresetNotification, ctx->led_color);Notification is three blinks at maximum brightness. So over the network you
pick a colour, and that is the whole of it. There is no steady-on, no rate,
no pattern.
| Want | Over HTTP? |
| --- | --- |
| Any colour, three blinks | yes — this is timers[].ledColor |
| Steady red or green | via /api/busy/*, giving up the device's session |
| Steady arbitrary colour | no — USB serial CLI only |
| Custom patterns, Morse | no |
Which settles Morse: every "on" you can produce is a three-blink animation, so dots and dashes would be built out of flashing. Not worth faking.
behavior.ledMode picks how the one available preset is used:
| Mode | Behaviour |
| --- | --- |
| transitions (default) | fire once when a timer starts, is switched, or expires — three clean blinks in that timer's colour, then quiet |
| running | re-fire on every redraw while a timer runs — continuous flashing |
| off | never touch the LED |
Why transitions is the default. The two modes answer different questions.
running tells you which timer is going at any moment, which is genuinely
useful across a room — but it is a workaround for the missing steady-on state,
faking persistence by re-triggering an animation, so it flickers in peripheral
vision for the whole session. transitions tells you that something just
happened, uses the preset the way the firmware intends, and is quiet the rest
of the time. Pick running if you want an ambient status light and don't mind
the flicker.
Confirmed on hardware: in transitions, starting a timer gives a short burst of
blinks in that timer's colour and the LED is then unlit until the next event.
Expiry always uses expiry.ledColor (red by default), not the timer's
colour — an alarm should read as an alarm whichever timer fired it.
If BUSY expose the other presets later — likely with the on-device SDK, where
status_lights_run_preset is a direct call — patterns become straightforward,
and ledMode is the natural place for them.
Robustness
The countdown never touches the network, so packet loss or a disconnect cannot make a timer drift — the display just stops updating until the link returns.
Beyond that: intervals between inputs are measured with the device's own clock, not arrival time, because a stalled link delivers buffered events together and two clicks arriving at once would otherwise look like a double-click and silently reset your timer. Durations use a monotonic clock, so an NTP step on the host can't corrupt a running timer. And the device has been seen replaying a large batch of historical input at once, so oversized bursts are dropped rather than firing dozens of actions.
What an on-device port would change
This is written to run off-device because that is what the Bar supports today. When the JS SDK for on-device apps ships, the plan is to port it — and the split is deliberately drawn so that most of the code doesn't care.
timers.ts, render.ts and audio.ts are pure: state machine, layout, audio
conversion, no I/O. Those port unchanged. api.ts and index.ts are the parts
that exist because there is a network in the way, and they are the parts that
would go.
Several things in here are workarounds for being a remote client, and would simply stop being problems:
| Today | On-device |
| --- | --- |
| Gesture timing measured with the device clock, because a laggy link distorts arrival times | input is local; no clock skew to reason about |
| reassertEveryMs redrawing to reclaim the panel | an app owns its screen |
| maxEventsPerMessage guarding against replayed input bursts | no stream to replay |
| doubleTapMs latency on a dial click | unchanged — that one is about human timing, not networking |
The hardware findings in docs/busy-bar-api.md should
mostly survive a port, since they describe the device rather than the transport:
the button and dial wire formats, BACK popping the navigation stack, the audio
format, and the fact that a 200 from the audio endpoint means nothing.
Development
npm test           # offline smoke test, incl. real captured device frames
npm run dev        # run from source (Node strips types natively)
npm run typecheck  # tsc --noEmit
npm run build      # -> dist/
| File | Role |
| --- | --- |
| src/config.ts | load, merge and validate config |
| src/proto.ts | minimal protobuf reader for the status WebSocket |
| src/api.ts | HTTP client + reconnecting WebSocket |
| src/gestures.ts | buttons and dial → timer actions |
| src/timers.ts | the two-countdown state machine (pure) |
| src/render.ts | 72×16 layout → draw payload (pure) |
| src/audio.ts | WAV → device PCM (pure) |
| src/audio-file.ts | file loading and ffmpeg |
| src/chime.ts | synthesised fallback chime |
| src/clock.ts | monotonic clock |
| src/index.ts | wiring, tick loop, expiry |
timers.ts, render.ts and audio.ts are deliberately pure, which is what
makes the offline test suite meaningful — it covers the protobuf decoder against
real captured frames, the gesture mapping, timer banking, layout bounds and
audio conversion, all with no hardware.
Continuous integration
.github/workflows/ci.yml runs typecheck, the smoke test and a build on Node 22
and 24 for every push and pull request. The test suite needs no hardware — it
covers the protobuf decoder against real captured device frames, the gesture
mapping, timer banking, layout bounds and audio conversion — so CI is a genuine
check rather than a formality.
.github/workflows/release.yml runs on a v* tag and attaches a ready-to-run
bundle to the GitHub release: compiled JS, an example config, the service file
and the docs. Since there are no runtime dependencies, anyone with Node 22+ can
unpack it and run node dist/index.js without a toolchain.
git tag v1.0.0 && git push origin v1.0.0CHANGELOG.md records what changed in each release. docs/architecture.md explains why each piece is shaped the way it is. docs/verification.md records what has actually been proven on hardware, and what hasn't.
Running on the Bar itself
Firmware 1.2.3 added an on-device JavaScript runtime, so we tried to move this app onto the Bar. It got a long way — the real timer state machine runs on-device unmodified and keeps accurate time, audio works, and the display can be driven by a firmware-rendered countdown — and then stopped on one thing:
A JS app cannot read input. There is no WebSocket binding, so the status stream carrying button and dial events is unreachable, and the HTTP API only sends input, never reports it. A timer you cannot start is not a timer.
So this remains an off-device app for now. The attempt is preserved on the
js-runtime-port
branch, along with a working app package, a bundler, an installer and an offline
harness — ready for the day an input binding appears.
- docs/js-port.md — the full write-up: what the runtime provides, what it costs, and a module-by-module estimate of the port
- docs/firmware-feedback.md — the short version sent to the firmware team: what blocked us and what would help most
Some of it applies to this app too, whether or not the port ever happens —
countdown elements, z_index, display_until and selective element deletion
are all in docs/busy-bar-api.md and
docs/roadmap.md.
Links
- BUSY Bar documentation
- HTTP API guide — enabling it, tokens, connection types
- HTTP API reference — interactive
- Official libraries —
TypeScript (
@busy-app/busy-lib), Python, Kotlin. This project deliberately uses none of them — see the ecosystem notes for what they offer and why - Downloads — 3D models of the Bar (STEP, GLB, and the FBX + textures package this repo's demo render uses), firmware sources, and the developer libraries
- Protobuf schemas
- Device firmware source — open source, and the definitive answer to most hardware questions
- Your own Bar serves its spec at
http://<bar>/openapi.yamland rendered docs athttp://<bar>/docs/
Security
This runs on your machine and talks to a device on your network, so the short version:
- Zero runtime dependencies, so there is no transitive package surface.
- It contacts exactly one host: the Bar you configured. No telemetry, no
update checks, no third-party endpoints — two call sites in
src/api.ts. - Your API token is never logged, and lives only in
config.json, which is gitignored and excluded from both the npm package and release tarballs. - The Bar's local API is plain HTTP, so on Wi-Fi the token crosses your LAN
in cleartext. That's the device's design. Over USB (
10.0.4.20) no token is needed at all. - Releases are built and published by CI, with npm provenance and a
.sha256on every artifact.
Full detail, including how to report a vulnerability, is in SECURITY.md.
Contributing
Pull requests welcome — see CONTRIBUTING.md. Worth reading
first: this project has zero runtime dependencies on purpose, Node's type
stripping rules out enum and parameter properties, and there are rules about
not marking a hardware claim "verified" unless you actually ran it.
You don't need a BUSY Bar to contribute. The test suite runs offline against real captured device frames.
License
MIT — see LICENSE. That covers everything here, including
docs/controls.jpg, which is a photograph of the author's own device rather
than vendored artwork.
No BUSY assets are redistributed. Their firmware graphics are GPL-2.0-or-later
and their fonts OFL-1.1 (see the firmware's REUSE.toml); this project links to
the official docs instead of copying from them. The device fonts are referenced
by name through the draw API, never bundled.