
ember-chimp
v0.1.1
Published
Simple, flexible Mailchimp Signup Form for Ember CLI Apps.

Readme
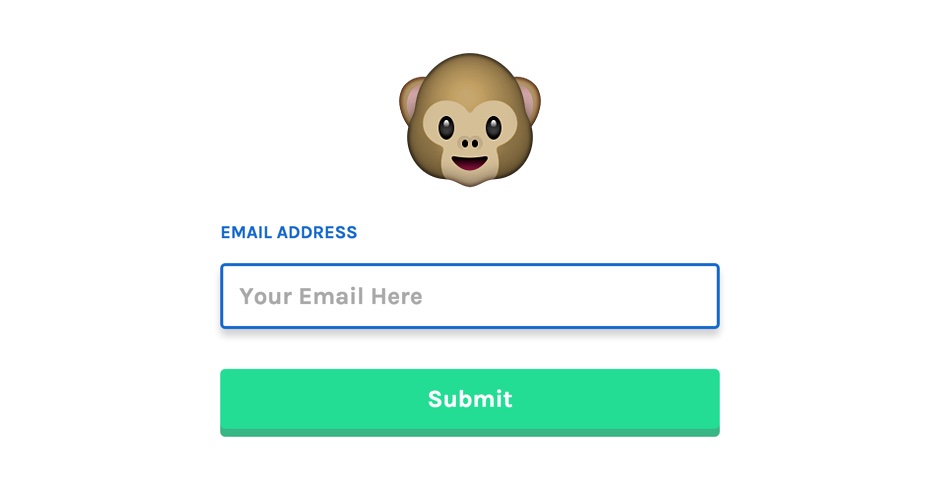
Ember Chimp

![]()
A simple Ember CLI Component for integrating a Mailchimp List signup for tighly with your application.
Installation
ember install ember-chimp
Important: Ember Chimp requires Ember Ajax to be available to the component to work out of the box. If you need to construct your Ajax request differently, please see Overriding makeRequest below.
Basic Usage
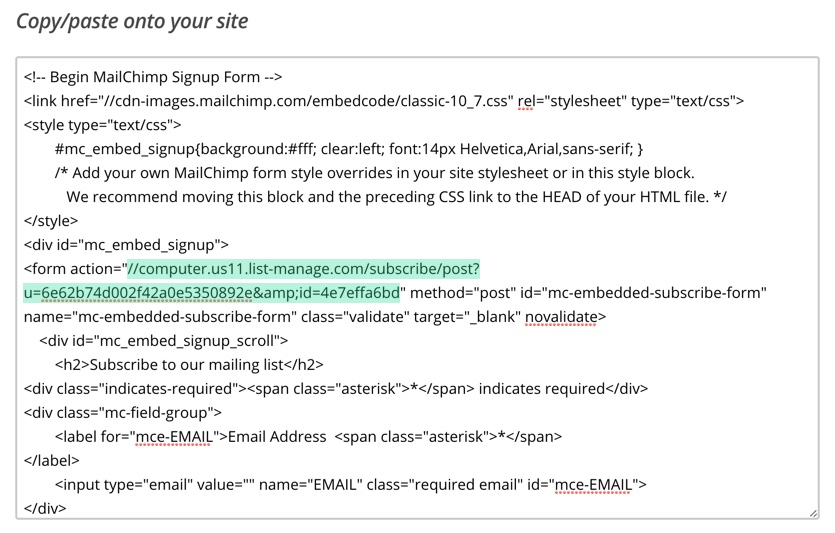
Create a list in your Mailchimp account, grab its unique form action URL
from the embeddable forms section, and then drop in the ember-chimp component
like so:
{{ember-chimp formAction="//your.mailchimp.form.action"}}You can find this form action here:
Important: This lib uses Babel to transpile ES2015. Some mobile browsers
will throw an error unless the Babel Browser Polyfill is included in your
ember-cli-build.js.
Advanced Usage
The ember-chimp component is built to serve a wide variety of use cases:
- label & placeholder
{{ember-chimp formAction="//your.mailchimp.form.action"
              label="Join our Mailing List:"
              placeholder="Email Address"}}
Optionally pass a label and placeholder attribute. They work as you'd
expect. The label is always for the email input.
- buttonText & loadingText
{{ember-chimp formAction="//your.mailchimp.form.action"
              buttonText="Submit"
              loadingText="Loading..."}}
The buttonText attr is the text on the submit button. This changes to
loadingText on submit.
Note: Out of convenience, the loadingText also populates the .chimp-says
div when loading. To hide that text, you can use the .loading chimpState
className, like below.
- Customized Responses
In your controller:
emberChimpResponses: {
  success: 'Please click the link in the email we just sent you.',
  error: 'Oops, something went wrong.  Please try again.',
  invalidError: 'Please enter a valid email address.',
  attemptsError: 'Please try again in about 5 minutes.'
}
Then in that controller's template:
{{ember-chimp formAction="//your.mailchimp.form.action"
responses=emberChimpResponses}}"- chimpState Class Name
.ember-chimp {
  &.idle, &.loading {
    .chimp-says {
      display: none;
    }
  }

  &.success {
    .chimp-says {
      background-color: palegreen;
    }
  }

  &.error {
    .chimp-says {
      background-color: antiquewhite;
    }
  }
}
The ember-chimp component can have the success, error, idle and
loading classNames, depending on it's state.
- Overriding makeRequest
In the case that you can't use Ember Ajax, or you need to customize
the actual request details, you can do that by overriding the makeRequest
method on the Component.
For example, to use Ember CLI IC Ajax with Ember Chimp, you'd do something like this:
import EmberChimp from 'ember-chimp/components/ember-chimp';
import ajax from 'ic-ajax';

exports default EmberChimp.extend({
  makeRequest(formAction) {
    return ajax({
      url: formAction,
      data: this._buildData(),
      dataType: 'jsonp'
    });
  }
});- ember-chimp-template Generator
ember generate ember-chimp-template
Will install the default ember-chimp template into your host app, at
app/templates/components/ember-chimp, for easy customization.
- novalidate
{{ember-chimp formAction="//your.mailchimp.form.action"
              novalidate=false}}
We add the novalidate attribute to the form element by default. If you'd
like to use native browser validation, pass false.
- Bubbling Action
Pass a didSubmitAction name to the ember-chimp component to allow other
parts of your application to be aware of the component's status.
{{ember-chimp formAction="//your.mailchimp.form.action"
              didSubmitAction="emberChimpDidSubmit"}}
Then in your controller or route:
actions: {
  emberChimpDidSubmit(promise) {
    promise
    .then(response => {
      if (response.result === 'success') {
        console.log("Ember Chimp submitted Successfully!");
      } else {
        console.log("Ember Chimp error message:" + response.msg);
      }
    })
    .catch(error => console.log("Ember Chimp had an Ajax Error."));
  }
}- Additional Fields (experimental)
The ember-chimp component theoretically also posts other fields within the
form element. To add fields in the post payload to Mailchimp, run the
ember-chimp-template generator, and add your custom fields, like so:
<!-- app/templates/components/ember-chimp -->


<label>
  <div class="label-text">{{label}}</div>
  {{input key-press="valueDidChange"
          placeholder=placeholder
          value=value
          type="email"
          name="EMAIL"}}
</label>

{{input value=firstname name="FIRSTNAME"}}
{{input value=lastname name="LASTNAME"}}

<div class="chimp-says">{{chimpSays}}</div>
<button type="submit">{{if isLoading loadingText buttonText}}</button>
The data payload with be serialized like so:
{
  EMAIL: "[email protected]",
  FIRSTNAME: "Hugh",
  LASTNAME: "Francis"
}
If anyone is using ember-chimp for this - please let me know whether it works.
I haven't needed to do this as of yet.