
flowshot
v0.7.4
Published
Flow-based visual regression dashboard for Playwright. One command, one HTML file — screenshots connected as user flows with diff slider.
Maintainers
 thingnoy
Readme
flowshot

![]()
![]()
Flow-based visual regression dashboard for Playwright. One command, one HTML file — screenshots connected as user flows with diff slider.
Why
Existing visual regression tools show screenshots as flat galleries. Flowshot shows them as user flows — screens connected with arrows, so you see the journey, not just the pages.
- No server, no account — generates a single HTML file (~63 KB, fully self-contained)
- Works with your existing Playwright snapshots — auto-detects the file naming from
playwright.config.* - Diff mode with drag slider + fullscreen
Compare / Expected / Actual / Difftabs - Dark/light theme, sidebar navigation, lightbox zoom
- Version badge in the report header — know which flowshot generated any report at a glance
Quick Start
# 1. Install
npm i -D flowshot

# 2. Create config
npx flowshot init

# 3. Edit flowshot.config.json — define your flows

# 4. Run Playwright visual tests
npx playwright test e2e/visual.spec.ts

# 5. Generate report
npx flowshot
How Diff Detection Works
Flowshot integrates with Playwright's built-in visual comparison. Here's the full workflow:
1. Create baseline screenshots
Run your visual tests to capture baseline screenshots:
npx playwright test e2e/visual.spec.ts --update-snapshotsThis saves baseline PNGs to your snapshotDir (e.g. e2e/visual.spec.ts-snapshots/).
2. Make changes to your app
Edit components, styles, layouts — anything visual.
3. Run visual tests again
npx playwright test e2e/visual.spec.ts || trueWhen Playwright detects a difference, it generates three files in test-results/:
*-expected.png— the baseline*-actual.png— what the screen looks like now*-diff.png— pixel diff highlighted in red
4. Generate the flow report
npx flowshotFlowshot scans test-results/ for those diff files, copies them to .flowshot/diffs/, and generates an HTML report.
5. Review diffs in the dashboard
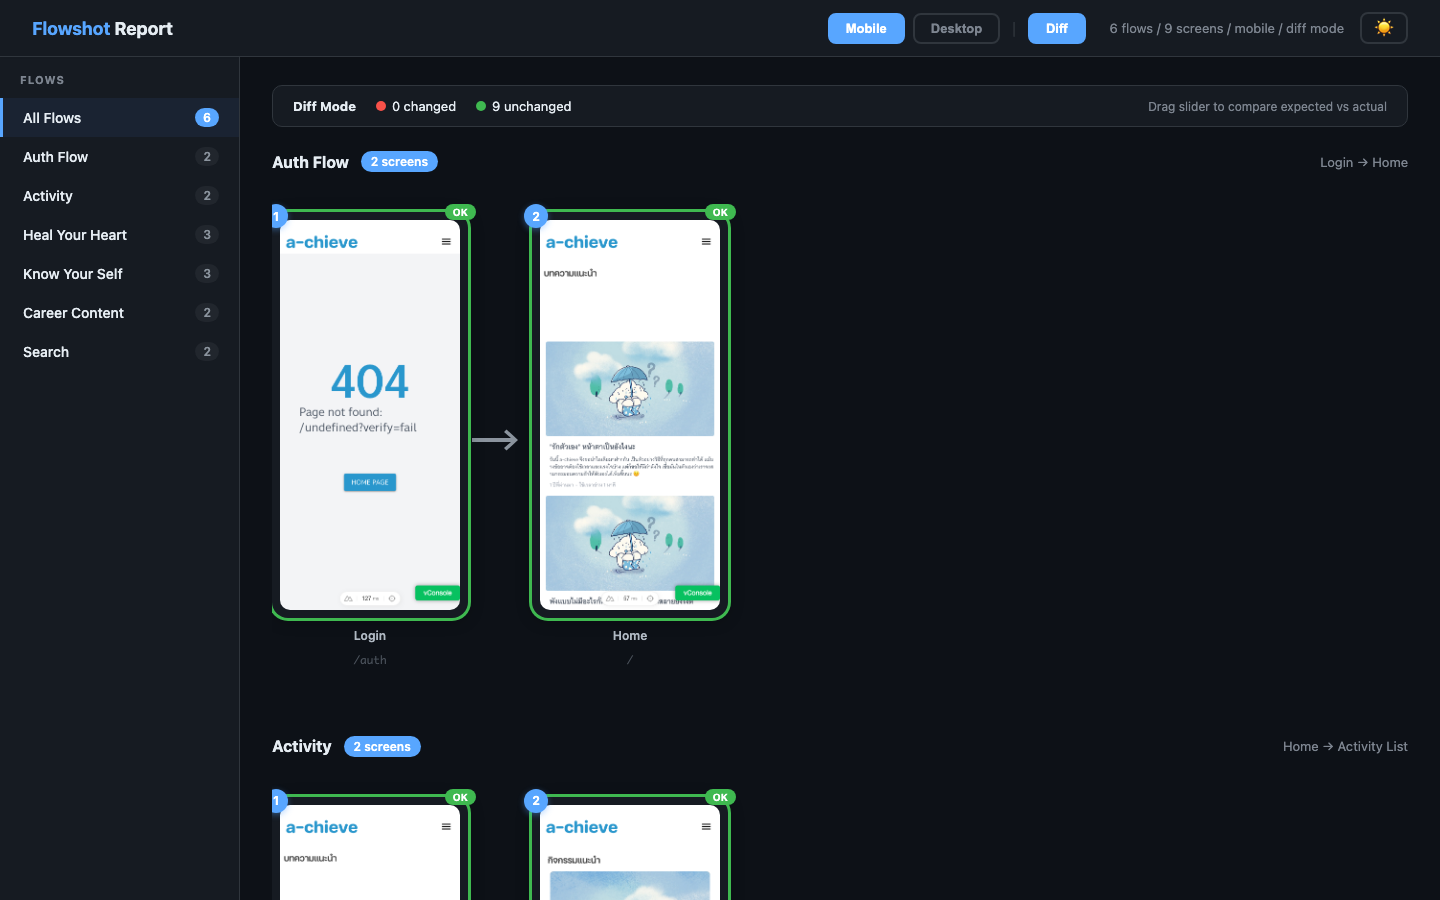
Open the report and click Diff in the top bar:
- CHANGED (red badge) — screens that differ from baseline
- OK (green badge) — screens that match
- Drag slider on each card to compare expected vs actual side-by-side
- Fullscreen button (top-right of each card) — opens fullscreen slider compare
- Sidebar shows warning icons on flows with changes
- Summary bar shows total changed vs unchanged count
6. Accept or fix
# If the changes are intentional — update baselines:
npx playwright test e2e/visual.spec.ts --update-snapshots

# If something broke — fix your code and re-run:
npx playwright test e2e/visual.spec.ts
One-command shortcut
Combine test + report in one step:
npx playwright test e2e/visual.spec.ts || true && npx flowshotOr add to your Makefile:
test-visual-review: ## Visual test + open flow dashboard
	npx playwright test e2e/visual.spec.ts --project=chromium || true
	npx flowshot
Recommended Playwright threshold
Playwright's default maxDiffPixelRatio is 0 (exact match). Common settings:
const screenshotOpts = {
  maxDiffPixelRatio: 0.05,  // allow 5% pixel diff
  threshold: 0.2,           // Playwright default color threshold
}
Setting maxDiffPixelRatio too high (e.g. 0.35) will cause real changes to go undetected.
Screenshots
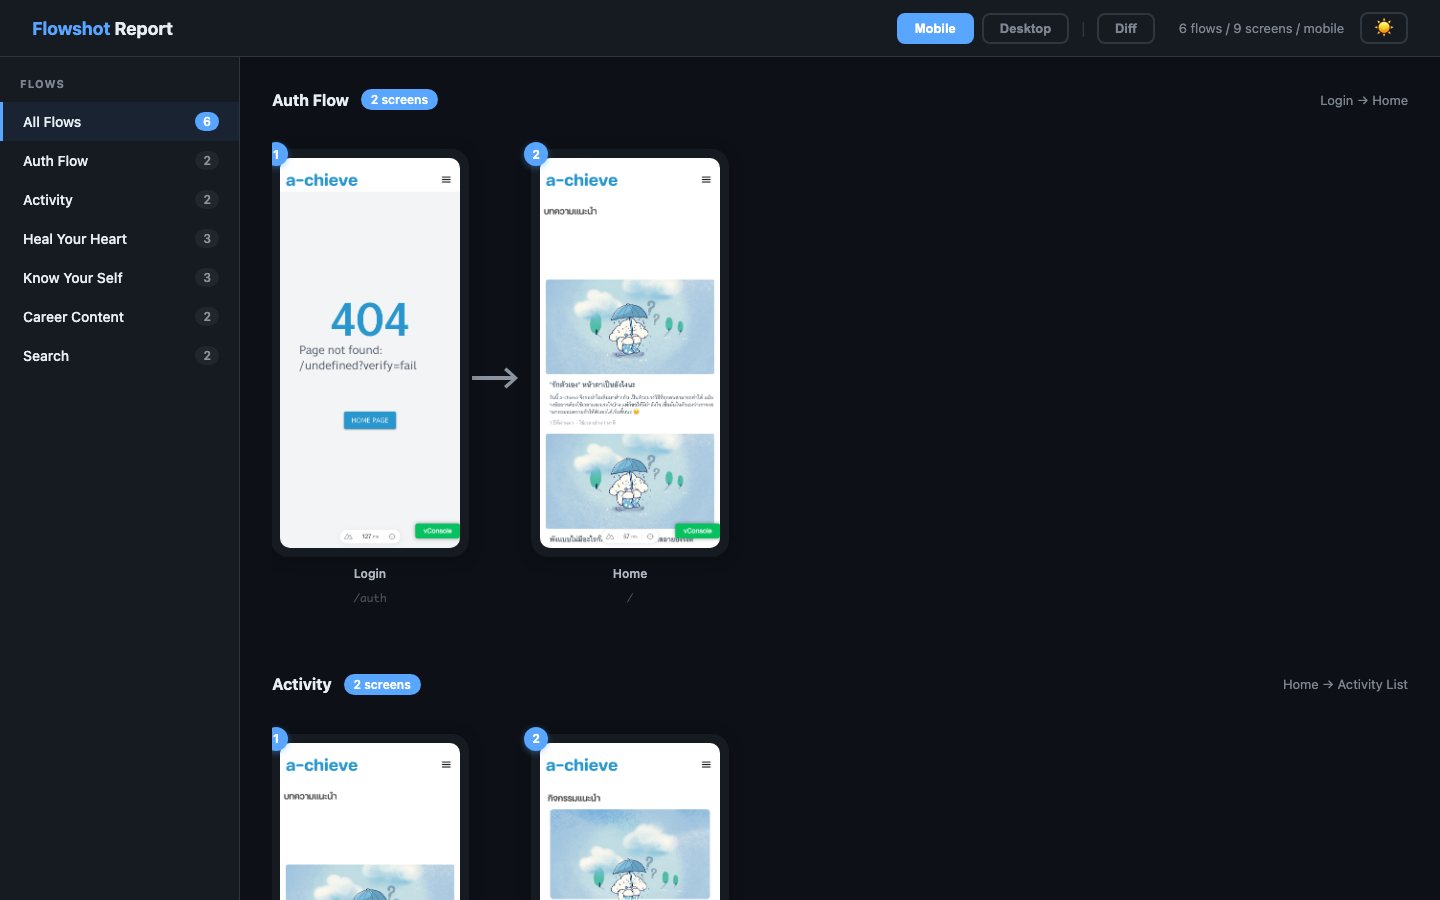
Flow View — Dark Theme
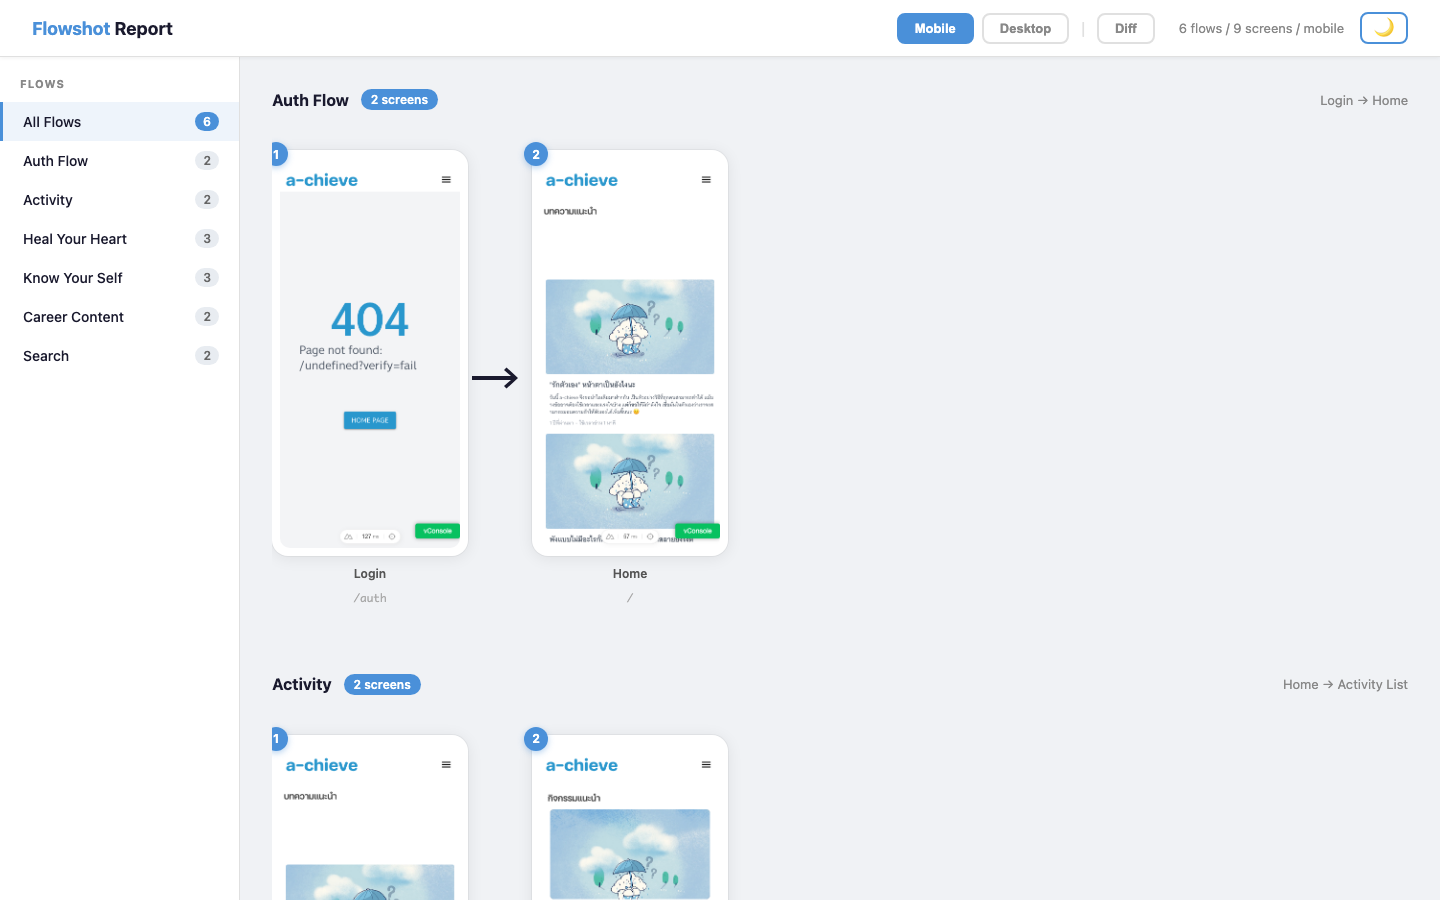
Flow View — Light Theme
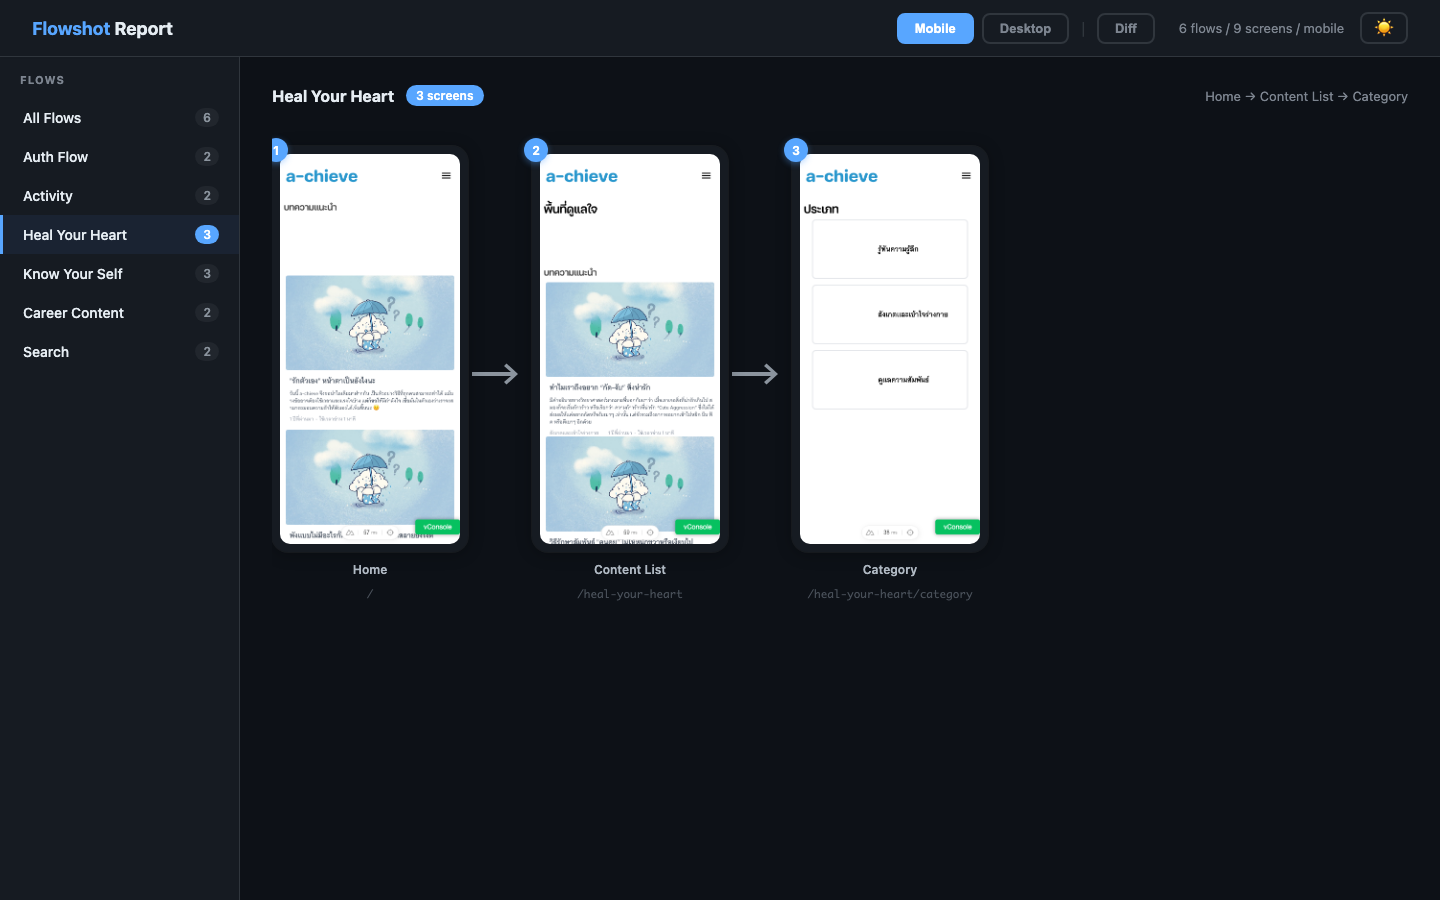
Single Flow Detail
Diff Mode
Config
flowshot.config.json:
{
  "snapshotDir": "e2e/visual.spec.ts-snapshots",
  "testResultsDir": "test-results",
  "platform": "chromium-darwin",
  "views": ["mobile", "desktop"],
  "outDir": ".flowshot",
  "flows": [
    {
      "name": "Auth Flow",
      "steps": [
        { "screen": "auth", "label": "Login", "path": "/auth" },
        { "screen": "home", "label": "Home", "path": "/" }
      ]
    }
  ],
  "components": [
    { "screen": "header-component", "label": "Header" }
  ]
}
| Field | Description |
|-------|-------------|
| snapshotDir | Where Playwright stores baseline screenshots |
| testResultsDir | Where Playwright writes test results (diffs on failure) |
| platform | Snapshot filename suffix, e.g. chromium-darwin |
| views | Viewport names matching your snapshot filenames |
| outDir | Output directory for report and collected diffs |
| flows | Array of user flows, each with ordered steps |
| components | Shared UI components (header, footer, etc.) |
| filePattern | Snapshot filename pattern (optional). Auto-detected from snapshotDir if omitted. Default: {screen}-{view}-{platform} |
Snapshot naming convention
By default, flowshot expects Playwright snapshots named as:
{screen}-{view}-{platform}.pngFor example: home-mobile-chromium-darwin.png, auth-desktop-chromium-darwin.png
This matches Playwright's default {name}-{projectName}-{platform}.png when your project name equals the view name (mobile, desktop).
Auto-detection
If you omit filePattern, flowshot resolves it in this priority order:
playwright.config.{ts,js,mjs,cjs}— parsessnapshotPathTemplate(or uses Playwright's default template if unset), extractsprojects[].nameto auto-populateviews, and setsplatform = process.platformwhen the template injects{-snapshotSuffix}- Disk scan — tries these candidate patterns against files in
snapshotDiruntil one matches:{screen}-{view}-{platform}(Playwright default on modern versions){screen}-{project}-{platform}{screen}-{view}{screen}-{project}{screen}
- Fallback to
{screen}-{view}-{platform}
Detected source + pattern is logged on report generation, e.g.:
🔍 Detected [playwright.config] pattern: {screen}-{project}-{platform} (playwright.config.ts projects=[chromium,mobile] platform=darwin)Set filePattern explicitly to skip detection entirely.
Cross-OS CI note
When Playwright uses its default template, baselines get an OS suffix (-darwin on Mac, -linux on Linux CI). Flowshot auto-sets platform = process.platform at runtime, so the same config works on both — each OS resolves its own baselines. This matches Playwright's per-OS baseline best practice (font rendering differs across platforms).
Custom file patterns
If auto-detect doesn't fit your setup, override filePattern in flowshot.config.json. Available tokens:
| Token | Value |
|-------|-------|
| {screen} | Screen name from flows[].steps[].screen |
| {view} | Viewport name from views |
| {project} | Alias for {view} (use whichever reads better) |
| {platform} | Value of platform config field |
Examples:
// Default — Playwright with project per viewport
"filePattern": "{screen}-{view}-{platform}"
// → home-mobile-chromium-darwin.png

// Project name only, no platform suffix
"filePattern": "{screen}-{project}"
// → home-mobile.png

// Screen + view, no platform
"filePattern": "{screen}-{view}"
// → home-mobile.png
Auto-Detect Flows
Flowshot can automatically discover your app's screens and generate flows — two ways:
flowshot detect — from test files + snapshots (no running app needed)
Scans your Playwright snapshot directory and test files to find screens and build flows:
flowshot detect              # preview detected flows
flowshot detect --write      # create flowshot.config.json from detected
flowshot detect --merge      # add new flows to existing config
How it works:
- Scans
e2e/visual.spec.ts-snapshots/for screenshot files - Parses
e2e/*.spec.tsforpage.goto()andtoHaveScreenshot()patterns - Groups screens by section (heal-your-heart, know-your-self, etc.)
- Detects component screenshots (header, footer)
flowshot crawl — by actually browsing your app with Playwright
Opens your app in a real browser, finds links, clicks them, takes screenshots:
# Start your app first, then:
flowshot crawl --url http://localhost:3000

# Options:
flowshot crawl --url http://localhost:3000 --mobile                  # mobile viewport
flowshot crawl --url http://localhost:3000 --max-pages 20            # limit pages
flowshot crawl --url http://localhost:3000 --max-depth 2             # limit link depth
flowshot crawl --url http://localhost:3000 --ignore "/admin,/api"    # skip paths
flowshot crawl --url http://localhost:3000 --write                   # save to config
How it works:
- Reads existing
flowshot.config.jsonforsnapshotDirandplatform(if present) - Opens the URL in Playwright Chromium
- Finds all
<a href>links on the page - Visits each link, takes a screenshot
- Follows links from discovered pages (up to max-depth)
- Groups pages by URL section into flows
- Screenshots saved to
snapshotDirwith naming{screen}-{view}-{platform}.png- If no config exists, falls back to
.flowshot/crawl-snapshots/
- If no config exists, falls back to
When using --write or --merge, existing config fields (snapshotDir, platform, views, components) are preserved — only flows are updated.
Requires playwright as a peer dependency: npm i -D playwright
flowshot init — smart init
When you run flowshot init, it automatically tries detect first. If snapshots exist, it generates config from them. Otherwise, creates an example config.
Commands
flowshot              # collect diffs + generate report + open browser
flowshot init         # auto-detect flows or create example config
flowshot detect       # detect flows from snapshots + test files
flowshot crawl        # discover pages by crawling your app
flowshot crawl --ignore "/content,/admin"  # skip specific paths
flowshot collect      # collect diff images from test-results/
flowshot report       # generate HTML report
flowshot report --open      # generate and open in browser
flowshot report --inline    # embed images as base64 (portable for CI)
flowshot report --collect   # collect diffs before generating
CI Usage
Generate a portable report with embedded images:
npx flowshot report --collect --inlineUpload .flowshot/report.html as a CI artifact.
GitHub Actions example
- name: Visual regression
  run: npx playwright test e2e/visual.spec.ts || true

- name: Generate flow report
  run: npx flowshot report --collect --inline

- uses: actions/upload-artifact@v4
  with:
    name: flowshot-report
    path: .flowshot/report.html
Stack
| Layer | Choice | Notes |
|---|---|---|
| Runtime dep | Commander | Only non-Node runtime dep. playwright is an optional peer dep used by the crawl command |
| Report UI | Svelte 5 (runes) | Compiled — no Svelte runtime shipped to users |
| UI build | Vite 8 + vite-plugin-singlefile | Bundles the Svelte app into one self-contained HTML (~63 KB / 22 KB gzip) |
| Library build | tsup (esbuild) | src/cli.ts + src/index.ts → CJS + ESM + .d.ts |
| Types | TypeScript 5.7 strict | Bundler resolution, resolveJsonModule |
| Tests | node --test + node:assert | Built-in runner, zero test deps, ~50 ms for 11 tests |
| CI | GitHub Actions | ci.yml runs typecheck + build + tests on push/PR; release.yml also gates publish on tests |
| Task runner | Makefile | Short aliases over npm scripts |
Published package: 51.5 KB tarball, 190 KB unpacked, 1 runtime dep
Report output: single self-contained HTML file — no external requests, drop it anywhere
Development
git clone https://github.com/thingnoy/flowshot
cd flowshot
npm install
Common tasks (via make or npm):
| Command | What it does |
|---|---|
| make build | Full build: tsup for CLI/lib + vite for the Svelte report template |
| make dev-ui | Vite dev server with HMR on the report template (mock data auto-loaded) |
| make test | Build + run integration tests (node --test) |
| make typecheck | tsc --noEmit |
| make publish-check | Build + test + npm pack --dry-run preview |
Architecture
src/cli.ts— Commander-based CLI entrysrc/report.ts— image map builder + template renderersrc/detect-*.ts— snapshot pattern detection (filePattern / playwright.config / disk scan)src/report-ui/— Svelte 5 app for the report UI, compiled by Vite to a single self-contained HTML file (dist/report-template.html). At runtimegenerateReport()reads this template and substitutes a/*FLOWSHOT_DATA*/marker with the JSON payload
Testing
Integration tests use Node's built-in test runner (no vitest/jest — zero test deps):
make test
# or
node --test test/*.test.mjs
Coverage:
- Pattern detection — explicit
filePattern,playwright.config.*parsing, disk-scan fallback, defaults - Report resolver — component naming across 4 styles (project-based, legacy
{screen}-{platform}, bare{screen}, missing file), single-file HTML output,filePatternround-trip
CI runs tests on every push + PR to main; releases block on a failing build or test run.
License
MIT