
gatsby-source-storyblok
v7.0.8
Published
SDK to integrate Storyblok into your project using Gatsby.
Downloads
25,106


Readme
🚀 Usage
If you are first-time user of the Storyblok, read the Getting Started guide to get a project ready in less than 5 minutes.
Installation
Install gatsby-source-storyblok:
npm install gatsby-source-storyblok
// yarn add gatsby-source-storyblok
Compatibility
| Version to install | Support |
| ------------------------------------------------------------------------------------------------------------------------------- | ---------------------------------------------------- |
| Latest >v6 gatsby-source-storyblok | Modern browsers + Node 16+. isomorphic-fetch is implemented. Supports Gatsby 5 (React Server Components) |
| Version 5 gatsby-source-storyblok@5 | Modern browsers + Node 16+. isomorphic-fetch is implemented. (Go to v5 branch for Gatsby 4 and lower Gatsby version support)
| Version 4 gatsby-source-storyblok@4 | Node 14 and lower Node with no Fetch API support
Initialization
Register the plugin on your application and add the access token of your Storyblok space. You can also add the apiPlugin in case that you want to use the Storyblok API Client.
You need to declare the plugin use and its options in
gatsby-config.js
gatsby-config.ts
import type { GatsbyConfig } from "gatsby"

const config: GatsbyConfig = {
  flags: {
    PARTIAL_HYDRATION: true // Required for Partial Hydration (RSC)
  },
  graphqlTypegen: true,
  plugins: [
    {
      resolve: 'gatsby-source-storyblok',
      options: {
        accessToken: '<your-access-token>',
        version: 'draft',
        localAssets: true, // Optional parameter to download the images to use with Gatsby Image Plugin
        languages: ['de', 'at'] // Optional parameter. Omission will retrieve all languages by default.
      }
    },
  ],
}
src/components/layout.jsx
"use client" // Required for Partial Hydration, client components (RSC)
import configuration from '../../gatsby-config'

const sbConfig = configuration.plugins.find((item) => item.resolve === 'gatsby-source-storyblok')

storyblokInit({
  accessToken: sbConfig.options.accessToken,
  // bridge: false,
  apiOptions: {
    region: "us", // Pass this key/value if your space was created under US region
  },
  use: [apiPlugin],
  components: {
    teaser: Teaser,
    grid: Grid,
    feature: Feature,
    page: Page
  }
});
Add all your components to the components object in the
storyblokInitfunction.
That's it! All the features are enabled for you: the API Client for interacting with Storyblok CDN API, and Storyblok Bridge for real-time visual editing experience.
You can enable/disable some of these features if you don't need them, so you save some KB. Please read the "Features and API" section
Region parameter
Possible values:
eu(default): For spaces created in EUus: For spaces created in the USap: For spaces created in Australiaca: For spaces created in Canadacn: For spaces created in China
Full example for a space created in the US:
storyblokInit({
  accessToken: "<your-access-token>",
  apiOptions: {
    region: 'us'
  },
});
Getting Started
gatsby-source-storyblok does three actions when you initialize it:
- Provides a
<StoryblokStory />component to enable live-editting experience for a story, automatically. - Loads Storyblok Bridge for real-time visual updates.
- Provides a
storyblokEditablefunction to link editable components to the Storyblok Visual Editor.
gatsby-source-storyblok v5 and lower had
useStoryblokStatethat parsed story content JSON into the object. Use<StoryblokStory />instead to handle the Visual Editor live events when editing story.
1. Fetching Content & Listen to Storyblok Visual Editor events
Query data from GraphQL:
src/pages/index.tsx
import { StoryblokStory } from "gatsby-source-storyblok"

import Layout from "../components/layout"

const IndexPage = ({ data }) => {
  if (typeof data.storyblokEntry.content === "string") data.storyblokEntry.content = JSON.parse(data.storyblokEntry.content);

  return (
    <Layout>
      <StoryblokStory story={data.storyblokEntry} />
    </Layout>
  )
}

export default IndexPage

export const query = graphql`
  query HomeQuery {
    storyblokEntry(full_slug: { eq: "home" }) {
      name
      full_slug
    }
  }
`
Note: if you don't use
apiPlugin, you can use your prefered method or function to fetch your data.
Use <StoryblokStory /> to get the new story every time is triggered a change event from the Visual Editor.
2. Link your components to Storyblok Visual Editor
<StoryblokStory /> keeps the state for the story behind the scenes and uses StoryblokComponent to render the route components dynamically, using the list of components loaded during the initialization inside the storyblokInit function. You can use the StoryblokComponent inside the components to redner the nested components dynamically. You can also pass bridge options to <StoryblokStory /> using the prop bridgeOptions.
<StoryblokStory
  story={data.story}
  bridgeOptions={{
    resolveRelations: ["Article.author"],
    resolveLinks: "url",
    preventClicks: true
  }} />
For every component you've defined in your Storyblok space, call the storyblokEditable function with the blok content:
src/components/Page.tsx
import { storyblokEditable, StoryblokComponent } from "gatsby-source-storyblok";

const Page = ({ blok }) => (
  <main {...storyblokEditable(blok)}>
    {blok.body.map((nestedBlok) => (
      <StoryblokComponent blok={nestedBlok} key={nestedBlok._uid} />
    ))}
  </main>
);

export default Page;
src/components/Feature.jsx
import { storyblokEditable } from "gatsby-source-storyblok";

const Feature = ({ blok }) => {
  return (
    <div {...storyblokEditable(blok)} key={blok._uid}>
      <div>{blok.name}</div>
      <p>{blok.description}</p>
    </div>
  );
};

export default Feature;
Where blok is the actual blok data coming from Storblok's Content Delivery API.
As an example, you can check in our Gatsby.js example demo how we use APIs provided from React SDK to combine with Gatsby.js projects.
Features and API
You can choose the features to use when you initialize the plugin. In that way, you can improve Web Performance by optimizing your page load and save some bytes.
Storyblok API
You can use an apiOptions object. This is passed down to the storyblok-js-client config object:
storyblokInit({
  accessToken: "YOUR_ACCESS_TOKEN",
  apiOptions: {
    // storyblok-js-client config object
    cache: { type: "memory" },
  },
  use: [apiPlugin],
  components: {
    teaser: Teaser,
    grid: Grid,
    feature: Feature,
  },
});
If you prefer to use your own fetch method, just remove the apiPlugin and storyblok-js-client won't be added to your application.
storyblokInit({});Storyblok Bridge
If you don't use registerStoryblokBridge, you still have access to the raw window.StoryblokBridge:
const sbBridge = new window.StoryblokBridge(options);

sbBridge.on(["input", "published", "change"], (event) => {
  // ...
});
Rendering Rich Text
You can easily render rich text by using the renderRichText function that comes with gatsby-source-storyblok:
import { renderRichText } from "gatsby-source-storyblok";
const renderedRichText = renderRichText(blok.richtext);
You can set a custom Schema and component resolver globally at init time by using the richText init option:
import { RichTextSchema, storyblokInit } from "gatsby-source-storyblok";
import cloneDeep from "clone-deep";
const mySchema = cloneDeep(RichTextSchema); // you can make a copy of the default RichTextSchema
// ... and edit the nodes and marks, or add your own.
// Check the base RichTextSchema source here https://github.com/storyblok/storyblok-js-client/blob/master/source/schema.js
storyblokInit({
  accessToken: "<your-token>",
  richText: {
    schema: mySchema,
    resolver: (component, blok) => {
      switch (component) {
        case "my-custom-component":
          return `<div class="my-component-class">${blok.text}</div>`;
        default:
          return "Resolver not defined";
      }
    },
  },
});
You can also set a custom Schema and component resolver only once by passing the options as the second parameter to renderRichText function:
import { renderRichText } from "gatsby-source-storyblok";
renderRichText(blok.richTextField, {
  schema: mySchema,
  resolver: (component, blok) => {
    switch (component) {
      case "my-custom-component":
        return `<div class="my-component-class">${blok.text}</div>`;
        break;
      default:
        return `Component ${component} not found`;
    }
  },
});
Gatsby feature references
Partial Hydration (RSC)
To enable Partial Hydration, you need to set the PARTIAL_HYDRATION flag to true in gatsby-config file. Here is an example of the usage:
module.exports = {
  flags: {
    PARTIAL_HYDRATION: true
  }
}
When enabling Partial Hydration, all components act as server component by default. For more details such as benefits in terms of performance, please refer to the Gatsby docs.
To define a component to act as a client component, use "use client" directive in the first line of the code. Here is an example of the usage:
layout.jsx
"use client" // Required for Partial Hydration, client components (RSC)
import configuration from '../../gatsby-config'

const sbConfig = configuration.plugins.find((item) => item.resolve === 'gatsby-source-storyblok')

storyblokInit({
  // ...
});
Partial Hydration is a Beta feature. For limitations, see Gatsby documentation: Partial Hydration, Limitations
With Gatsby's image
You need to set the localAssets option to true. Here is an example of the usage:
import { graphql } from "gatsby"
import { GatsbyImage, getImage } from "gatsby-plugin-image"

function BlogPost({ data }) {
  const image = getImage(data.file)
  return (
    <section>
      <GatsbyImage image={image} />
    </section>
  )
}

export const pageQuery = graphql`
  query {
    file(name: {eq: "demo"}) {
      absolutePath
      url
      childImageSharp {
         gatsbyImageData(
          width: 200
          placeholder: BLURRED
          formats: [AUTO, WEBP, AVIF]
        )
      }
    }
  }
`
With Gatsby's createPages
For more info regarding createPages see the Gatsby docs: docs/reference/config-files/gatsby-node/#createPages
2a. You need to create a template file to get the data from GraphQL
import { StoryblokStory } from "gatsby-source-storyblok";
import Layout from "../components/layout";

export default function StoryblokEntry ({ data }) {
  return (
    <Layout>
      <StoryblokStory story={data.storyblokEntry} />
    </Layout>
  )
}

export const query = graphql`
  query($slug: String!) {
    storyblokEntry(full_slug: { eq: $full_slug }) {
      internalId
      name
      full_slug
    }
  }
`
3a. After this, you need to create the pages for your application. For this, edit your gatsby-node.js.
const path = require('path')

exports.createPages = async ({ graphql, actions }) => {
  const storyblokEntry = path.resolve('src/templates/storyblok-entry.js')

  // querying the storyblok data from GraphQL data layer
  const { data } = await graphql(
    `query {
      allStoryblokEntry {
        edges {
          node {
            internalId
            full_slug
          }
        }
      }
    }`
  )

  // creating pages using createPage function like described in the documentation
  // https://www.gatsbyjs.org/docs/programmatically-create-pages-from-data/#creating-pages
  data.allStoryblokEntry.edges.forEach(edge => {
    const full_slug = edge.node.full_slug

    actions.createPage({
      path: full_slug,
      component: storyblokEntry,
      context: {
        slug: full_slug
      },
    })
  })
}
With Gatsby's File System Routes API
For more info regarding The File System Routes API see the Gatsby docs: docs/reference/routing/file-system-route-api/
2b. Create a collection route inside src/pages
|-- src
   |-- pages
      |-- {storyblokEntry.full_slug}.js
3b. Gatsby will use ths page template for each storyblokEntry
import { StoryblokStory } from "gatsby-source-storyblok";

import Layout from "../components/layout";

export default function StoryblokEntry ({ data }) {
  return (
    <Layout>
      <StoryblokStory story={data.storyblokEntry} />
    </Layout>
  )
}

export const query = graphql`
  query ($full_slug: String!) {
    storyblokEntry(full_slug: { eq: $full_slug }) {
      internalId
      name
      full_slug
    }
  }
`
The options object in details
gatsby-config.js
{
  resolve: 'gatsby-source-storyblok',
  options: {
    accessToken: 'YOUR_TOKEN',
    version: 'draft',
    resolveRelations: [''],
    includeLinks: false
  }
}accessToken: Your Storyblok draft tokenversion: 'draft' or 'published'timeout: Optionally provide a timeout for the api requestresolveLinks: This will automatically resolve internal links of the multilink field type. If the value isstorythe whole story object will be included. If the value isurlonly uuid, id, name, path, slug and url (url is a computed property which returns the "Real path" if defined to use it for navigation links) will be included.resolveRelations: Resolve relationships to other Stories (in the first level of nesting) of a multi-option or single-option field-type. Provide the field key(s) as array to resolve specific fields. Example: ['article.related_articles', 'article.author'].includeLinks: If 'true' you can query links by allStoryblokLinkEntry. The links query lets you create a dynamic navigation tree as it includes also content folders.languages: An array of strings that will be used in languages request instead of languages in space settings. Use it to only load the languages that you want to.
How to query all Content Entries
To get all entries unfiltered you can do the following query:
{
  allStoryblokEntry {
    edges {
      node {
        id
        name
        created_at
        published_at
        uuid
        slug
        full_slug
        content
        is_startpage
        parent_id
        group_id
        internalId
      }
    }
  }
}
How to query filtering of content inside a folder
The following example shows a filter to get all items from a news folder:
{
  allStoryblokEntry(filter: {full_slug: {regex: "/^news\//"}}) {
    edges {
      node {
        name
        full_slug
      }
    }
  }
}
How to query filtering of languages
If you use field level translations you can filter for a specific language using following query:
{
  allStoryblokEntry(filter: {lang: {eq: "de"}}) {
    edges {
      node {
        name
        full_slug
      }
    }
  }
}
How to query filtering on content type fields
Every field of your content types is available via the prefix field_.
This lets you for example to query for a specific component:
{
  allStoryblokEntry(filter: {field_component: {eq: "page"}}) {
    edges {
      node {
        name
        full_slug
      }
    }
  }
}
How to query a single content entry
{
  storyblokEntry(slug: { eq: "global-navi" }) {
    content
  }
}
Datasources
allStoryblokDatasource {
  edges {
    node {
      id
      value
      name
      data_source
    }
  }
}
How to query Datasource entries
This will return all datasources, with or not dimensions values:
allStoryblokDatasourceEntry(filter: { data_source: { eq: "DATASOURCE_SLUG" } }) {
  edges {
    node {
      id
      name
      value
      data_source
      data_source_dimension
    }
  }
}
If you want to filter by a specific dimension, you should use:
allStoryblokDatasourceEntry(filter: { data_source: { eq: "DATASOURCE_SLUG" }, data_source_dimension: { eq: "DATASOURCE_DIMENSION_VALUE" } }) {
  edges {
    node {
      id
      name
      value
      data_source
      data_source_dimension
    }
  }
}
How to query links
Use the links api to create a dynamic navigation tree. To use this query you need to add includeLinks: true in the plugin options.
allStoryblokLinkEntry {
edges {
node {
id
uuid
slug
parent_id
name
is_folder
published
is_startpage
position
}
}
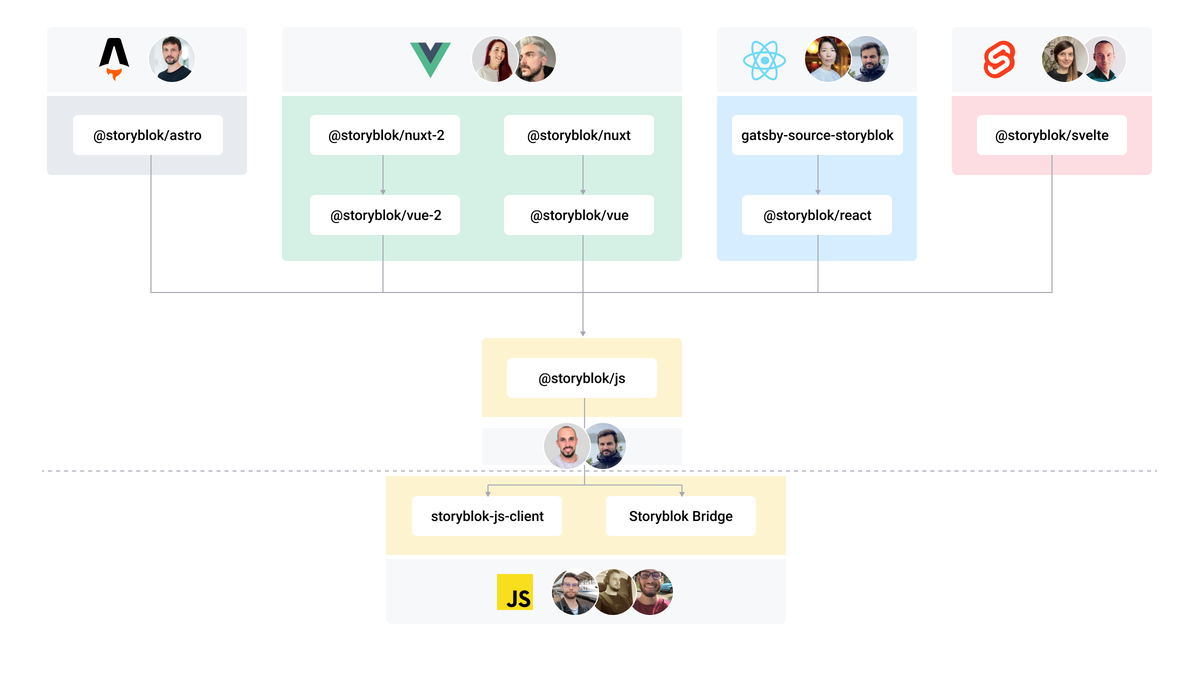
}The Storyblok JavaScript SDK Ecosystem
🔗 Related Links
- Storyblok Gatsby.js Technology Hub: Learn how to develop your own Gatsby.js applications that use Storyblok APIs to retrieve and manage content.
- Getting Started: Get a project ready in less than 5 minutes.
- Storyblok CLI: A simple CLI for scaffolding Storyblok projects and fieldtypes.
- Storyblok React.js example demo: See and try how React SDK works with React.js projects
- Storyblok Gatsby.js example demo: See and try how gatsby-source-storyblok works with Gatsby.js projects
ℹ️ More Resources
Support
- Bugs or Feature Requests? Submit an issue.
- Do you have questions about Storyblok or you need help? Join our Discord Community.
Contributing
Please see our contributing guidelines and our code of conduct. This project use semantic-release for generate new versions by using commit messages and we use the Angular Convention to naming the commits. Check this question about it in semantic-release FAQ.