hexo-seo-autopush
v2.1.5
Published
Daily automatic submission of urls to baidu and Google bing
Maintainers
 lete114
Readme
说明
每天中午 12 点推送一次网站信息到 Baidu 和 Bing,提高爬虫抓取几率
可手动点击star触发 Actions
简述一下整个流程。
以bing搜索引擎为例,插件运行以后会生成两个文件,一个是.github/workflows/HexoSeoAutoPush.yml的Github Action配置文件,一个是bing.json存放需要推送的url。我自己只推送给了bing引擎,其他引擎若有细微区别,请自研。这些都会生成在打包的文件当中,最终会被推送到部署分支。HexoSeoAutoPush.yml会读取部署分支的bing.json的内容然后进行推送。因此注意到一件事情,不管是每天自动触发,还是手动star触发的Action,都需要保证HexoSeoAutoPush.yml位于项目的默认分支才能生效。结合起来可以知道,部署分支必须是默认分支才能使得插件生效。问题来了,不是每个人的部署分支都是默认分支。比如我的默认分支就是源代码分支,部署分支就是普遍的gh-pages。
那该如何解决这个问题呢?留意到actions.js中使用了actions/checkout@main来checkout一个仓库,但是没有添加部署分支的相关属性,默认这里是checkout默认分支,和上面对应。得知这一点以后,顺理成章加上部署分支deployBranch的相关逻辑,彻底将部署分支和默认分支区别开。这样最终的使用方法就明确了。在打包文件中生成HexoSeoAutoPush.yml以后,手动将他拷到默认分支的.github/workflows/中。记得如果有时间周期、提交数目或者部署分支的改动以后,请同步此文件到默认分支。其他使用方式同原插件不变。
使用
- 安装
npm install hexo-seo-autopush --save- 配置文件 在 hexo 的 _config.yml 配置文件中添加以下内容
# enable: 开启/关闭 推送
# cron: 执行时间周期
# deployBranch: 部署分支
# count: 每次提交最新的10篇文章,输入0或者不填写则默认为所有文章(建议是最新的10篇文章)
# date: 更新时间(updated)|创建日期(created)
# https://github.com/Lete114/hexo-seo-autopush.git
hexo_seo_autopush:
  cron: 0 4 * * *
  deployBranch:
  baidu:
    enable: true
    date: created
    count: 10
  bing:
    enable: true
    date: created
    count: 10
  google:
    enable: true
    date: created
    count: 10
由于生成的 actions 是在.github/workflows/HexoSeoAutoPush.yml,点开头的文件或文件夹都会被视为隐藏文件,所以 hexo 不会将隐藏文件部署到 pages,需要新增配置ignore_hidden
deploy:
  type: git
  repo: https://github.com/<username>/<project>
  # example, https://github.com/hexojs/hexojs.github.io
  branch: gh-pages
ignore_hidden: false # 忽略隐藏文件及文件夹(目录)- 安全设置
打开你博客仓库地址如下图

| Name | Value | 说明 |
| ------------------- | ----------------- | ------------------------------------------------------------------------------------------------------ |
| baidu_token | UlxxxxxxxxxxxxxB9 | 【必填】Value 输入百度的 token |
| bing_apikey | 47xxxxxxxxxxxxx91 | 【必填】Value 输入必应的 apikey |
| google_private_key | xxxxxxxxxxxxxxxxx | 【必填】Value 输入谷歌的 private_key (注意:填写的时候需要使用双引号包起来,如: "private_key") |
| google_client_email | xxxxxxxxxxxxxxxxx | 【必填】Value 输入谷歌的 client_email |
Baidu key
打开百度站长平台,点击左侧的普通收录https://ziyuan.baidu.com

Bing key
- 打开 Bing 站长平台 https://www.bing.com/webmasters/home
- 点击右上角头像 旁边的齿轮,跟着下图操作

Google key
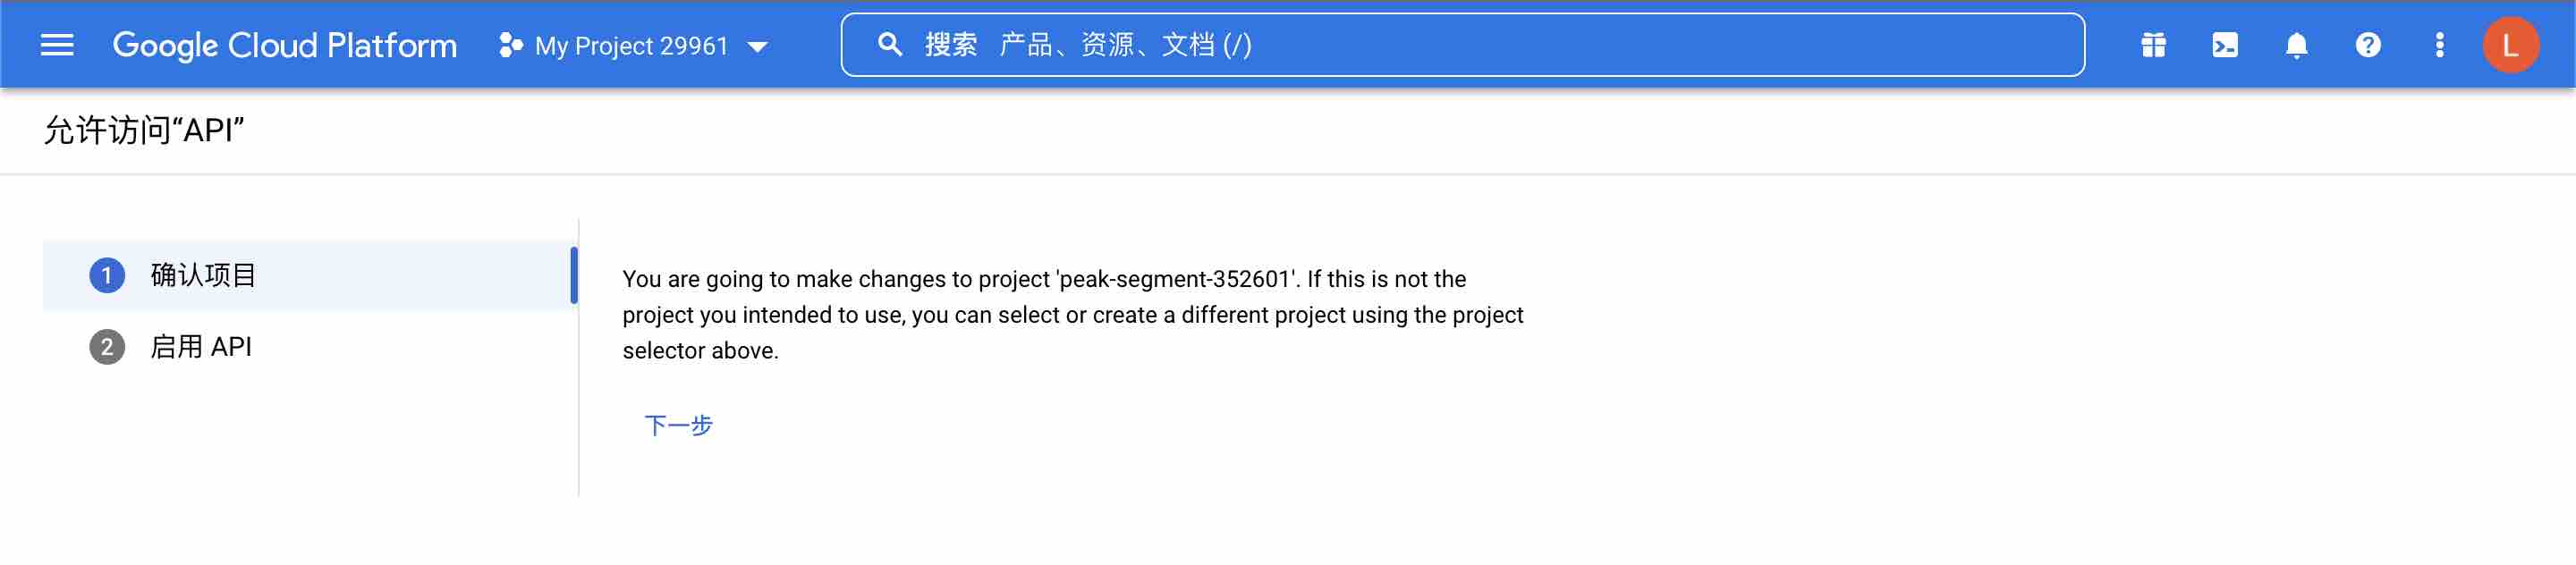
(1) 开启Indexing API

如果账号中没有项目, 点击创建项目, 创建完项目后继续下面的操作.
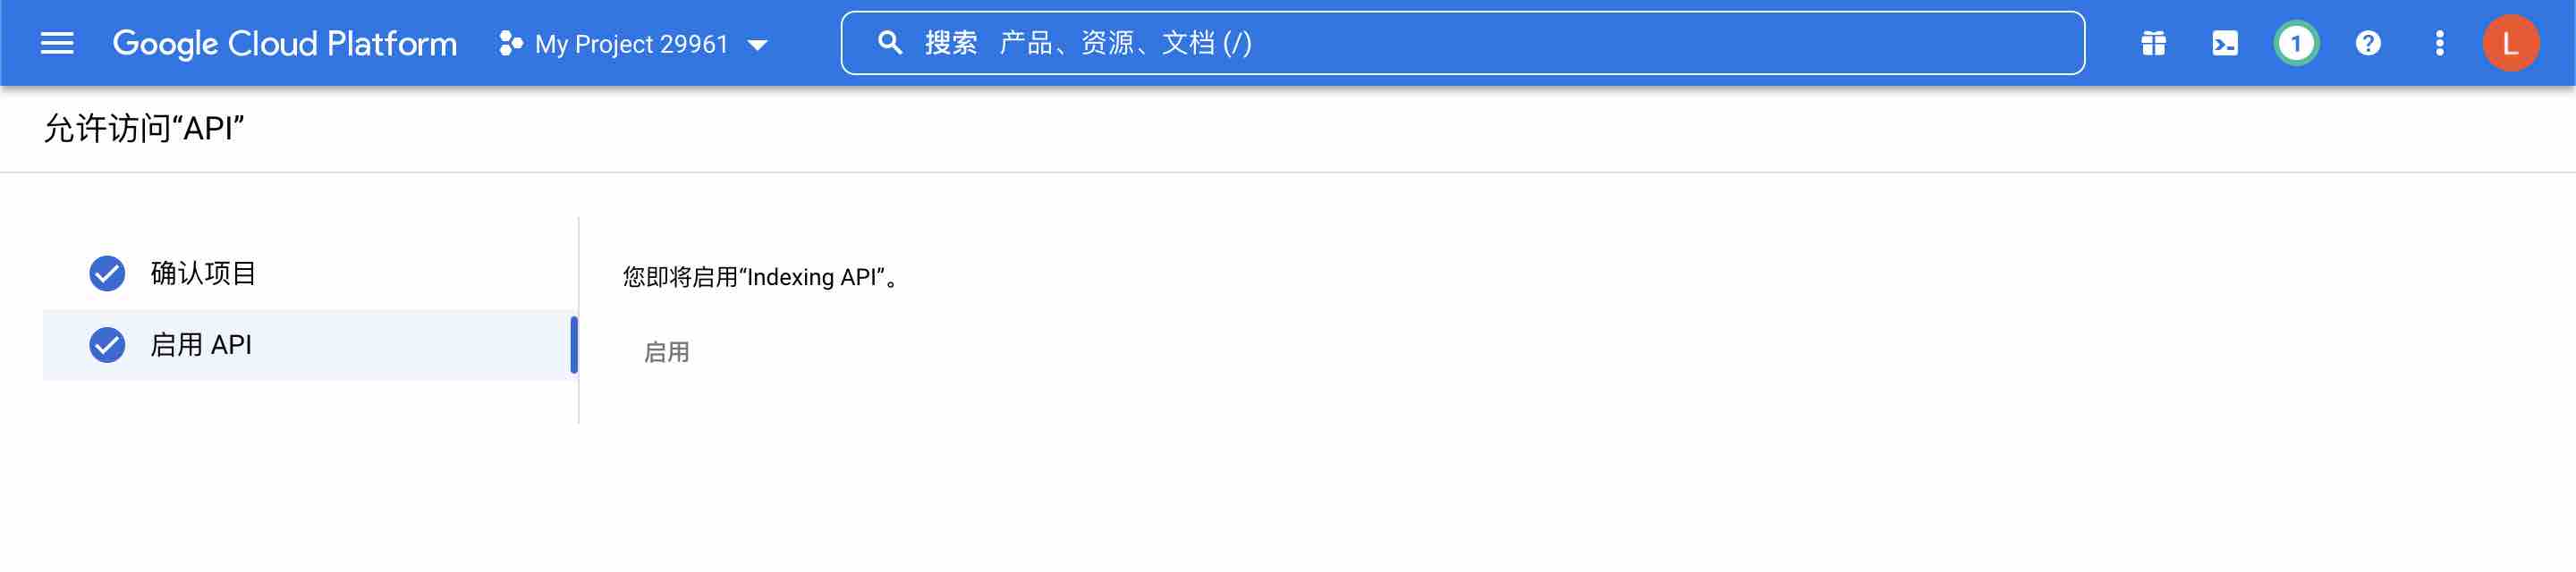
点击下一步, 开启即可.
开启完成就是这样, 感觉像是卡住了.
(2) 打开凭证页面
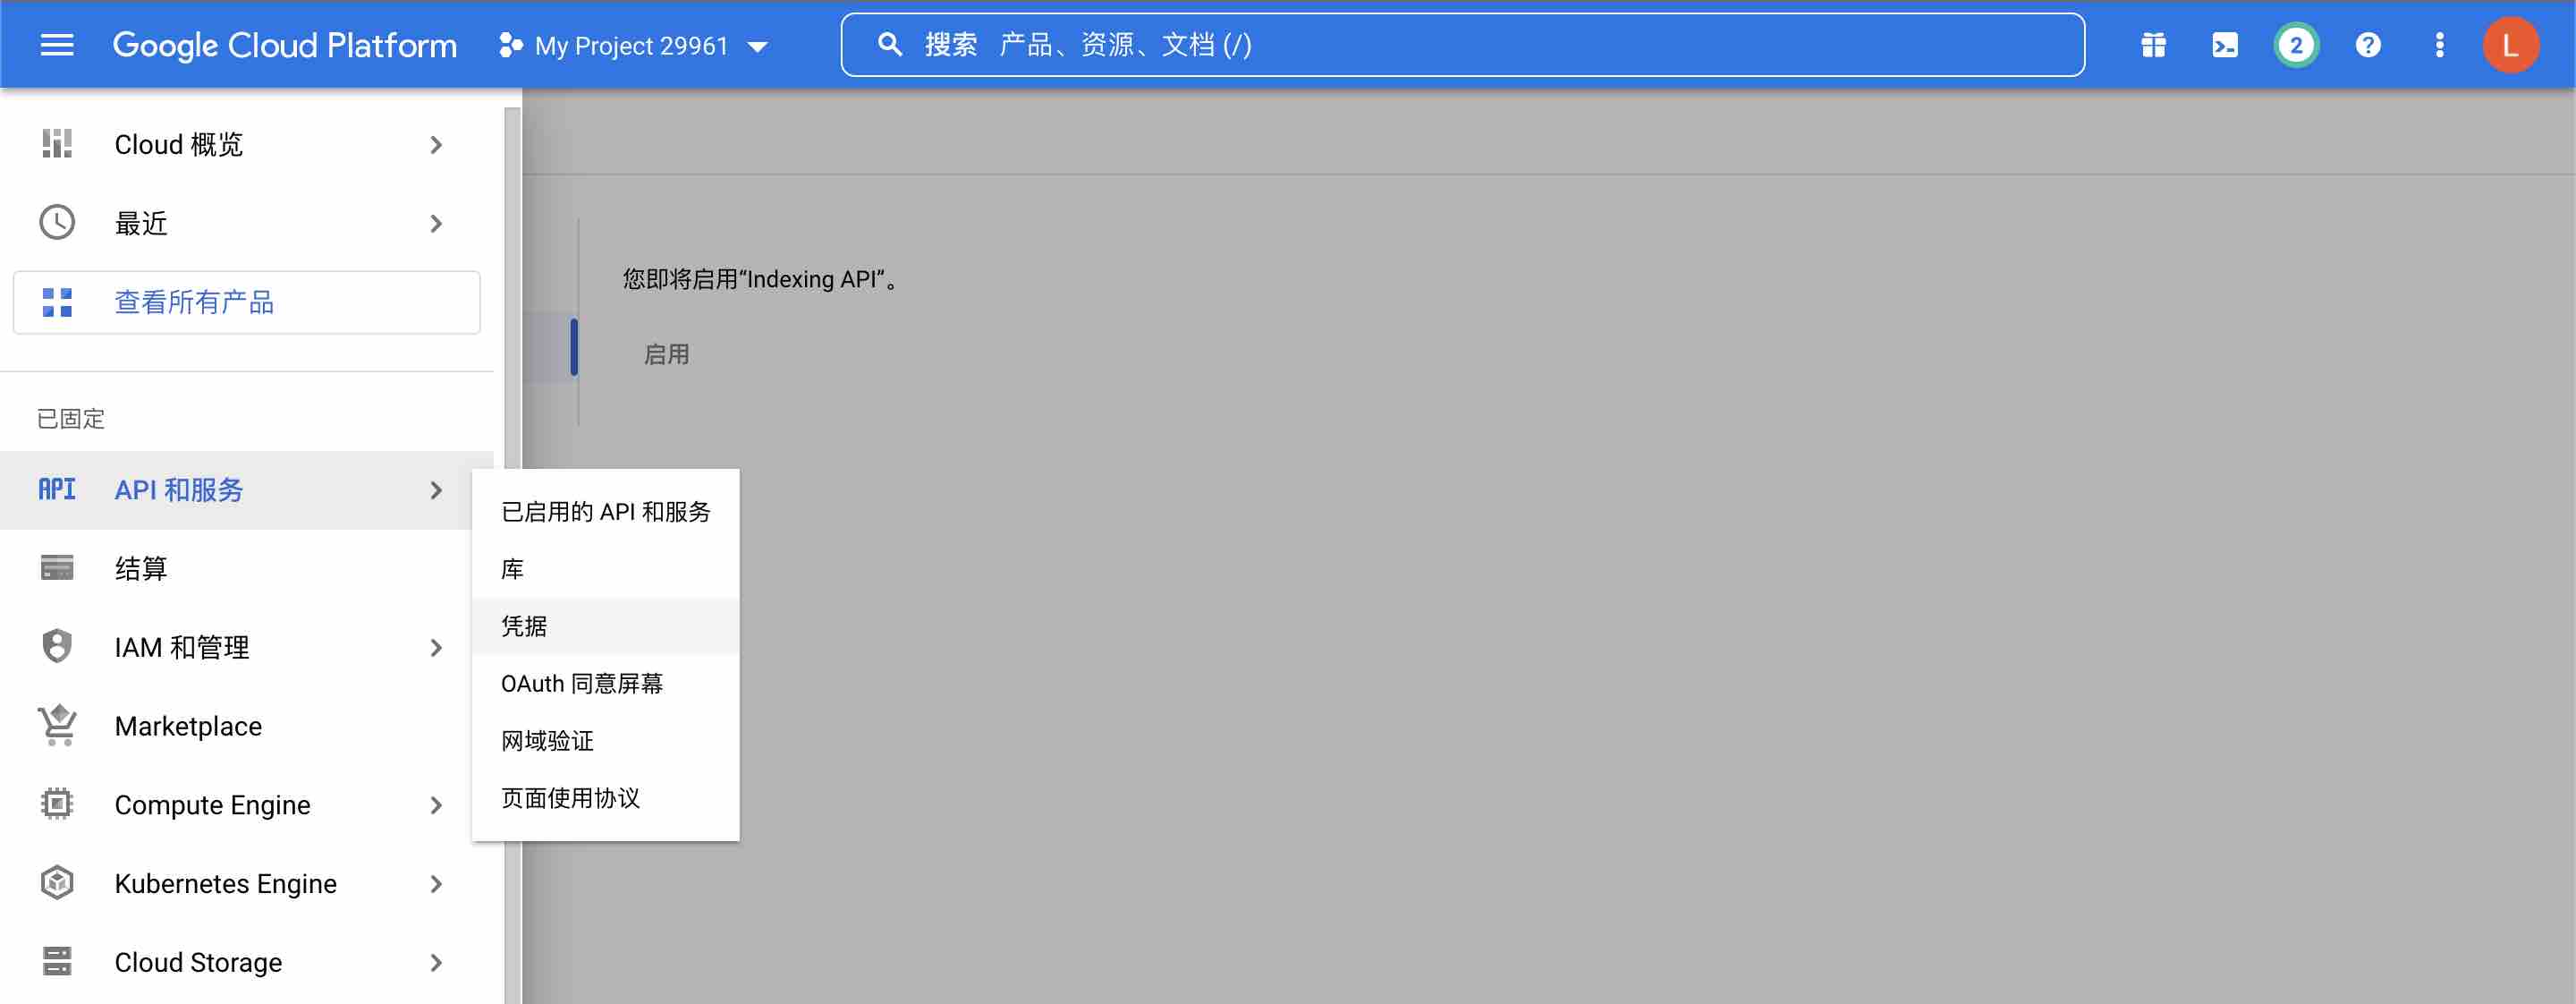
(3) 创建服务账号
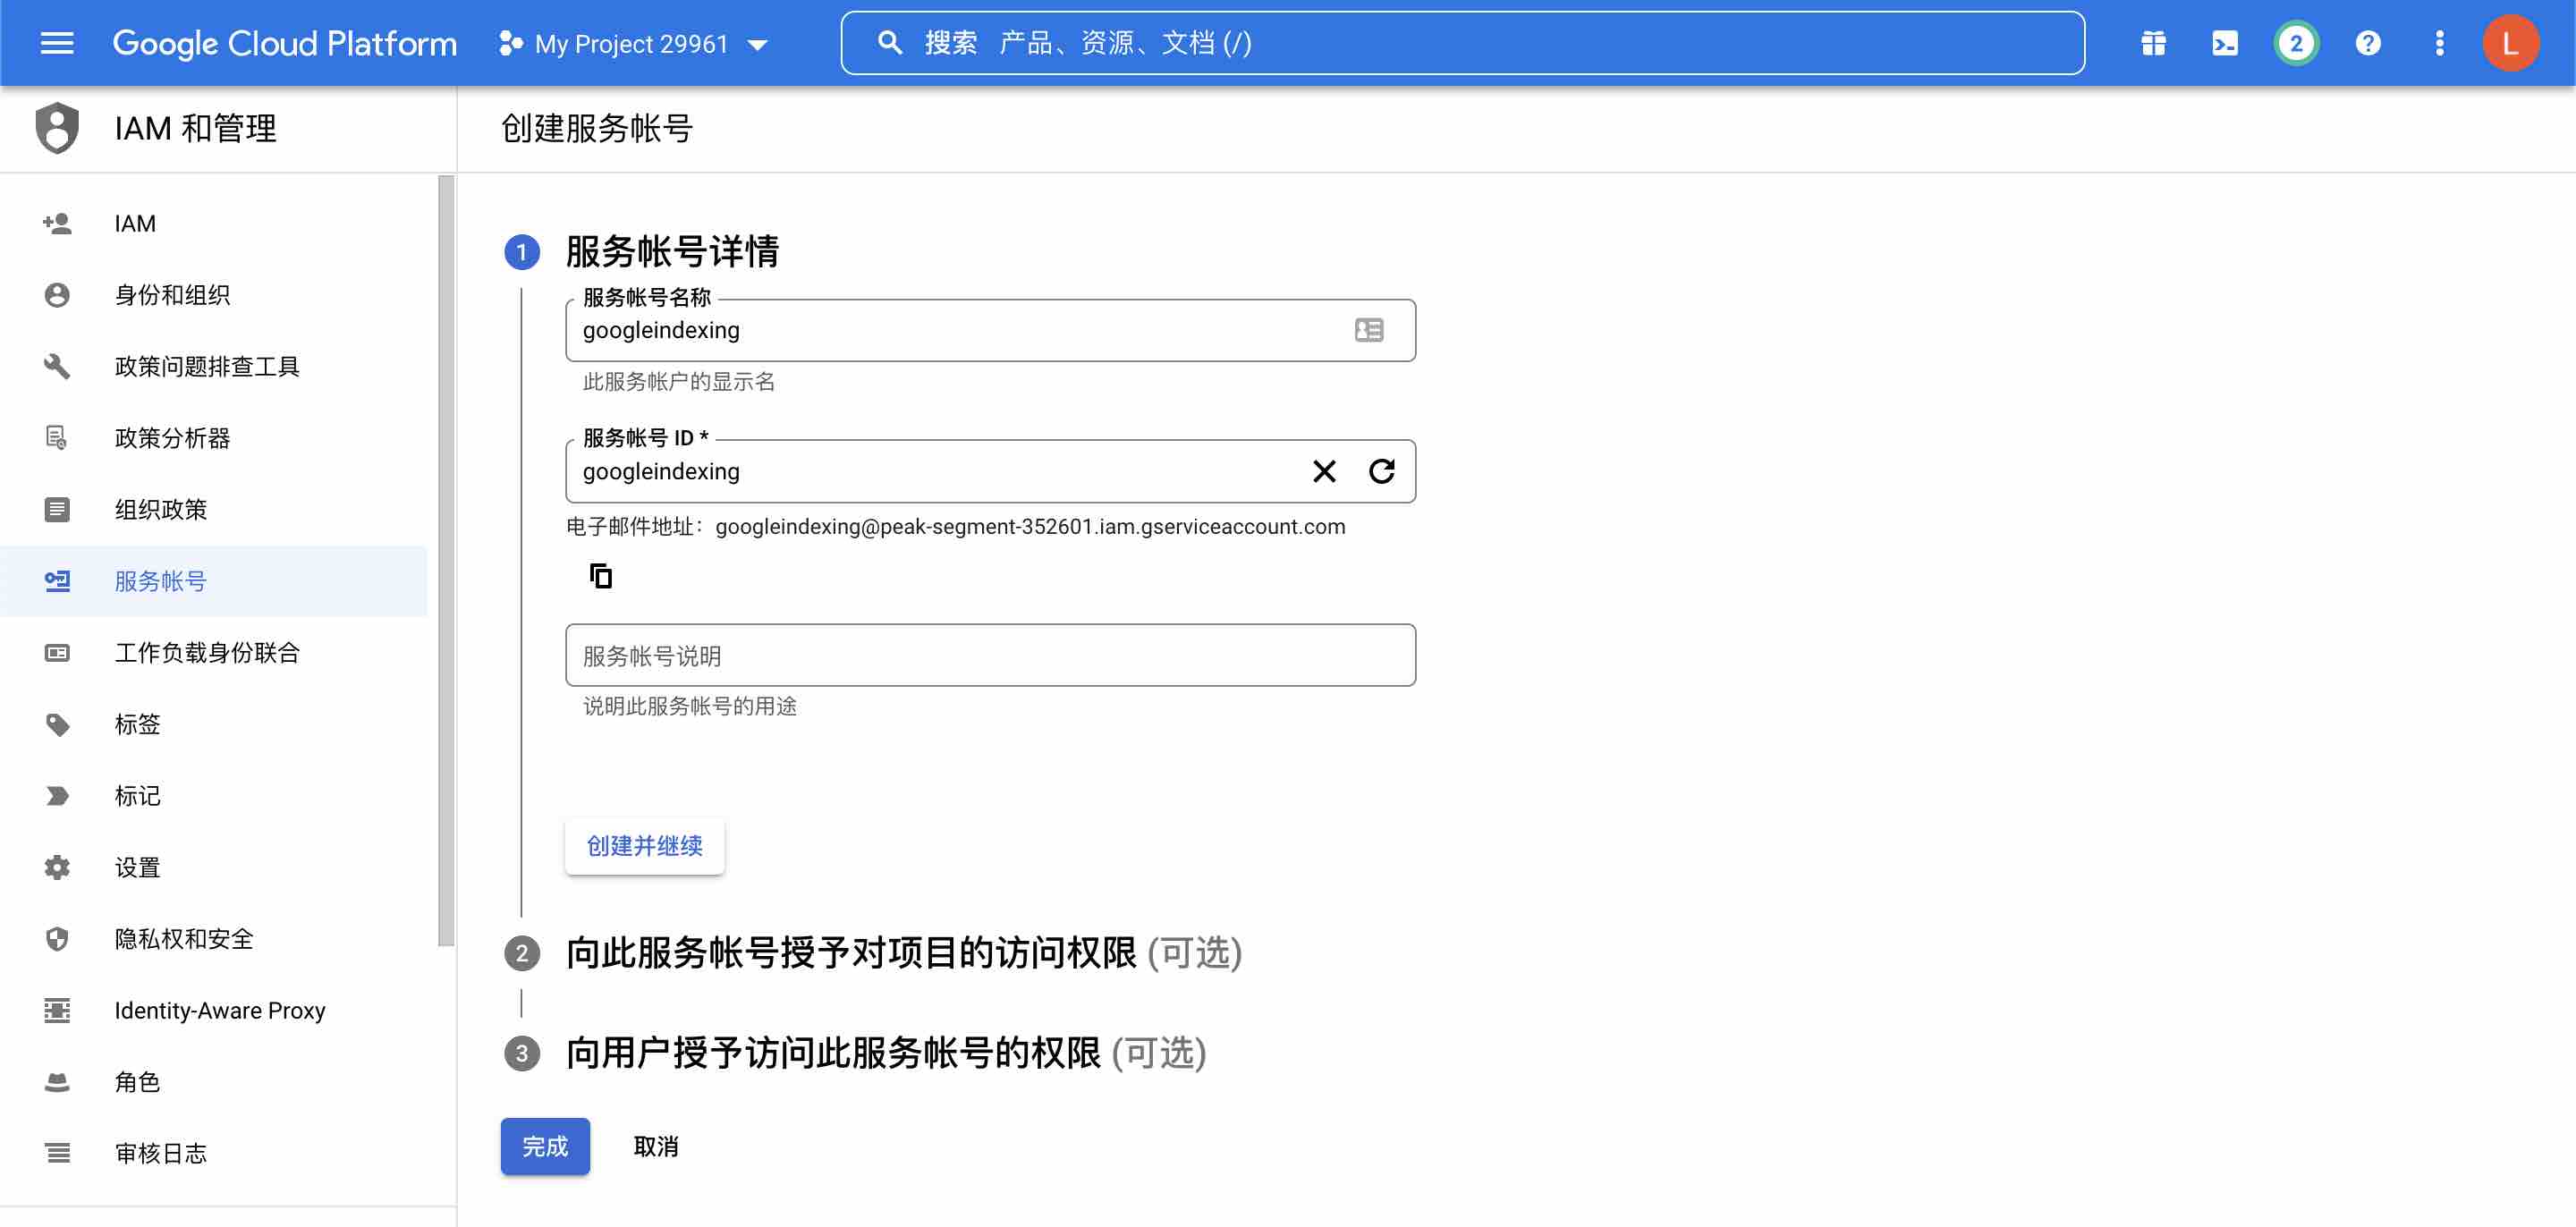
点击创建凭证, 点击服务账号.
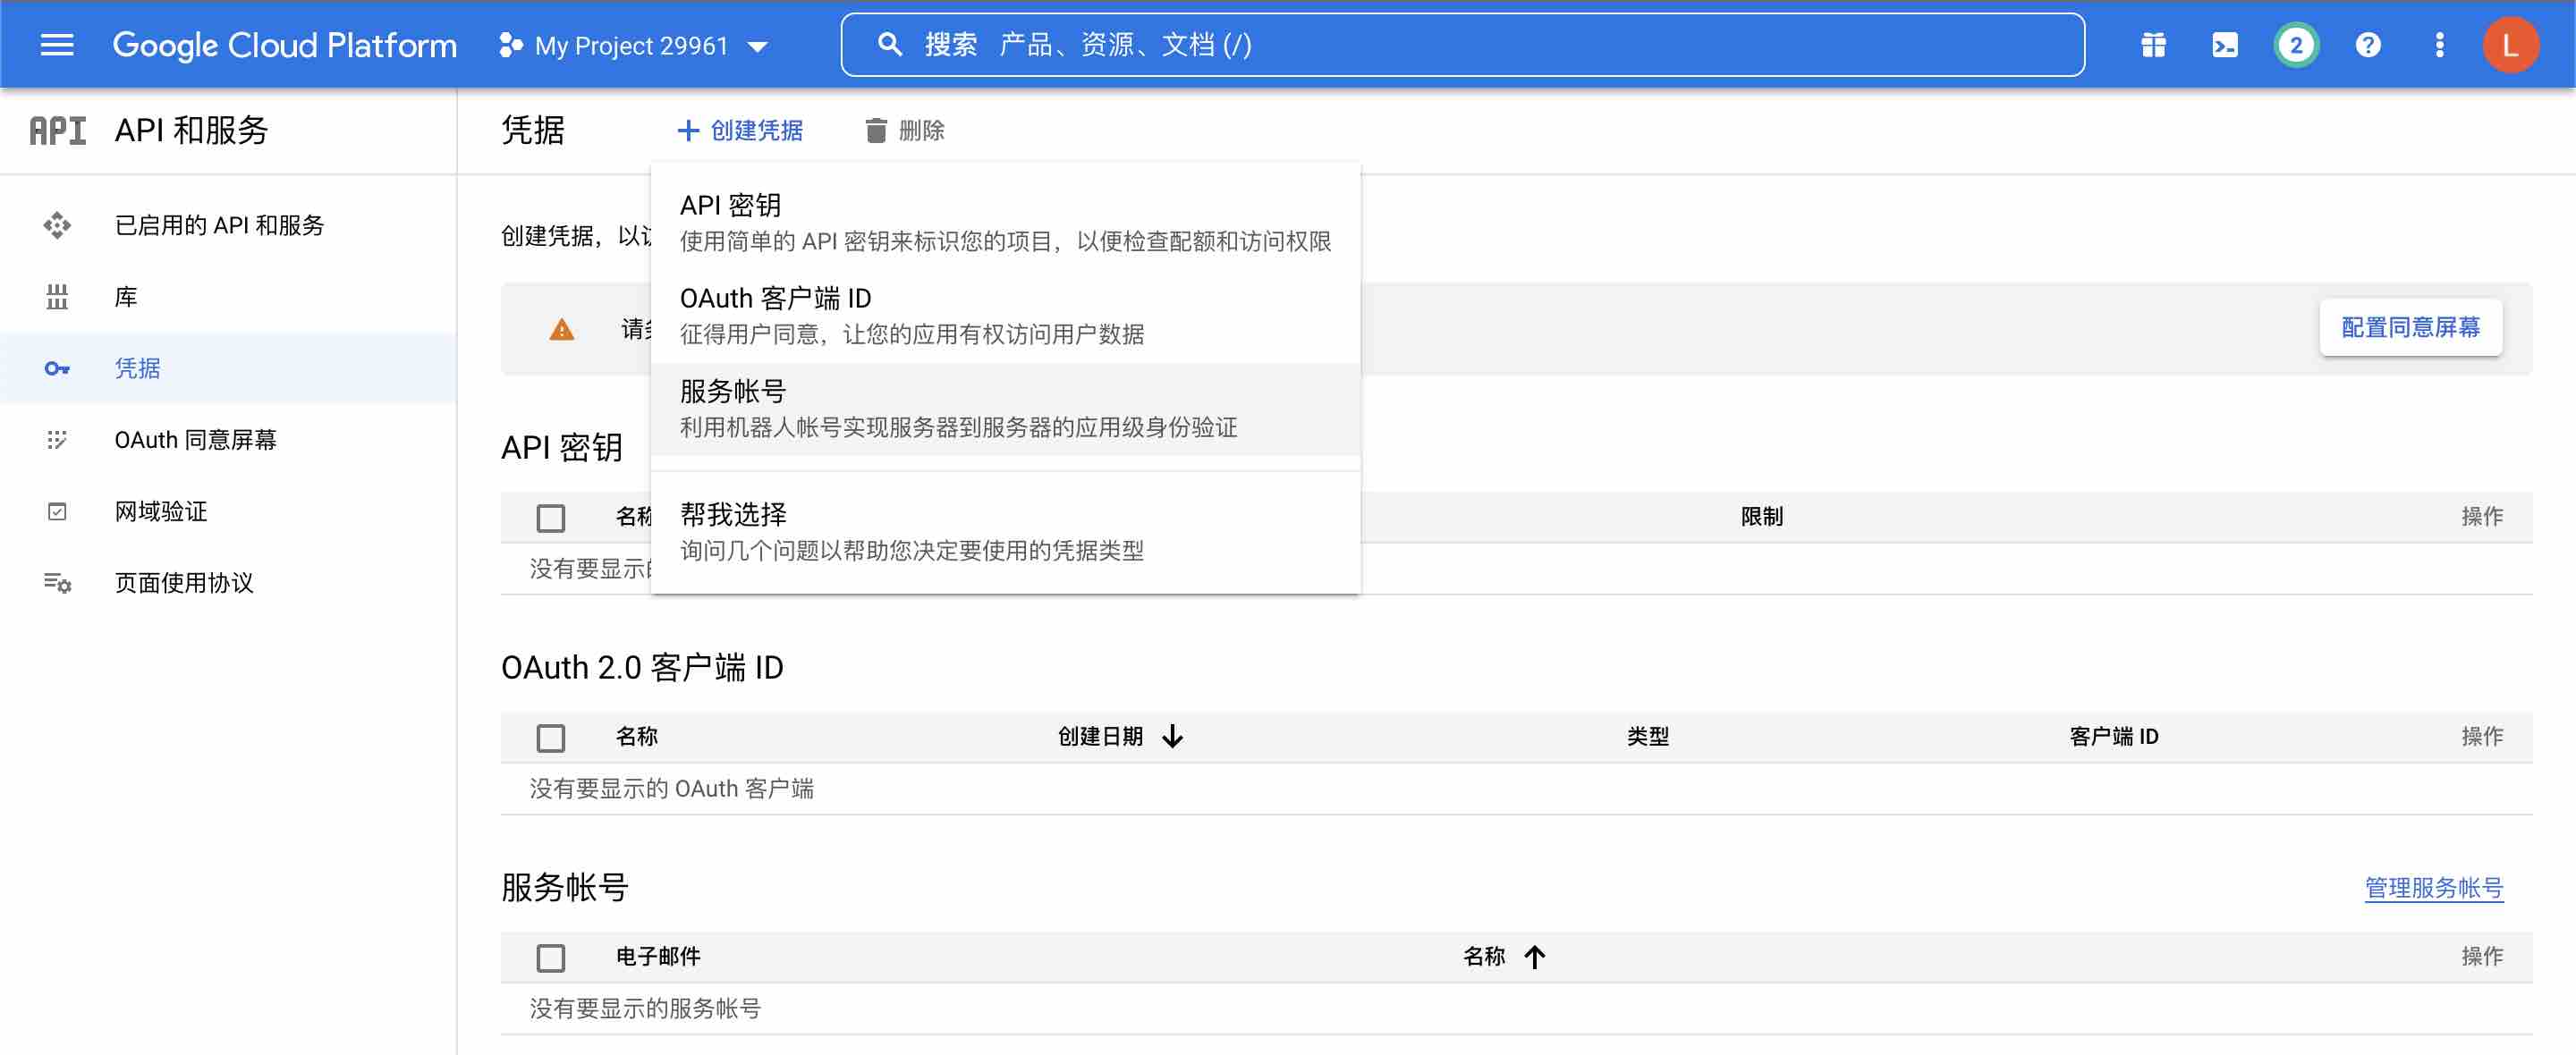
输入服务账号名称, 然后直接点击完成,
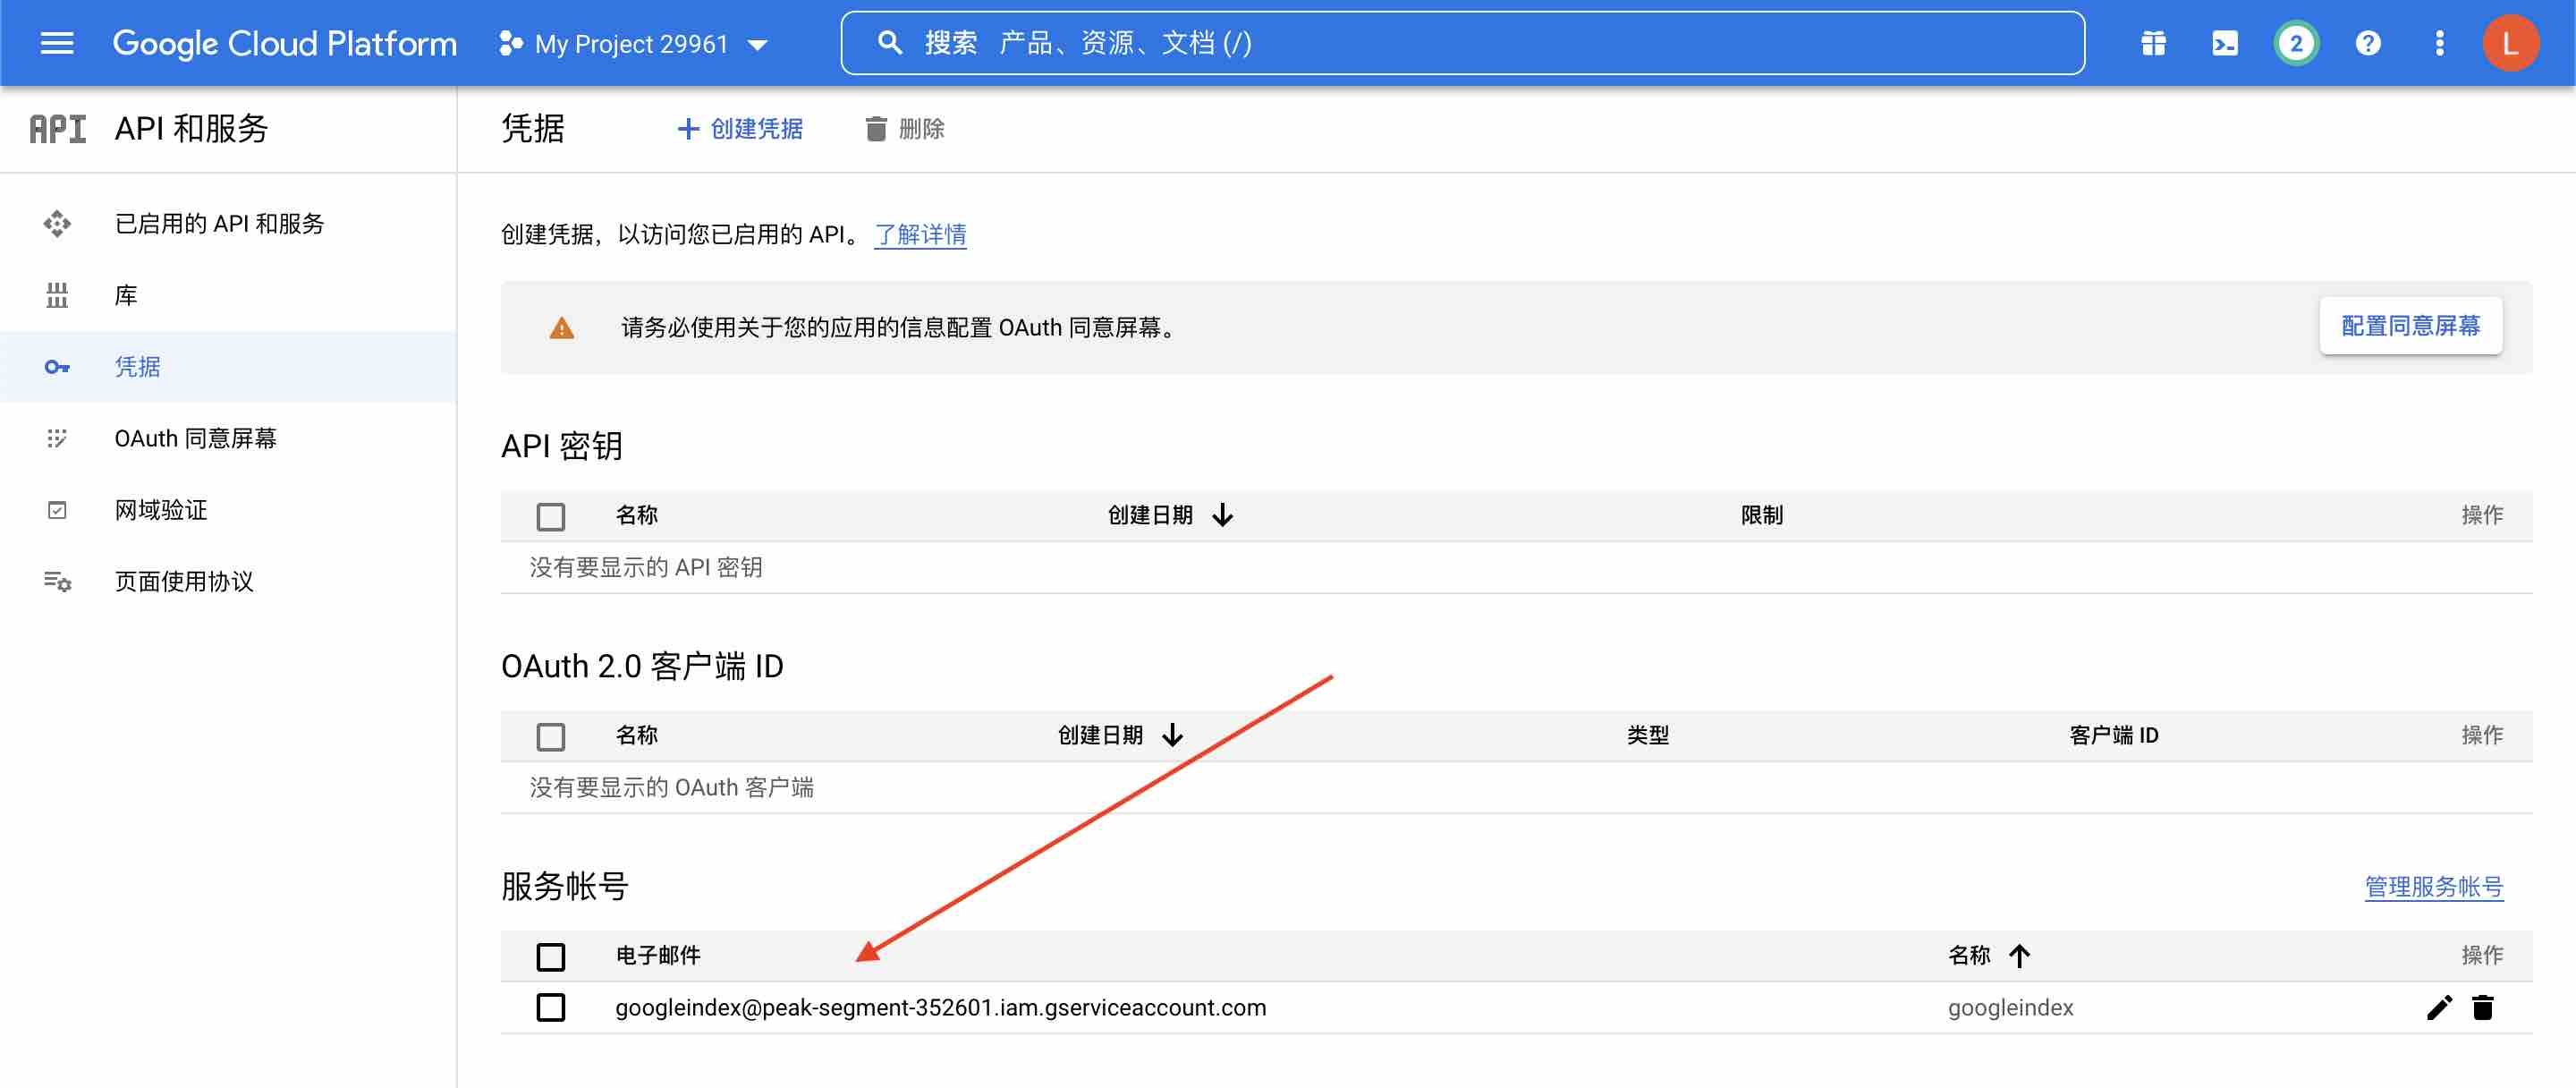
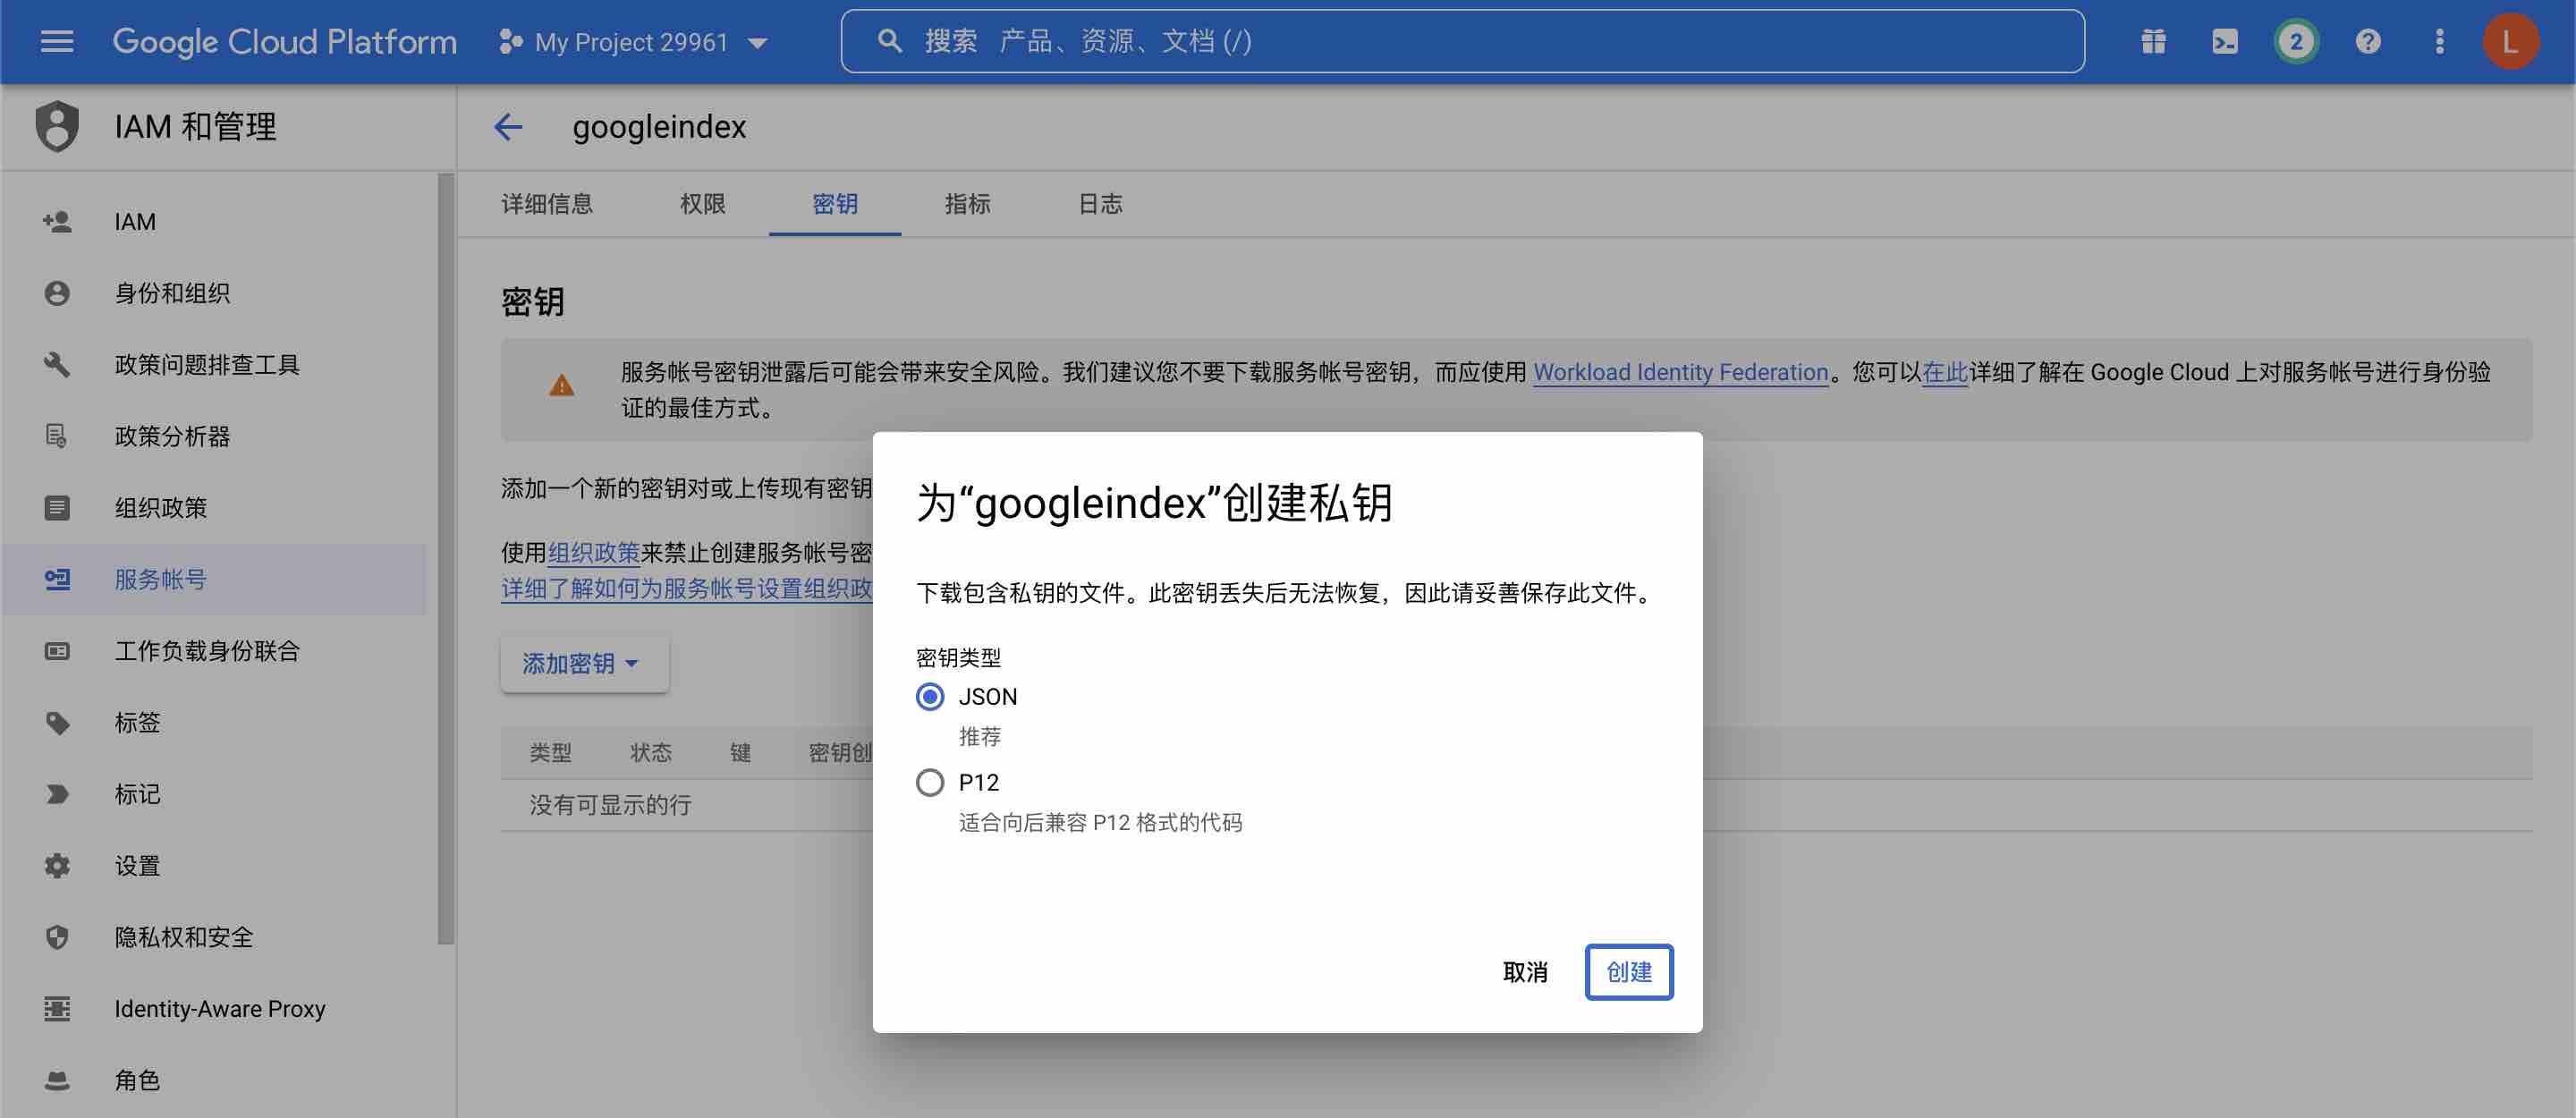
(4) 创建凭证
点击刚刚创建的服务账号
点击密钥标签, 点击添加密钥, 点击创建新密钥.
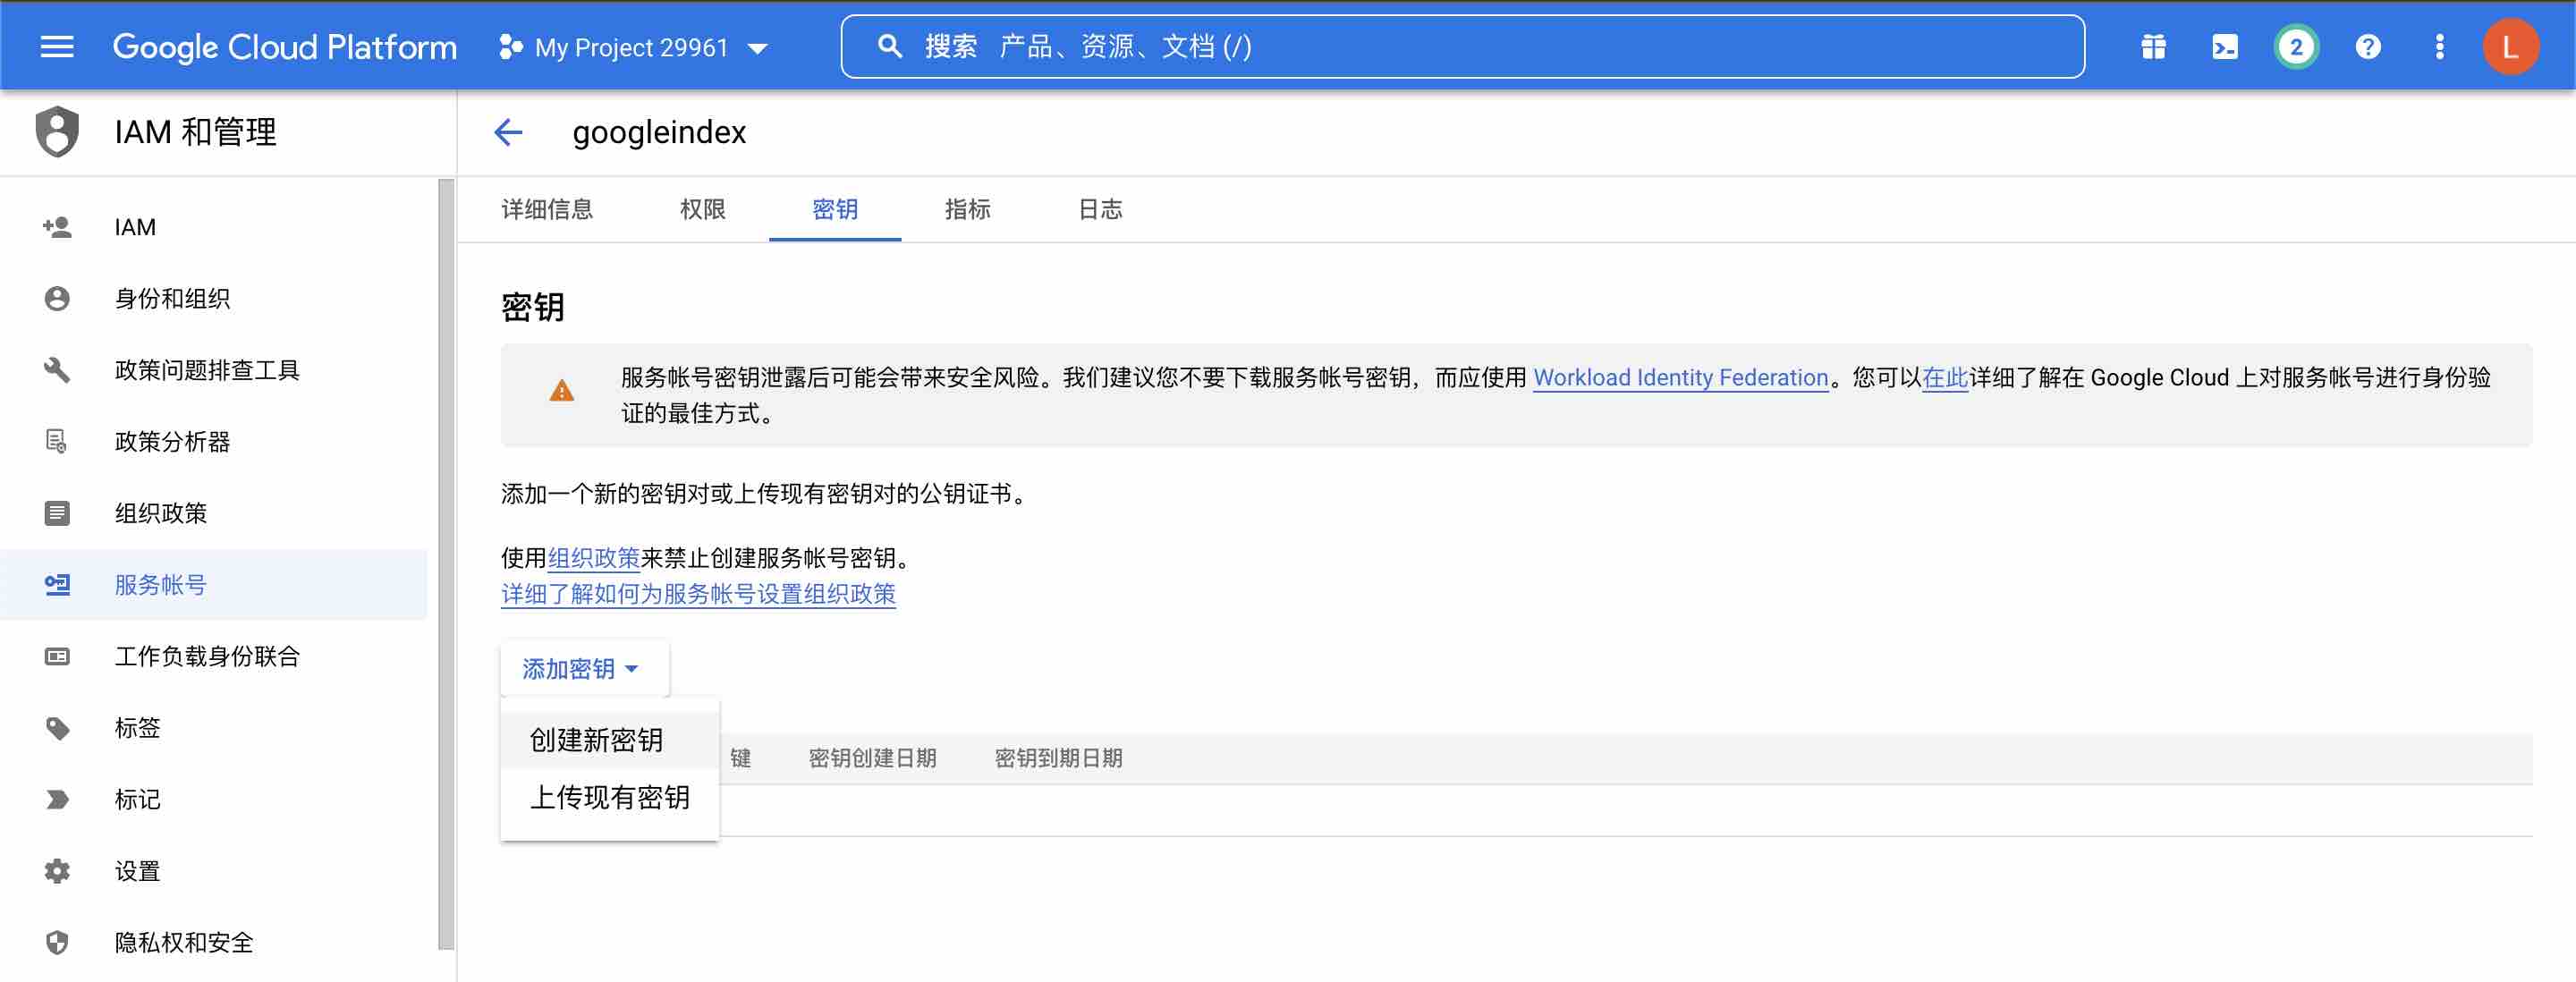
选择JSON格式, 点击创建, 然后JSON格式的密钥就会自动下载到电脑中.
json文件内的内容,
以下信息已经过修改,并且已删除相关的申请,仅用于参考
其中
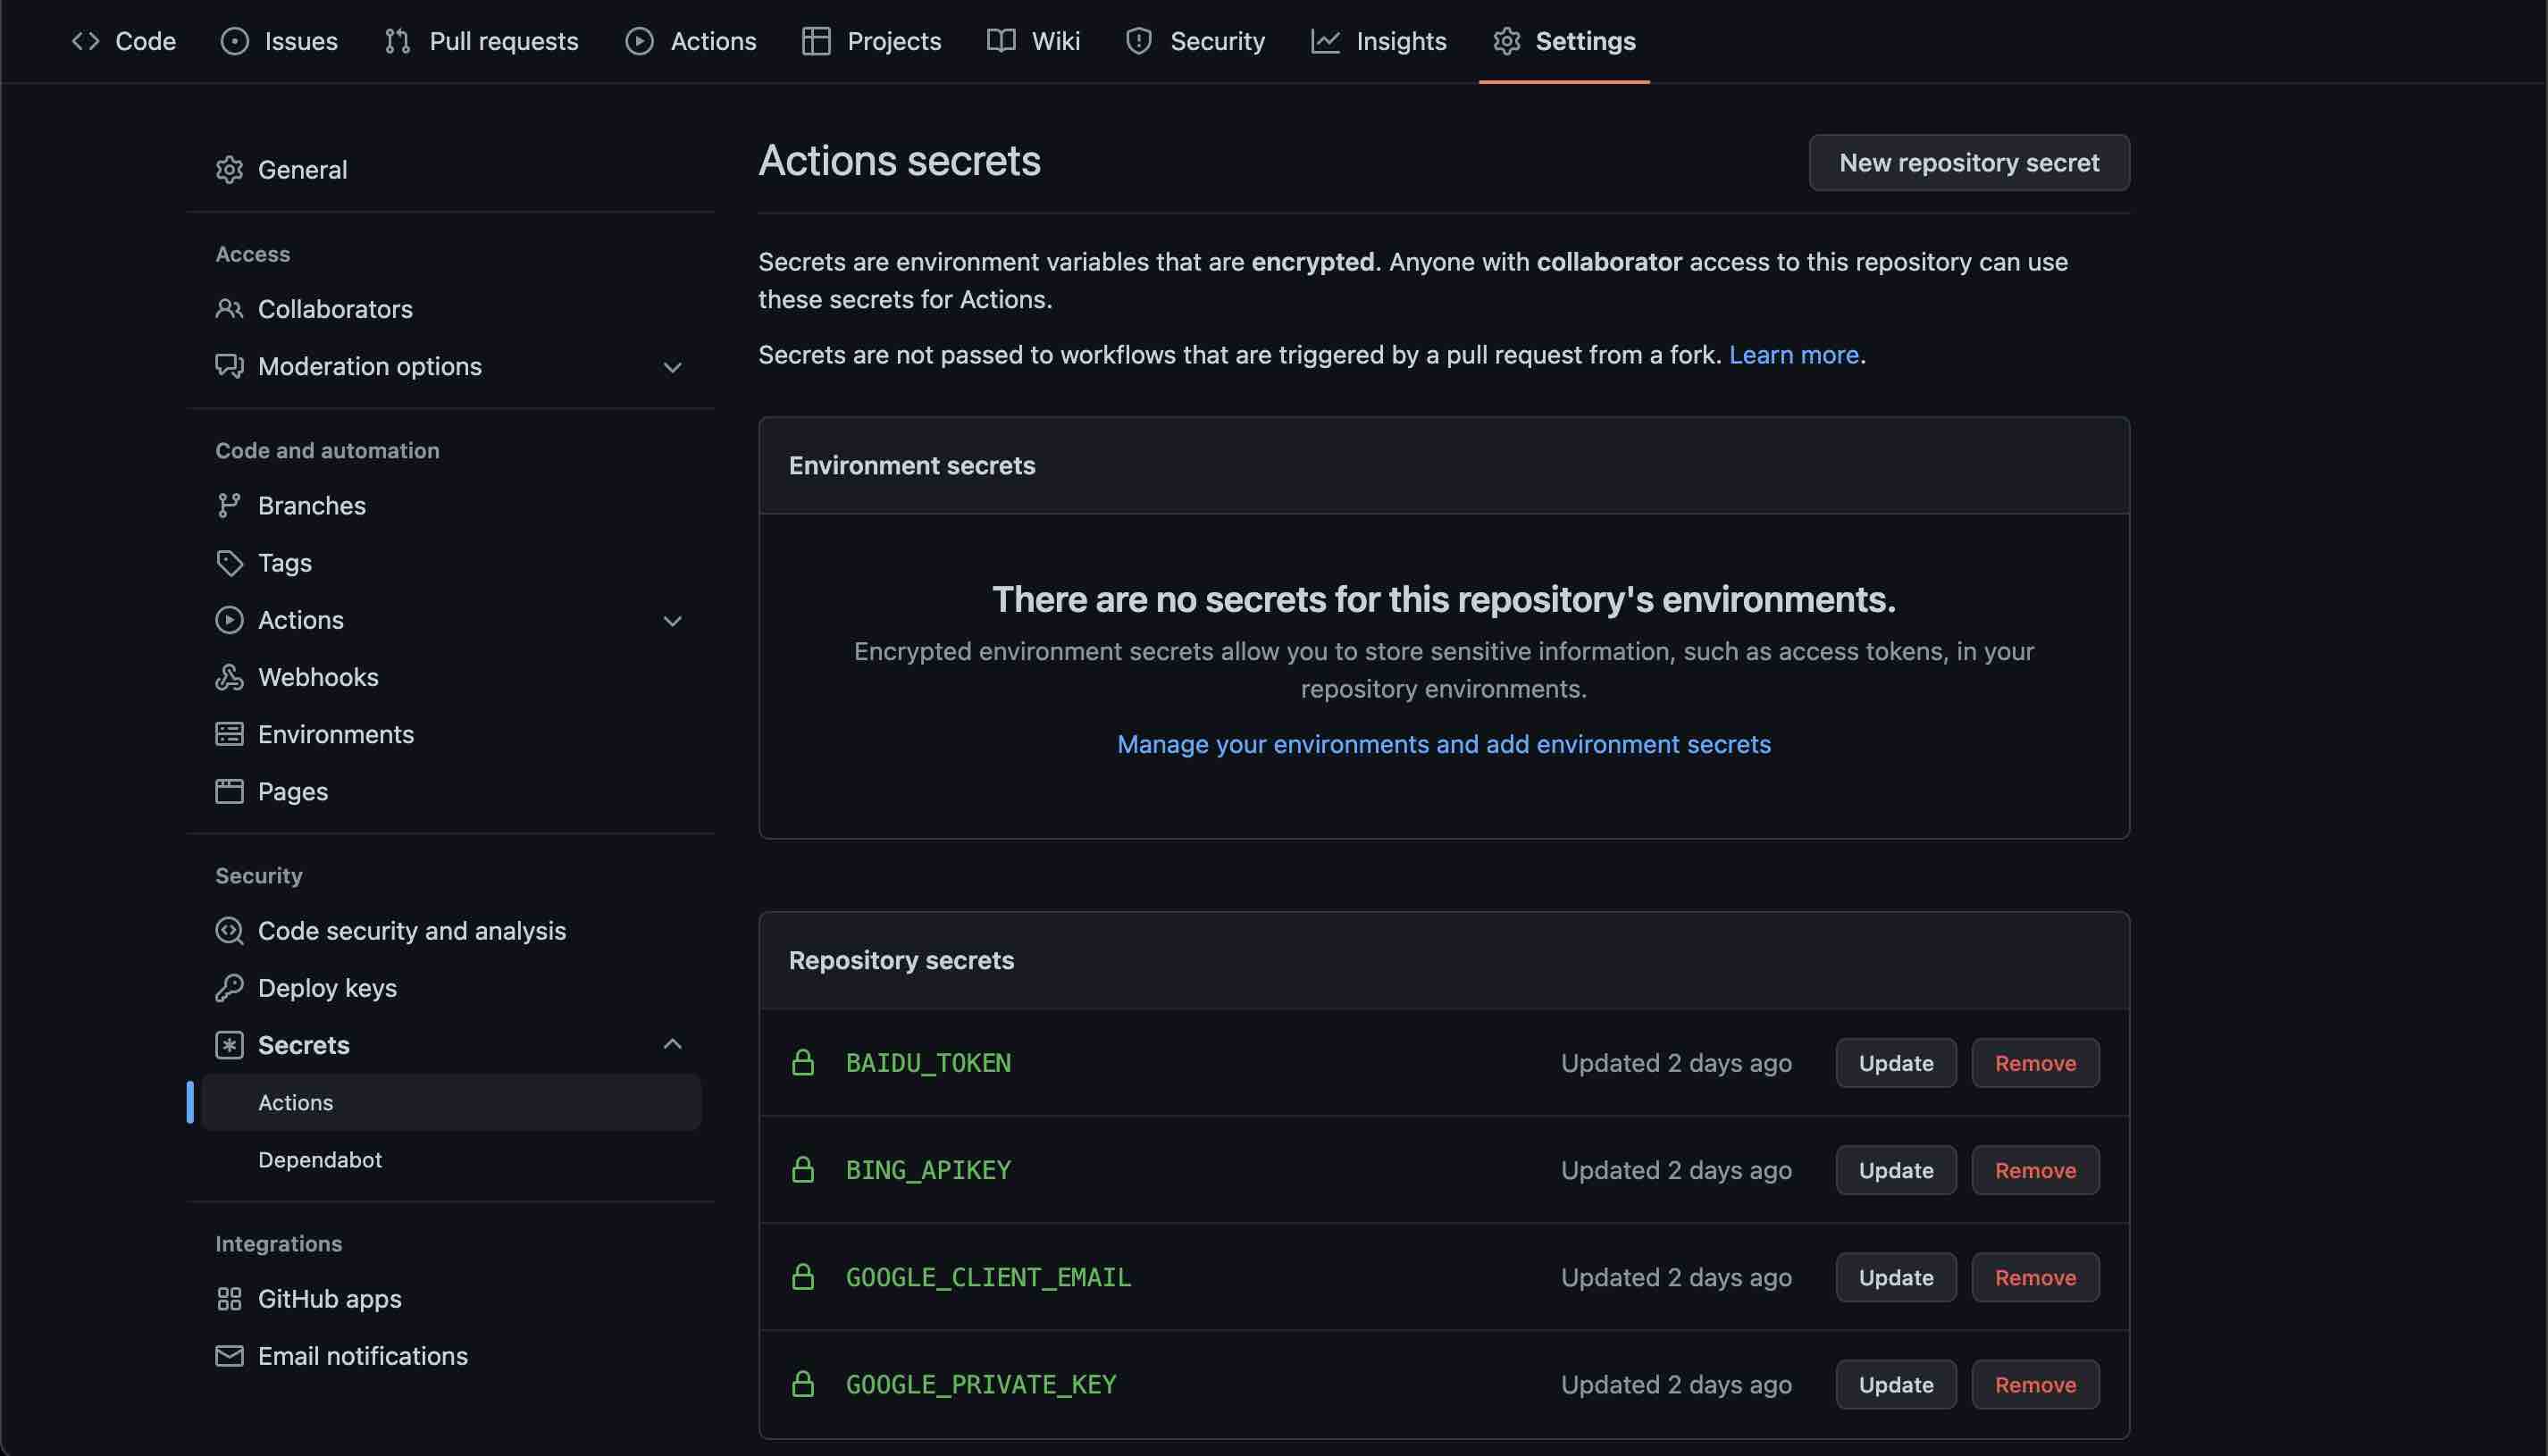
private_key和client_email是该项目需要的,注意在GitHub中的Secrets名为,
google_private_key和google_client_email
{
  "type": "service_account",
  "project_id": "elated-guild-298003",
  "private_key_id": "cf58d669c0e8c8e082b2c403ade5e2548078e384",
  "private_key": "-----BEGIN PRIVATE KEY-----\nMIIEvgIBADANBgkqhkiG9w0BAQEFAASCBKgwggSkAgEAAoIBAQDEAJw89yeylRrA\nB+bzOAfQQNgOCABIwEKCy5mMxWSaiXy2RktyCJWjMR2Pgz770NJgClQHPJjsFn0c\nukHufpnuiX3VPlimLANPCRFdU/qp+yiaw4quIhYF1UZJkhmhL30anghUcvi+r9hQ\nw+RwcKrgA4EUzqUJaPdvjtzSoo315PPGfR91ASD5S8gE02yVI8igtYMX7v2x1JYR\n7PwHJwOVemiM9lot8ilvoUbV4BU0vSlwFoxKMJAbEXTmJjEKQi9992rcMW0GzXO8\ncHldUUtURXkt3VFjYTH27KhHiTkTXw+uZRBu1rkubDJkS8lGIWN7Fc/r4HMMCVTu\nXPS6HbJ/AgMBAAECggEANSS7OBaFd3jRL3cVCiZLjA5A5pEJzq/+eKtOn2oYDISx\nwVRO+YTVWdGj47kg1zM4D11NikbGaeDxHFxuKwW9o/04lpyYebneTcw2Hpl6EiOs\nz0WssOlCEmPQ8nrAI0GWiKSHuqoPwtg37TIoGsqZsjKRCby759DDokZYnm3/0sc+\niEllT0ZyBZhGDzyguVLEdCIR2P02q/hQzLyd6ejWGGwZebImbGoILhmuOjVrco0p\nV0JbrrNskjM5Epe7w+CpGftEASJ7Dxa8oj0qIT6cyAipra2AZAGnG9jrLcWpJuhu\nvNeDIFnTfpNEac+khXZZE2++MIQfTX9wGJc8tox2vQKBgQD6yiNvAL7sxExiy6ER\ntLtFQ3bvmMpKRFGvFOyPOtMbmjZ3D1GEtNNKGH4v1TI+tncEy7Q5Dm7nWwpi8yvL\nbh8xKghelAc/CU1nw0xDEDCkMbAwpFg5A5ZDImy3LZsQh0kNXniIMy1vMSt5yLKS\n80gXQKGCxG8t3rP8Qd/2a55g1QKBgQDIExP1nG9sHJaigmitEUwr0Ow6Shqr56Me\nd7995gaV1oLWWCQzrXt/viWkb1W5ZGIxzcWNWz99m4CbvqfewRr598Eenald0csN\nVcIEk+0C+6KqA+jU9Tfs2zow/C7JuKULP2N++o0EoSz/ngokP7f1yLOYbr507v/R\n0cLElQBQAwKBgAbxDWYHKUG4dTzO0hiBXiWepm4fVooTtgcYlyunvywmapeFDwaT\nUr3cS7HbPtbJiiXR1Z02rw8sT+9JN88brzVXKoAjrMer5D6ZA0Vf71i8H1pZUi/R\nz5jwHP48/uvIMtdx4/gxInLPc5qdWYQDw90Q5ueNtF4aqfSzhhV2CR45AoGBAJN9\nPOF6iMjx6jmyWOf8MGK8iOgPaMoA4Ea9j/SHdaNPlvPb1hQid0AcNDObv14Dmj+M\nqW0jLxKxZ4VobufPAsvyz/J51zjKRx11cqldQwNH7QnYB/O1MZzxn1wtC3C5JTG9\ncONSYFJhXoKxRliigEI3ye089jnNVdifAS1ZiflxAoGBANTX1fEMEeNuYU0v3rtd\n5CkPZg4TNZ+y2MGl5xR1LdIgrJ8c9xKoW4rpp7SsOIvHpWX494f90D7o9uFEGSQ4\nyQK53jVzJ0ekGV5BdPF3n3/2j2VEqFLHi7LL4CJSxr6ci7OfBoHOGE8odhevQCCK\njnFzEin0QsBEgIC73fBh6XcH\n-----END PRIVATE KEY-----\n",
  "client_email": "[email protected]",
  "client_id": "103034240916368863393",
  "auth_uri": "https://accounts.google.com/o/oauth2/auth",
  "token_uri": "https://oauth2.googleapis.com/token",
  "auth_provider_x509_cert_url": "https://www.googleapis.com/oauth2/v1/certs",
  "client_x509_cert_url": "https://www.googleapis.com/robot/v1/metadata/x509/googleindexing%40elated-guild-298003.iam.gserviceaccount.com"
}
(5) 为服务账号授权
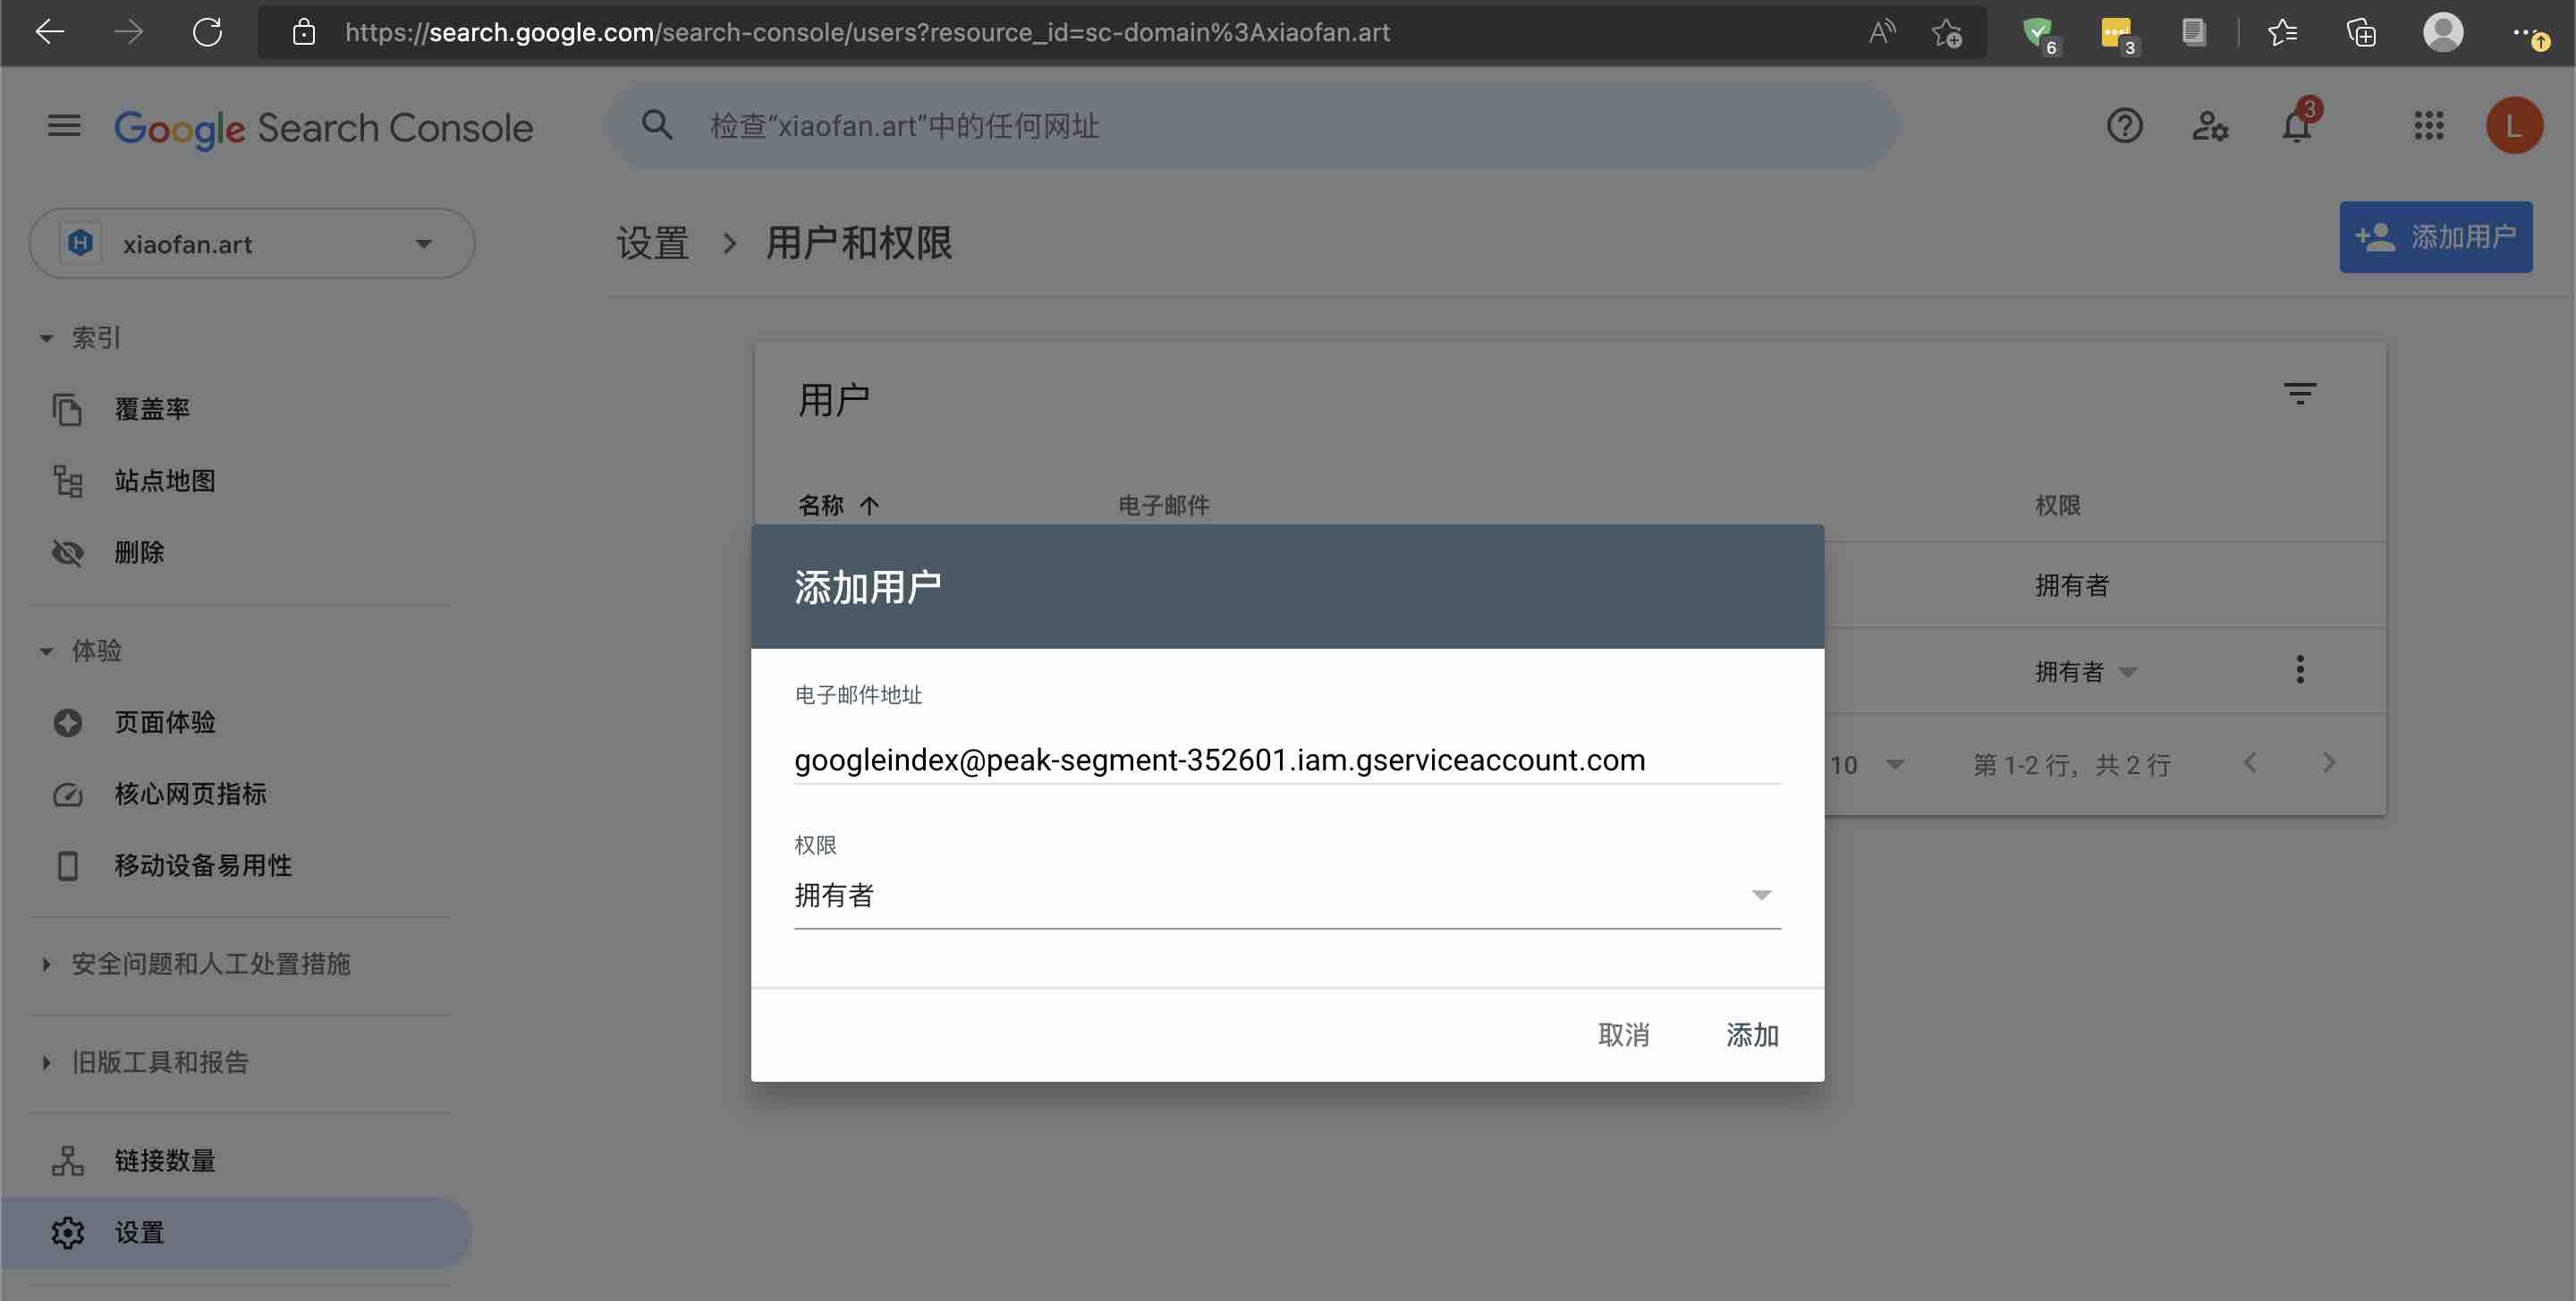
打开谷歌站长, 选择需要设置的网站, 点击设置, 点击用户和权限, 点击添加用户.
电子邮箱地址: json文件中的client_email字段
权限: 选择拥有者, 选择完整GitHub执行时会报权限错误.
(6) GitHub填入secrets
google_private_key: json文件中的private_key字段, 填入时要带双引号 google_client_email: json文件中的client_email字段, 填入时不带双引号
(7) 官网说明
由于谷歌常更新页面, 所以如果以上操作出现问题, 可参考官方教程, 不过官方教程也不是完成100%跟页面同步的.
使用 Indexing API 的前提条件 | Google Developers
验证
取消Star, 再点击Star, 触发自动提交.
GitHub Action结果
点击Actions, 查看执行情况.
如果返回更新内容, 就说明成功了.
# 百度的
{"remain":2990,"success":10}
# 必应的
{"d":null}
# 谷歌的
Google response: {...}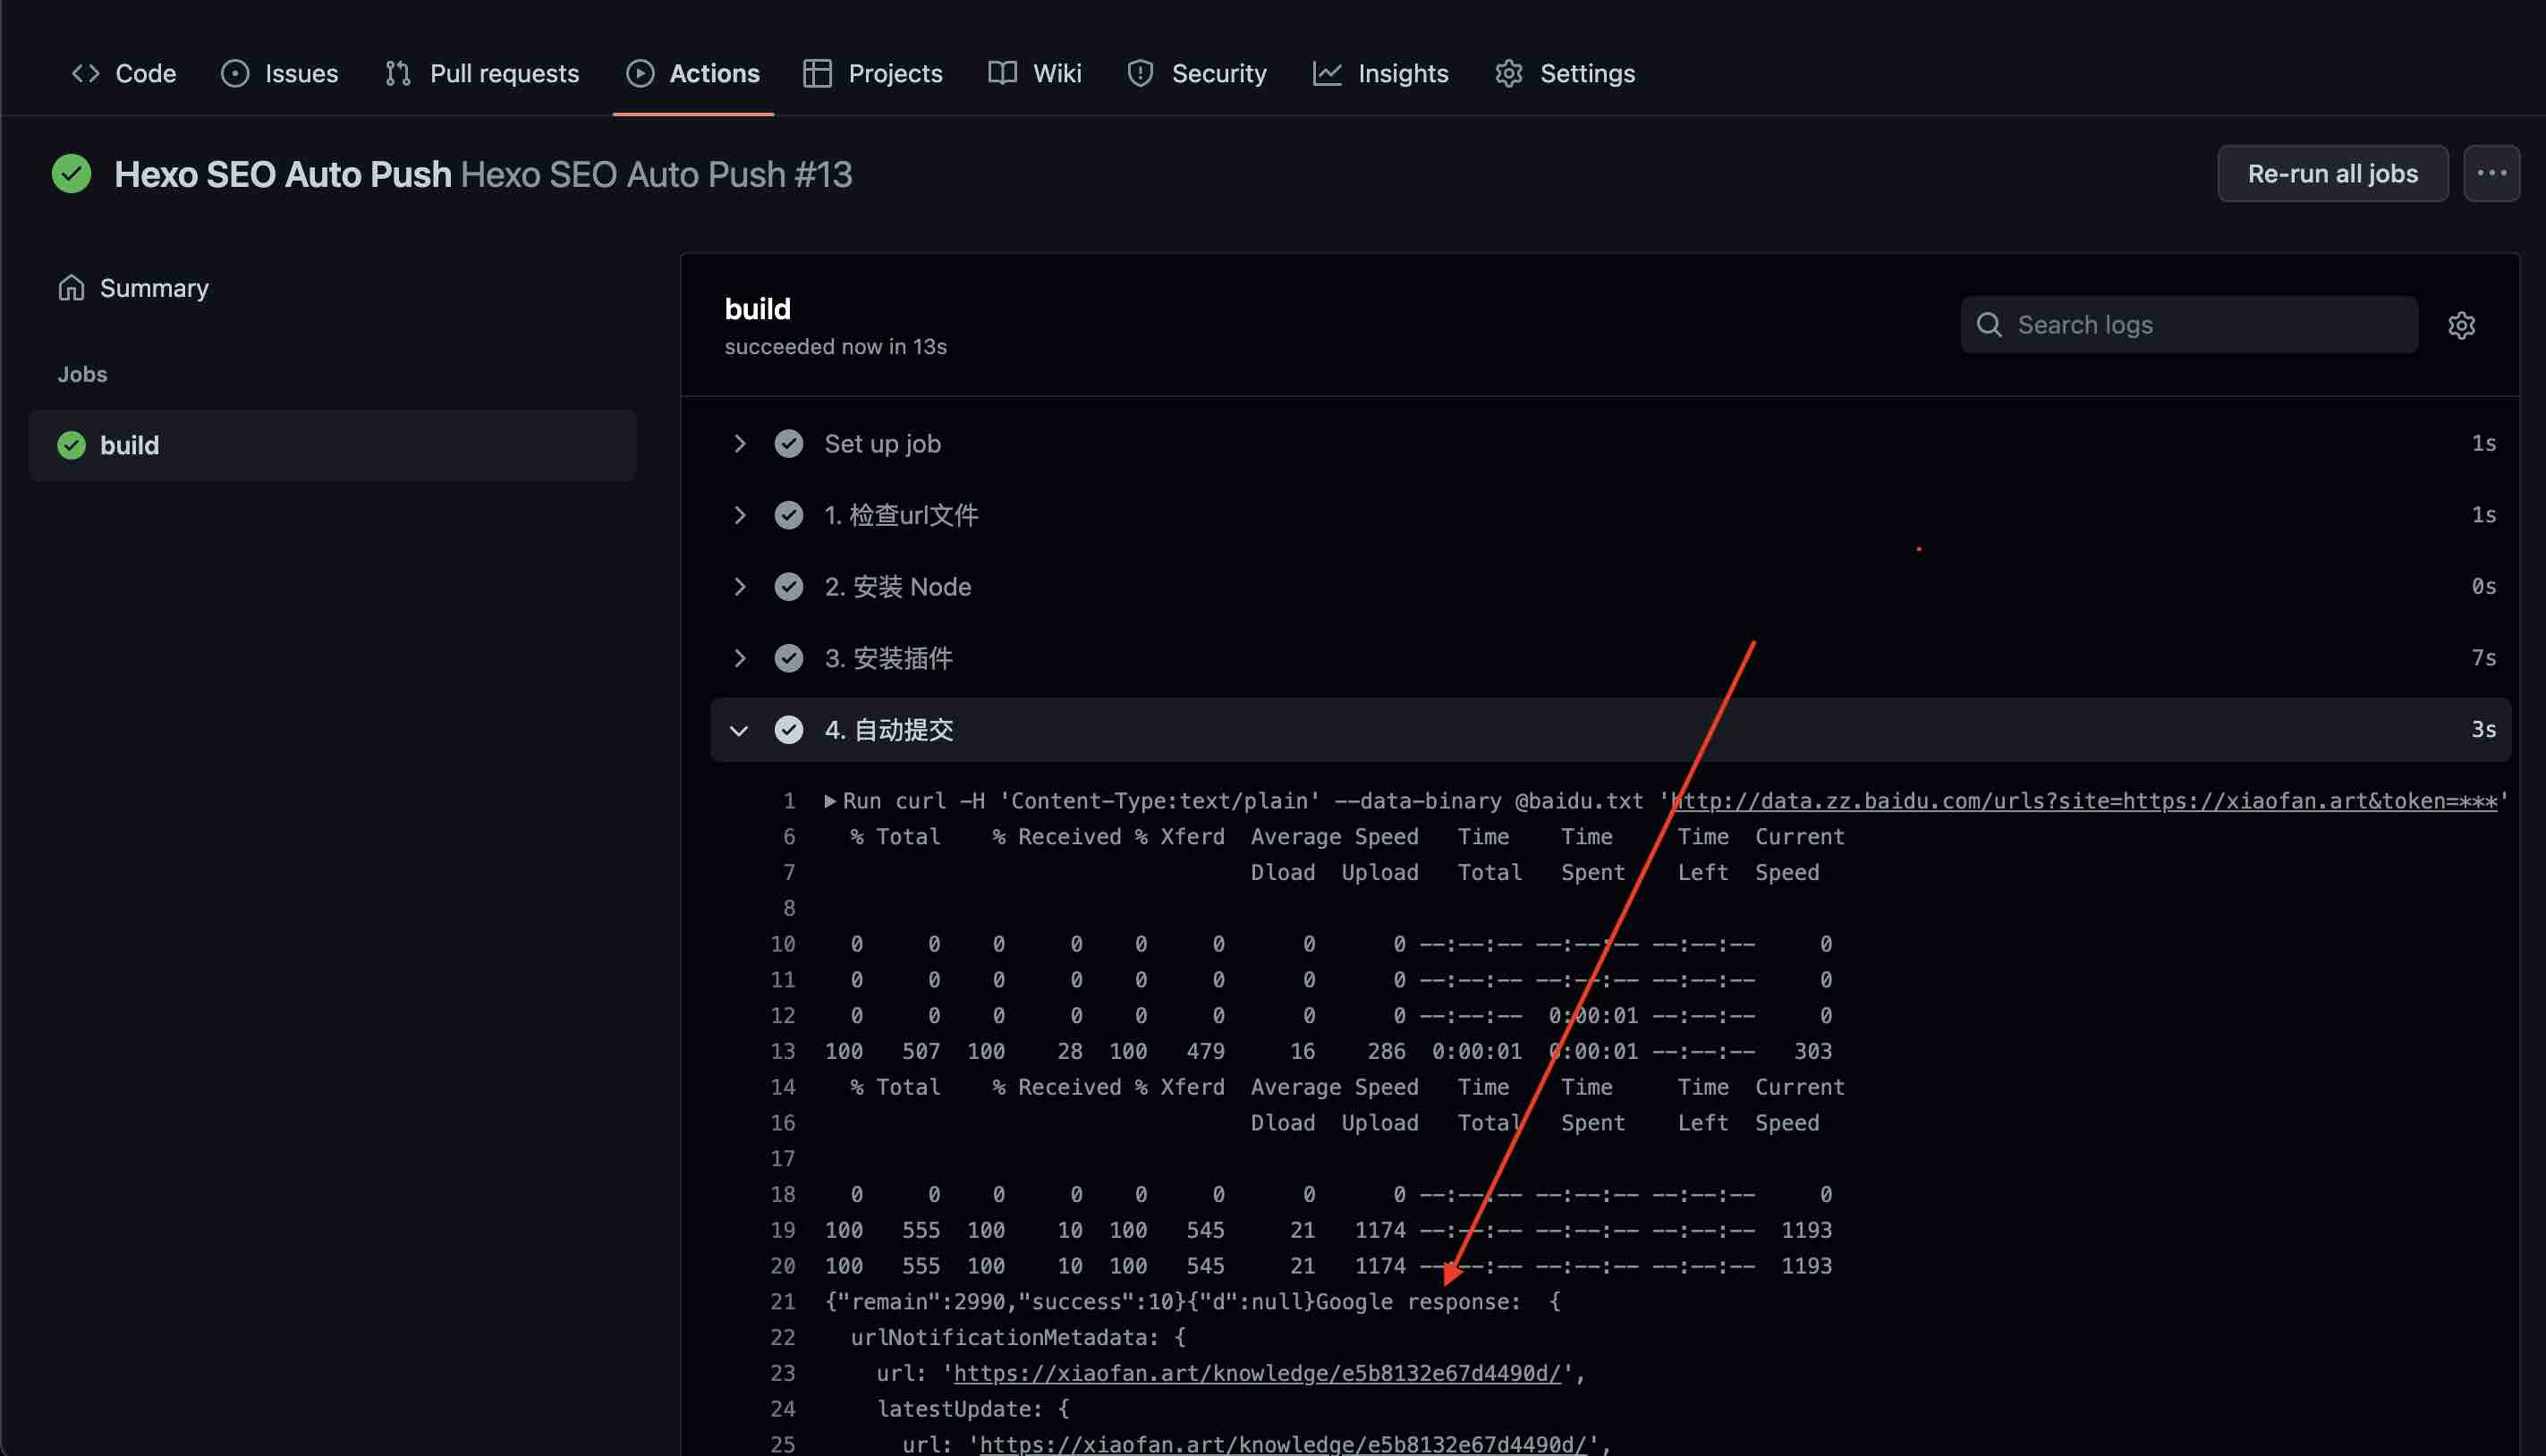
百度页面结果
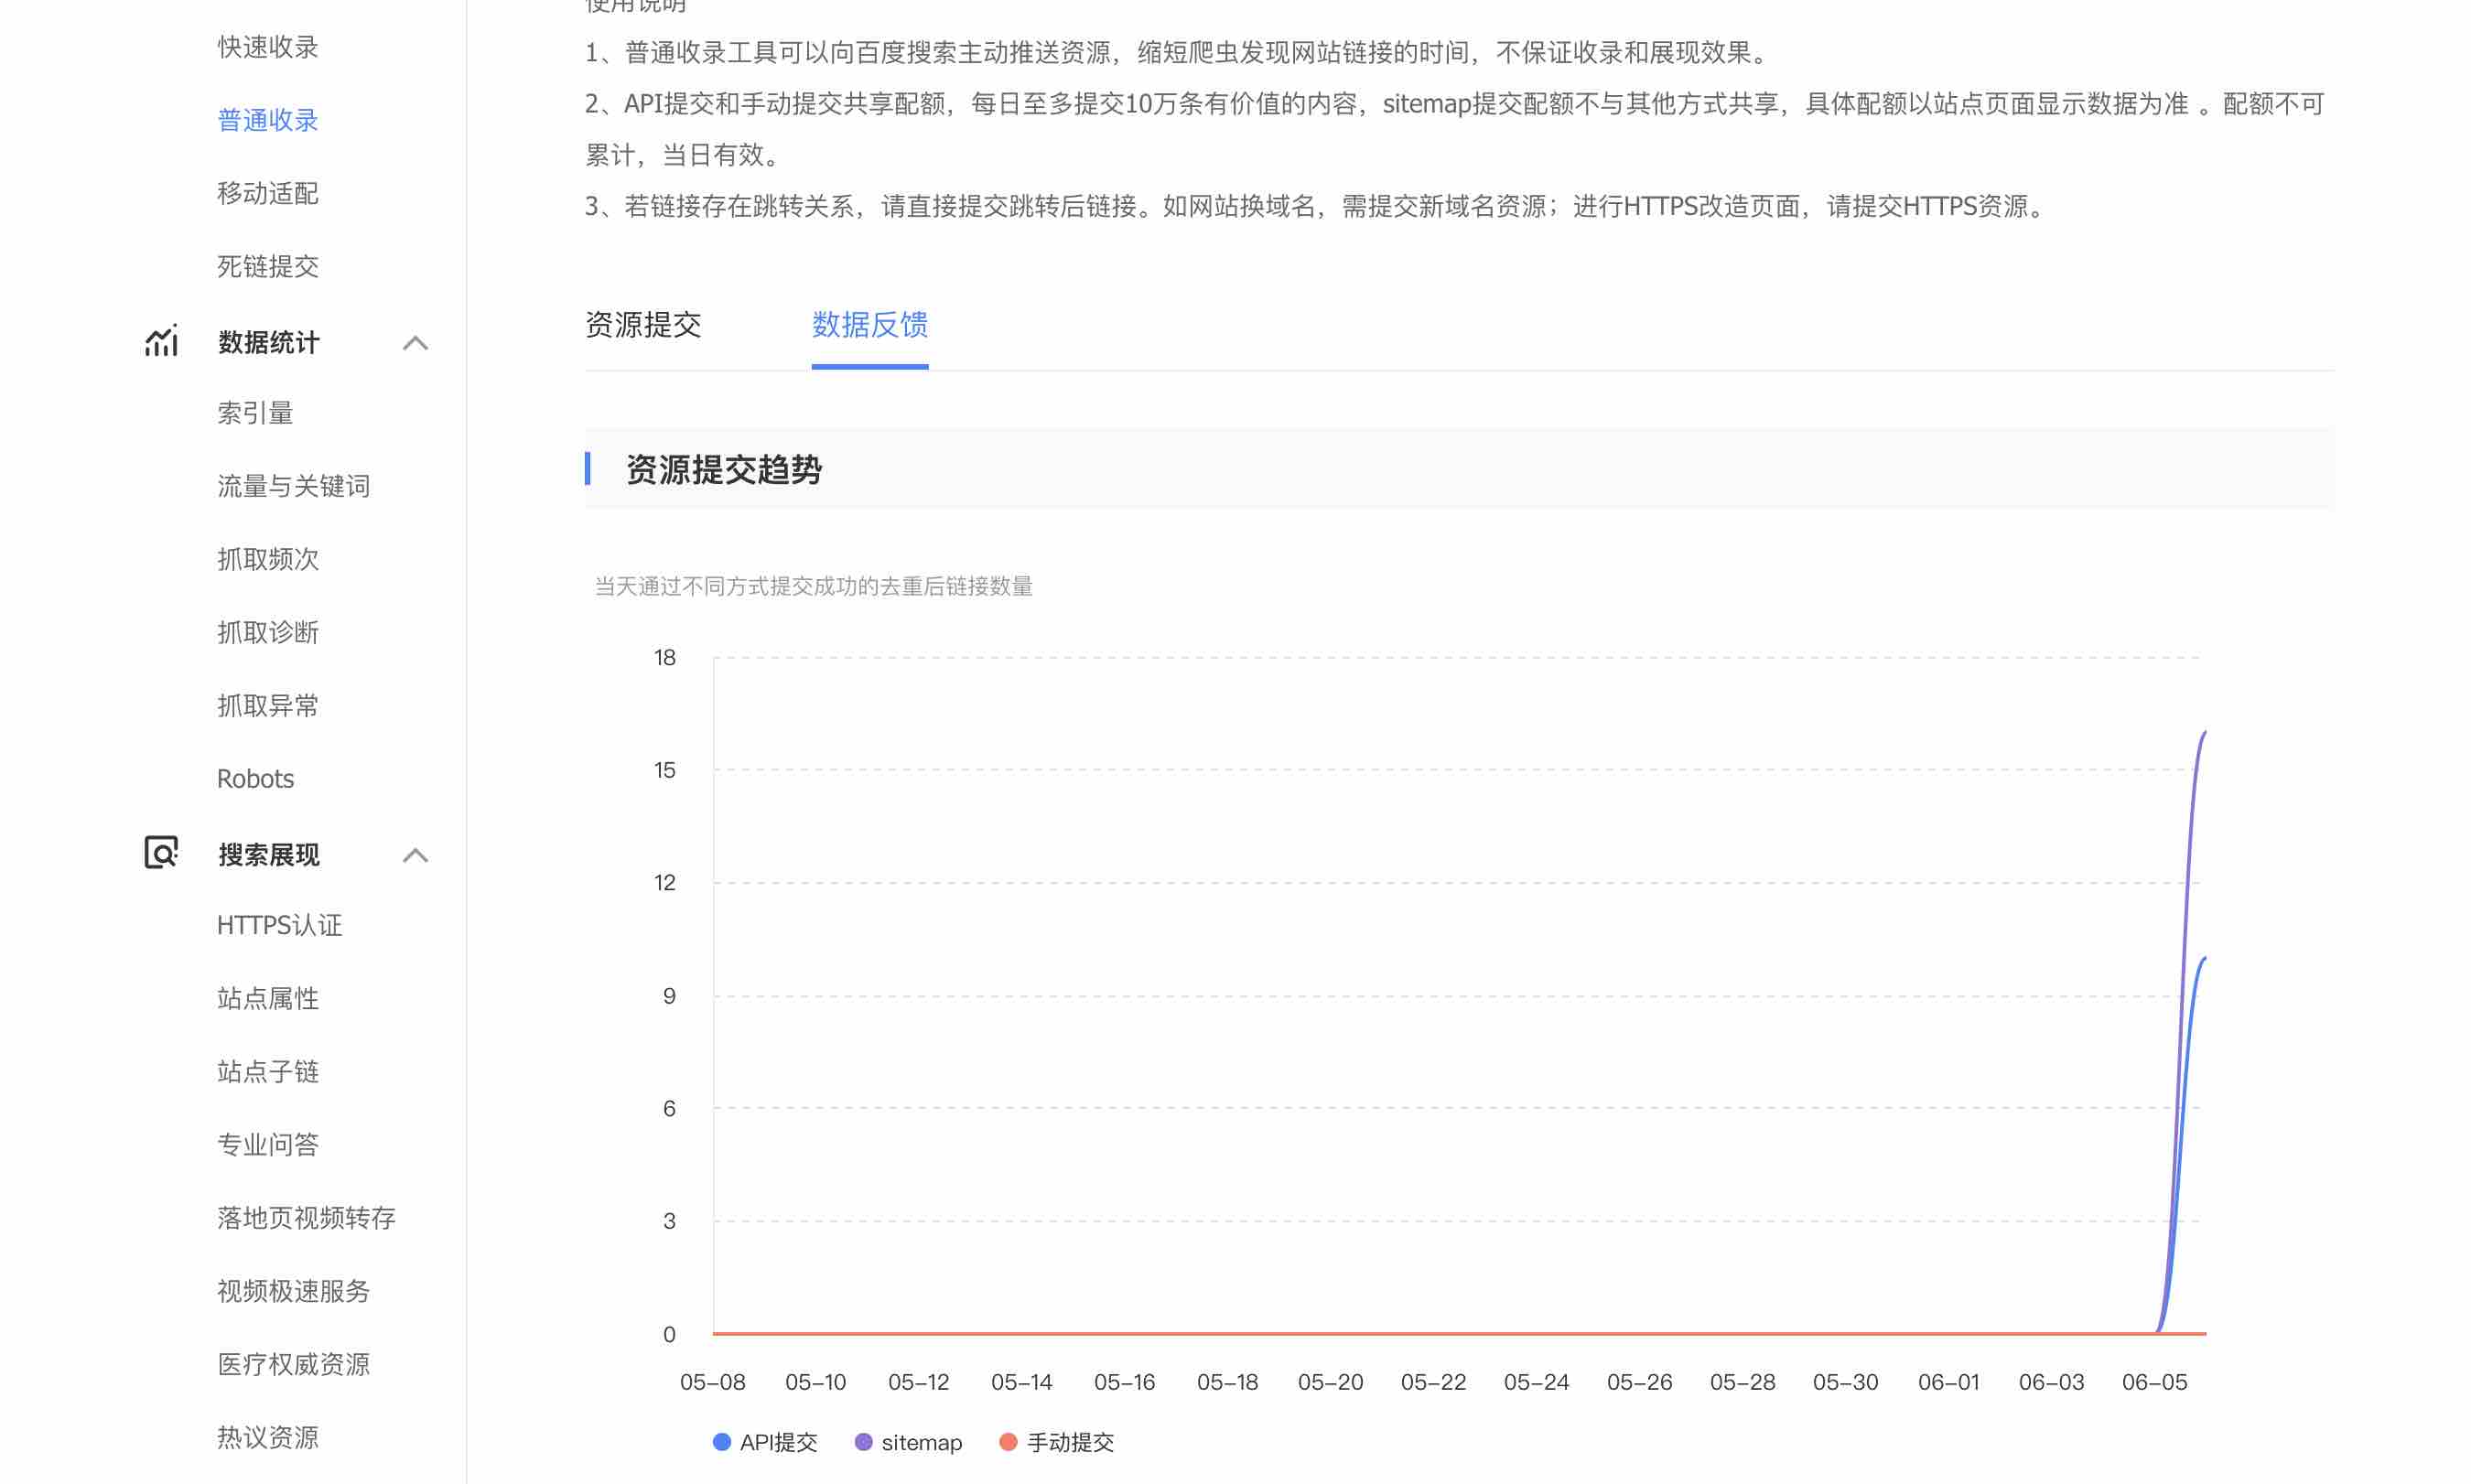
打开百度站长, 选择对应站点, 选择普通收录中的数据反馈.
看到当日API提交有值, 说明成功了. 但是这个页面好像有延迟, 不是GitHub Action那么指定完这个页面就能刷出来结果.
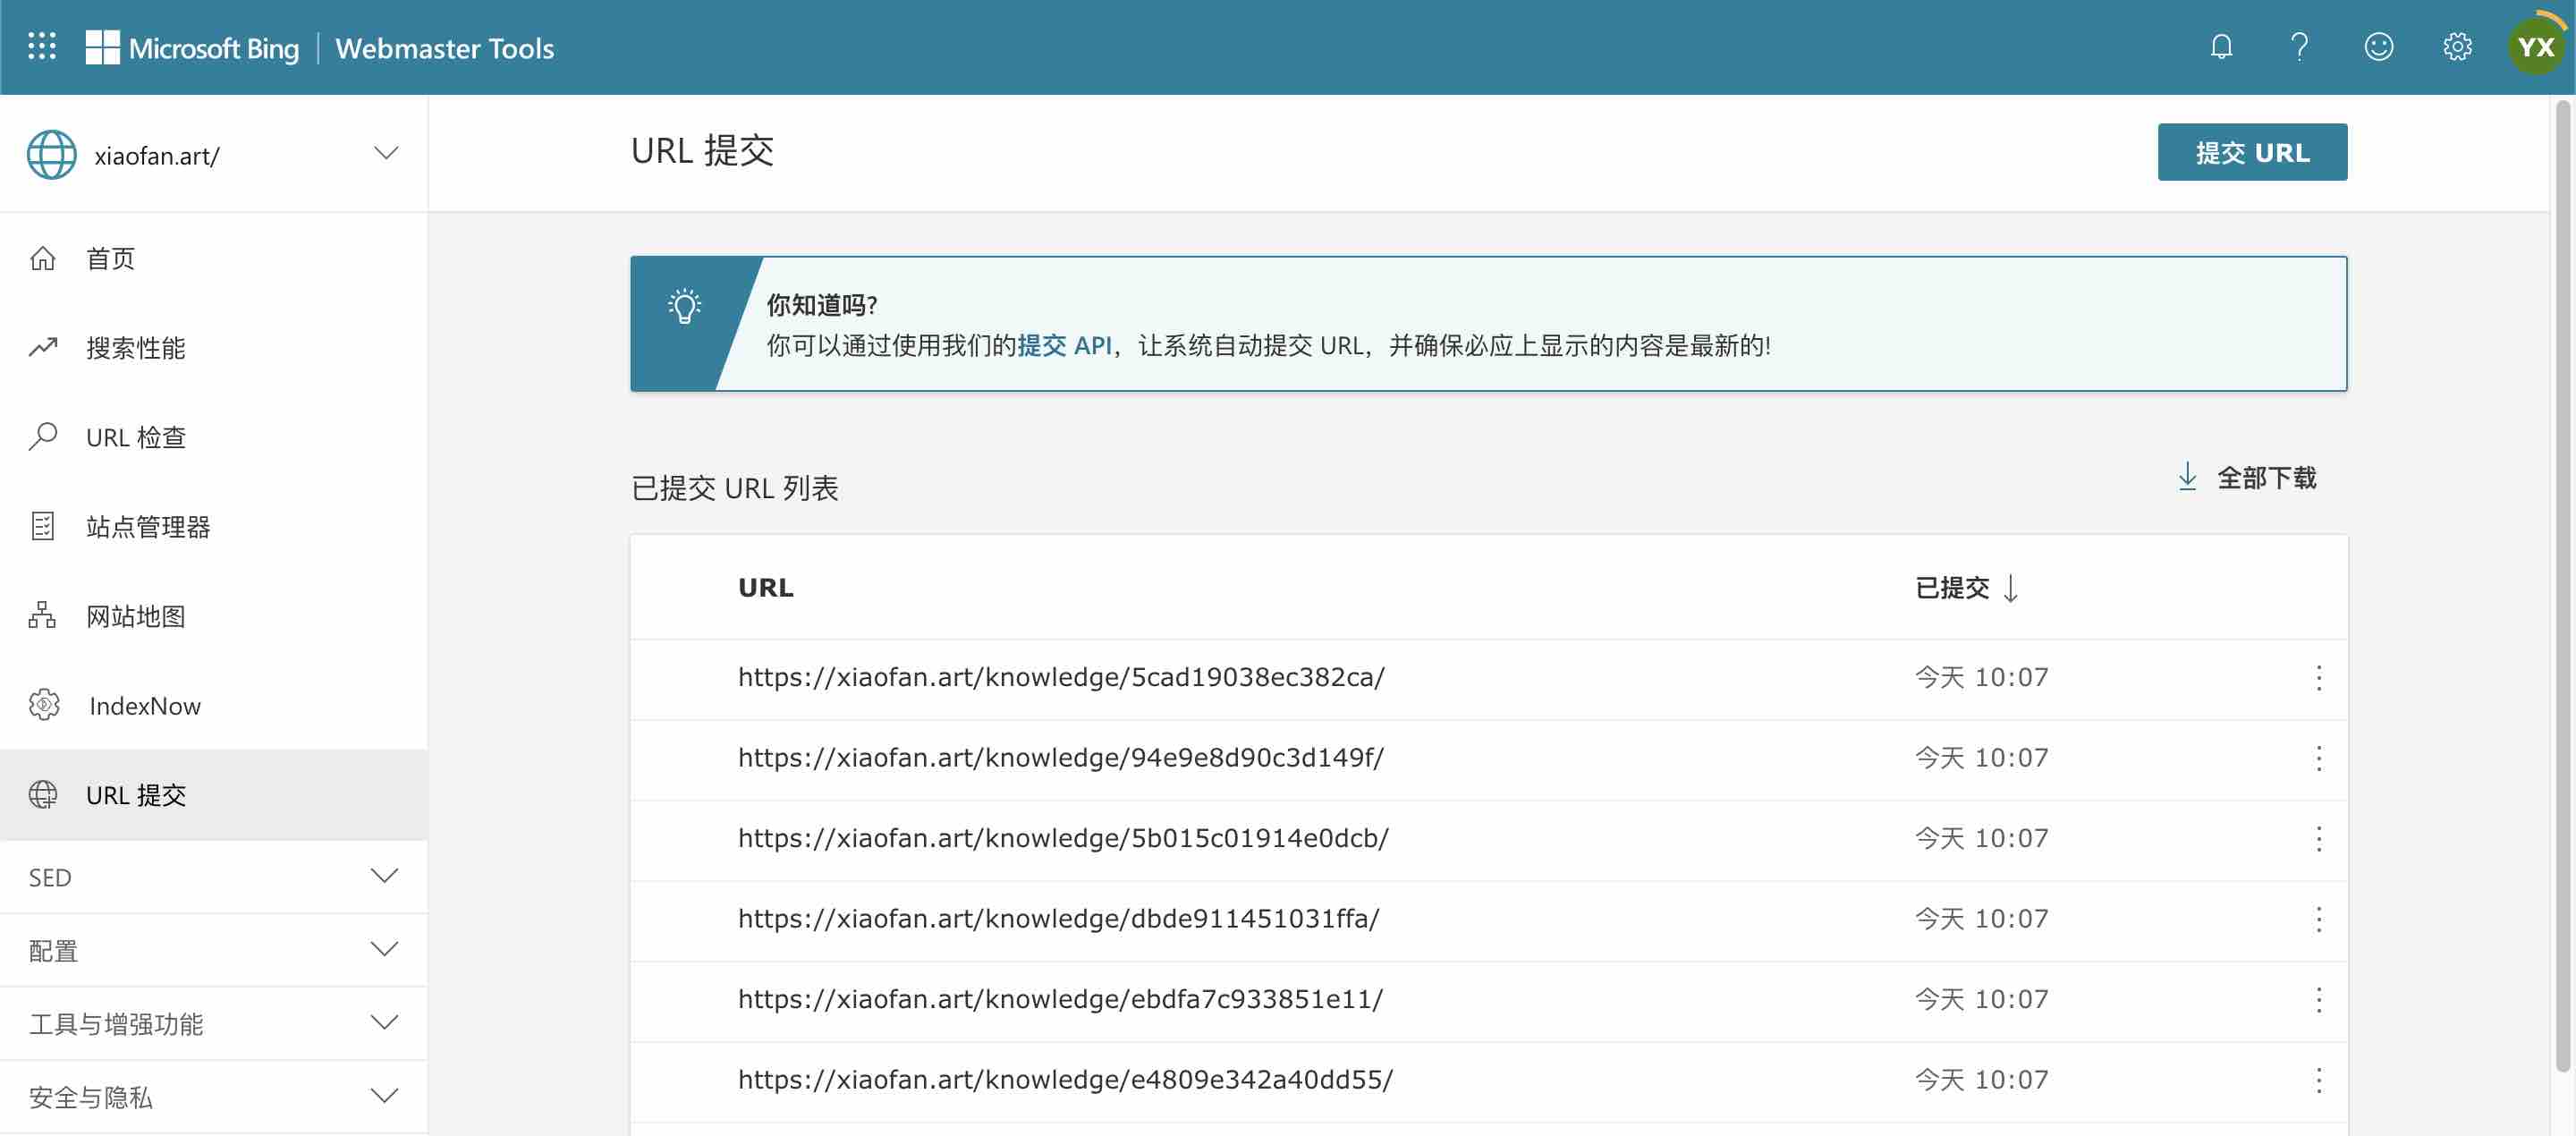
必应页面结果
打开Home - Bing Webmaster Tools, URL提交标签
有提交信息说明成功了.
谷歌页面结果
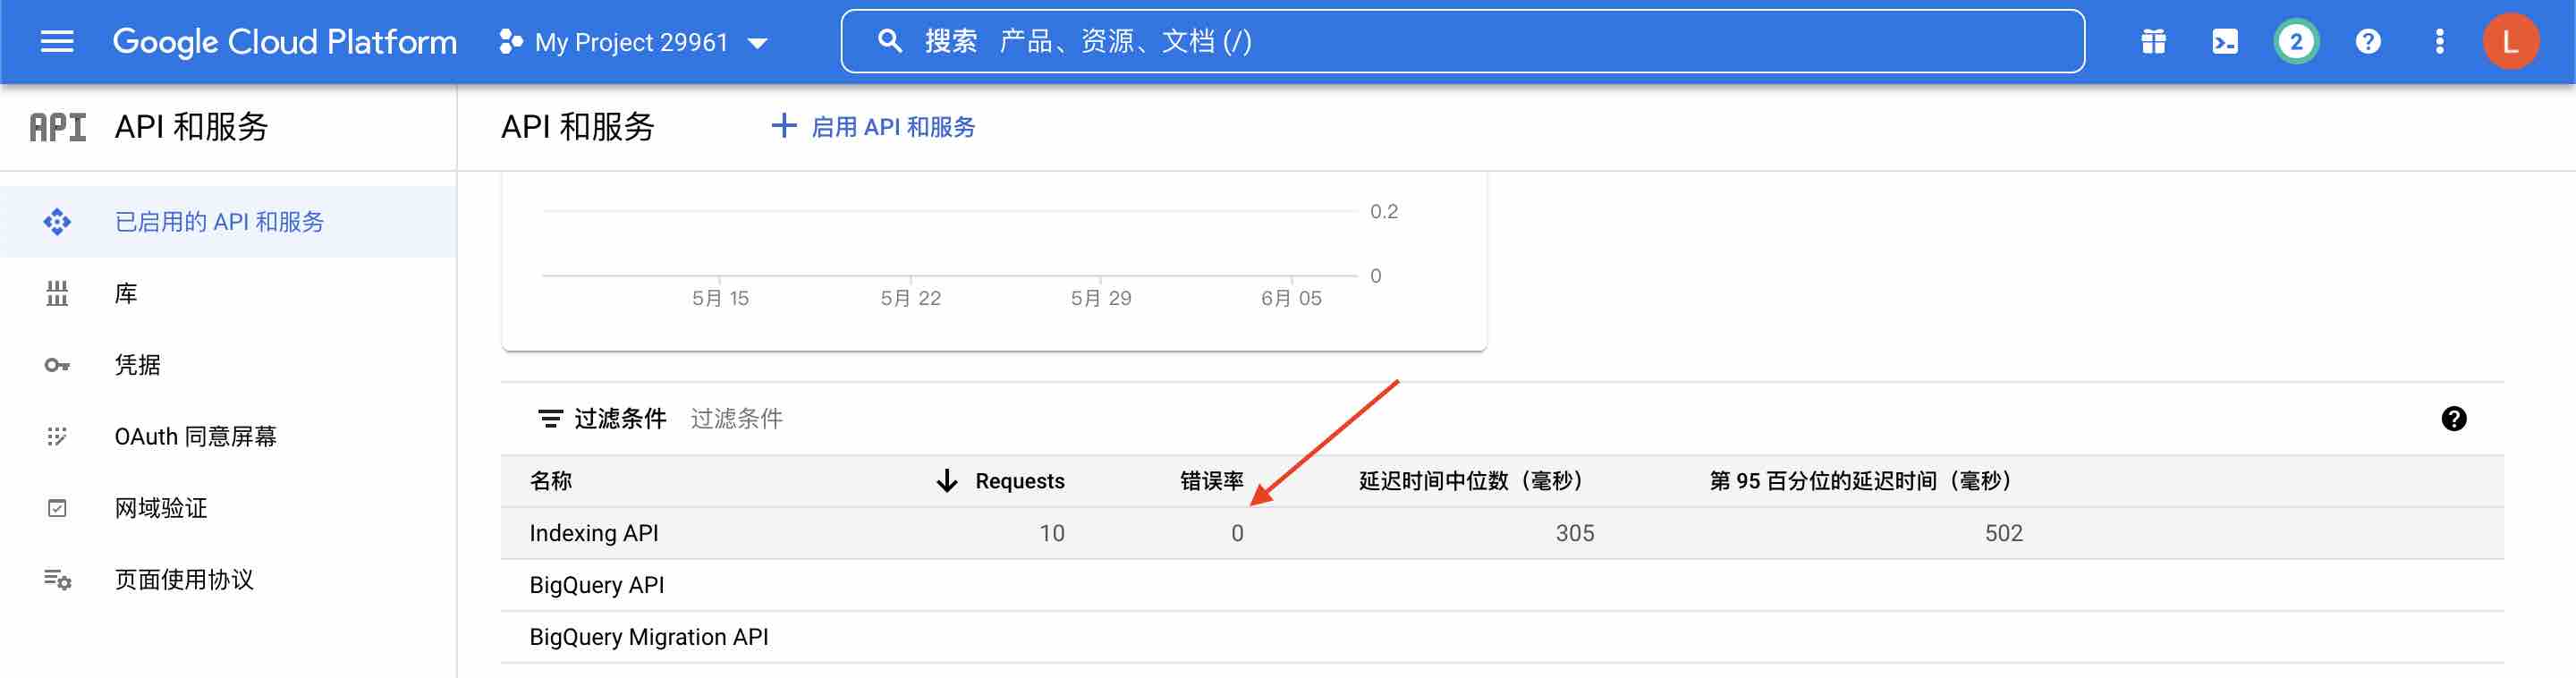
在Google Cloud Platform 中查看.
错误率只要不是100%, 就说明成功了.