
html-webpack-plugin
v5.6.7
Published
Simplifies creation of HTML files to serve your webpack bundles


Readme


![]()
![]()
![]()
npm i --save-dev html-webpack-plugin yarn add --dev html-webpack-plugin npm i --save-dev html-webpack-plugin@4 yarn add --dev html-webpack-plugin@4This is a webpack plugin that simplifies creation of HTML files to serve your webpack bundles. This is especially useful for webpack bundles that include a hash in the filename which changes every compilation. You can either let the plugin generate an HTML file for you, supply
your own template using lodash templates or use your own loader.
Thanks for supporting the ongoing improvements to the html-webpack-plugin!
The html-webpack-plugin works without configuration.
It's a great addition to the ⚙️ webpack-config-plugins.
The html-webpack-plugin provides hooks to extend it to your needs. There are already some really powerful plugins which can be integrated with zero configuration
- webpack-subresource-integrity for enhanced asset security
- appcache-webpack-plugin for iOS and Android offline usage
- favicons-webpack-plugin which generates favicons and icons for iOS, Android and desktop browsers
- html-webpack-harddisk-plugin can be used to always write to disk the html file, useful when webpack-dev-server / HMR are being used
- html-webpack-inline-svg-plugin to inline SVGs in the resulting HTML file.
- html-webpack-exclude-assets-plugin for excluding assets using regular expressions
- html-webpack-include-assets-plugin for including lists of js or css file paths (such as those copied by the copy-webpack-plugin).
- html-webpack-injector to inject chunks in
headorbody(different locations ) of same html document. - resource-hints-webpack-plugin to add resource hints for faster initial page loads using
<link rel='preload'>and<link rel='prefetch'> - link-media-html-webpack-plugin allows for injected stylesheet
<link />tags to have their media attribute set automatically; useful for providing specific desktop/mobile/print etc. stylesheets that the browser will conditionally download - html-webpack-inline-style-plugin for inlining styles to HTML elements using juice. Useful for email generation automatisation.
- html-webpack-exclude-empty-assets-plugin removes empty assets from being added to the html. This fixes some problems with extract-text-plugin with webpack 4.
- webpack-concat-plugin for concat and uglify files that needn't to be webpack bundles(for legacy files) and inject to html-webpack-plugin.
- html-webpack-link-type-plugin adds a configurable mimetype to resources injected as links (such as adding type="text/css" to external stylesheets) for compatibility with "strict mode".
- csp-html-webpack-plugin to add Content Security Policy meta tags to the HTML output
- strict-csp-html-webpack-plugin to add a strict Content-Security-Policy (CSP) as a
metatag to the HTML output. A strict CSP is specifically efficient against XSS attacks. - webpack-nomodule-plugin allows you to add a
nomoduleattribute to specific injected scripts, which prevents the scripts from being loaded by newer browsers. Good for limiting loads of polyfills. - html-webpack-skip-assets-plugin Skip adding certain output files to the html file. Built as a drop-in replacement for html-webpack-exclude-assets-plugin and works with newer html-webpack-plugin versions
- html-webpack-inject-preload allows to add preload links <link rel='preload'> anywhere you want.
- inject-body-webpack-plugin is a simple method of injecting a custom HTML string into the body.
- html-webpack-plugin-django a Webpack plugin to inject Django static tags.
- html-webpack-inject-attributes-plugin add extra attributes to inject assetTags.
- js-entry-webpack-plugin creates webpack bundles into your js entry
The plugin will generate an HTML5 file for you that includes all your webpack
bundles in the head using script tags. Just add the plugin to your webpack
config as follows:
webpack.config.js
const HtmlWebpackPlugin = require("html-webpack-plugin");

module.exports = {
  entry: "index.js",
  output: {
    path: __dirname + "/dist",
    filename: "index_bundle.js",
  },
  plugins: [new HtmlWebpackPlugin()],
};
This will generate a file dist/index.html containing the following
<!doctype html>
<html>
  <head>
    <meta charset="utf-8" />
    <title>Webpack App</title>
    <script defer src="index_bundle.js"></script>
  </head>
  <body></body>
</html>
If you have multiple webpack entry points, they will all be included with script tags in the generated HTML.
If you have any CSS assets in webpack's output (for example, CSS extracted with the mini-css-extract-plugin)
then these will be included with <link> tags in the HTML head.
If you have plugins that make use of it, html-webpack-plugin should be ordered first before any of the integrated Plugins.
You can pass a hash of configuration options to html-webpack-plugin.
Allowed values are as follows:
| Name | Type | Default | Description |
| :----------------------: | :--------------------------------------------------: | :---------------------------------------------------: | :----------------------------------------------------------------------------------------------------------------------------------------------------------------------------------------------------------------------------------------------------------------------------------------------------------------------------------------------------------------------------------------------------------------------------------------------------------------------------------------------------------------------------------------- |
| title | {String} | Webpack App | The title to use for the generated HTML document |
| filename | {String\|Function} | 'index.html' | The file to write the HTML to. Defaults to index.html. You can specify a subdirectory here too (eg: assets/admin.html). The [name] placeholder will be replaced with the entry name. Can also be a function e.g. (entryName) => entryName + '.html'. |
| template | {String} | | `webpack` relative or absolute path to the template. By default it will use `src/index.ejs` if it exists. Please see the [docs](https://github.com/jantimon/html-webpack-plugin/blob/master/docs/template-option.md) for details |
| **`templateContent`** | `{string\|Function\|false}` | false | Can be used instead of `template` to provide an inline template - please read the [Writing Your Own Templates](https://github.com/jantimon/html-webpack-plugin#writing-your-own-templates) section |
| **`templateParameters`** | `{Boolean\|Object\|Function}` | `false` | Allows to overwrite the parameters used in the template - see [example](https://github.com/jantimon/html-webpack-plugin/tree/master/examples/template-parameters) |
| **`inject`** | `{Boolean\|String}` | `true` | `true \|\| 'head' \|\| 'body' \|\| false` Inject all assets into the given `template` or `templateContent`. When passing `'body'` all javascript resources will be placed at the bottom of the body element. `'head'` will place the scripts in the head element. Passing `true` will add it to the head/body depending on the `scriptLoading` option. Passing `false` will disable automatic injections. - see the [inject:false example](https://github.com/jantimon/html-webpack-plugin/tree/master/examples/custom-insertion-position) |
| **`publicPath`** | `{String\|'auto'}` | `'auto'` | The publicPath used for script and link tags |
| **`scriptLoading`** | `{'blocking'\|'defer'\|'module'\|'systemjs-module'}` | `'defer'` | Modern browsers support non blocking javascript loading (`'defer'`) to improve the page startup performance. Setting to `'module'` adds attribute [`type="module"`](https://developer.mozilla.org/en-US/docs/Web/JavaScript/Guide/Modules#applying_the_module_to_your_html). This also implies "defer", since modules are automatically deferred. |
| **`favicon`** | `{String}` | | Adds the given favicon path to the output HTML |
| meta | {Object} | {} | Allows to inject meta-tags. E.g. meta: {viewport: 'width=device-width, initial-scale=1, shrink-to-fit=no'} |
| base | {Object\|String\|false} | false | Inject a base tag. E.g. base: "https://example.com/path/page.html |
| minify | {Boolean\|Object} | true if mode is 'production', otherwise false | Controls if and in what ways the output should be minified. See minification below for more details. |
| hash | {Boolean} | false | If true then append a unique webpack compilation hash to all included scripts and CSS files (i.e. main.js?hash=compilation_hash). This is useful for cache busting |
| cache | {Boolean} | true | Emit the file only if it was changed |
| showErrors | {Boolean} | true | Errors details will be written into the HTML page |
| chunks | {?} | ? | Allows you to add only some chunks (e.g only the unit-test chunk) |
| chunksSortMode | {String\|Function} | auto | Allows to control how chunks should be sorted before they are included to the HTML. Allowed values are 'none' \| 'auto' \| 'manual' \| {Function} |
| excludeChunks | {Array.<string>} | `` | Allows you to skip some chunks (e.g don't add the unit-test chunk) |
| xhtml | {Boolean} | false | If true render the link tags as self-closing (XHTML compliant) |
Here's an example webpack config illustrating how to use these options
webpack.config.js
{
  entry: 'index.js',
  output: {
    path: __dirname + '/dist',
    filename: 'index_bundle.js'
  },
  plugins: [
    new HtmlWebpackPlugin({
      title: 'My App',
      filename: 'assets/admin.html'
    })
  ]
}
Generating Multiple HTML Files
To generate more than one HTML file, declare the plugin more than once in your plugins array
webpack.config.js
{
  entry: 'index.js',
  output: {
    path: __dirname + '/dist',
    filename: 'index_bundle.js'
  },
  plugins: [
    new HtmlWebpackPlugin(), // Generates default index.html
    new HtmlWebpackPlugin({  // Also generate a test.html
      filename: 'test.html',
      template: 'src/assets/test.html'
    })
  ]
}
Writing Your Own Templates
If the default generated HTML doesn't meet your needs you can supply
your own template. The easiest way is to use the template option and pass a custom HTML file.
The html-webpack-plugin will automatically inject all necessary CSS, JS, manifest
and favicon files into the markup.
Details of other template loaders are documented here.
plugins: [
  new HtmlWebpackPlugin({
    title: "Custom template",
    // Load a custom template (lodash by default)
    template: "index.html",
  }),
];
index.html
<!doctype html>
<html>
  <head>
    <meta charset="utf-8" />
    <title><%= htmlWebpackPlugin.options.title %></title>
  </head>
  <body></body>
</html>
If you already have a template loader, you can use it to parse the template.
Please note that this will also happen if you specify the html-loader and use .html file as template.
webpack.config.js
module: {
  loaders: [
    { test: /\.hbs$/, loader: "handlebars-loader" }
  ]
},
plugins: [
  new HtmlWebpackPlugin({
    title: 'Custom template using Handlebars',
    template: 'index.hbs'
  })
]
You can use the lodash syntax out of the box. If the inject feature doesn't fit your needs and you want full control over the asset placement use the default template of the html-webpack-template project as a starting point for writing your own.
The following variables are available in the template by default (you can extend them using the templateParameters option):
htmlWebpackPlugin: data specific to this pluginhtmlWebpackPlugin.options: the options hash that was passed to the plugin. In addition to the options actually used by this plugin, you can use this hash to pass arbitrary data through to your template.htmlWebpackPlugin.tags: the preparedheadTagsandbodyTagsArray to render the<base>,<meta>,<script>and<link>tags. Can be used directly in templates and literals. For example:<html> <head> <%= htmlWebpackPlugin.tags.headTags %> </head> <body> <%= htmlWebpackPlugin.tags.bodyTags %> </body> </html>htmlWebpackPlugin.files: direct access to the files used during the compilation.publicPath: string; js: string[]; css: string[]; manifest?: string; favicon?: string;
webpackConfig: the webpack configuration that was used for this compilation. This can be used, for example, to get thepublicPath(webpackConfig.output.publicPath).compilation: the webpack compilation object. This can be used, for example, to get the contents of processed assets and inline them directly in the page, throughcompilation.assets[...].source()(see the inline template example).
The template can also be directly inlined directly into the options object.
⚠️ templateContent does not allow to use webpack loaders for your template and will not watch for template file changes
webpack.config.js
new HtmlWebpackPlugin({
  templateContent: `
    <html>
      <body>
        <h1>Hello World</h1>
      </body>
    </html>
  `,
});
The templateContent can also access all templateParameters values.
⚠️ templateContent does not allow to use webpack loaders for your template and will not watch for template file changes
webpack.config.js
new HtmlWebpackPlugin({
  inject: false,
  templateContent: ({ htmlWebpackPlugin }) => `
    <html>
      <head>
        ${htmlWebpackPlugin.tags.headTags}
      </head>
      <body>
        <h1>Hello World</h1>
        ${htmlWebpackPlugin.tags.bodyTags}
      </body>
    </html>
  `,
});
Filtering Chunks
To include only certain chunks you can limit the chunks being used
webpack.config.js
plugins: [
  new HtmlWebpackPlugin({
    chunks: ["app"],
  }),
];
It is also possible to exclude certain chunks by setting the excludeChunks option
webpack.config.js
plugins: [
  new HtmlWebpackPlugin({
    excludeChunks: ["dev-helper"],
  }),
];
Minification
If the minify option is set to true (the default when webpack's mode is 'production'),
the generated HTML will be minified using html-minifier-terser
and the following options:
{
  collapseWhitespace: true,
  keepClosingSlash: true,
  removeComments: true,
  removeRedundantAttributes: true,
  removeScriptTypeAttributes: true,
  removeStyleLinkTypeAttributes: true,
  useShortDoctype: true
}
To use custom html-minifier options
pass an object to minify instead. This object will not be merged with the defaults above.
To disable minification during production mode set the minify option to false.
Meta Tags
If the meta option is set the html-webpack-plugin will inject meta tags.
For the default template the html-webpack-plugin will already provide a default for the viewport meta tag.
Please take a look at this well maintained list of almost all possible meta tags.
name/content meta tags
Most meta tags are configured by setting a name and a content attribute.
To add those use a key/value pair:
webpack.config.js
plugins: [
  new HtmlWebpackPlugin({
    meta: {
      viewport: "width=device-width, initial-scale=1, shrink-to-fit=no",
      // Will generate: <meta name="viewport" content="width=device-width, initial-scale=1, shrink-to-fit=no">
      "theme-color": "#4285f4",
      // Will generate: <meta name="theme-color" content="#4285f4">
    },
  }),
];
Simulate http response headers
The http-equiv attribute is essentially used to simulate a HTTP response header.
This format is supported using an object notation which allows you to add any attribute:
webpack.config.js
plugins: [
  new HtmlWebpackPlugin({
    meta: {
      "Content-Security-Policy": {
        "http-equiv": "Content-Security-Policy",
        content: "default-src https:",
      },
      // Will generate: <meta http-equiv="Content-Security-Policy" content="default-src https:">
      // Which equals to the following http header: `Content-Security-Policy: default-src https:`
      "set-cookie": {
        "http-equiv": "set-cookie",
        content: "name=value; expires=date; path=url",
      },
      // Will generate: <meta http-equiv="set-cookie" content="value; expires=date; path=url">
      // Which equals to the following http header: `set-cookie: value; expires=date; path=url`
    },
  }),
];
Base Tag
When the base option is used,
html-webpack-plugin will inject a base tag.
By default, a base tag will not be injected.
The following two are identical and will both insert <base href="http://example.com/some/page.html">:
new HtmlWebpackPlugin({
  base: "http://example.com/some/page.html",
});
new HtmlWebpackPlugin({
base: { href: "http://example.com/some/page.html" },
});The target can be specified with the corresponding key:
new HtmlWebpackPlugin({
  base: {
    href: "http://example.com/some/page.html",
    target: "_blank",
  },
});
which will inject the element <base href="http://example.com/some/page.html" target="_blank">.
Long Term Caching
For long term caching add contenthash to the filename.
Example:
plugins: [
  new HtmlWebpackPlugin({
    filename: "index.[contenthash].html",
  }),
];
contenthash is the hash of the content of the output file.
Refer webpack's Template Strings for more details
Events
To allow other plugins to alter the HTML this plugin executes tapable hooks.
The lib/hooks.js contains all information about which values are passed.
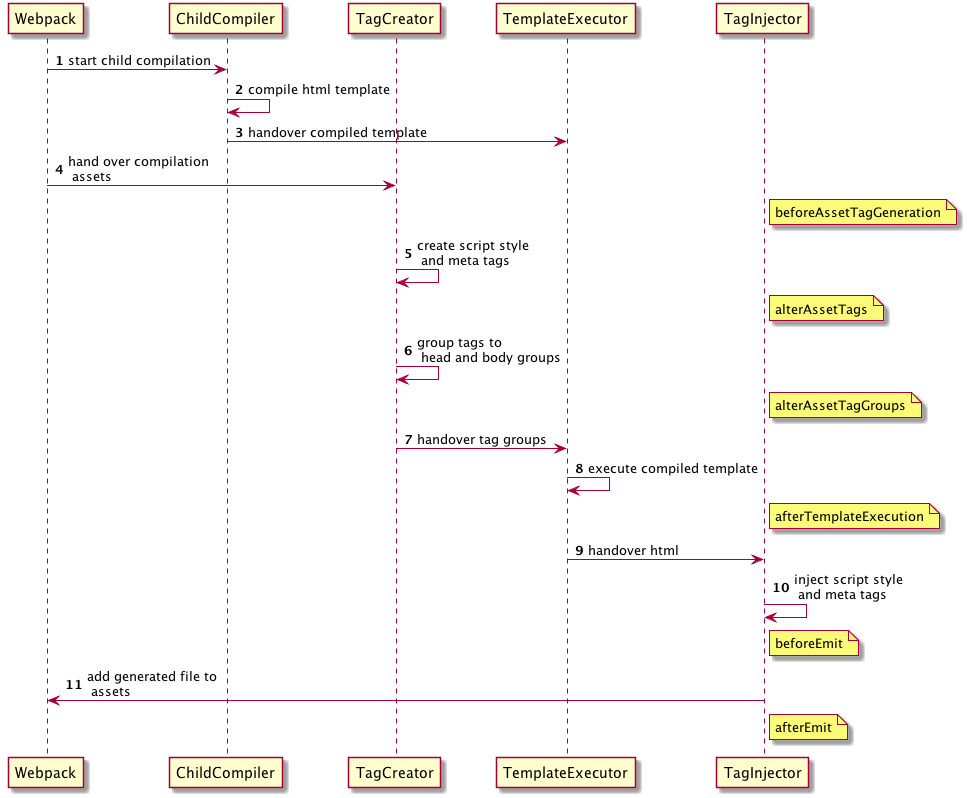
beforeAssetTagGeneration hook
    AsyncSeriesWaterfallHook<{
      assets: {
        publicPath: string,
        js: Array<{string}>,
        css: Array<{string}>,
        favicon?: string | undefined,
        manifest?: string | undefined
      },
      outputName: string,
      plugin: HtmlWebpackPlugin
    }>
alterAssetTags hook
    AsyncSeriesWaterfallHook<{
      assetTags: {
        scripts: Array<HtmlTagObject>,
        styles: Array<HtmlTagObject>,
        meta: Array<HtmlTagObject>,
      },
      publicPath: string,
      outputName: string,
      plugin: HtmlWebpackPlugin
    }>
alterAssetTagGroups hook
    AsyncSeriesWaterfallHook<{
      headTags: Array<HtmlTagObject | HtmlTagObject>,
      bodyTags: Array<HtmlTagObject | HtmlTagObject>,
      publicPath: string,
      outputName: string,
      plugin: HtmlWebpackPlugin
    }>
afterTemplateExecution hook
    AsyncSeriesWaterfallHook<{
      html: string,
      headTags: Array<HtmlTagObject | HtmlTagObject>,
      bodyTags: Array<HtmlTagObject | HtmlTagObject>,
      outputName: string,
      plugin: HtmlWebpackPlugin,
    }>
beforeEmit hook
    AsyncSeriesWaterfallHook<{
      html: string,
      outputName: string,
      plugin: HtmlWebpackPlugin,
    }>
afterEmit hook
    AsyncSeriesWaterfallHook<{
      outputName: string,
      plugin: HtmlWebpackPlugin
    }>
Example implementation: webpack-subresource-integrity
plugin.js
// If your plugin is direct dependent to the html webpack plugin:
const HtmlWebpackPlugin = require("html-webpack-plugin");
// If your plugin is using html-webpack-plugin as an optional dependency
// you can use https://github.com/tallesl/node-safe-require instead:
const HtmlWebpackPlugin = require("safe-require")("html-webpack-plugin");

class MyPlugin {
  apply(compiler) {
    compiler.hooks.compilation.tap("MyPlugin", (compilation) => {
      console.log("The compiler is starting a new compilation...");

      // Static Plugin interface |compilation |HOOK NAME | register listener
      HtmlWebpackPlugin.getCompilationHooks(compilation).beforeEmit.tapAsync(
        "MyPlugin", // <-- Set a meaningful name here for stacktraces
        (data, cb) => {
          // Manipulate the content
          data.html += "The Magic Footer";
          // Tell webpack to move on
          cb(null, data);
        },
      );
    });
  }
}

module.exports = MyPlugin;
webpack.config.js
plugins: [new MyPlugin({ options: "" })];Note that the callback must be passed the HtmlWebpackPluginData in order to pass this onto any other plugins listening on the same beforeEmit event
Backers
Thank you to all our backers!
If you want to support the project as well become a sponsor or a a backer.
Contributors
This project exists thanks to all the people who contribute.
You're free to contribute to this project by submitting issues and/or pull requests. This project is test-driven, so keep in mind that every change and new feature should be covered by tests.