
js-web-screen-shot
v2.0.2
Published
web端自定义截屏插件(原生JS版)
Maintainers
 likaia
Readme
js-web-screen-shot · 


web端自定义截屏插件(原生JS版),运行视频:实现web端自定义截屏功能 ,效果图如下:
写在前面
关于此插件的更多介绍以及实现原理请移步:
注意⚠️:本文档并非最新的,最新文档请移步官网
插件安装
pnpm add js-web-screen-shot

# or

npm install js-web-screen-shot --save
插件使用
由于插件采用原生js编写且不依赖任何第三方库,因此它可以在任意一台支持js的设备上运行。
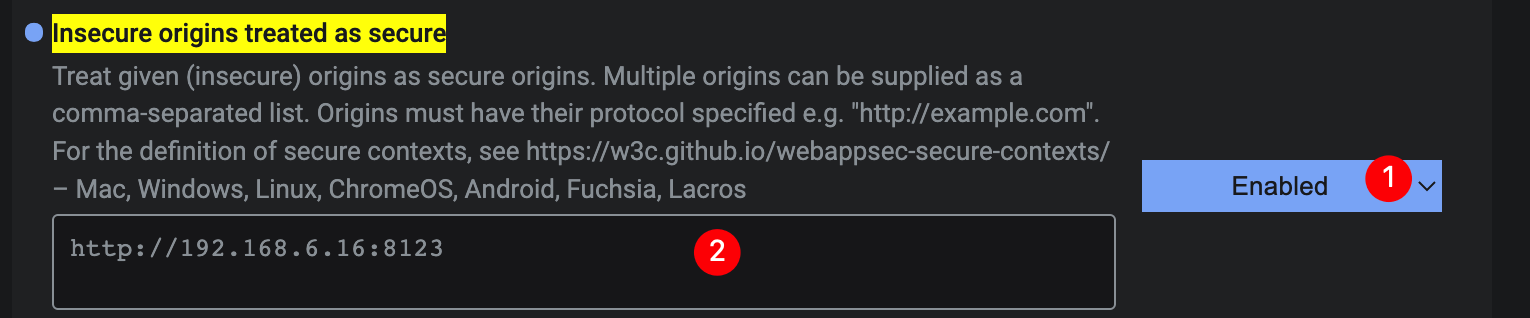
注意⚠️: 如果需要使用插件的webrtc模式或者截图写入剪切板功能,需要你的网站运行在
https环境或者localhost环境。当然,也可以通过修改浏览器设置的方式实现在所有环境下都能运行。步骤如下: 1.打开谷歌浏览器,在地址栏输入chrome://flags/#unsafely-treat-insecure-origin-as-secure2.在打开的界面中:下拉框选择enabled,地址填写你的项目访问路径。
import形式使用插件
- 在需要使用截屏插件的业务代码中导入插件
import ScreenShot from "js-web-screen-shot";- 在业务代码中使用时实例化插件即可
new ScreenShot();⚠️注意:实例化插件时一定要等dom加载完成,否则插件无法正常工作。
cdn形式使用插件
- 将插件的
dist文件夹复制到你的项目中 - 使用
script标签引入dist目录下的screenShotPlugin.umd.js文件
<script src="./screenShotPlugin.umd.js"></script>- 在业务代码中使用时实例化插件即可
// 截图确认按钮回调函数
const callback = ({base64, cutInfo})=>{
  console.log(base64, cutInfo);
}
// 截图取消时的回调函数
const closeFn = ()=>{
  console.log("截图窗口关闭");
}
new screenShotPlugin({
  capture: {
    source: "display-media"
  },
  completeCallback: callback,
  closeCallback: closeFn
});
⚠️注意:实例化插件时一定要等dom加载完成,否则插件无法正常工作。
推荐的 capture 配置
从 2.0.0 开始,推荐优先使用 capture 来描述截图来源与渲染策略:
new ScreenShot({
  capture: {
    source: "display-media",
    render: "browser-frame"
  }
});
capture 支持的配置如下:
sourcedisplay-media浏览器原生屏幕捕获injected-stream外部传入屏幕流,适合Electrondom使用html2canvas渲染当前页面snapdom使用 SnapDOM 渲染当前页面image使用外部传入的图片内容
renderbrowser-frame当前标签页截图window-frame窗口截图
cursor- 屏幕捕获流是否包含鼠标指针,值为
never | motion | always,默认never - 仅对
source: "display-media"生效;injected-stream模式下需要在创建外部流时自行处理
- 屏幕捕获流是否包含鼠标指针,值为
stream- 当
source为injected-stream时必传
- 当
imageSrc- 当
source为image时必传
- 当
snapdom- 当
source为snapdom时可传,值为 SnapDOM 导出的snapdom对象;不传时会读取window.snapdom
- 当
snapdomOptions- 当
source为snapdom时可传,值为 SnapDOM 的截图配置
- 当
旧参数
enableWebRtc、screenFlow、imgSrc、wrcWindowMode仍然兼容,但已经进入废弃迁移阶段。新项目请直接使用capture,旧参数将在后续版本中移除。
electron环境下使用插件
由于electron环境下无法直接调用webrtc来获取屏幕流,因此需要调用者自己稍作处理,具体做法如下所示:
- 直接获取设备的窗口,主线程发送一个IPC消息handle
// electron主线程
import { desktopCapturer, webContents } from "electron";

// 修复electron18.0.0-beta.5 之后版本的BUG: 无法获取当前程序页面视频流
const selfWindws = async () =>
        await Promise.all(
                webContents
                        .getAllWebContents()
                        .filter(item => {
                          const win = BrowserWindow.fromWebContents(item);
                          return win && win.isVisible();
                        })
                        .map(async item => {
                          const win = BrowserWindow.fromWebContents(item);
                          const thumbnail = await win?.capturePage();
                          // 当程序窗口打开DevTool的时候  也会计入
                          return {
                            name:
                                    win?.getTitle() + (item.devToolsWebContents === null ? "" : "-dev"), // 给dev窗口加上后缀
                            id: win?.getMediaSourceId(),
                            thumbnail,
                            display_id: "",
                            appIcon: null
                          };
                        })
        );

// 获取设备窗口信息
ipcMain.handle("IPC消息名称", async (_event, _args) => {
  return [
    ...(await desktopCapturer.getSources({ types: ["window", "screen"] })),
    ...(await selfWindws())
  ];
});- 渲染线程(前端)发送消息封装处理(相应写法自己调整)
// xxx.ts
export const getDesktopCapturerSource = async () => {
  return await window.electron.ipcRenderer.invoke<Electron.DesktopCapturerSource[]>("IPC消息名称", []);
}- 获取指定窗口的媒体流
// yyy.ts
export function getInitStream(source: any): Promise<MediaStream | null> {
    return new Promise((resolve, _reject) => {
        // 获取指定窗口的媒体流
        // 此处遵循的是webRTC的接口类型  暂时TS类型没有支持  只能断言成any
        (navigator.mediaDevices as any).getUserMedia({
            audio: false,
            video: {
                mandatory: {
                    chromeMediaSource: 'desktop',
                    chromeMediaSourceId: source.id
                },
            }
        }).then((stream: MediaStream) => {
            resolve(stream);
        }).catch((error: any) => {
            console.log(error);
            resolve(null);
        })
    });
}- 前端调用设备窗口信息
import { getDesktopCapturerSource } from "xxx.ts";
import { getInitStream } from "yyy.ts";
import ScreenShot from "js-web-screen-shot";

export const doScreenShot = async ()=>{
  // 下面这两块自己考虑
  const sources = await getDesktopCapturerSource(); // 这里返回的是设备上的所有窗口信息
  // 这里可以对`sources`数组下面id进行判断  找到当前的electron窗口  这里为了简单直接拿了第一个
  const stream = await getInitStream(sources[0]);

  new ScreenShot({
    capture: {
      source: "injected-stream",
      stream: stream!
    },
    level: 999,
  });
}
capture.cursor只会影响浏览器原生display-media捕获。Electron 通过capture.source = "injected-stream"传入的流已经在外部创建,插件无法再从流里移除鼠标指针。
如果 Electron 截图底图里仍然出现鼠标指针,可以在调用侧用 @nut-tree/nut-js 做兜底:截图前保存当前鼠标位置并移出屏幕区域,等 triggerCallback 触发后再移回。这个逻辑需要放在 Electron 有 Node 能力的一侧执行,并按系统要求授予辅助功能/自动化权限。
import ScreenShot from "js-web-screen-shot";
import { mouse, Point, straightTo } from "@nut-tree/nut-js";
import { getDesktopCapturerSource } from "xxx.ts";
import { getInitStream } from "yyy.ts";

export const doScreenShotWithoutCursor = async () => {
  const previousPosition = await mouse.getPosition();
  await mouse.move(straightTo(new Point(-100, -100)));

  let cursorRestored = false;
  const restoreCursor = async () => {
    if (cursorRestored) return;
    cursorRestored = true;
    await mouse.move(straightTo(previousPosition));
  };

  const sources = await getDesktopCapturerSource();
  const stream = await getInitStream(sources[0]);

  new ScreenShot({
    capture: {
      source: "injected-stream",
      stream: stream!
    },
    triggerCallback: restoreCursor,
    cancelCallback: restoreCursor,
    closeCallback: restoreCursor,
    level: 999
  });
};
如果你的多屏坐标不允许负数位置,可以把 new Point(-100, -100) 换成主屏幕右下角外侧或项目里确认过的屏幕外坐标。
感谢 @Vanisper 提供的在electron环境下使用本插件的兼容思路。
使用 electron 编写 Mac 软件
Mac 全屏场景下,系统菜单栏可能会覆盖截图工具栏。可以通过 menuBarHeight 设置菜单栏高度,插件在计算全屏工具栏位置时会扣除这部分高度。
screenShotIns = new ScreenShot({
  menuBarHeight: 22
});
menuBarHeight 使用逻辑像素,常见 Mac 菜单栏高度是 22,Retina 屏幕视觉尺寸不变;如果开启系统缩放、辅助功能大字号,或使用刘海屏 MacBook,可以按实际项目微调到 24 或更高。
electron示例代码
如果你看完上个章节的使用方法,依然不是很理解的话,这里准备了一份在electron环境下使用本插件的demo,请移步electron-js-web-screen-shot-demo。
兼容移动端
插件对触屏设备做了兼容处理,如果你是pc端的触屏设备可以支持webrtc模式,如果是移动端那么就只能使用html2canvas模式。
import ScreenShot from "js-web-screen-shot";

const config = {
    capture: {
      source: "dom"
    }
};
const screenShotHandler = new ScreenShot(config);
<!DOCTYPE html>
<html lang="zh-CN">
<head>
<!--禁止移动端浏览器的缩放-->
<meta name="viewport" content="user-scalable=no">
</head>
<body>
/body>
</html>注意:在移动端使用时,需要在head标签里禁止浏览器的缩放行为,否则就会出现在使用撤销功能时,多次双击造成界面放大问题。
Vue项目下使用乱码问题
当你vue项目中使用h2c模式进行截图时,画布左上角可能会出现一些奇怪的字符,这是由于noscript标签导致的,将其删除即可。
参数说明
截图插件有一个可选参数,它接受一个对象,对象每个key的作用如下:
capture推荐使用的新截图配置,值为Object类型:source截图来源,值为display-media | injected-stream | dom | snapdom | imagerender渲染策略,值为browser-frame | window-framecursor屏幕捕获流是否包含鼠标指针,值为never | motion | always,默认never,仅对source: "display-media"生效stream当source为injected-stream时必传,值为MediaStreamimageSrc当source为image时必传,值为stringsnapdom当source为snapdom时可传,值为 SnapDOM 导出的snapdom对象;不传时会读取window.snapdomsnapdomOptions当source为snapdom时可传,值为 SnapDOM 的截图配置
enableWebRtc已废弃。旧写法中用于控制是否启用 webrtc,值为boolean类型,值为false则使用html2canvas来截图screenFlow已废弃。旧写法中用于传入设备提供的屏幕流数据(常用于electron环境)completeCallback截图完成回调函数,值为Function类型,最右侧的对号图标点击后会将图片的base64地址与裁剪信息回传给你定义的函数,如果不传的话则会将这些数据放到sessionStorage中,你可以通过下述方式拿到他:
sessionStorage.getItem("screenShotImg");closeCallback截图关闭回调函数,值为Function类型。triggerCallback截图响应回调函数,值为Function类型,使用html2canvas截屏时,页面图片过多时响应会较慢;使用webrtc截屏时用户点了分享,该函数为响应完成后触发的事件。回调函数返回一个对象,类型为:{code: number,msg: string, displaySurface: string | null,displayLabel: string | null},code为0时代表截图加载完成,displaySurface返回的的是当前选择的窗口类型,displayLabel返回的是当前选择的标签页标识,浏览器不支持时此值为null。cancelCallback取消分享回到函数,值为Function类型,使用webrtc模式截屏时,用户点了取消或者浏览器不支持时所触发的事件。回调函数返回一个对象,类型为:{code: number,msg: string, errorInfo: string},code为-1时代表用户未授权或者浏览器不支持webrtc。saveCallback保存截图回调函数,值为Function类型。回调函数中返回三个参数:code状态码,number类型,为0时代表保存成功msg消息码,string类型。base64截图的base64信息,string类型。
level截图容器层级,值为number类型。cutBoxBdColor裁剪区域边框像素点颜色,值为string类型。maxUndoNum最大可撤销次数, 值为number类型canvasWidth画布宽度,值为number类型,必须与高度一起设置,单独设置无效。canvasHeight画布高度,值为number类型,必须与宽度一起设置,单独设置无效。position截图容器位置,值为{left?: number, top?: number}类型clickCutFullScreen单击截全屏启用状态,值为boolean类型, 默认为falsehiddenToolIco需要隐藏的截图工具栏图标,值为Object类型,默认为{}。传你需要隐藏的图标名称,将值设为true即可,除关闭图标外,其他图标均可隐藏。可隐藏的key如下所示:square矩形绘制round圆形绘制rightTop箭头绘制brush涂鸦mosaicPen马赛克工具text文本工具separateLine分割线save下载图片undo撤销工具confirm保存图片
showScreenData截图组件加载完毕后,是否显示截图内容至canvas画布内,值为boolean类型,默认为false。customRightClickEvent自定义容器的右键点击事件,值为Object类型,接受2个参数:state是否拦截右键点击,值为boolean类型,默认为false。handleFn拦截后的事件处理函数,该属性为可选项,如果不传,默认行为是销毁组件。
imgSrc已废弃。旧写法中用于传入截图内容(例如electron环境下已有图片数据)。“新写法”请改用capture.imageSrcloadCrossImg是否加载跨域图片,值为boolean类型,默认为false。proxyUrl代理服务器地址,值为string类型,默认为""screenShotDom需要进行截图的容器,值为HTMLElement类型,默认使用的是body。useRatioArrow是否使用等比例箭头, 默认为false(递增变粗的箭头)。imgAutoFit是否开启图片自适应, 默认为false。如果自定义了截图内容,浏览器的缩放比例不为100%时,可以设置此参数来修复图片与蒙板大小不一致的问题。cropBoxInfo初始裁剪框,值为{ x: number; y: number; w: number; h: number }类型,默认不加载。wrcReplyTimewebrtc模式捕捉屏幕时的响应时间,值为number类型,默认为500ms。wrcImgPositionwebrtc模式下是否需要对图像进行裁剪,值为{ x: number; y: number; w: number; h: number }类型,默认为不裁剪。noScroll是否禁止页面滚动,值为boolean类型,默认为false。maskColor蒙层颜色,值为{ r: number; g: number; b: number; a: number }类型,默认为:{ r: 0; g: 0; b: 0; a: 0.6 }toolPosition工具栏展示位置,值为string类型,默认为居中展示,提供三个选项:left左对齐于裁剪框center居中对齐于裁剪框right右对齐于裁剪框
writeBase64是否将截图内容写入剪切板,值为boolean类型,默认为trueexportOptions截图导出配置,值为Object类型:type导出图片类型,值为image/png | image/jpeg | image/webp,默认为image/pngquality导出图片质量,值为0 ~ 1之间的数字,默认为0.75。该参数主要对image/jpeg和image/webp生效,image/png通常会忽略质量参数。
wrcWindowMode已废弃。旧写法中用于启用窗口截图模式。新写法请改用capture.render = "window-frame"hiddenScrollBar是否隐藏滚动条,用webrtc模式截图时chrome 112版本的浏览器在部分系统下会挤压出现滚动条,如果出现你可以尝试通过此参数来进行修复。值为Object类型,有4个属性:state: boolean; 启用状态, 默认为falsefillState?: boolean; 填充状态,默认为falsecolor?: string; 填充层颜色,滚动条隐藏后可能会出现空缺,需要进行填充,默认填充色为黑色。fillWidth?: number; 填充层宽度,默认为截图容器的宽度fillHeight?: number; 填充层高度,默认为空缺区域的高度
使用当前标签页进行截图相对而言用户体验是最好的,但是因为
chrome 112版本的bug会造成页面内容挤压导致截取到的内容不完整,因此只能采用其他方案来解决此问题了。wrcWindowMode和hiddenScrollBar都可以解决这个问题。
wrcWindowMode方案会更完美些,但是用户授权时会出现其他的应用程序选项,用户体验会差一些hiddenScrollBar方案还是采用标签页截图,但是会造成内容挤压,底部出现空白。两种方案的优点与缺点讲完了,最好的办法还是希望
chrome能在之后的版本更新中修复此问题。
迁移建议
如果你正在从旧参数迁移到新参数,可以按下面的映射来替换:
enableWebRtc: true->capture.source: "display-media"enableWebRtc: false->capture.source: "dom"screenFlow->capture.source: "injected-stream" + capture.streamimgSrc->capture.source: "image" + capture.imageSrcwrcWindowMode: true->capture.render: "window-frame"wrcWindowMode: false->capture.render: "browser-frame"
当前版本仍兼容旧参数,但运行时会给出废弃提示。建议尽快切换到
capture,旧参数将在不久的将来移除。
上述类型中的
?:为ts中的可选类型,意思为:这个key是可选的,如果需要就传,不需要就不传。
imgSrc是url时,如果图片资源跨域了,必须让图片服务器允许跨域才能正常加载。同样的loadCrossImg设置为true时,图片资源跨域了也需要让图片服务器允许跨域。
快捷键监听
插件容器监听了三个快捷键,如下所示:
Esc,按下键盘上的esc键时,等同于点了工具栏的关闭图标。Enter,按下键盘上的enter键时,等同于点了截图工具栏的确认图标。Ctrl/Command + z,按下这两个组合键时,等同于点了截图工具栏的撤销图标。
额外提供的API
插件暴露了一些内部变量出来,便于调用者根据自己的需求进行修改。
getCanvasController
该函数用于获取截图容器的DOM,返回值为HTMLCanvasElement类型。
示例代码:
import ScreenShot from "js-web-screen-shot";

const screenShotHandler = new ScreenShot();
const canvasDom = screenShotHandler.getCanvasController();
注意:如果截图容器尚未加载完毕,获取到的内容可能为null。
destroyComponents
该函数用于销毁截图容器,无返回值。
示例代码:
import ScreenShot from "js-web-screen-shot";

const screenShotHandler = new ScreenShot();
screenShotHandler.destroyComponents()
completeScreenshot
该函数用于将框选区域的截图内容写入剪切版,无返回值。
该方法可以跟cropBoxInfo参数结合起来实现指定位置的自动截图,截图内容默认写入剪切版内,如果你想拿到截取到的base64内容可以通过completeCallback参数拿到,或者直接从sessionStorage中获取。
该回调函数中返回的参数格式如下所示:
- base64
- cutInfo 裁剪框位置参数
- startX
- startY
- width
- height
示例代码:
      const plugin = new screenShotPlugin(
        {
          clickCutFullScreen:true,
          capture: {
            source: "display-media",
            render: "window-frame"
          },
          cropBoxInfo:{x:350, y:20, w:300, h:300},
          completeCallback: ({base64, cutInfo}) => {
            console.log(base64, cutInfo);
          },
          triggerCallback:() => {
            // 截图组件加载完毕调用此方法来完成框选区域的截图
            plugin.completeScreenshot()
          }
        });
注意:此方法在1.9.9版本之后不再返回字符串类型的数据,而是返回的对象格式。
getCutBoxInfo
该函数用于获取当前裁剪框的位置信息,返回值为一个对象:
startXx 点坐标startYy 点坐标width裁剪框宽度height裁剪框高度
示例代码:
import ScreenShot from "js-web-screen-shot";

const screenShotHandler = new ScreenShot();
const info = screenShotHandler.getCutBoxInfo();
工具栏图标定制
如果你需要修改截图工具栏的图标,可以通过覆盖元素css类名的方式实现,插件内所有图标的css类名如下所示:
- square 矩形绘制图标
- round 圆型绘制图标
- right-top 箭头绘制图标
- brush 画笔工具
- mosaicPen 马赛克工具
- text 文本工具
- save 保存
- close 关闭
- undo 撤销
- confirm 确认
以square为例,要修改它的图标,只需要将下述代码添加进你项目代码的样式中即可。
  .square {
    background-image: url("你的图标路径") !important;

    &:hover {
      background-image: url("你的图标路径") !important;
    }

    &:active {
      background-image: url("你的图标路径") !important;
    }
 }
写在最后
至此,插件的所有使用方法就介绍完了,该插件的Vue3版本,请移步:vue-web-screen-shot