
linkgravity
v1.10.2
Published
Discord/Telegram bot bridge for the Antigravity (agy) CLI, with voice interaction support

Maintainers
 sseuldev
Readme
LinkGravity
A Discord, Telegram, and Slack bot interface for the Antigravity agentic AI system. It translates Antigravity CLI prompts into chat UI components and provides voice interaction capabilities.
Features
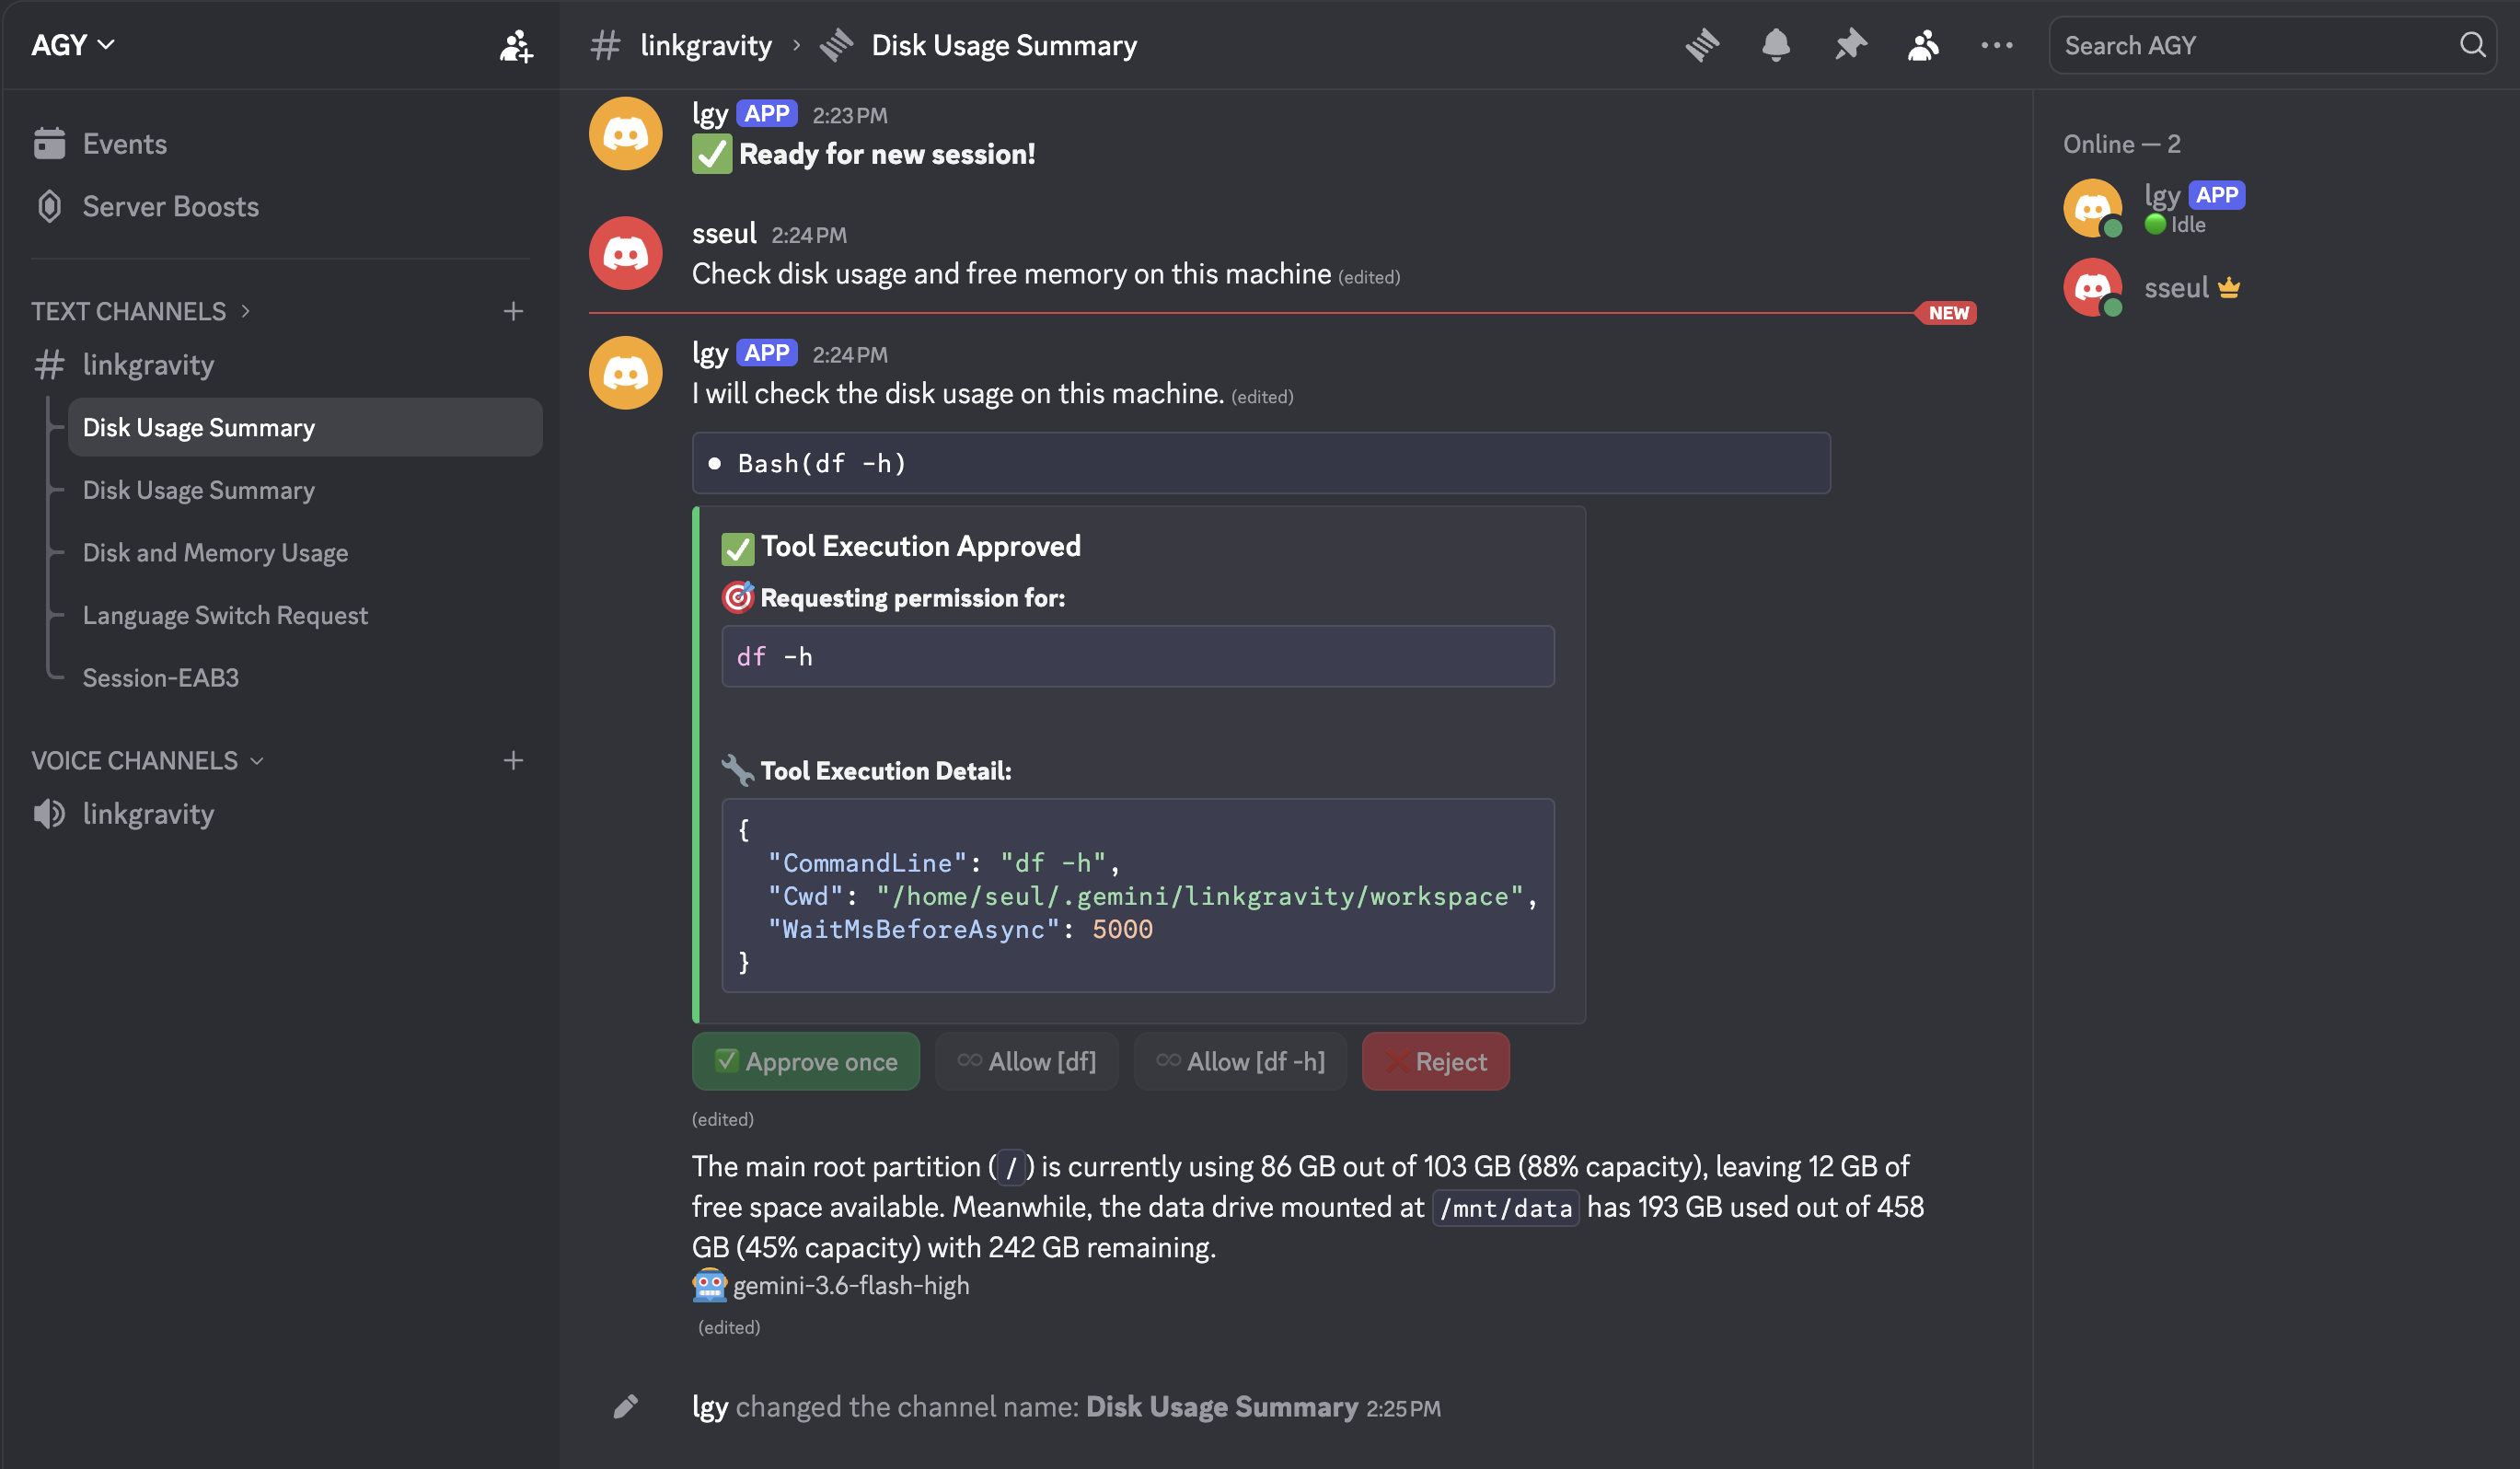
- Sessions as Threads: Each
agyconversation lives in its own thread, so several can run side by side and stay readable later. Threads get named from what you actually talked about instead of stayingSession-XXXX. - Approval Flow: Command and tool-call approvals become interactive chat buttons. Chained shell commands are approved individually, and any approval can be scoped to auto-allow that command or tool going forward - something plain
agydoesn't do. - Voice Interaction: Talk to the agent from a Discord voice channel and hear its replies. Say your wake word to get its attention, so side conversation in the channel doesn't set it off.
- Multi-Modal Input: Attach files for the AI to read, including audio, which gets transcribed to text automatically.
- Files Back to You: Ask for something as a file ("send me that as a PDF") and the agent posts it as a real attachment in the chat.
- Schedules: Ask the agent to do something later or on repeat ("every 3 days at 9", "weekdays at 9", "in 30 minutes"), and manage them the same way ("what's scheduled?", "stop the dust alerts"). They run in the same thread, so you can reply to the result, and checks with nothing to report ("tell me if it rains") stay silent. When one is created you pick with buttons where results go (this chat, or an allowed DM/channel on any connected messenger), which model runs it, and how approvals are handled while you're away.
/scheduleslists, pauses, or deletes them. - Tables: Messengers don't render markdown tables, so tables in a reply are sent as an image, with CSV and Markdown copies attached.
- Same Agent as Your Terminal: Reads the
agysetup already on the machine, so sessions started from chat use the same models and settings you use locally.
Supported Platforms
| | Discord | Telegram | Slack | | ------------------------- | ------- | -------- | ------- | | Sessions | Threads | Flat | Threads | | Voice | ✓ | ✗ | ✗ | | Approval buttons | ✓ | ✓ | ✓ | | File attachments | ✓ | ✓ | ✓ | | Session title auto-rename | ✓ | ✗ | ✓ | | Schedules | ✓ | ✓ | ✓ | | DMs | ✓ | ✓ | ✓ | | Group | ✓ | ✗ | ✓ |
Requirements
- Node.js >= 18
- Python >= 3.10
- Antigravity CLI installed on this machine
- A messenger bot token, and at least one server/channel to allow it in - Discord, Telegram, and Slack are all supported, and you can enable more than one at once
Creating the Discord bot
In the Discord Developer Portal:
- New Application, name it, then go to Bot in the left sidebar.
- Under Privileged Gateway Intents, enable Message Content Intent - required, since the bot reads message text/attachments.
- Click Reset Token to reveal the bot token, and copy it - this is what goes into
lgy setup'sdiscord_token. - Go to OAuth2 > URL Generator in the sidebar. Under Scopes, check bot and applications.commands. Under the Bot Permissions box that appears below, check:
- Send Messages, Send Messages in Threads, Create Public Threads
- Read Message History, Attach Files, Embed Links, Add Reactions
- Connect, Speak (for voice channel support)
- Copy the Generated URL at the bottom of that page, open it in a browser, and invite the bot to your server.
Creating the Telegram bot
Message @BotFather on Telegram, send /newbot, and follow the prompts to get a bot token. No further permission setup is needed - Telegram sessions are 1 chat = 1 session, so just message your bot directly (or add it to a group) and run /new.
Creating the Slack app
Slack has more moving parts than the others - two separate tokens, and a few settings pages that gate each other. Going in this order avoids re-doing steps:
- Go to api.slack.com/apps > Create New App > From scratch, name it, and pick your workspace.
- Socket Mode (left sidebar) > toggle it on. This avoids needing a public HTTP endpoint. Slack will prompt you to generate an app-level token here - name it anything, add the
connections:writescope, and Generate. Copy this token (starts withxapp-) - this isslack_app_token.- If it doesn't prompt you, go to Basic Information > App-Level Tokens > Generate Token and Scopes instead.
- OAuth & Permissions (left sidebar) > scroll to Scopes > Bot Token Scopes (not User Token Scopes - that's a different section further up the page, for a different token, and is not used here). Add an OAuth Scope for each of:
chat:write,channels:history,groups:history,im:history,mpim:history,reactions:write,files:read,files:write. - Scroll to the top of that same page > Install to Workspace > Allow. This generates the token under OAuth Tokens > Bot User OAuth Token, starting with
xoxb-. Copy that one - this isslack_bot_token.- It's easy to grab the wrong token here - the page also shows a User OAuth Token (
xoxp-...) further down, which is a different thing and won't work for this bot.
- It's easy to grab the wrong token here - the page also shows a User OAuth Token (
- App Home (left sidebar) > under Show Tabs, turn on Messages Tab, then check Allow users to send Slash commands and messages from the messages tab - this is what lets you DM the bot at all. (If this section looks greyed out, it's because step 3 hasn't been saved/installed yet - go back and do that first.)
- Event Subscriptions (left sidebar) > toggle Enable Events on > under Subscribe to bot events, add
message.channels,message.groups,message.im, andmessage.mpim> Save Changes. - Slash Commands (left sidebar) > Create New Command, six times, for
/new,/model,/credit,/permissions,/automode, and/schedules(any description/hint text is fine - only the command name matters). - Back on OAuth & Permissions, since scopes/events changed after the initial install, click Reinstall to Workspace to push those changes live. Any time you change scopes or events later, you'll need to repeat this step.
- In Slack itself, for any channel (not DM) you want the bot usable in, run
/invite @<your bot's name>there first - the bot can't post in a channel it hasn't been added to.
Installation
npm install -g linkgravitySets up its own Python environment automatically - no manual pip install needed.
Setup
Run the configuration wizard once to pick which platform(s) to enable and set their tokens, allowed users, and other settings:
lgy setupThis writes to ~/.gemini/linkgravity/lgy.json, outside the package directory, so npm update/reinstall never touches it. You can re-run lgy setup any time to change settings later - each field keeps its current value if you leave it empty. Discord, Telegram, and Slack can all be turned on independently; the bot runs whichever ones are enabled in a single shared process.
For Discord, during setup you'll be asked for one or more servers to allow, and optionally specific channels within each:
- Leave the channel list empty for a server → the whole server is allowed - any channel can start a session.
- List specific channel IDs for a server → only those channels in that server are allowed.
Telegram and Slack have no server/channel gating yet - every chat/channel you message the bot from can start a session, subject to the allowed-users list you set during setup.
A new session is started with the /new slash command - never just by typing a message. On Discord and Slack, /new works both in a regular channel and from inside an existing thread; on Telegram, it applies to whichever chat you send it in.
Usage
lgy start      # Start the bot as a background daemon via PM2
lgy stop       # Stop it
lgy restart    # Restart it
lgy logs       # View live logs - add -f to follow, --tail N for more lines
lgy enable     # Register the bot to auto-start on system boot
lgy disable    # Remove it from system boot
lgy            # Interactive menu - same commands, picked from a list
Development
npm iThat's it - it wires up Ruff for Python and Prettier for Node, plus git hooks that lint/format on commit and enforce Conventional Commits commit messages.
Debugging
LOG_LEVEL=DEBUG lgy startUse lgy logs -t to include timestamps.
Security Warning
This bot gives an AI agent broad access to the machine it runs on - that's inherent to what it does, so don't expose it publicly or run it somewhere you don't fully trust its users.
- The allowed-users list for each platform, set via
lgy setup, is your primary access control - always set it. - Tool calls, including shell commands, go through an approval flow by default; treat anyone on an allowed-users list as having effectively full control of this machine.
- Schedules run while nobody is watching.
readonlyonly lets through read-only tools and commands (search, view files,ls,docker ps, ...), even with/automodeon;autoallows everything except LinkGravity's own config. - Your bot tokens and other settings live in
~/.gemini/linkgravity/lgy.json, outside this repo/package directory - never commit or share that file.