
node-lix
v1.0.1
Published
run in service

Readme
前后端一体化应用
中后台项目中,带有Node的项目,我们总是维护两个js项目:Node项目+View项目
两者之间通过Api地址链接,新的一体化应用,通过特殊的__service__作用域,可以将两者代码写在一起。所有在__service__内部的代码都会在服务器执行
使用lix一体化开发,过去我们需要在两个项目里维护代码,现在可以前后端js代码写在一起。
你可以用下面右侧的写法,来进行你的项目开发。
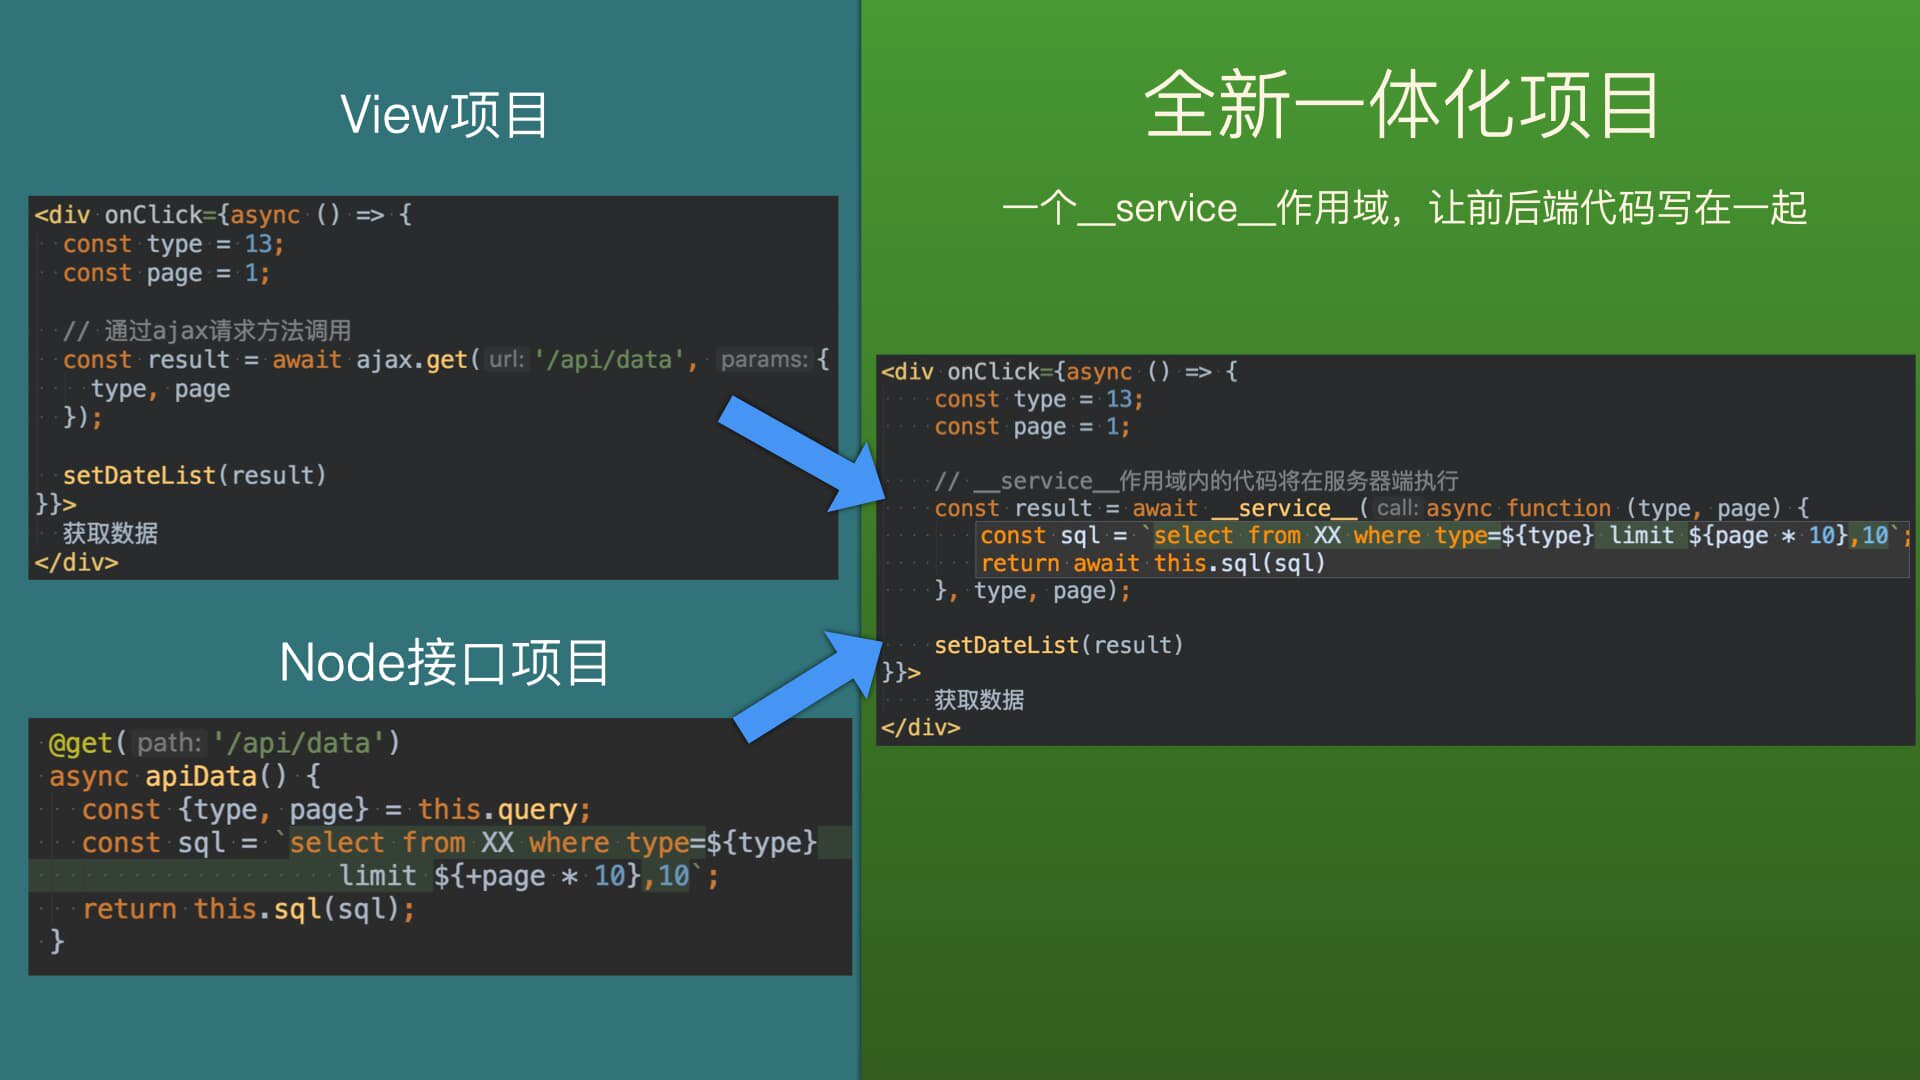
所有在__service__内部的代码都会在服务器端执行
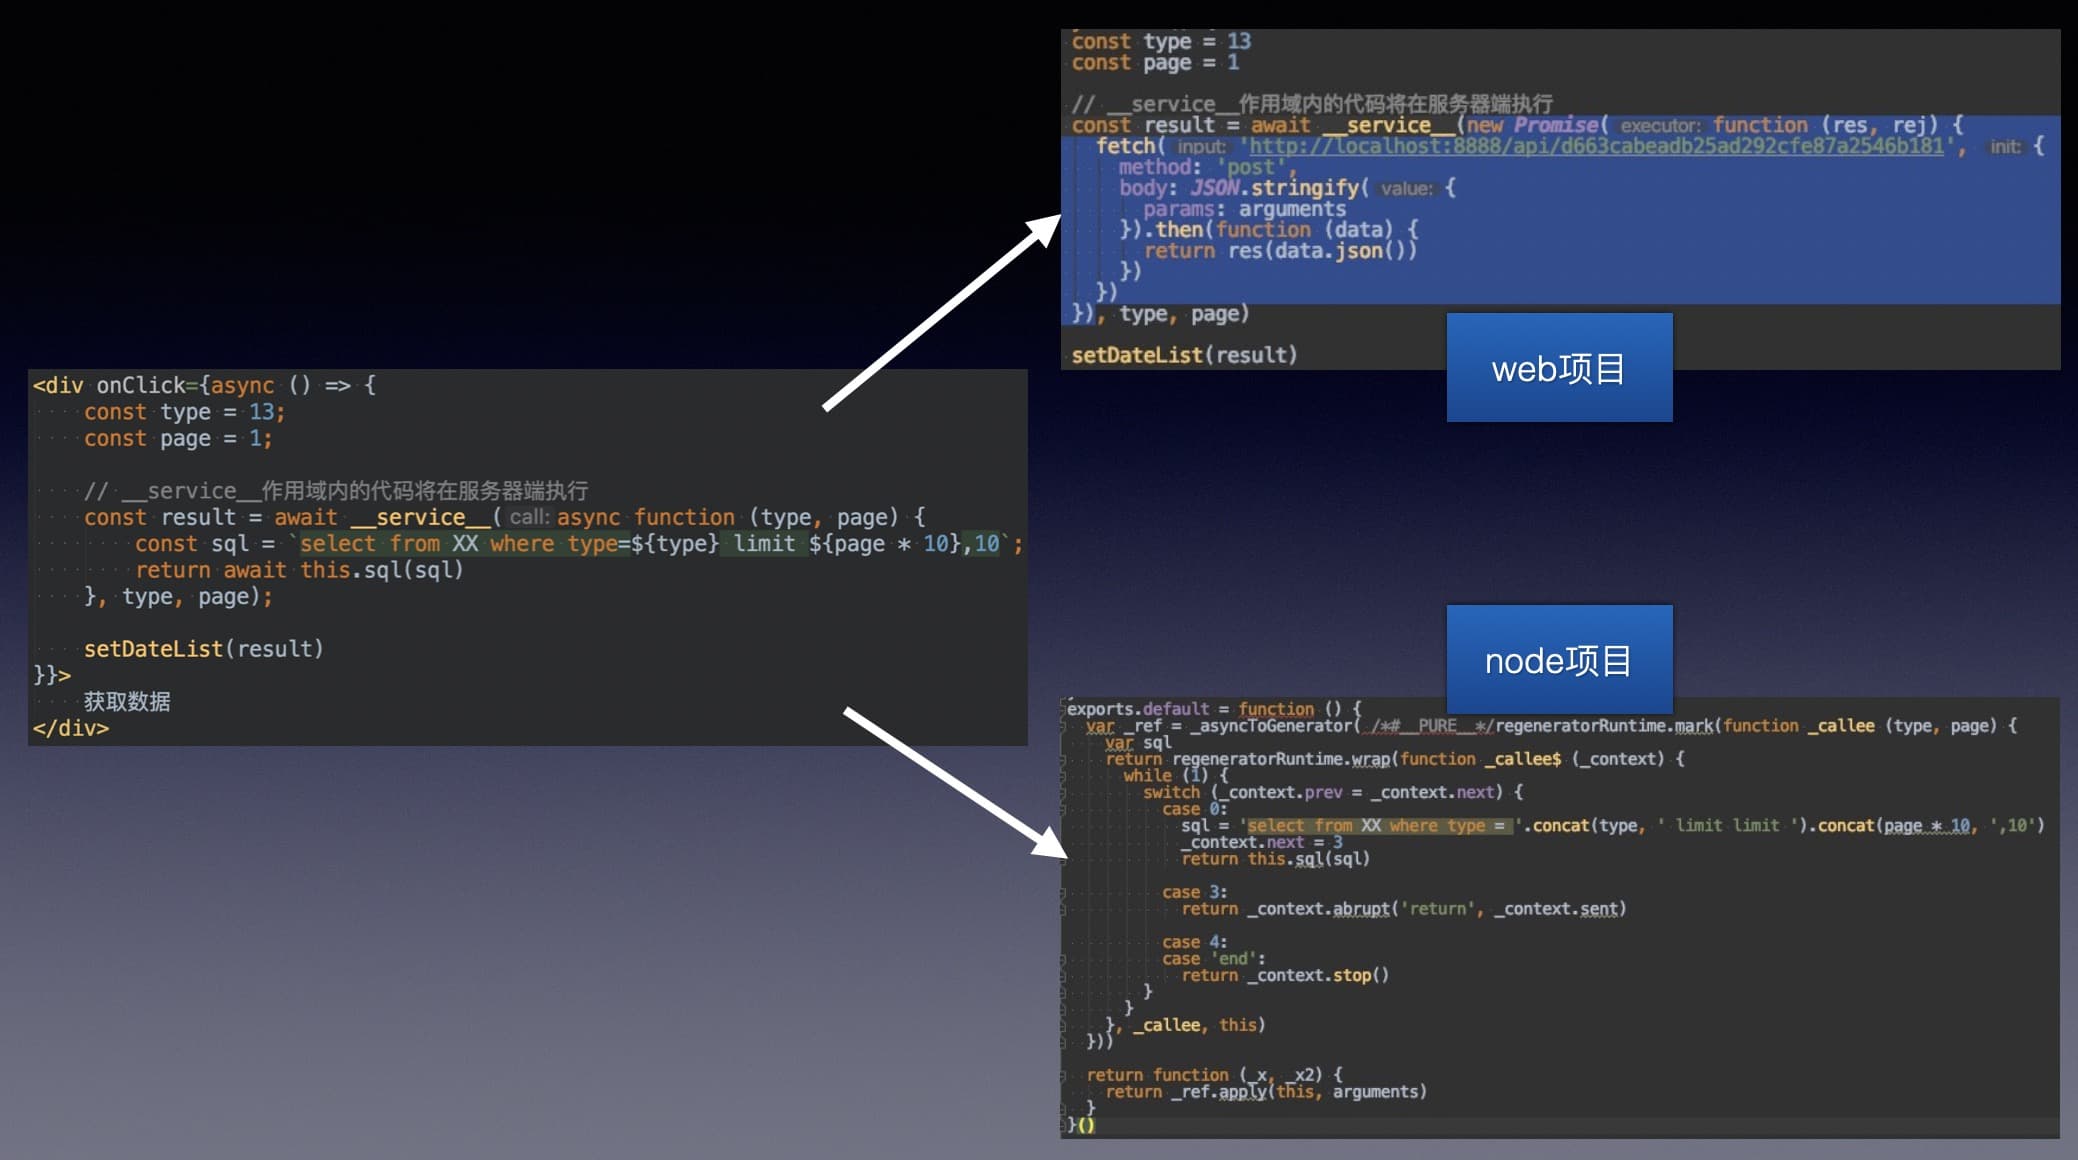
实现方式
通过webpack插件,将源码,提取到两个项目中
准备工作
npm i node-lix
1、在webpack配置文件里添加插件(view项目)
const {lix} = require('node-lix')
module.exports = {
  plugins: [
    new lix({
      // 提取的服务端code文件保存到的位置
      getSaveCodePath(hash) {
        return `${__dirname}/../service`
      },
      // 浏览器请求这个函数对应的http的地址
      getHttpUrl(hash, annotation) {
        if (annotation) {
          return `/api_service/${hash}/${annotation}`
        } else {
          return `/api_service/${hash}`
        }
      },
      // 提取的服务端code保存的文件名
      saveFileName(hash, annotation) {
        return hash + '.js'
      }
    }),
  ]
};
2、创建服务端代码里的this对象(node项目)
__service__包的函数的上下文都在this对象上扩展
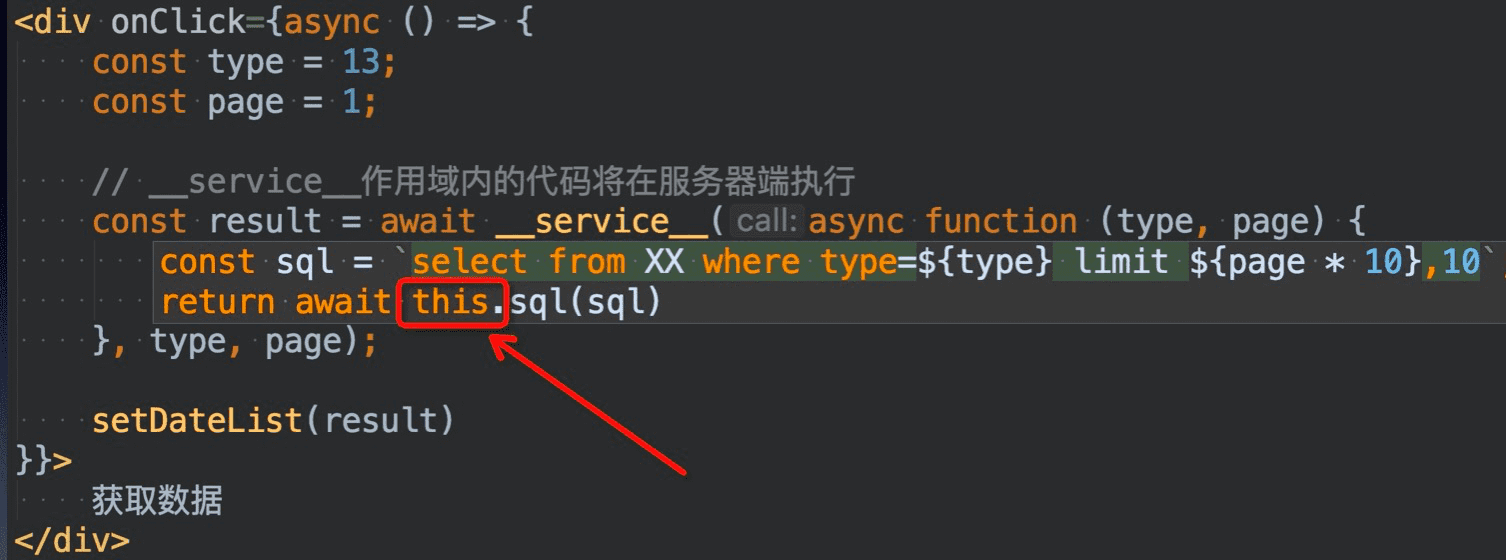
我们在Node项目里创建一个类,用于远端调用代码代码的this对象
以midway例如:
import {provide, inject} from '@ali/midway';

@provide('thisService')
export class IThis {
  sql(sql){
    // run sql code
  }
}
3、中间层(链接http地址和保存的code文件)(node项目)
接下来你需要根据你的项目情况,写一个中间层,保证node服务,接收http地址,可以正确的去执行保存的函数。
例如 midway 用可以这样写
import {provide, controller, post, inject} from '@ali/midway';
import {IThis} from '../../RunInService';

@provide()
@controller('/api_service')
export class RunInServiceController {
  @inject()
  thisService: IThis;

  @post('/:path')
  @post('/:path/:name')
  async templates(ctx): Promise<void> {
    await super.send(
      async () => {
        const {path} = this.params;
        const {params} = this.body;
        // 去生成的文件夹拉取生成的code文件
        const apiFunc = require('../../../service/' + path)

        // 执行的时候,第二步构造的IThis类的实例,绑定作为this对象
        try {
          ctx.body = await apiFunc.default.call(this.thisService, params);
        } catch (e) {
          ctx.body = await apiFunc.error(e);
        }
      }
    );
  }
}
使用
react的Demo
import React, {useState, useEffect} from 'react';

export default function () {
  const [data, setData] = useState([]);
  return <div>
    <div onClick={async () => {
      const data = await __service__(function () {
        return this.sql('select * from XXX');
      });
      setData(data)
    }}>
      获取数据
    </div>
    <div>
      {
        data.map(item => {
          return <p>{item.name}</p>
        })
      }
    </div>
  </div>
}
vue的Demo
<template>
  <div class="home">
    <button @click="getData">获取数据</button>
  </div>
</template>
<script>
export default {
  name: 'Home',
  date () {
    return {
      id: 1
    }
  },
  methods: {
    async getData () {
      const dataList = await __service__(async function (id) {
        if (this.user.type === 'admin') {
          return this.runSql('DELETE FROM XXX WHERE id=' + (+id))
        }
      }, this.id)
      console.log(dataList)
    }
  }
}
</script>
注意事项
1、__service__第一个参数是一个函数,必须使用function(){}函数表达式,不能使用箭头函数()=>{},因为es标准里箭头函数使用外部的this的对象。
2、在__service__内的code里执行console.log是推荐的调试方法,console.log的执行,会输出到浏览器端的控制台。但是线上环境建议关闭,否则容易输出敏感内容,关闭方法可以在准备工作第三步配置,类似下面这样
  const returnData = await apiFunc.default.call(this.thisService, params);
  if(env==='prod'){
    // 添加执行函数捕获的console内容(注意线上环境要返回[]空数组)
    returnData['console'] = [];
  }
  ctx.body = returnData;
3、内外作用域是隔离的,不要使用作用域链获取外部的变量
async () => {
  const id = 1;// 外部作用域变量
  const data = await __service__(function () {
    return this.sql('select * from XXX where id='+id);// 错误方法,因为隔离性,内部无法引用外部作用域变量id
  });
  setData(data)
}
async () => {
const id = 1;// 外部作用域变量
const data = await __service__(function (id) {
// 通过参数传递,获取了id
},id);
setData(data)
}其他
自定义header
// 在项目入口文件,通过初始化方法,可以指定header
import LixClient from 'node-lix/client';

LixClient.header(() => {
  return {
    token: getCookie('token')
  }
});
钩子
afterCreateCode
每一个函数生成代码写入文件之前触发,提取的服务端代码,你拥有最后加工代码时机。
const {lix} = require('node-lix')
module.exports = {
  plugins: [
    new lix({
      // 提取的服务端code文件保存到的位置
      getSaveCodePath(hash) {
        return `${__dirname}/../service`
      },
      // 浏览器请求这个函数对应的http的地址
      getHttpUrl(hash, annotation) {
        if (annotation) {
          return `/api_service/${hash}/${annotation}`
        } else {
          return `/api_service/${hash}`
        }
      },
      // 提取的服务端code保存的文件名
      saveFileName(hash, annotation) {
        return hash + '.js'
      },
      afterCreateCode(fileName, functionName, code){
        // fileName文件,functionName函数名称,code生成的最终code
      }
    })
  ]
};