
node-red-contrib-omron-eip
v0.2.0
Published
Node-RED nodes for reading and writing Omron NX/NJ Sysmac controller tags over EtherNet/IP, built on the omron-eip library.
Maintainers
 imthatguy
Readme
node-red-contrib-omron-eip
Node-RED nodes for reading and writing Omron NX / NJ Sysmac controller tags over
EtherNet/IP, by symbolic tag name — no memory maps, offsets, or PLC-side gateway blocks. Built
on the omron-eip library (installed automatically).
The package adds two working nodes plus one connection node:
- omron-plc — a configuration node that holds one controller connection (its IP address and messaging mode). You create it once and every read/write node shares it, so they all use a single, auto-reconnecting connection to the controller.
- omron read — reads one or more tags. Can run when a message arrives, on a repeating timer, and/or once shortly after deploy.
- omron write — writes one or more tags. The value(s) can come from the incoming message or be fixed in the node.
Tags are addressed exactly as they are named in Sysmac Studio, including nested ones —
Counter, MyArray[3], MyStruct.Speed, Machine.Axes[2].Position, and so on.
Requirements
- Node-RED 3.0 or newer, on Node.js 16 or newer.
- An Omron NX/NJ controller reachable on the network from the machine running Node-RED.
- In Sysmac Studio, each tag you want to reach must be a global variable with Network Publish = "Publish Only" (or "Input/Output"), and the project must be transferred to the controller. A variable that isn't published cannot be read or written by any EtherNet/IP client — this is the single most common reason a tag "isn't found."
Install
From the Node-RED editor: Menu → Manage palette → Install, search
node-red-contrib-omron-eip, and click Install.
Or from the command line, in your Node-RED user directory (e.g. ~/.node-red):
npm install node-red-contrib-omron-eipThe omron-eip library is pulled in automatically as a dependency. Restart Node-RED; the nodes
appear under the Omron category in the palette. (Running in Docker? See
DOCKER_INSTALL_AND_TEST.md.)
UCMM vs Class 3 — which connection to choose
EtherNet/IP explicit messaging can run two ways, and you pick one when you set up the PLC connection:
- UCMM (Unconnected Messaging) — the default and recommended choice for almost everyone, especially when the PC/Node-RED machine talks directly to the controller. Requests are sent without setting up a persistent session, they can run in parallel, and there is no limit on large array reads.
- Class 3 (Connected Messaging) — opens one persistent connection and sends requests over it. This only helps in specific topologies where traffic is routed through a gateway, a communications module, or across a backplane, where keeping a connection open avoids re-resolving the route on every request. On a direct connection it is slower (a single connection serializes requests) and it cannot read very large arrays. If a controller declines Class 3, the library automatically falls back to UCMM, so enabling it can never break a connection — at worst it simply doesn't help.
Rule of thumb: leave it on UCMM unless you specifically know your network path benefits from Class 3.
These nodes have been tested against NX1P2, NX102, and NX502 controllers, in both UCMM and Class 3 modes, reading and writing scalars, strings, structures, arrays, and Omron date/time types.
Walkthrough
A complete first-time setup, from connecting to a controller through reading and writing tags.
1. The two nodes, and the "not configured" marker
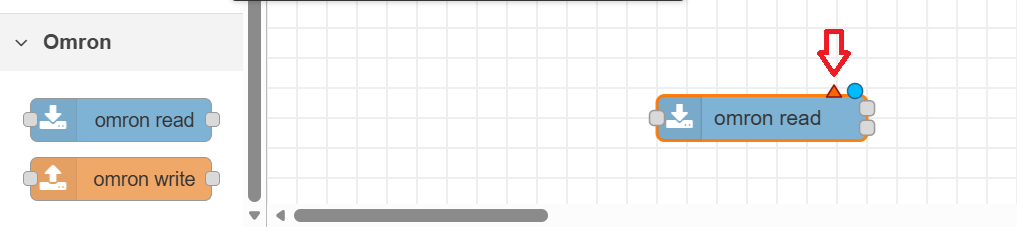
Dragging the package onto your canvas gives you the two nodes you'll use: a read node and a write node. Before either can do anything, it needs to know which controller to talk to — that's the job of the PLC connection. A node that has no controller attached shows a small red triangle in the corner (Node-RED's "this node isn't fully configured" marker). We'll clear it by creating a PLC connection. You can do this from inside either node; here we'll start in a read node.
2. Add a PLC connection
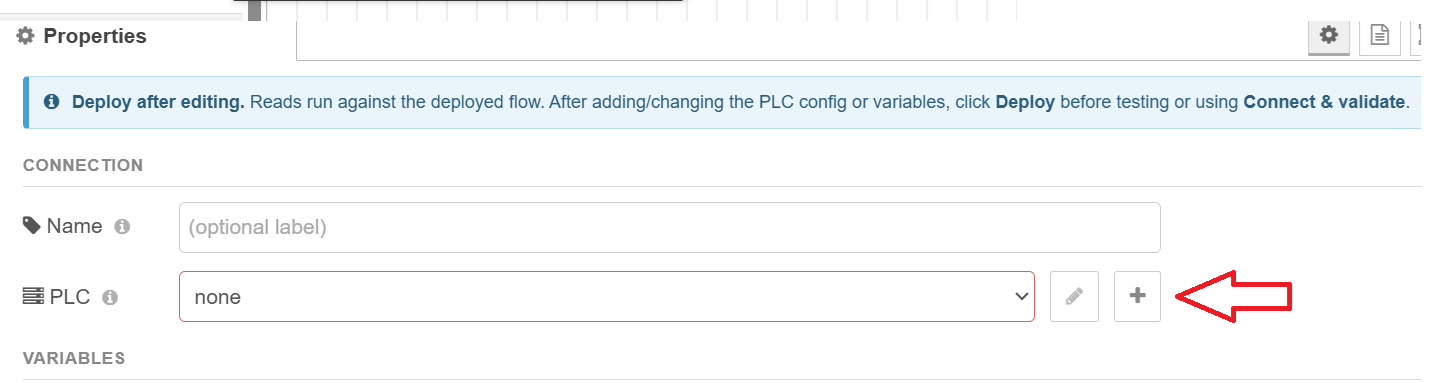
Open the read node (double-click it). Next to the PLC field, click the pencil/add button to create a new controller connection. This opens the PLC configuration panel.
3. Name it, set the address, and choose the messaging mode
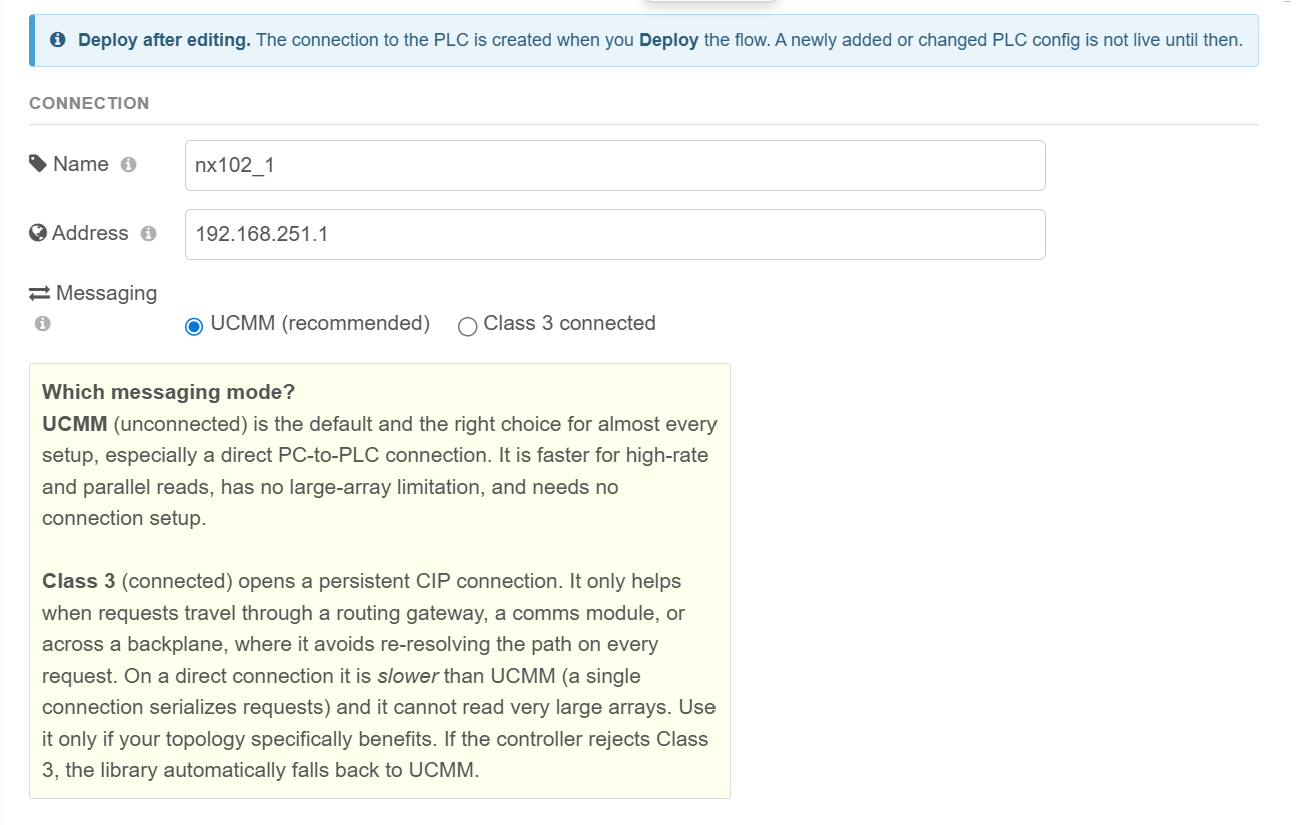
Give the connection a Name you'll recognize (for example Line 3 NX102), and enter the
controller's IP address (for example 192.168.250.1).
Two things to get right here:
- Networking. The machine running Node-RED must be able to reach that IP. The PLC and the
PC/server need to be on the same network and subnet (or have a route between them). A good
sanity check is to
pingthe controller's IP from the machine running Node-RED before going further — if you can't ping it, the node won't connect either. - Messaging mode (UCMM or Class 3). Choose UCMM unless you have a specific reason not to — it's faster on a direct connection, runs requests in parallel, and has no large-array limit. Pick Class 3 only when you're reaching the controller through a routing gateway/comms module or across a backplane, where a held-open connection saves re-resolving the route each time. (See the "UCMM vs Class 3" section above. If in doubt, UCMM.)
4. Save, then Deploy before testing

Close the configuration panel (Done/Add), then click Deploy in the top-right of Node-RED. This is important: the PLC connection only actually connects to the controller after you deploy. Several features below — loading the tag list, validating names, test reads/writes — talk to the live, running connection, so they won't work until you've deployed at least once.
5. Point a read (or write) node at the connection
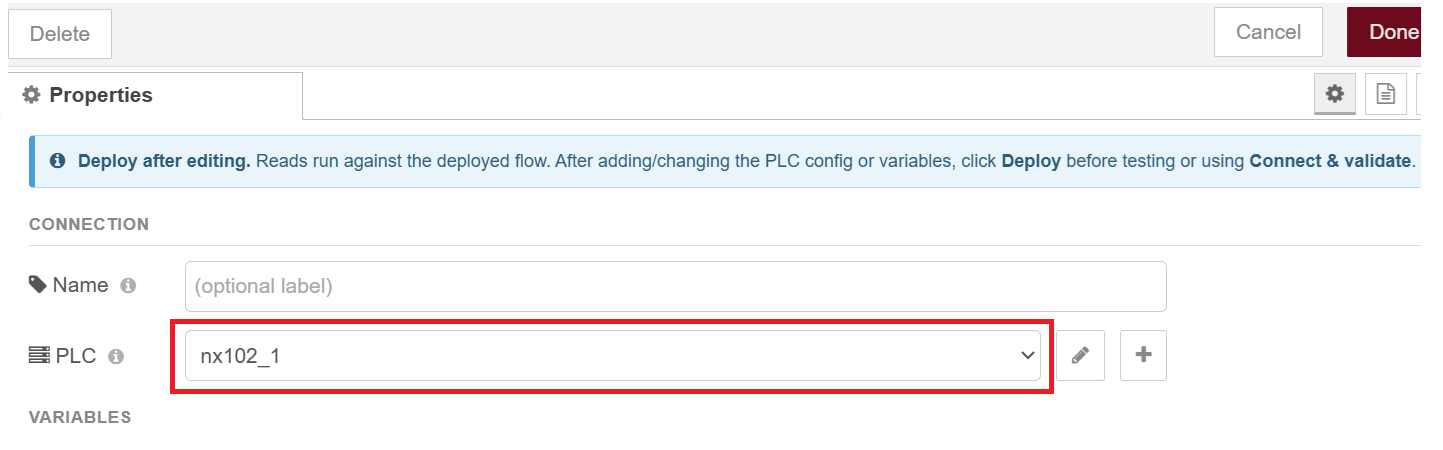
Open your read node again. In the PLC dropdown, select the connection you just created. The red triangle clears — the node now knows which controller it belongs to. Any other read or write node can select the same connection; they'll all share that one connection to the controller.
6. Test Connection, Load and Validate Published Variables
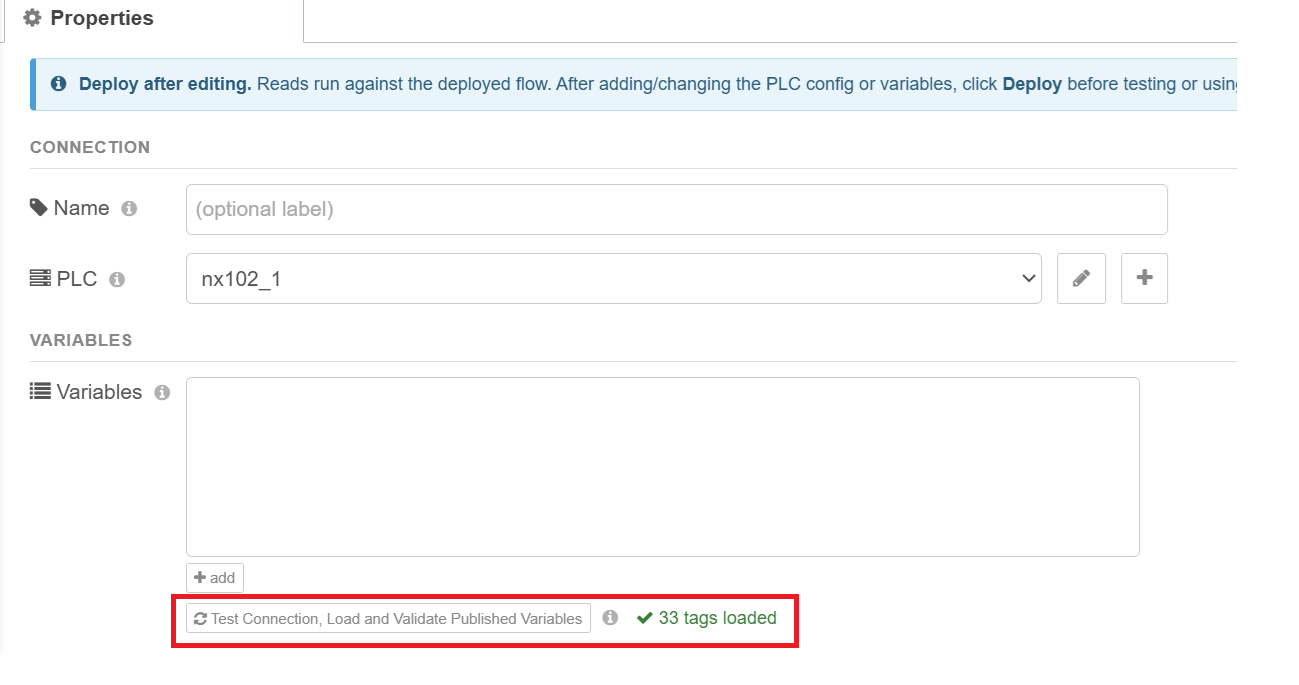
Click Test Connection, Load and Validate Published Variables. This one button does three useful things at once:
- Tests the connection to the controller (confirming the IP, network, and that it's reachable).
- Loads the controller's published tag list — every variable you marked Network Publish = Publish Only in Sysmac Studio. These names then become auto-complete suggestions as you type tag names.
- Validates the tags you've already entered — each gets a green check (✓) if it exists on the controller, or a red X (✗) if the name wasn't found (a typo, or a tag that isn't published).
Remember it talks to the live controller, so you must have deployed first (step 4).
7. Add the tags you want to read
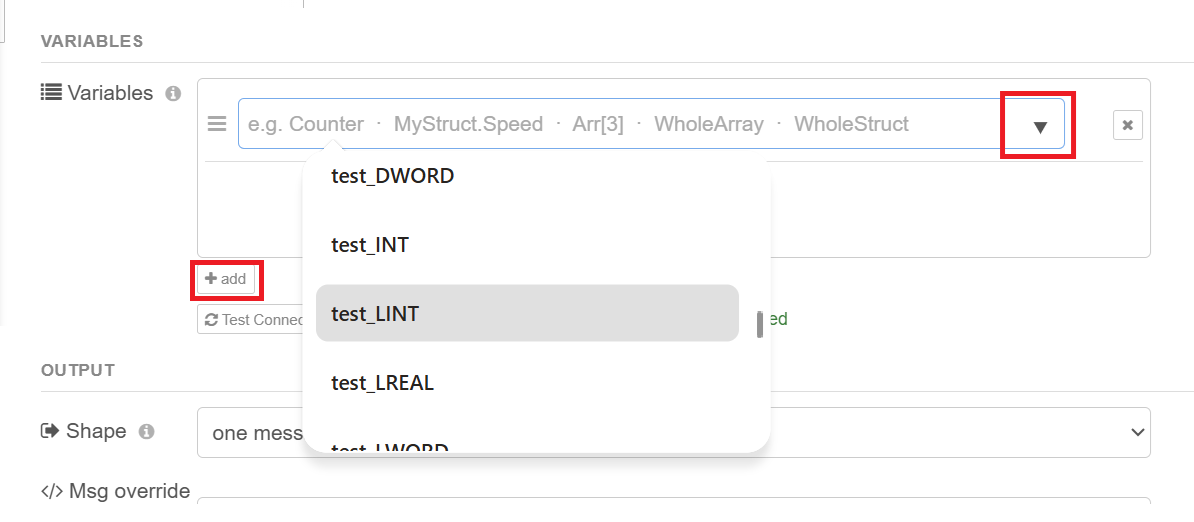
Add one row per tag you want to read. After loading the tag list (step 6) you can pick names from the dropdown instead of typing them, which avoids spelling mistakes. You can read:
| You want | Type this |
|---|---|
| a single value | Counter |
| one element of an array | MyArray[3] |
| a whole array at once | MyArray |
| one field of a structure | MyStruct.Speed |
| a whole structure at once | MyStruct |
| something deeply nested | Machine.Axes[2].Position |
Reading a whole array or structure in one row (just its name, no [index] or .field) is
the fastest way to pull a lot of data — it's a single request rather than many.
8. Read output — one message, or one message per tag
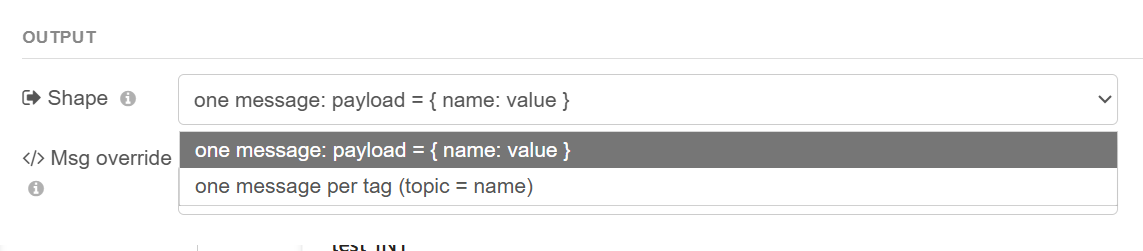
The Output setting controls how the readings are packaged into the message(s) the node
sends out. (A "message" is the data packet that travels along the wires to the next node.) Say
you read three tags — Counter = 42, Speed = 1500, Temp = 21.5:
One message, payload = { name: value } (the default)
All tags come out together in a single message, as an object keyed by tag name:
{ "Counter": 42, "Speed": 1500, "Temp": 21.5 }Use this when you want all the readings together — to show on a dashboard, build a record, write a log row, or hand a complete snapshot to a function node. It's the most common choice.
One message per tag (topic = tag name)
Each tag comes out as its own separate message. Reading three tags emits three messages:
message 1 →  msg.topic = "Counter"   msg.payload = 42
message 2 →  msg.topic = "Speed"     msg.payload = 1500
message 3 →  msg.topic = "Temp"      msg.payload = 21.5
Use this when the next node expects one value at a time, with the name in msg.topic — the
classic example is the Node-RED chart node (it uses topic as the series name and payload
as the point), or when you want to route each tag to a different place with a switch node.
If you're not sure, leave it on "one message."
9. Msg override — let an incoming message choose what to read

This is the one people find confusing, so here it is plainly.
Normally, the node reads the fixed list of tags you typed in step 7. Msg override lets a
different part of your flow decide what to read, on the fly, by putting the tag name(s) inside
the message that triggers the node. The box just names which property of the incoming message
to look at — the default is variables, meaning the node checks msg.variables.
How it behaves: when a message arrives, if that property is present, the node reads those tags instead of its own list; if the property is absent, it reads its configured list as normal.
What you can put in msg.variables (from a function node, a change node, a dashboard control,
etc.):
// read several tags, named in an array:
msg.variables = ["Pressure", "FlowRate", "MotorMode"];

// read just one tag, as a string:
msg.variables = "Pressure";

// it accepts nested names too:
msg.variables = ["Machine.Axes[0].Position", "Recipe.Speed"];
Why use it: so one read node can serve many situations instead of building a separate node
for each set of tags. For example, an operator picks a machine from a dashboard dropdown; a
function node sets msg.variables to that machine's tag names; the single read node reads
whatever was chosen.
If you don't need any of that, leave this field alone — with no msg.variables on the
incoming message, the node simply reads the list you configured.
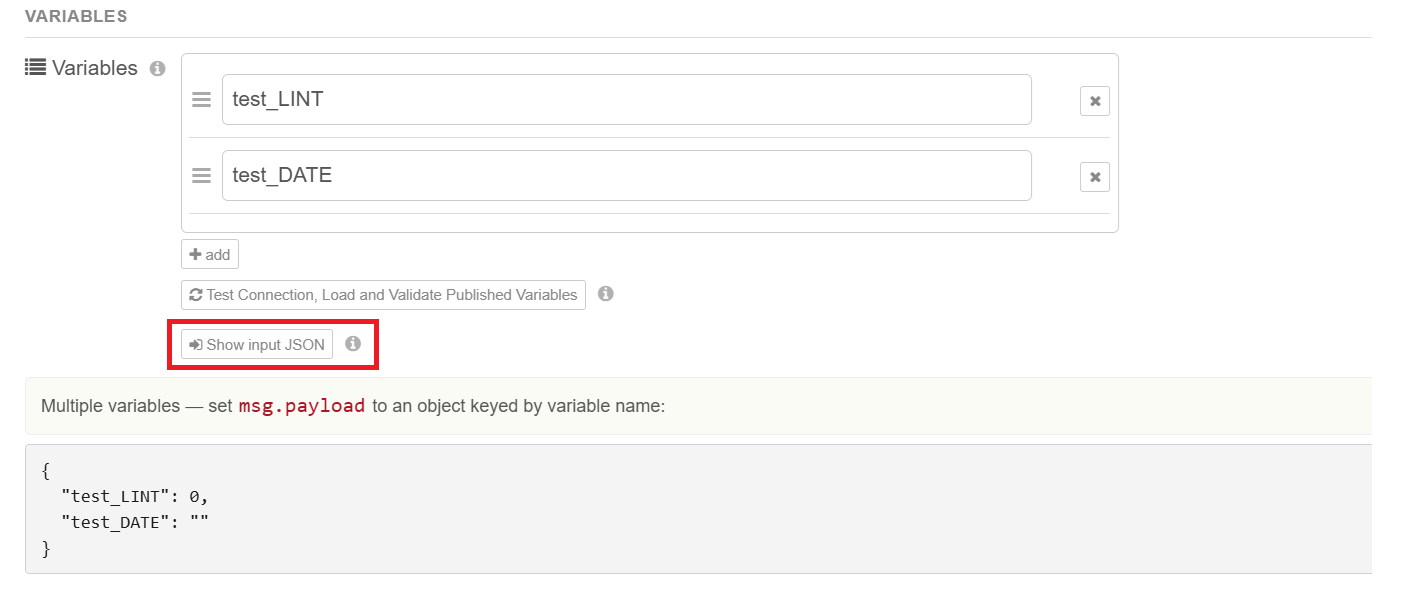
10. Show output JSON — preview the exact output
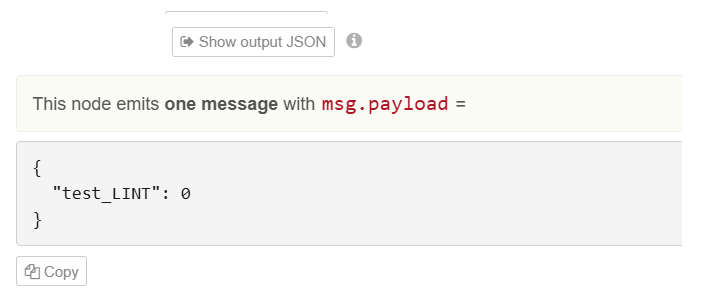
Clicking Show output JSON previews exactly what this node will send, in the shape you chose in step 8. If you ran Test Connection / Load / Validate first, the preview fills in the real kinds of values your tags hold (whole numbers, true/false, text, lists, structures); if you haven't connected yet, it shows generic placeholders. This is just a preview to help you set up the nodes that come after this one — it doesn't read the controller or change anything. There's a Copy button to paste the example elsewhere.
11. Read triggers — Repeat, and Read once after deploy
By default a read node reads whenever a message arrives at its input. Two optional triggers let it read on its own:
- Repeat (ms) — makes the node read by itself, repeatedly, on a timer, with no input
wired in. The number is the interval in milliseconds:
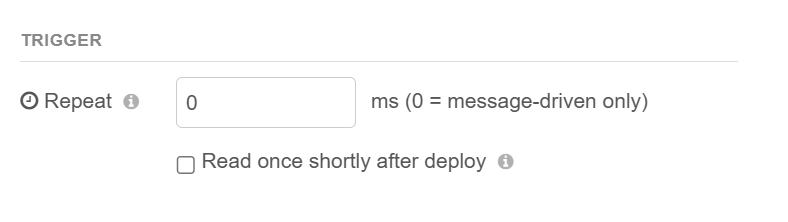
1000= once per second,500= twice per second,250= four times per second. (It will also still read when a message arrives.) Leave it at 0 to read only when triggered by an incoming message. Tip: don't poll faster than you actually need — very small intervals flood the controller. Reading a modest batch every 250 ms is comfortable on most controllers; tighter loops should read only a few tags. - Read once shortly after deploy — when ticked, the node performs one read automatically about 1.5 seconds after you Deploy (or after Node-RED restarts). This is handy for grabbing an initial value at startup instead of waiting for the first trigger or timer.
(Deploy is the Node-RED button that saves and starts your flow running.)
Now the write node. It shares the same PLC connection, tag-name syntax, validate button, and trigger options as the read node, so this section focuses on what's different about writing.
12. The write node
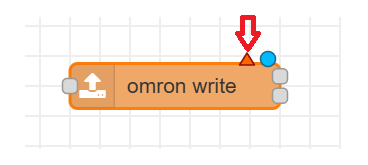
Drag a write node onto the canvas. Like the read node, it starts with the red "not configured" triangle until you attach a PLC connection.
13. Select the PLC, then choose where values come from
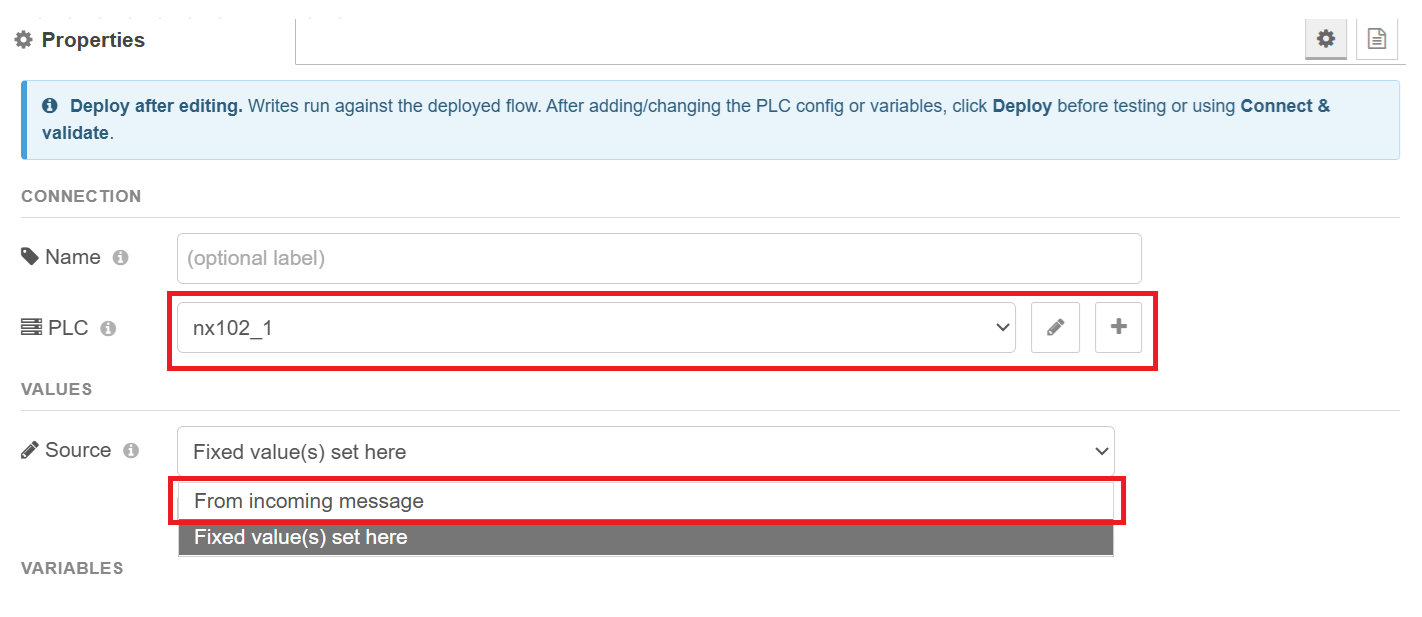
Select the PLC connection you already made (same one the read node uses — they share it). The key write-only setting is Source, which controls where the value to write comes from:
- From incoming message — the value is supplied by the message that triggers the node.
- Fixed value(s) set here — you type the value into the node itself.
We'll cover From incoming message first (highlighted), then Fixed in step 16.
14. From incoming message — add the tag names
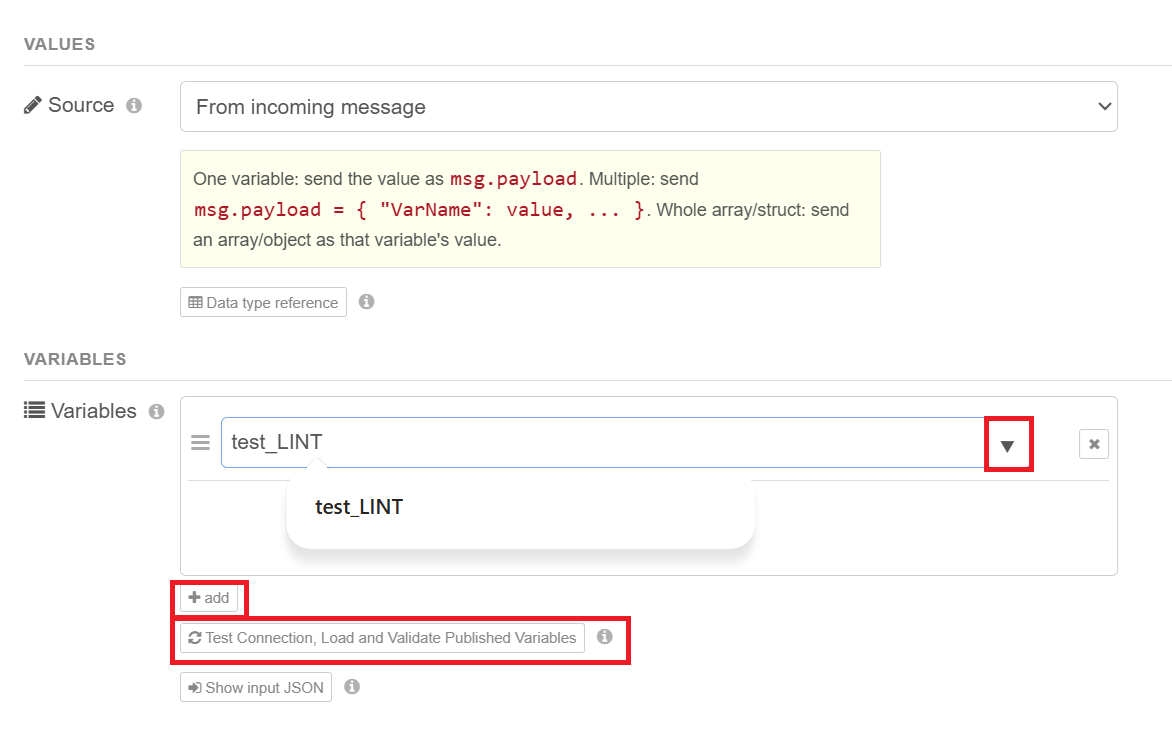
In From incoming message mode, you list only the tag names to write (no value boxes) — the values will arrive on the message. Just like the read node, use Test Connection, Load and Validate Published Variables to load the tag list and get dropdown suggestions and ✓/✗ checking, then add the tag(s) you want to write.
15. Show input JSON — the exact message this node expects
Click Show input JSON to see exactly what message to send this node. This is a reference
for whatever feeds the write node (an inject node, a dashboard control, a function node) — it
shows the msg.payload format for the tags you've added. The format depends on how many tags
you're writing:
// ONE variable — send the value directly as the payload:
msg.payload = 1500;

// MULTIPLE variables — send an object keyed by tag name:
msg.payload = { "Setpoint": 1500, "Mode": 3, "Enable": true };

// a whole structure or array — send an object/array as that tag's value:
msg.payload = { "Recipe": { "Speed": 100, "Steps": [1, 2, 3] } };
So whatever sends a message into this node must put the value(s) in msg.payload in this shape.
As with the read node, if you've validated first, the preview shows the real value types for
your specific tags.
16. Fixed value(s) — set the value right in the node
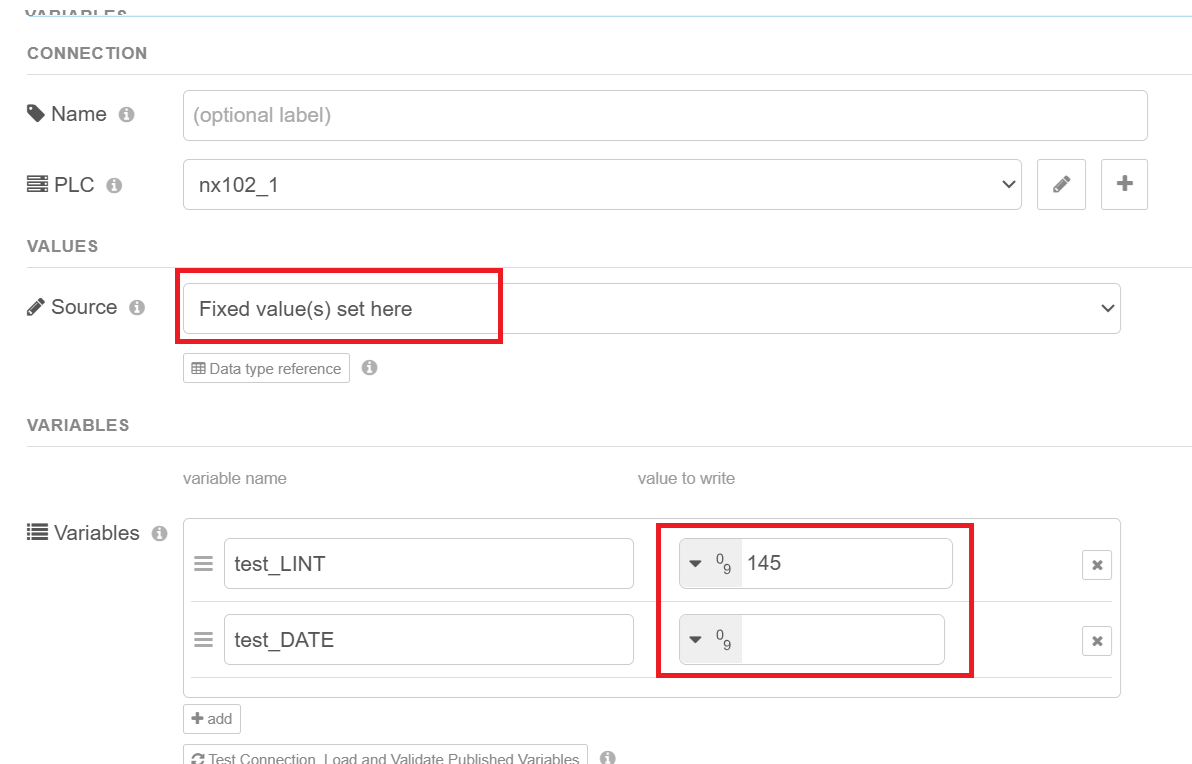
Switch Source to Fixed value(s) set here and each tag row gains a value to write field. Now the node writes those exact values every time it's triggered — the triggering message is just a "go" signal and its contents are ignored.
The value field is a standard Node-RED typed input, so you can enter either:
- a static value — type a constant: a number like
1500, text, true/false, etc. (choose the matching type in the small dropdown — see step 17), or - a value pulled from elsewhere — switch the field's type to
msg.,flow., orglobal.to write whatever is in a message property or a context variable at the moment the node fires (for exampleflow.targetSpeed).
Use Fixed when the value is constant (forcing a mode, a test value, a startup state), or when you want to pull from flow/global context rather than the triggering message's payload.
17. Data type reference
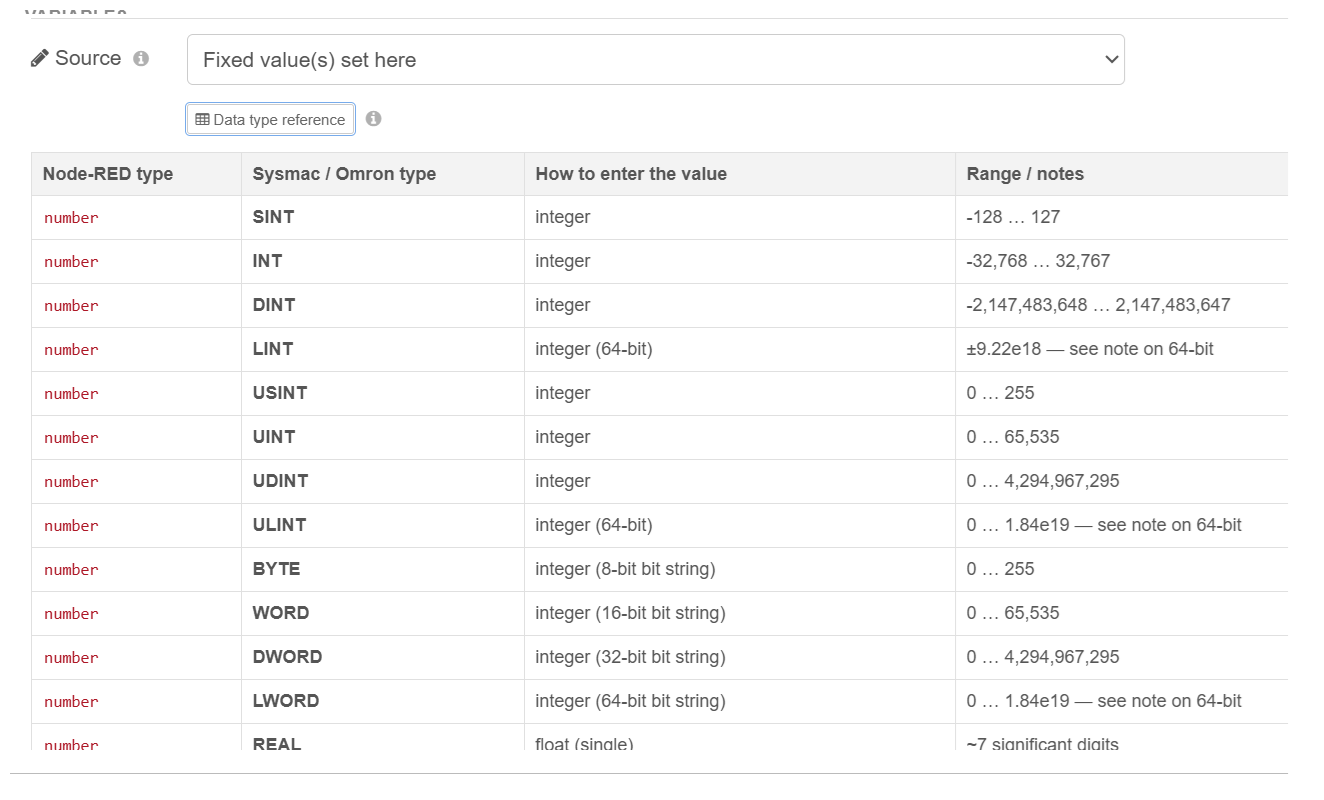
The Data type reference button opens a table mapping every Omron/Sysmac tag type to what you should enter. The important idea: the small type dropdown beside a fixed value (number / true-false / text / JSON) describes the kind of value you are entering — it is not the controller's tag type. You don't have to match the exact Omron type; the node converts your value to whatever the real tag is. As a guide:
- numeric tags (SINT, INT, DINT, REAL, LREAL, etc.) → enter a number
- BOOL → true/false
- STRING → text
- a whole structure or array → JSON (an object or array)
- 64-bit integers (LINT, ULINT) → numbers within JavaScript's safe range work directly; for very large values, be aware precision can be lost (these are large 64-bit values).
- Date / time types (DATE, DATE_AND_TIME, TIME, TIME_OF_DAY) → enter a number of
nanoseconds. DATE / DATE_AND_TIME use nanoseconds since 1970 (epoch ms × 1,000,000)
and read back as a date; TIME / TIME_OF_DAY are a nanosecond duration (e.g.
5000000000= 5 seconds). These are reliable to millisecond precision.
18. Verified write

When Verified write is ticked, right after writing, the node reads the value back and checks it matches what you sent — and reports an error if it doesn't.
Why bother, when a normal write already gets an "accepted/error" reply from the controller (which is enough almost every time)? Verified write catches the rarer case where the controller says accepted but the stored value still isn't what you intended — for example:
- the controller's own program limits/clamps the value (you send
5000, but program logic caps it at4000), or - another device or the program overwrites that tag a split second later.
Turn it on for important values — setpoints, recipe parameters, mode changes — where you want positive proof the value landed. The trade-off is one extra read per tag, so it's slightly slower; leave it off for ordinary or high-rate writes. (One limit: it checks only the instant right after writing — a change made later can't be detected.)
19. Write triggers — Repeat, and Write once after deploy
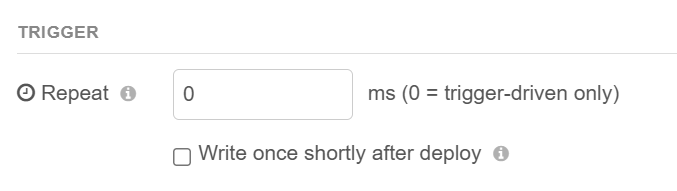
Same two optional triggers as the read node:
- Repeat (ms) — writes by itself on a timer, with nothing wired in; the number is the
interval (
1000= once per second). Combined with a Fixed value, this can continuously hold a tag at a set value — a "heartbeat" signal, or keeping an enable bit on. Leave at 0 to write only when triggered. Use this deliberately: most writes should happen in response to an event, not constantly on a timer. - Write once shortly after deploy — writes one time about 1.5 seconds after Deploy (or a restart). With a Fixed value, it's a simple way to put a tag into a known starting state at startup, with nothing wired into the input.
Outputs and error handling
Both nodes have two output ports:
- Result — the successful read result (read node) or a pass-through with
payloadset to what was written (write node). - Error — anything that failed comes out here, so you can wire error handling without it interrupting the success path.
Each node also calls node.error() (so flow-wide Catch nodes work) and shows the last
status on the node's status badge under its icon. Common controller errors are decoded into
plain language — for example "variable not found on the controller — check the name and that it
is published to the network" for CIP status 0x05.
Reading & writing arrays, structures, and nested data
Addressing is symbolic, so you just type the path — there are no special modes:
| You want | Tag name |
|---|---|
| whole array | MyArray |
| one array element | MyArray[3] |
| whole structure | MyStruct |
| a structure member | MyStruct.Speed |
| array element inside a structure | MyStruct.History[2] |
| member of a structure inside an array | Machine.Axes[2].Position |
For writes, a whole structure/array takes an object/array value; a member/element takes a single
value. Writing a single member (MyStruct.Speed) is safer than rewriting the whole structure,
because writing the whole structure replaces every field in it — including ones another
writer may have changed.
Troubleshooting
- Red triangle on a node → it has no PLC connection selected. Open it and pick (or create) one in the PLC field.
- Validate / read / write does nothing or errors right after editing → you haven't Deployed since the change. These features talk to the live connection, which only exists after a deploy.
- "variable not found" (CIP 0x05) → the tag name is wrong, or the tag isn't published. In Sysmac Studio set it to a global variable with Network Publish = Publish Only and transfer the project to the controller.
- Can't connect at all → check the network. From the machine running Node-RED, confirm you
can
pingthe controller's IP, and that both are on the same subnet/route. In Docker, the container must be able to reach the PLC (see the Docker guide). - Large array fails under Class 3 → switch the connection to UCMM; Class 3 can't carry very large array replies. (UCMM is the recommended default anyway.)
More documentation
- MANUAL.md — a complete, plain-language reference: every field on every node, message formats, flow recipes, and troubleshooting.
- DOCKER_INSTALL_AND_TEST.md — installing into a Docker-based Node-RED, plus a full feature-test sequence against a real controller.
- omron-eip — the underlying library, if you want to use it directly from Node.js.
License
GPL-2.0, matching the omron-eip library it is built on.