
noflo-assembly
v0.3.1
Published
Industrial approach to writing NoFlo applications


Readme
NoFlo Assembly Line
Industrial approach to writing NoFlo applications
Goals
- Build your application like a real world production
- Make development with NoFlo more fun by reducing component boilerplate and the complexity of graphs
- Follow best practices for concurrency, error handling, etc. to avoid common pitfalls
- ES6-first
Example
A rather abstract example is embedded into this repository. We use it in tests, but it also gives an idea what Assembly Line components and graphs look like.
So, this is how you build a car with NoFlo:
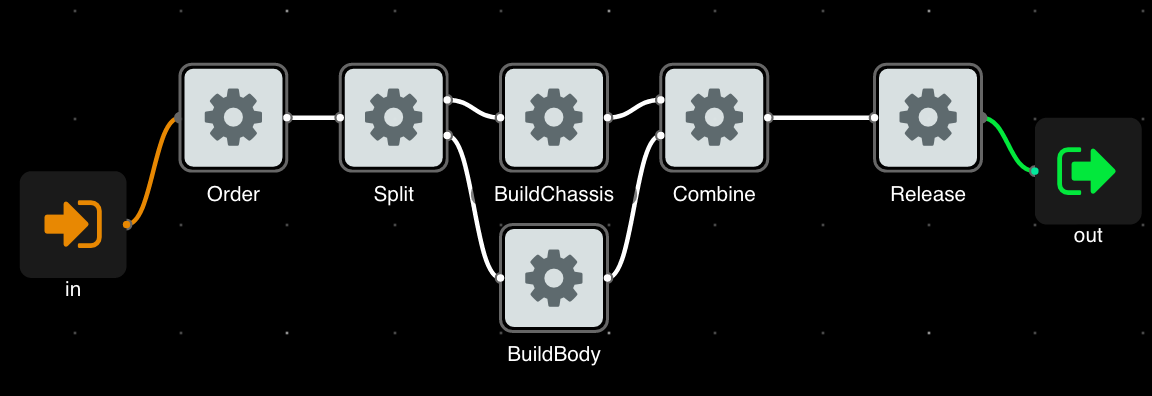
The BuildBody and BuildChassis are actually subgraphs consisting of other components. You can copy and paste .fbp code into NoFlo Visualize to get the picture of those subgraphs.
Documentation
For introduction, underlying conventions and best practices please see NoFlo Assemblipedia.
Below is a quick start guide and technical reference for the NPM package.
Installation
The package can be installed via NPM:
npm install --save noflo-assemblyComponent interface
To use features provided by the library, your components should derive from noflo-assembly.Component rather than noflo.Component. All noflo.Component features are also inherited.
Importing the Component class in ES6 way:
import { Component } from 'noflo-assembly';We highly recommend declaring named classes instead of instantiating Component directly (like many NoFlo examples do), because it makes correct class names appear in stack traces when an error occurs.
Simple relay-type components
Components having just one input port called in and one output port called out are called relay-type components and benefit from conveniences such as optional definition of ports and built-in input validation.
The minimal Assembly Line component then looks like this:
class Hello extends Component {
  relay(msg, output) {
    msg.hello = 'Hello world!';
    output.sendDone(msg);
  }
}
Note that it only applies if the in expects a valid assembly message rather than other data type.
Component constructor options
More details, including the standard NoFlo Component properties, can be specified by calling the constructor of the parent class:
  constructor() {
    super({
      description: 'Does lots of nice things',
      icon: 'science',
      inPorts: ['foo', 'bar'],
      outPorts: ['boo', 'baz'],
      validates: ['subitem.id'], // See Validation section below
    });
  }
Compact port definition syntax
Normal way to define a ports collection in NoFlo is using verbose syntax:
inPorts: {
  foo: {
    datatype: 'object',
    description: 'Something',
  },
  bar: {
    datatype: 'string',
    description: 'Else',
  },
}
However, when prototyping it may be useful to default to datatype: 'all' and reduce to just listing the port names:
inPorts: ['foo', 'bar'],This compact record will be automatically expanded by Component constructor.
Multi-route components
Components with multiple input or output ports should not skip port definition and should provide a complete NoFlo process function taking input and output as arguments.
class MountEngine extends Component {
  constructor() {
    super({
      description: 'Mounts 3rd party engine on chassis',
      inPorts: {
        in: {
          datatype: 'object',
          description: 'Assembly',
        },
        engine: {
          datatype: 'string',
          description: 'Engine name',
          control: true,
        },
      },
      validates: { chassis: 'obj' },
    });
  }
  handle(input, output) {
    if (!input.hasData('in', 'engine')) { return null; }

    const msg = input.getData('in');
    const engine = input.getData('engine');

    // Message validation is explicit if there are multiple inports
    if (!this.validate(msg)) {
      return output.sendDone(msg);
    }

    msg.chassis.engine = engine;

    return output.sendDone(msg);
  }
}
This example demonstrates verbose form of port declaration. The handle method is a normal NoFlo process handler function, the name handle is used because process is already taken.
For more on input validation and sending errors see below.
Errors
See also Error handling page in Wiki.
Relay-type components check and validate assembly messages automatically before calling the relay method. However, if a component has multiple inputs or needs to check for errors inside the process function, facilities below may come helpful.
Throwing errors
Once a component encounters an error, the best thing to do is to include this error in the assembly message and send it to all subscribed outputs right away. The fail() helper can be used to include errors in the message:
import { fail } from 'noflo-assembly';

// ...
// Got an error somewhere in process
if (err) {
  return output.sendDone(fail(msg, err));
}
It is important to stop any further processing at this point and send a failed message to all outputs of the assembly message type. Other ways to use the fail helper:
// fail modifies its first argument and returns it as well for convenience
// multiple errors can be added via array
fail(msg, [err1, err2, err3]);
output.sendDone({ out1: msg, out2: msg });
Checking failed state
A quick way to check if the message failed earlier and forward it is
import { failed } from 'noflo-assembly';

// ...
const msg = input.getData('msg');
const foo = input.getData('foo');
// Right after process precondition and getting the input
if (failed(msg)) {
  return output.sendDone(msg);
}
Message validation
Components intending to be reliable and reusable should check their input. With assembly messages, it makes sense to check if fields required by a component are present and match some validation rules.
Validation rules
Simple validation rules for message fields are set by using validates property of the class, e.g.:
constructor() {
  super({
    description: 'Does lots of nice things',
    validates: {
      id: 'num',
      'user.name': 'str',
      'user.age': '>0',
      text: 'ok',
    },
  });
}
Full list of available validators can be found in source file.
If you want to just check for presence of some fields, use short array syntax that applies ok validator to each of the items:
validates: ['id', 'user.name', 'user.age', 'text'],Applying validation
For components with just in port, validation rules are applied automatically before calling the relay() method.
Other components can invoke validation using validate() method:
const msg = input.getData('line');

if (!this.validate(msg)) {
  return output.sendDone(msg);
}
The validate() method does 3 things:
- checks if the message already contains errors;
- applies validators to the message;
- puts errors into message if validation failed.
By default it checks for validation rules in this.validates property. You can specify different rules by passing them as second argument:
const msg1 = input.getData('msg1');
const msg2 = input.getData('msg2');

if (!this.validate(msg1, { id: 'num', 'site.url': 'ok' })) {
  output.sendDone(msg1);
}
if (!this.validate(msg2, { id: 'num', 'user.name': 'str' })) {
  output.sendDone(msg2);
}
Concurrency helpers
See Concurrency handling section in the Wiki for theory behind this feature.
Forking
Use fork() before sending the message to parallel branches:
import { fork } from 'noflo-assembly';

// ...
const m1 = fork(msg);
const m2 = fork(msg);

output.sendDone({
  out0: msg,
  out1: m1,
  out2: m2,
});
If some properties of the original message should not be included in the forks, use the excludeKeys parameter:
msg.excludeMe = 'This property will not be copied or cloned';
const m1 = fork(msg, ['excludeMe']);
If some properties of the original message should be cloned rather than copied by reference, use the cloneKeys parameter:
msg.cloneMe = {
  str: 'This object is critical to be cloned, no parallel access please',
  nested: { alsoCloned: true },
};
const m1 = fork(msg, [], ['cloneMe']);
Merging
Once parallel processing of a job is finished, forked messages should be merged back. The merge() function is here to help with it:
import { merge } from 'noflo-assembly';

// ...
const m0 = input.getData('m0');
const m1 = input.getData('m1');
const m2 = input.getData('m2');

// Check for branch-specific errors here if needed

let msg = merge(m0, m1);
msg = merge(msg, m2);
The assembly message in the first parameter has priority over the second parameter, meaning that if both messages have property with the same key, the property from this first object will not be overwritten by the second.