
notion-helper
v1.3.30
Published
A library of functions for working more easily with the Notion API
Maintainers
 tomfrankly
Readme
Notion Helper
Power tools for the Notion API.
Notion Helper is a JavaScript library that makes working with the Notion API much easier.
Key Features
Compared to working with the Notion API directly, Notion Helper gives you several advantages:
- Automatically splits large payloads into multiple API requests to respect Notion API limits
- Lets you quickly build page objects with a fluent interface with methods for every block and property-type
- Applies templates to new pages via the API
- Gracefully splits long text into multiple rich text objects
In short, Notion Helper helps you easily write more robust, fault-tolerant Notion API intergrations, more quickly.
Notion Helper is designed to be used alongside the official Notion TypeScript SDK, and contains multiple layers of functionality.
You can pass a client object from the SDK into its high-level request functions to let it orchestrate API requests, or just use it at a lower level to more easily build up JSON objects.
Notion Helper has been fully updated to support databases with multiple data sources. See the 2025-09-03 API version update details to learn more about this change.
All functions and methods have JSDoc markup to support IntelliSense.
Check out the library's website for additional examples.
Full documentation on all functions can methods can be found here.
Installation
This package is ESM-only.
Node.js
Install via npm:
npm install notion-helperBrowser
You can use notion-helper directly in the browser via CDN:
<script type="module">
  import NotionHelper from "https://unpkg.com/notion-helper@latest";

  // Use NotionHelper functions
  const page = NotionHelper.createNotionBuilder()
    .parentDataSource("data-source-id")
    .title("Name", "My Page")
    .build();
</script>Note: Browsers can't directly call the Notion API due to CORS restrictions. You'll need a backend proxy or serverless function to handle the actual API calls. See the Browser Usage Guide for more details.
TypeScript Support
The notion-helper package has TypeScript support via declarations generated from the JSDocs comments in the source files. If you're using TypeScript, you'll get full type-checking and auto-completion in your editor when using notion-helper.
Importing Functions
You can import the entire package, which will give you access to everything:
import NotionHelper from "notion-helper";

// Usage example with direct block API method

const paragraph = NotionHelper.block.paragraph.createBlock(
  "My mistake. Table's cold, anyway."
);

// Usage example with shorthand function
const paragraph = NotionHelper.paragraph(
  "I'd try the lounge at the Caesar's. It gets busy after three o'clock."
);
Alternatively, you can import individual functions:
import { paragraph } from "notion-helper";

// Usage example
const paragraph = paragraph(
  "I'd try the lounge at the Caesar's. It gets busy after three o'clock."
);
In all of these cases, the function will return a valid object representing a paragraph block:
{
  "type": "paragraph",
  "paragraph": {
    "rich_text": [
      {
        "type": "text",
        "text": {
          "content": "I'd try the lounge at the Caesar's. It gets busy after three o'clock."
        }
      }
    ],
    "color": "default",
    "children": []
  }
}
Handling Large API Requests
Notion Helper's most useful tools are those that help you make Create Page and Append Block Children requests that contain large payloads.
The Notion API has many request limits that make it difficult to create robust integrations that can handle large or complex content.
For example, my Notion Voice Notes workflow needs to be able to sync transcripts from extremely long audio files to Notion.
And Flylighter, our Notion web clipper, needs to be able to handle capturing complex HTML content that gets translated to deeply-nested block structures.
These needs often butt up against the API's limits. For example:
- Requests can contain no more than 1,000 blocks
- Any array of can contain no more than 100 blocks (or 100 rich text elements)
- Rich text elements can contain no more than 2,000 characters
- Blocks can have a max of two levels of nested
childrenper request
Accounting for all of these limitations in production code is hard. Doing it in a way that minimizes API requests (and thus maximizes performance) is hard enough that you basically need to build an entire library for it... hence Notion Helper.
Notion Helper contains a request API with methods for creating pages and appending block children. These contain all the logic needed to account for API request limits, split large payloads into the minimum number of API requests needed, and make these API requests in sequence.
This API contains two primary methods:
request.pages.create()(alias function:createPage())request.blocks.children.append()(alias function:appendBlocks())
In this section, I'll use the alias functions for examples, as they're easier to type out.
Here's a simple example of how we can use createPage() to create a page that contains 1,000 paragraph blocks via the Notion API. We're using the official Notion SDK to create a client object for making the actual, authenticated HTTPS requsts, and we're using createNotionBuilder (Notion Helper's fluent interface) for building up the actual page body. See the next section for a more detailed guide on using the fluent interface.
import { Client } from "@notionhq/client";
import { createPage, createNotionBuilder } from "notion-helper";

const secret = "YOUR_NOTION_KEY";
const notion = new Client({ auth: secret });

const data_source_id = "YOUR_DATA_SOURCE_ID";

let page = createNotionBuilder({
  limitChildren: false,
})
  .parentDataSource(data_source_id)
  .title("Name", "Page with a big list!")
  .heading1("Down the Rabbit Hole...");

for (let i = 0; i < 1000; i++) {
  page = page.paragraph(`This is paragraph #${i + 1}.`);
}

page = page.build();

const response = await createPage({
  data: page.content,
  client: notion,
});

console.log(response);
Let's highlight the actual createPage() call:
const response = await createPage({
  data: page.content,
  client: notion,
});
This is all you need to create this page. createPage() takes a single argument that only requires two properties by default:
data- a valid Notion page object with any needed properties (parent,properties,icon, etc.)client- An instance ofClientfrom the Notion SDK
With this, createPage() will intelligently split the page body into chunks, each containing the maximum number of blocks allowed by the Notion API request limits.
It will use the first chunk to create the page, then send the remaining chunks to the appendBlocks() function so they can be appended to the page.
The client variable you set is used to make the actual, authenticated HTTP requests to the Notion API, and you can optionally swap it out for a custom apiCall property with a callback if you don't want to use the Notion SDK (see the section below for more on this). This design means Notion Helper can work alongside your chosen HTTP tool, acting at a higher level to split up and coordinate requests. It also means the library remains dependency-free.
If you want to append block children directly to an existing page (or another block that supports children), you can use appendBlocks() in your code.
import { Client } from "@notionhq/client";
import { appendBlocks, createNotionBuilder } from "notion-helper";

const secret = "YOUR_NOTION_KEY";
const notion = new Client({ auth: secret });

let blocks = createNotionBuilder({
  limitNesting: false,
  limitChildren: false,
});

for (let i = 0; i < 10; i++) {
  blocks = blocks.startParent("bulleted_list_item", `Level ${i + 1}`);
}

blocks = blocks.build();

const page_id = "YOUR_PAGE_ID";

const response = await appendBlocks({
  block_id: page_id,
  children: blocks.content,
  client: notion,
});
If you'd like to append blocks after a specific block on a page (or in another block's children array), you can also include an after property with the block ID. Notion Helper still handles chunking here; in the case of multiple API calls, it intelligently changes the block ID in after between requests so their sequence is not broken.
Alternative HTTP Clients
You may want to use an alternative HTTP tool, such as axios or ky, instead of the official Notion TypeScript SDK, for making requests.
Or perhaps you still want to use the SDK, but you'd like to wrap it in your own custom callback that handles automatic retries and exponential backoff in case of rate-limiting (e.g. using async-retry).
In both of these cases, you can provide an apiCall property (instead of a client property) to both createPage() and appendBlocks().
The apiCall function receives an options object with a type property and a data property:
type: 'create_page'withdatacontaining the page object (parent, properties, etc.)type: 'append_blocks'withdatacontaining{ block_id, children, after }
This unified approach allows you to use a single callback function for both operations.
Along with apiCall, you should also include one or both of these callback functions:
getPage- returns the page object created in a Create Page request (needed forcreatePage()calls)getResults- returns the array of block objects created in an Append Block Children request (needed forappendBlocks()calls, and for anycreatePage()calls with body content that will be split up)
Note: When using createPage(), you'll probably want to include both of these functions. When you provide body content that needs to be split into multiple chunks, createPage() will handle the first one and then kick all the others over to appendBlocks() automatically.
Custom API call example using both createPage() and appendBlocks() with ky:
import ky from "ky";
import { createPage, appendBlocks, createNotionBuilder } from "notion-helper";

const secret = "YOUR_NOTION_KEY";

// Unified callback for both operations
const apiCall = async ({ type, data }) => {
  if (type === "create_page") {
    return await ky
      .post("https://api.notion.com/v1/pages", {
        json: data,
        headers: {
          Authorization: `Bearer ${secret}`,
          "Notion-Version": "2025-09-03",
          "Content-Type": "application/json",
        },
      })
      .json();
  } else if (type === "append_blocks") {
    const { block_id, children, after } = data;
    return await ky
      .patch(`https://api.notion.com/v1/blocks/${block_id}/children`, {
        json: { children, ...(after && { after }) },
        headers: {
          Authorization: `Bearer ${secret}`,
          "Notion-Version": "2025-09-03",
          "Content-Type": "application/json",
        },
      })
      .json();
  }
};

// Use the same callback for both operations
let page = createNotionBuilder()
  .parentDataSource("your-data-source-id")
  .title("Name", "My Page")
  .paragraph("Content")
  .build();

const pageResult = await createPage({
  data: page.content,
  apiCall,
  getPage: (response) => response,
  getResults: (response) => response.results,
});

// Append more blocks using the same callback
let blocks = createNotionBuilder({
  limitNesting: false,
  limitChildren: false,
});

for (let i = 0; i < 10; i++) {
  blocks = blocks.startParent("bulleted_list_item", `Level ${i + 1}`);
}

blocks = blocks.build();

const blockResult = await appendBlocks({
  block_id: pageResult.apiResponse.id,
  children: blocks.content,
  apiCall,
  getResults: (response) => response.results,
});
Building Up Pages
Notion-Helper can also help you to build up large page and block objects in your applications using far less verbose code than what you have to write when working the API directly.
It provides the createNotionBuilder() function, which gives you a fluent interface that allows you to chain methods in order to build up page objects.
For example, here's how we could build the data object in order to create a simple page in a task manager data source:
import { createNotionBuilder } from "notion-helper";

const builder = createNotionBuilder()
  .parentDataSource("your-data-source-id")
  .icon("🐕")
  .title("Name", "Walk the dog")
  .date("Due", "2025-10-29")
  .paragraph(
    "I need to walk Mrs. Nesbit's dog today. The leash is hanging near the door."
  )
  .build();

const page = builder.content;
By default, createNotionBuilder() expects that you'll be handling the actual API requests on your own instead of using createPage() or appendBlocks() to help you.
This means that createNotionBuilder() will respect Notion API request limits:
- A top-level
childrenarray will contain no more than 100 blocks. Additional blocks are moved to anadditionalBlocksproperty in the return object, which you can handle with Append Block Children requests - Only two levels of nested
childrenarrays will be allowed
Lower levels of the library handle other limits for you; for example, if more than 2,000 characters are provided to any text-based block method, the library has logic for splitting the text into multiple rich text objects.
import { createNotionBuilder } from "notion-helper";

const builder = createNotionBuilder()
  .parentDataSource("your-data-source-id")
  .icon("🐕")
  .title("Name", "Walk the dog")
  .date("Due", "2025-10-29")
  .loop(
    (page, sentence, index) => {
      page.numberedListItem(`This is numbered sentence #${index + 1}`);
    },
    Array.from({ length: 200 }, (_, index) => index)
  )
  .build();

const page = builder.content; // Will append the first 100 list items

const additionalBlocks = builder.additionalBlocks; // Array with the final 100 list items
If you're working with createPage to create pages, or with appendBlocks() to append child blocks, you don't need to worry about these API limits! Those functions intelligently split up the page body into multiple requests and automatically make them in sequence.
To set up createNotionBuilder() for use with these functions, pass an options object with the following flags:
const builder = createNotionBuilder({
  limitChildren: false,
  limitNesting: false,
});
This sets the builder up to allow any number of blocks in any children array (even nested ones), and allows for an infinite number of nested children levels.
By the way, you can use createNotionBuilder() to create block arrays, too – without embedding them in a page data object. To do this, simply omit any page meta or page property methods while chaining methods:
const blockArray = createNotionBuilder()
  .heading1("This is a heading")
  .paragraph("This is a paragraph")
  .build();
By default, createNotionBuilder() will try to smoothly handle null/undefined values passed to its methods, returning this and effectively ignoring the method call. This can be helpful when you're looping over an array of objects with inconsistent keys, or handling user input where even specific properties may or may not be defined by the user.
However, you can call createNotionBuilder({ strict: true }) if you'd like to enable strict mode. When enabled, null/undefined block types, property names, property types, and property/block values passed will cause the function to throw an error.
createNotionBuilder() includes methods for:
- Parents
parentDataSource(id)parentDs(id)(alias)parentPage(id)parentDatabase(id)(deprecated)parentDb(id)(deprecated, alias)
- IDs
pageId(pageId)(for updating pages)blockId(blockId)(for block operations)propertyId(propertyId)(for property operations)
- Icon
icon(emojiOrUrlOrFile)
- Cover
cover(urlOrFile)
- Templates
template(templateIdOrDefault)
- Position (for pages with a page parent)
position(positionChoice)
- Properties
property(name, type, value)(add custom property by type)title(name, value)richText(name, value)checkbox(name, value)date(name, value)email(name, value)files(name, value)multiSelect(name, value)number(name, value)people(name, value)phoneNumber(name, value)relation(name, value)select(name, value)status(name, value)url(name, value)
- Block types
addBlock(type, value, options)(generic, works for all block types)paragraph(options)heading1(options)heading2(options)heading3(options)bulletedListItem(options)numberedListItem(options)toDo(options)callout(options)quote(options)code(options)divider()image(options)video(options)audio(options)file(options)pdf(options)bookmark(options)embed(options)table(options)tableRow(options)columnList(options)(andendColumnList())column(options)(andendColumn())toggle(options)
All of the methods for blocks, properties, and parent/id/cover/template take the same arguments as the lower-level versions in the blocks, page_meta, and page_props APIs. In fact, they simply pass their arguments to those functions. Therefore, you can refer to the sections below on Block, Page Meta, and Page Property methods.
createNotionBuilder() also has some utility methods that make buiding up page objects even easier:
loop(callback, array)addExistingBlock(block)startParent(parentBlock)endParent()
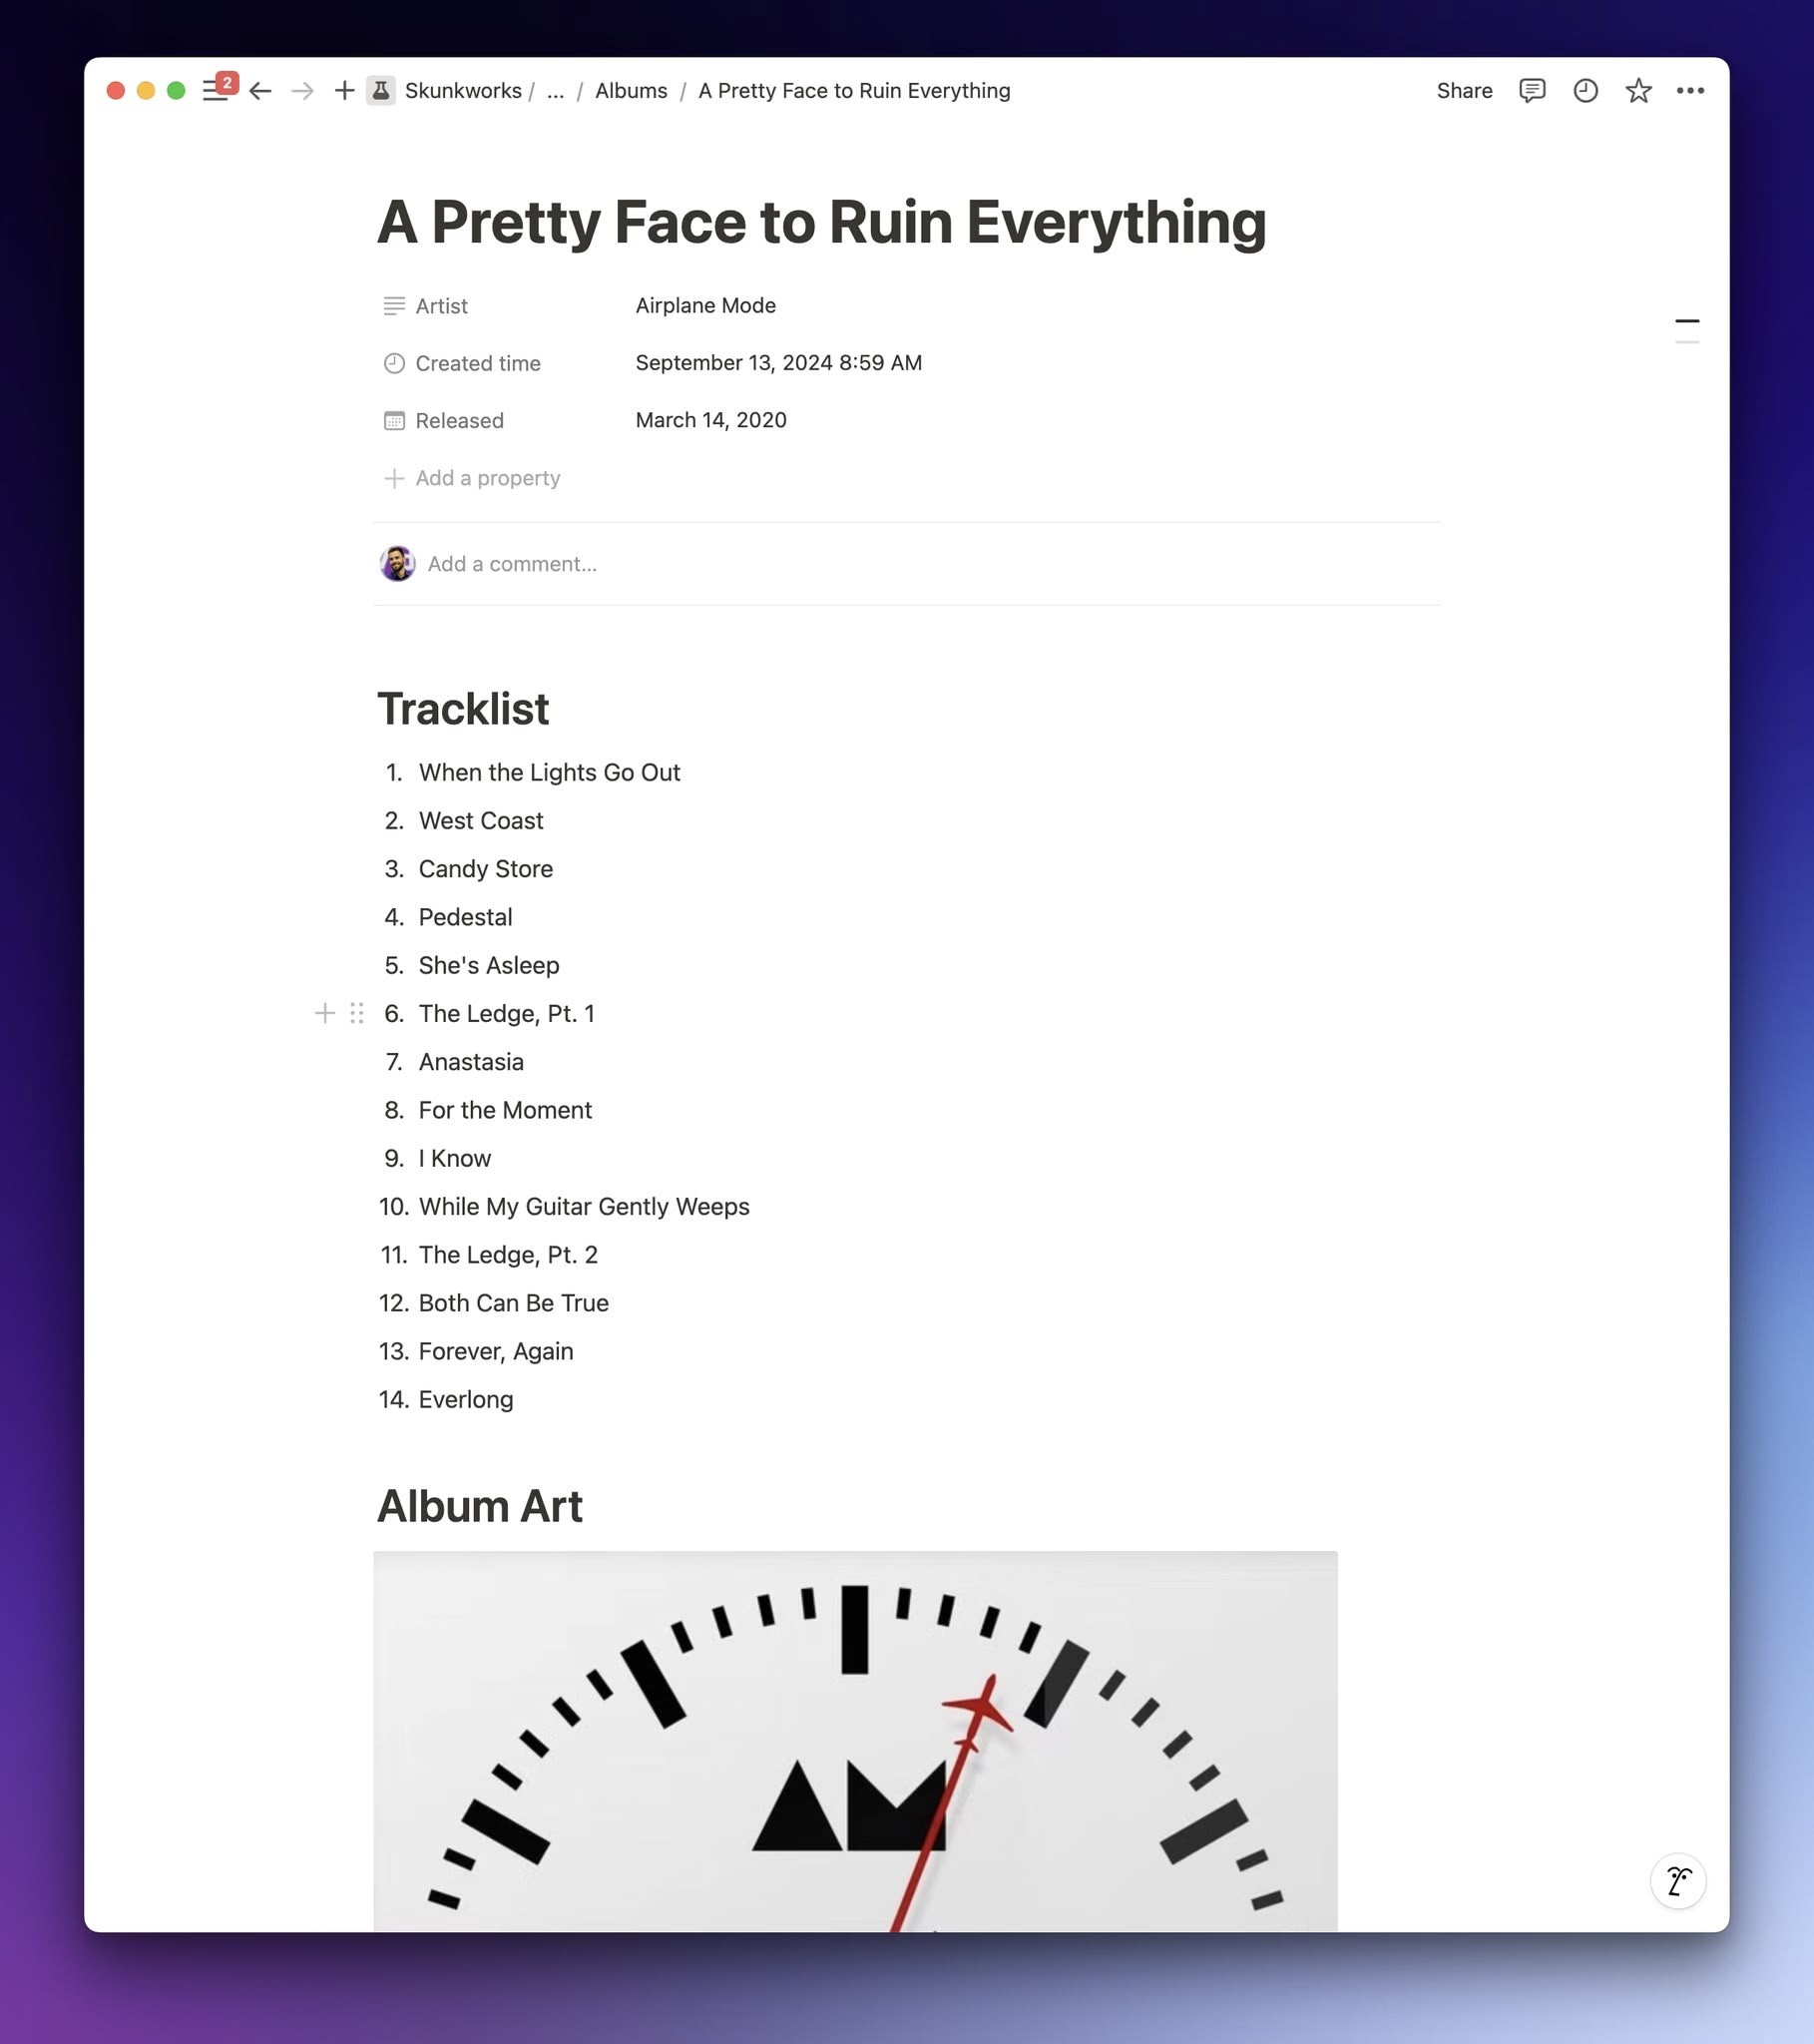
You can use loop() to create blocks from every element of an array, either by specifying a block type or using a callback. For example, let's say you want to create a Notion page with a numbered list representing the tracks in an album.
You can automatically call one of the block methods for each element in the tracks array by passing a block type for the first argument in loop():
const album = {
  name: "A Pretty Face to Ruin Everything",
  artist: "Airplane Mode",
  release_date: "03/14/2020",
  cover: "https://i.imgur.com/d3BBFhF.jpeg",
  tracks: [
    "When the Lights Go Out",
    "West Coast",
    "Candy Store",
    "Pedestal",
    "She's Asleep",
    "The Ledge, Pt. 1",
    "Anastasia",
    "For the Moment",
    "I Know",
    "While My Guitar Gently Weeps",
    "The Ledge, Pt. 2",
    "Both Can Be True",
    "Forever, Again",
    "Everlong",
  ],
};

const page = createNotionBuilder()
  .parentDataSource("your-data-source-id")
  .title("Name", album.name) // prop name, value
  .richText("Artist", album.artist)
  .date("Released", album.release_date)
  .heading1("Tracklist")
  .loop("numbered_list_item", album.tracks)
  .heading1("Album Art")
  .image(album.cover)
  .build();
Result:
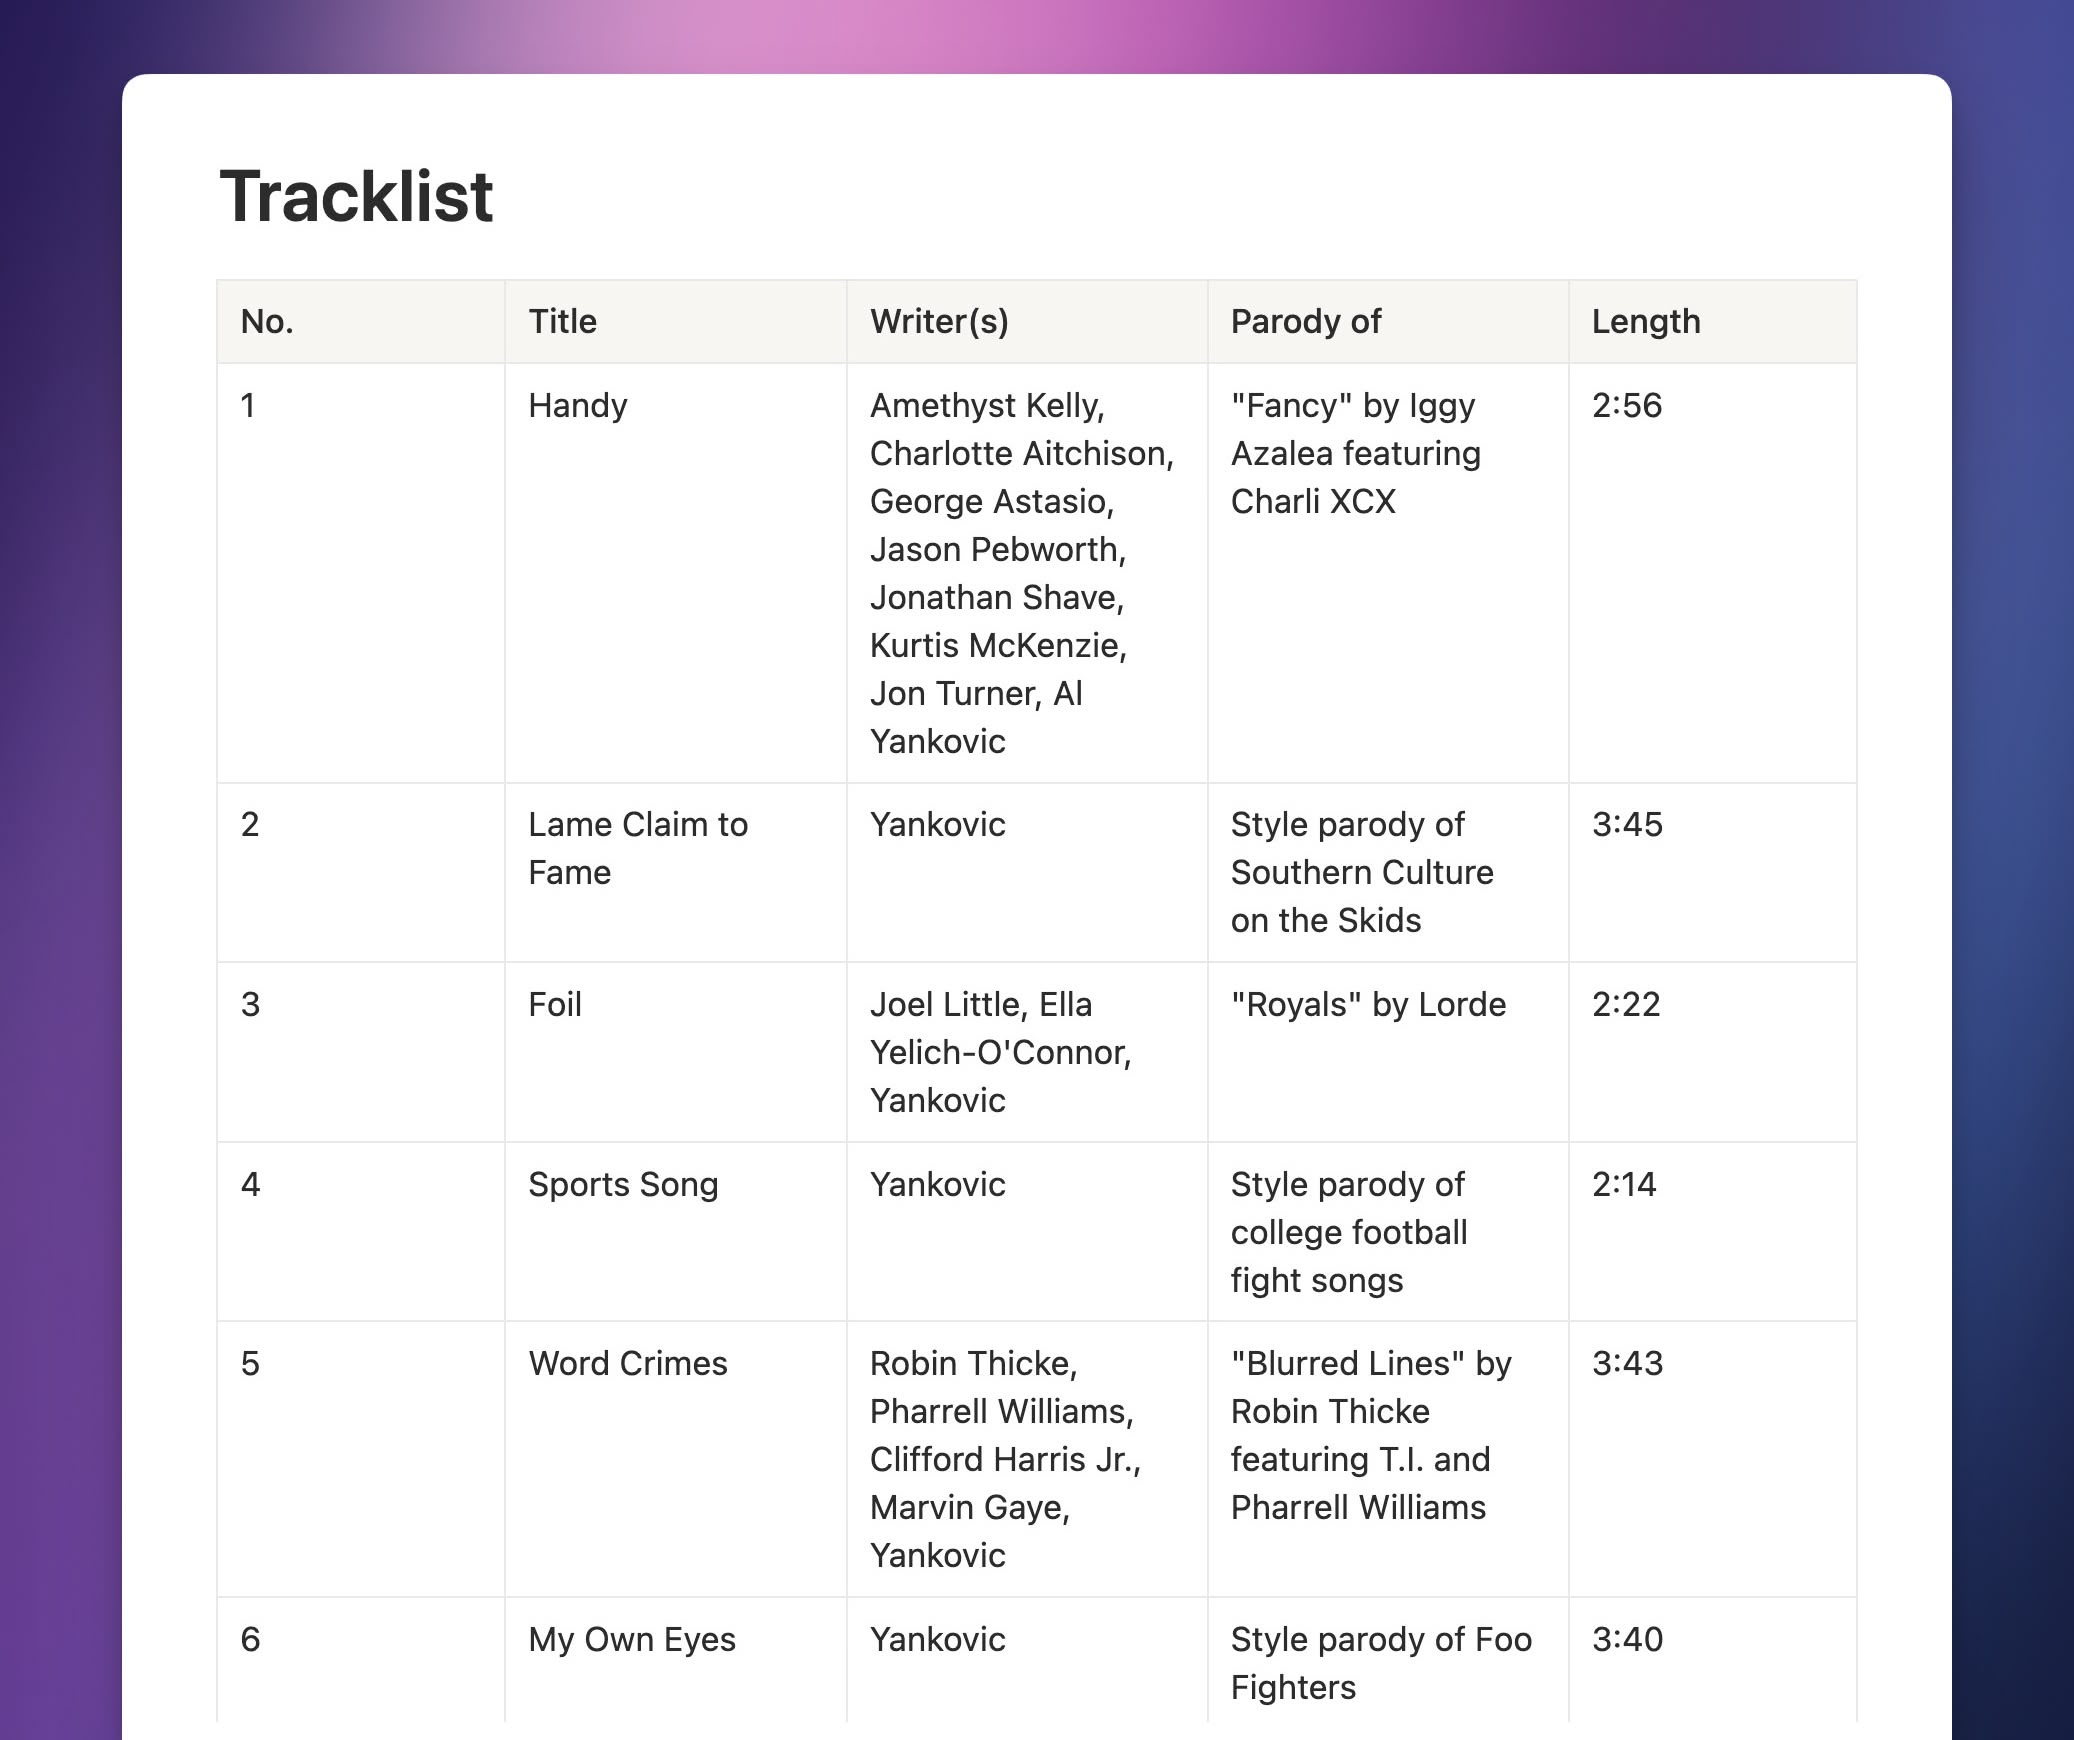
But what if you need to do something fancier for each array element? For that, provide a callback for the first argument in loop() instead of a block-type string. The callback's own arguments should be:
builder- The builder objectelement- Represents the current element of the arrayindex- Optional, for tracking the current index
const album = {
  name: "Mandatory Fun",
  artist: `"Weird Al" Yankovic`,
  release_date: "07/15/2014",
  tracks: [
    {
      "No.": 1,
      Title: "Handy",
      "Writer(s)": "Amethyst Kelly\nCharlotte Aitchison...",
      Length: "2:56",
    },
    /* ...more tracks... */
  ],
};

const page = createNotionBuilder()
  .parentDataSource(data_source_id)
  .title("Name", album.name)
  .heading1("Tracklist")
  .startParent("table", {
    has_column_header: true,
    rows: [["No", "Title", "Writer(s)", "Length"]],
  })
  .loop((page, track) => {
    page.tableRow([
      track["No."],
      track.Title,
      track["Writer(s)"],
      track.Length,
    ]);
  }, album.tracks)
  .endParent()
  .build();
Result:
The addExistingBlock() method lets you add an existing, properly-formatted blocks to the builder. It's useful if you have code, or another library (e.g. Martian, the markdown-to-Notion converter), that already creates Notion blocks.
const paragraphBlock = {
  object: "block",
  type: "paragraph",
  paragraph: {
    text: [
      {
        type: "text",
        text: {
          content:
            "This is a custom paragraph block, added via addExistingBlock().",
        },
      },
    ],
  },
};

const pageWithParagraph = createNotionBuilder()
  .title("Paragraph Example")
  .addExistingBlock(paragraphBlock)
  .build();
If you want to created nested block structures (i.e. add children to a block), you can use the startParent() and endParent() methods. Each instance of startParent() should have a matching instance of endParent() to close the parent block, after you've added all child blocks.
const nestedPage = createNotionBuilder()
  .title("Nested Blocks Example")
  .startParent("toggle", "Click to expand")
  .paragraph("This is a nested paragraph block.")
  .endParent()
  .build();
Remember: If you set the limitNesting option to false and use createPages() to make your API requests, you can nest as deeply as you want:
const nestedPage = createNotionBuilder({ limitNesting: false })
  .title("Nested Blocks Example")
  .startParent("bulleted_list_item", "It's")
    .startParent("bulleted_list_item", "Turtles"
      .startParent("bulleted_list_item", "All")
        .startParent("bulleted_list_item", "The")
          .startParent("bulleted_list_item", "Way")
            .bulletedListItem("Down")
          .endParent()
        .endParent()
      .endParent()
    .endParent()
  .endParent()
  .build();
Applying Database Templates
The Notion API allows you to apply data source templates to new pages as you're creating them.
This is super useful, but it introduces some complexity into the process of creating new pages. When you create a page from a template, you cannot include a children property in the Create Page request.
Additionally, the Notion API will reject Append Block Children requests if the template hasn't finished applying. The API also doesn't provide a way to directly check if the template has finished applying.
Notion Helper is set up to help you deal with this complexity. As I briefly showed in the Building Up Pages section above, you can use the template() method while creating page objects to set a template, either passing a specific template ID or "default" to use a data source's default template.
Note: Using "default" when a data source has no default template will cause a Create Page request to fail. The "Empty" option is not considered a default with respect to the API, even though it does show the "Default" badge in the Notion app.
When you use the createPage() function to create a page with a template, the library will automatically remove any children property present in the page body and save it for a subsequent Append Block Children request.
By default, it'll wait 3000ms (3 seconds) after getting a successful response from the Create Page call before starting to append any children blocks. This default setting should work for 95% of cases, since most data source templates don't create a large amount of page content. It also means that applications that were using Notion Helper prior to template support being added to the Notion API don't need to update their code.
However, Notion Helper provides you with a few ways to customize how createPage() waits for templates to finish applying. There are three optional properties you can set within the options argument:
templateWaitMs- sets a custom number of milliseconds (ms) to wait before attempting to append children. Defaults to 3000ms.onTemplatePageCreated- a custom callback function you can provide in order to handle verification of the created page however you like (for exmample: fetching the page's top-level blocks and comparing them to the top-level blocks within the actual template).skipAutoAppendOnTemplate- a Boolean which, when set tofalse, will causecreatePage()to skip appending children and include them in apendingChildrenproperty within the return object. This allows you to handle appending block children manually.
Out of these options, setting an onTemplatePageCreated callback provides the best balance between reliability and batteries-included functionality. The example below shows how you can build a callback that compares the number of top-level blocks in the created page against the number in the template page. It also includes basic retry logic.
See the Template Usage Guide for more examples and options.
import { createPage } from "notion-helper";
import { collectDataSourceTemplates } from "@notionhq/client";

// Sample verification helper function
async function verifyTemplateReady({
  template,
  dataSourceId,
  createdPageId,
  client,
  options = {},
}) {
  const { maxRetries = 3, waitMs = 2000 } = options;

  console.log("⏳ Verifying template content is ready...");

  // Validate template object
  if (
    !template ||
    typeof template !== "object" ||
    !template.hasOwnProperty("type")
  ) {
    throw new Error(
      'Template verification failed: template object is invalid or missing required "type" property'
    );
  }

  // Determine template ID based on template type
  let templateId;

  if (template.type === "template_id") {
    templateId = template.template_id;
    if (!templateId) {
      throw new Error(
        'Template verification failed: Missing template_id for template.type "template_id"'
      );
    }
    console.log(`   Using template_id: ${templateId}`);
  } else if (template.type === "default") {
    console.log("   Fetching default template from data source...");
    try {
      const templates = await collectDataSourceTemplates(client, {
        data_source_id: dataSourceId,
      });
      const defaultTemplate = templates.find((t) => t.is_default);
      if (defaultTemplate) {
        templateId = defaultTemplate.id;
        if (!templateId) {
          throw new Error(
            "Template verification failed: Default template found but it has no id"
          );
        }
        console.log(
          `   Found default template: ${defaultTemplate.name} (${templateId})`
        );
      } else {
        throw new Error(
          "Template verification failed: No default template found in the provided data source"
        );
      }
    } catch (error) {
      throw new Error(
        `Template verification failed: Could not fetch templates (${error.message})`
      );
    }
  } else if (template.type === "none") {
    throw new Error(
      'Template verification failed: Template type is "none", nothing to verify.'
    );
  } else {
    throw new Error(
      `Template verification failed: Unknown template type "${template.type}"`
    );
  }

  // Get template block count
  let templateBlockCount;
  try {
    const templateBlocks = await client.blocks.children.list({
      block_id: templateId,
      page_size: 100, // Note: If your template has >100 top-level blocks, you'll need pagination here
    });
    templateBlockCount = templateBlocks.results.length;
    console.log(`   Template has ${templateBlockCount} top-level blocks`);
  } catch (error) {
    throw new Error(
      `Template verification failed: Could not fetch template blocks (${error.message})`
    );
  }

  // Verify created page has same structure (with retries)
  let retries = 0;
  let verified = false;
  let currentBlockCount = 0;

  while (retries <= maxRetries && !verified) {
    await new Promise((resolve) => setTimeout(resolve, waitMs));
    let pageBlocks;
    try {
      pageBlocks = await client.blocks.children.list({
        block_id: createdPageId,
        page_size: 100,
      });
      currentBlockCount = pageBlocks.results.length;
    } catch (error) {
      throw new Error(
        `Template verification failed: Could not fetch page blocks for verification attempt ${
          retries + 1
        } (${error.message})`
      );
    }

    console.log(
      `   Attempt ${retries + 1}/${
        maxRetries + 1
      }: Page has ${currentBlockCount} blocks`
    );

    if (currentBlockCount >= templateBlockCount) {
      verified = true;
      console.log("✓ Template content verified!");
    } else {
      retries++;
    }
  }

  if (!verified) {
    throw new Error(
      `Template verification failed after ${maxRetries + 1} attempts. ` +
        `Expected at least ${templateBlockCount} blocks but found ${currentBlockCount}.`
    );
  }
}

// Use the verification callback
const result = await createPage({
  data: templatePage.content,
  client: notion,
  templateWaitMs: 0, // Set to 0 since verification callback handles waiting
  onTemplatePageCreated: async ({ page, template, fallbackWaitMs }) => {
    console.log(`✓ Template page created: ${page.id}`);
    console.log(
      `✓ Page URL: https://www.notion.so/${page.id.replace(/-/g, "")}`
    );

    // Verify template is ready before appending children
    await verifyTemplateReady({
      template: template,
      dataSourceId: data_source_id,
      createdPageId: page.id,
      client: notion,
      options: {
        maxRetries: 3,
        waitMs: 2000,
      },
    });
  },
});

console.log("✓ Page creation complete!");
console.log("✓ Template verification passed!");
Block Methods
Notion Helper lets you easily create any block supported by the Notion API. Instead of typing out verbose JSON, you can use Notion Helper's block API methods to create blocks in a single line.
You have two ways of using these functions. First, you can import the entire block API and use the methods directly. When you do, the block names are exactly as they are in the official Notion API (note how blocks with multi-word names use underscores: e.g. numbered_list_item):
import { block } from "notion-helper";

const paragraph = block.paragraph.createBlock("It's called a grind, bro.");

const item = block.numbered_list_item.createBlock("Pickles");

const table = block.table.createBlock({
  has_column_header: true,
  rows: [
    ["Name", "Type"],
    ["Charmander", "Fire"],
    ["Squirtle", "Water"],
  ],
});
Alternatively, you can use the shorthand alias methods for each block. You can import these directly as needed, and they're identical to the block methods available in the createNotionBuilder() fluent interface. These methods use camelCase for multi-word block names (e.g. numberedListItem):
import { paragraph, numberedListItem, table } from "notion-helper";

const paragraph = paragraph("It's called a grind, bro.");

const item = numberedListItem("Pickles");

const table = table({
  has_column_header: true,
  rows: [
    ["Name", "Type"],
    ["Charmander", "Fire"],
    ["Squirtle", "Water"],
  ],
});
Here's a table listing all avaible block methods, along with their shorthand alias functions. I've also linked the actual Notion API reference for each block type.
| Block Method | Shorthand Alias | API Reference |
| ---------------------------------------- | ---------------------------------- | ---------------------------------------------------------------------------------------------- |
| block.audio.createBlock() | audio() | Audio |
| block.bookmark.createBlock() | bookmark() | Bookmark |
| block.breadcrumb.createBlock() | (no shorthand) | Breadcrumb |
| block.bulleted_list_item.createBlock() | bulletedListItem() or bullet() | Bulleted list item |
| block.callout.createBlock() | callout() | Callout |
| block.code.createBlock() | code() | Code |
| block.column_list.createBlock() | columnList() | Column list and column |
| block.column.createBlock() | column() | Column list and column |
| block.divider.createBlock() | divider() | Divider |
| block.embed.createBlock() | embed() | Embed |
| block.file.createBlock() | file() | File |
| block.heading_1.createBlock() | heading1() | Heading 1 |
| block.heading_2.createBlock() | heading2() | Heading 2 |
| block.heading_3.createBlock() | heading3() | Heading 3 |
| block.image.createBlock() | image() | Image |
| block.numbered_list_item.createBlock() | numberedListItem() or num() | Numbered list item |
| block.paragraph.createBlock() | paragraph() | Paragraph |
| block.pdf.createBlock() | pdf() | PDF |
| block.quote.createBlock() | quote() | Quote |
| block.table.createBlock() | table() | Table |
| block.table_row.createBlock() | tableRow() | Table |
| block.table_of_contents.createBlock() | tableOfContents() | Table of contents |
| block.to_do.createBlock() | toDo() | To do |
| block.toggle.createBlock() | toggle() | Toggle blocks |
| block.video.createBlock() | video() | Video |
Below, you'll find a brief explanation of each block method and its alias function, along with a few snippets of example code you can use.
Audio
You can create audio blocks using either block.audio.createBlock() or the shorthand alias audio().
import { audio } from "notion-helper";

// External URL (string)
const block1 = audio(
  "https://thomasjfrank.com/wp-content/uploads/2025/11/Voice-Sample3.mp3"
);

// Options object with URL
const block2 = audio({
  url: "https://thomasjfrank.com/wp-content/uploads/2025/11/Voice-Sample3.mp3",
});

// With caption (string)
const block3 = audio({
  url: "https://thomasjfrank.com/wp-content/uploads/2025/11/Voice-Sample3.mp3",
  caption: "Check out my mixtape, man.",
});

// With caption (array of strings)
const block4 = audio({
  url: "https://thomasjfrank.com/wp-content/uploads/2025/11/Voice-Sample3.mp3",
  caption: ["Podcast episode", "Episode description"],
});

// File upload ID (from local upload or external import)
const block5 = audio("123e4567-e89b-12d3-a456-426614174000");
Bookmark
You can create bookmark blocks using either block.bookmark.createBlock() or the shorthand alias bookmark().
import { bookmark, buildRichTextObj } from "notion-helper";

// URL (string)
const block1 = bookmark("https://www.flylighter.com");

// Options object with URL
const block2 = bookmark({ url: "https://www.flylighter.com" });

// With caption (string)
const block3 = bookmark({
  url: "https://www.flylighter.com",
  caption: "Flylighter is a super-rad web clipper for Notion.",
});

// With caption (rich text)
const block4 = bookmark({
  url: "https://www.flylighter.com",
  caption: buildRichTextObj("Rich text caption with ", { bold: true }),
});
Breadcrumb
You can create breadcrumb blocks using block.breadcrumb.createBlock(). There is no shorthand alias for breadcrumb blocks.
import { breadcrumb } from "notion-helper";

// No parameters required
const block1 = breadcrumb();
Bulleted List Item
You can create bulleted list item blocks using either block.bulleted_list_item.createBlock() or the shorthand aliases bulletedListItem() or bullet().
import {
  bulletedListItem,
  bullet,
  buildRichTextObj,
  paragraph,
} from "notion-helper";

// Single string
const block1 = bulletedListItem(
  "You're both of you nuts. I know more about casino security than any man alive. I invented it!"
);

// Array of strings
const block2 = bulletedListItem(["My mistake. ", "Table's cold, anyway."]);

// Options object with color
const block3 = bulletedListItem({
  rich_text: "Somebody made a duplicate of my vault.",
  color: "red",
});

// With rich text formatting
const block4 = bulletedListItem({
  rich_text: [
    "Are you a man? Yes. ",
    buildRichTextObj("Are you alive? Yes. ", { italic: true }),
    buildRichTextObj("Evel Knievel.", { bold: true }),
  ].flat(),
  color: "blue_background",
});

// With child blocks
const block5 = bulletedListItem({
  rich_text:
    "I still owe you for the thing with the guy in the place, and I'll never forget it.",
  children: [
    paragraph(
      "You could try the lounge at the Caesar's. I hear it gets busy after three o'clock."
    ),
    bulletedListItem("Haha, he's a balloon boy!"),
  ],
});

// Using bullet() alias
const block6 = bullet("What, did you guys get a group rate or something?");
Callout
You can create callout blocks using either block.callout.createBlock() or the shorthand alias callout().
import { callout, buildRichTextObj, paragraph } from "notion-helper";

// Single string
const block1 = callout(
  "You're both of you nuts. I know more about casino security than any man alive. I invented it!"
);

// Options object with icon (emoji)
const block2 = callout({
  rich_text: "Somebody made a duplicate of my vault.",
  icon: "💡",
});

// With icon (external image URL) and color
const block3 = callout({
  rich_text:
    "I still owe you for the thing with the guy in the place, and I'll never forget it.",
  icon: "https://thomasjfrank.com/wp-content/uploads/2021/09/Thomas-Frank-Headshot-2021.jpg",
  color: "blue_background",
});

// With rich text formatting
const block4 = callout({
  rich_text: [
    "Are you a man? Yes. ",
    buildRichTextObj("Are you alive? Yes.", { italic: true }),
    buildRichTextObj("Evel Knievel.", { bold: true }),
  ].flat(),
  icon: "🚀",
  color: "yellow_background",
});

// With child blocks
const block5 = callout({
  rich_text:
    "You could try the lounge at the Caesar's. I hear it gets busy after three o'clock.",
  icon: "📌",
  children: [
    paragraph("Haha, he's a balloon boy!"),
    callout("What, did you guys get a group rate or something?"),
  ],
});
Code
You can create code blocks using either block.code.createBlock() or the shorthand alias code().
import { code, buildRichTextObj } from "notion-helper";

// Single line string
const block1 = code("console.log('My mistake. Table's cold, anyway.');");

// Multi-line string (template literal)
const block2 = code({
  rich_text: `const greet = (name) => {
    console.log(\`Hello, \${name}!\`);
};

greet("Notion");`,
  language: "javascript",
});

// Array of strings (joined with newlines)
const block3 = code([
  "def fib(n):",
  "    if n <= 1:",
  "        return n",
  "    return fib(n-1) + fib(n-2)",
]);

// With language and caption
const block4 = code({
  rich_text: `SELECT id, title
FROM pages
WHERE created_time >= CURRENT_DATE - INTERVAL '7 days';`,
  language: "sql",
  caption:
    "You're both of you nuts. I know more about casino security than any man alive. I invented it!",
});

// With rich text formatting
const block5 = code({
  rich_text: [
    "// ",
    buildRichTextObj("Bold comment", { italic: true }),
    buildRichTextObj(" with formatting", { bold: true }),
    "\nconst value = 1;",
  ].flat(),
  language: "javascript",
});
Column
You can create column blocks using either block.column.createBlock() or the shorthand alias column(). Columns must be children of column lists, and each column must have at least 1 child block.
import { column, paragraph, heading3 } from "notion-helper";

// Single string (creates column with one paragraph)
const block1 = column("Somebody made a duplicate of my vault.");

// Array of strings (creates column with multiple paragraphs)
const block2 = column([
  "I still owe you for the thing with the guy in the place, and I'll never forget it.",
  "You could try the lounge at the Caesar's. I hear it gets busy after three o'clock.",
]);

// Array with mixed content (strings and block objects)
const block3 = column([
  "Haha, he's a balloon boy!",
  heading3("What, did you guys get a group rate or something?"),
  "All right chaps. Hang on to your knickers.",
]);
Column List
You can create column list blocks using either block.column_list.createBlock() or the shorthand alias columnList(). Column lists must have at least 2 columns, and each column must have at least 1 child block.
import { columnList, column, paragraph } from "notion-helper";

// Number parameter (creates N columns with empty paragraphs)
const block1 = columnList(2);

// Array of strings (each string becomes a column)
const block2 = columnList([
  "My mistake. Table's cold, anyway.",
  "You're both of you nuts. I know more about casino security than any man alive. I invented it!",
]);

// Array of arrays (each inner array becomes a column with multiple children)
const block3 = columnList([
  [
    "Somebody made a duplicate of my vault.",
    "I still owe you for the thing with the guy in the place, and I'll never forget it.",
  ],
  ["Haha, he's a balloon boy!"],
]);

// With pre-built column objects
const block4 = columnList([
  column(["Are you a man? Yes.", "Are you alive? Yes. Evel Knievel."]),
  column(["What, did you guys get a group rate or something?"]),
]);
Divider
You can create divider blocks using either block.divider.createBlock() or the shorthand alias divider().
import { divider } from "notion-helper";

// No parameters required
const block1 = divider();
Embed
You can create embed blocks using either block.embed.createBlock() or the shorthand alias embed().
import { embed } from "notion-helper";

// URL (string)
const block1 = embed("https://www.youtube.com/watch?v=ec5m6t77eYM");

// Options object with URL
const block2 = embed({ url: "https://www.youtube.com/watch?v=ec5m6t77eYM" });

// Twitter/X embed
const block3 = embed("https://x.com/TomFrankly/status/1985017900433051866");

// CodePen embed
const block4 = embed("https://en.wikipedia.org/wiki/Byte");
File
You can create file blocks using either block.file.createBlock() or the shorthand alias file().
import { file, buildRichTextObj } from "notion-helper";

// External URL (string)
const block1 = file(
  "https://collegeinfogeek.com/wp-content/uploads/2015/01/10steps-reddit.pdf"
);

// Options object with URL
const block2 = file({
  url: "https://collegeinfogeek.com/wp-content/uploads/2015/01/10steps-reddit.pdf",
});

// With custom name
const block3 = file({
  url: "https://collegeinfogeek.com/wp-content/uploads/2015/01/10steps-reddit.pdf",
  name: "10 Steps to Earning Awesome Grades (preview)",
});

// With caption (string)
const block4 = file({
  url: "https://collegeinfogeek.com/wp-content/uploads/2015/01/10steps-reddit.pdf",
  caption: "The Reddit preview of the 10 Steps to Earning Awesome Grades book.",
});

// With name and caption
const block5 = file({
  url: "https://collegeinfogeek.com/wp-content/uploads/2015/01/10steps-reddit.pdf",
  name: "10 Steps to Earning Awesome Grades (preview)",
  caption: "The Reddit preview of the 10 Steps to Earning Awesome Grades book.",
});

// File upload ID (from local upload or external import)
const block6 = file("123e4567-e89b-12d3-a456-426614174000");
Heading 1
You can create heading 1 blocks using either block.heading_1.createBlock() or the shorthand alias heading1().
import { heading1, buildRichTextObj, paragraph } from "notion-helper";

// Single string
const block1 = heading1(
  "You're both of you nuts. I know more about casino security than any man alive. I invented it!"
);

// Array of strings
const block2 = heading1(["My mistake. ", "Table's cold, anyway."]);

// Options object with color
const block3 = heading1({
  rich_text: "Somebody made a duplicate of my vault.",
  color: "red",
});

// With rich text formatting
const block4 = heading1({
  rich_text: [
    "Are you a man? Yes. ",
    buildRichTextObj("Are you alive? Yes.", { italic: true }),
    buildRichTextObj(" Evel Knievel.", { bold: true }),
  ].flat(),
  color: "blue_background",
});

// Toggle heading with children
const block5 = heading1({
  rich_text:
    "I still owe you for the thing with the guy in the place, and I'll never forget it.",
  is_toggleable: true,
  children: [
    paragraph(
      "You could try the lounge at the Caesar's. I hear it gets busy after three o'clock."
    ),
  ],
});
Heading 2
You can create heading 2 blocks using either block.heading_2.createBlock() or the shorthand alias heading2().
import { heading2, buildRichTextObj, paragraph } from "notion-helper";

// Single string
const block1 = heading2("Haha, he's a balloon boy!");

// Array of strings
const block2 = heading2([
  "What, did you guys get a group rate or something? ",
  "All right chaps. Hang on to your knickers.",
]);

// Options object with color
const block3 = heading2({
  rich_text:
    "You're both of you nuts. I know more about casino security than any man alive. I invented it!",
  color: "yellow",
});

// With rich text formatting
const block4 = heading2({
  rich_text: [
    "Are you a man? Yes. ",
    buildRichTextObj("Are you alive? Yes.", { italic: true }),
    buildRichTextObj(" Evel Knievel.", { bold: true }),
  ].flat(),
  color: "green_background",
});

// Toggle heading with children (implicit toggle)
const block5 = heading2({
  rich_text: "My mistake. Table's cold, anyway.",
  children: [paragraph("Somebody made a duplicate of my vault.")],
});
Heading 3
You can create heading 3 blocks using either block.heading_3.createBlock() or the shorthand alias heading3().
import { heading3, buildRichTextObj, paragraph } from "notion-helper";

// Single string
const block1 = heading3(
  "I still owe you for the thing with the guy in the place, and I'll never forget it."
);

// Array of strings
const block2 = heading3([
  "You could try the lounge at the Caesar's. ",
  "I hear it gets busy after three o'clock.",
]);

// Options object with color
const block3 = heading3({
  rich_text: "Haha, he's a balloon boy!",
  color: "purple",
});

// With rich text formatting
const block4 = heading3({
  rich_text: [
    "Are you a man? Yes. ",
    buildRichTextObj("Are you alive? Yes.", { italic: true }),
    buildRichTextObj(" Evel Knievel.", { bold: true }),
  ].flat(),
  color: "orange_background",
});

// Toggle heading with children
const block5 = heading3({
  rich_text: "What, did you guys get a group rate or something?",
  is_toggleable: true,
  children: [paragraph("All right chaps. Hang on to your knickers.")],
});
Image
You can create image blocks using either block.image.createBlock() or the shorthand alias image().
import { image, buildRichTextObj } from "notion-helper";

// External URL (string)
const block1 = image("https://i.imgur.com/5vSShIw.jpeg");

// Options object with URL
const block2 = image({
  url: "https://i.imgur.com/5vSShIw.jpeg",
});

// With caption (string)
const block3 = image({
  url: "https://i.imgur.com/5vSShIw.jpeg",
  caption: "A beautiful landscape image",
});

// With caption (array of strings)
const block4 = image({
  url: "https://i.imgur.com/5vSShIw.jpeg",
  caption: ["First line of caption", "Second line of caption"],
});

// With caption (rich text)
const block5 = image({
  url: "https://i.imgur.com/5vSShIw.jpeg",
  caption: buildRichTextObj("Rich text caption with ", { bold: true }),
});

// File upload ID (from local upload or external import)
const block6 = image("123e4567-e89b-12d3-a456-426614174000");
Numbered List Item
You can create numbered list item blocks using either block.numbered_list_item.createBlock() or the shorthand aliases numberedListItem() or num().
import {
  numberedListItem,
  num,
  buildRichTextObj,
  paragraph,
} from "notion-helper";

// Single string
const block1 = numberedListItem(
  "You're both of you nuts. I know more about casino security than any man alive. I invented it!"
);

// Array of strings
const block2 = numberedListItem(["My mistake. ", "Table's cold, anyway."]);

// Options object with color
const block3 = numberedListItem({
  rich_text: "Somebody made a duplicate of my vault.",
  color: "red",
});

// With rich text formatting
const block4 = numberedListItem({
  rich_text: [
    "Are you a man? Yes. ",
    buildRichTextObj("Are you alive? Yes.", { italic: true }),
    buildRichTextObj(" Evel Knievel.", { bold: true }),
  ].flat(),
  color: "blue_background",
});

// With child blocks
const block5 = numberedListItem({
  rich_text:
    "I still owe you for the thing with the guy in the place, and I'll never forget it.",
  children: [
    paragraph(
      "You could try the lounge at the Caesar's. I hear it gets busy after three o'clock."
    ),
    numberedListItem("Haha, he's a balloon boy!"),
  ],
});

// Using num() alias
const block6 = num("What, did you guys get a group rate or something?");
Paragraph
You can create paragraph blocks using either block.paragraph.createBlock() or the shorthand alias paragraph().
import { paragraph, buildRichTextObj } from "notion-helper";

// Single string
const block1 = paragraph(
  "You're both of you nuts. I know more about casino security than any man alive. I invented it!"
);

// Array of strings (combined into a single paragraph)
const block2 = paragraph(["My mistake. ", "Table's cold, anyway."]);

// Options object with color
const block3 = paragraph({
  rich_text: "Somebody made a duplicate of my vault.",
  color: "red",
});

// Rich text with formatting
const block4 = paragraph({
  rich_text: [
    "Are you a man? Yes. ",
    buildRichTextObj("Are you alive? Yes.", { bold: true, color: "blue" }),
  ].flat(),
  color: "yellow",
});

// With child blocks (nested paragraphs)
const block5 = paragraph({
  rich_text:
    "I still owe you for the thing with the guy in the place, and I'll never forget it.",
  children: [
    paragraph(
      "You could try the lounge at the Caesar's. I hear it gets busy after three o'clock."
    ),
    paragraph("Haha, he's a balloon boy!"),
  ],
});

// Mixed strings and rich text objects
const block6 = paragraph(
  [
    "What, did you guys get a group rate or something? ",
    buildRichTextObj("All right chaps. Hang on to your knickers.", {
      italic: true,
    }),
  ].flat()
);You can create PDF blocks using either block.pdf.createBlock() or the shorthand alias pdf().
import { pdf, buildRichTextObj } from "notion-helper";

// External URL (string)
const block1 = pdf(
  "https://collegeinfogeek.com/wp-content/uploads/2015/01/10steps-reddit.pdf"
);

// Options object with URL
const block2 = pdf({
  url: "https://collegeinfogeek.com/wp-content/uploads/2015/01/10steps-reddit.pdf",
});

// With caption (string)
const block3 = pdf({
  url: "https://collegeinfogeek.com/wp-content/uploads/2015/01/10steps-reddit.pdf",
  caption: "The Reddit preview of the 10 Steps to Earning Awesome Grades book.",
});

// With caption (array of strings)
const block4 = pdf({
  url: "https://collegeinfogeek.com/wp-content/uploads/2015/01/10steps-reddit.pdf",
  caption: ["PDF document", "Document description"],
});

// With caption (rich text)
const block5 = pdf({
  url: "https://collegeinfogeek.com/wp-content/uploads/2015/01/10steps-reddit.pdf",
  caption: buildRichTextObj("Rich text caption with ", { bold: true }),
});

// File upload ID (from local upload or external import)
const block6 = pdf("123e4567-e89b-12d3-a456-426614174000");
Quote
You can create quote blocks using either block.quote.createBlock() or the shorthand alias quote().
import { quote, buildRichTextObj, paragraph } from "notion-helper";

// Single string
const block1 = quote(
  "You're both of you nuts. I know more about casino security than any man alive. I invented it!"
);

// Array of strings
const block2 = quote(["My mistake. ", "Table's cold, anyway."]);

// Options object with color
const block3 = quote({
  rich_text: "Somebody made a duplicate of my vault.",
  color: "gray",
});

// With rich text formatting
const block4 = quote({
  rich_text: [
    "Are you a man? Yes. ",
    buildRichTextObj("Are you alive? Yes.", { italic: true }),
    buildRichTextObj(" Evel Knievel.", { bold: true }),
  ].flat(),
  color: "blue_background",
});

// With child blocks
const block5 = quote({
  rich_text:
    "I still owe you for the thing with the guy in the place, and I'll never forget it.",
  children: [
    paragraph(
      "You could try the lounge at the Caesar's. I hear it gets busy after three o'clock."
    ),
    quote("Haha, he's a balloon boy!"),
  ],
});
Table
You can create table blocks using either block.table.createBlock() or the shorthand alias table().
import {
  table,
  tableRow,
  buildRichTextObj,
  createNotionBuilder,
} from "notion-helper";

// Options object with rows array
const block1 = table({
  has_column_header: true,
  has_row_header: false,
  rows: [
    ["Name", "Role", "Experience"],
    ["Thomas", "Creator", 10],
    ["Alex", "Designer", 5],
  ],
});

// Number parameter (creates table with N columns, then add rows incrementally)
const block2 = table(3);
// Then use .tableRow() to add rows and .endTable() to finish

// With pre-built table row objects
const block3 = table({
  rows: [
    tableRow(["Header 1", "Header 2"]),
    tableRow(["Row 1, Cell 1", "Row 1, Cell 2"]),
    tableRow(["Row 2, Cell 1", "Row 2, Cell 2"]),
  ],
  has_column_header: true,
  has_row_header: false,
});

// With rich text objects in rows
const block4 = table({
  rows: [
    [
      buildRichTextObj("Name", { bold: true }),
      buildRichTextObj("Role", { bold: true }),
    ],
    ["Thomas", "Creator"],
  ],
  has_column_header: true,
});

// Using table() builder method with incremental rows (table_width inferred from first row)
// Note: table() is an alias for startParent("table", { ... }). endTable() is an alias for endParent().
const page1 = createNotionBuilder()
  .table({
    has_column_header: true,
    has_row_header: false,
  })
  .tableRow(["Header 1", "Header 2", "Header 3"])
  .tableRow(["Row 1, Cell 1", "Row 1, Cell 2", "Row 1, Cell 3"])
  .tableRow(["Row 2, Cell 1", "Row 2, Cell 2", "Row 2, Cell 3"])
  .endTable()
  .build();

// Using table() builder method with explicit table_width
const page2 = createNotionBuilder()
  .table({
    has_column_header: true,
    has_row_header: false,
    table_width: 4,
  })
  .tableRow(["Col 1", "Col 2", "Col 3", "Col 4"])
  .tableRow(["A", "B", "C", "D"])
  .endTable()
  .build();
Table Row
You can create table row blocks using either block.table_row.createBlock() or the shorthand alias tableRow().
import { tableRow, buildRichTextObj } from "notion-helper";

// Array of strings and numbers
const block1 = tableRow(["Product", "Price", 50]);

// Array with rich text objects
const block2 = tableRow([
  buildRichTextObj("Cell 1"),
  buildRichTextObj("Cell 2", { bold: true }),
  buildRichTextObj("Cell 3", { italic: true }),
]);

// Mixed content
const block3 = tableRow([
  "Plain text",
  buildRichTextObj("Formatted text", { color: "green" }),
  42,
]);
Table of Contents
You can create table of contents blocks using either block.table_of_contents.createBlock() or the shorthand alias tableOfContents().
import { tableOfContents } from "notion-helper";

// No parameters (default color)
const block1 = tableOfContents();

// String color parameter
const block2 = tableOfContents("red");

// Options object with color
const block3 = tableOfContents({ color: "blue" });
To Do
You can create to-do blocks using either block.to_do.createBlock() or the shorthand alias toDo().
import { toDo, buildRichTextObj, paragraph } from "notion-helper";

// Single string (unchecked by default)
const block1 = toDo(
  "You're both of you nuts. I know more about casino security than any man alive. I invented it!"
);

// Array of strings
const block2 = toDo(["My mistake. ", "Table's cold, anyway."]);

// Options object with checked state
const block3 = toDo({
  rich_text: "Somebody made a duplicate of my vault.",
  checked: true,
});

// Options object with color
const block4 = toDo({
  rich_text:
    "I still owe you for the thing with the guy in the place, and I'll never forget it.",
  checked: false,
  color: "yellow_background",
});

// With rich text formatting
const block5 = toDo({
  rich_text: [
    "Are you a man? Yes. ",
    buildRichTextObj("Are you alive? Yes.", { italic: true }),
    buildRichTextObj(" Evel Knievel.", { bold: true }),
  ].flat(),
  checked: false,
});

// With child blocks
const block6 = toDo({
  rich_text:
    "You could try the lounge at the Caesar's. I hear it gets busy after three o'clock.",
  checked: false,
  children: [
    paragraph("Haha, he's a balloon boy!"),
    toDo({
      rich_text: "What, did you guys get a group rate or something?",
      checked: true,
    }),
  ],
});
Toggle
You can create toggle blocks using either block.toggle.createBlock() or the shorthand alias toggle().
import { toggle, buildRichTextObj, paragraph, heading2 } from "notion-helper";

// Single string
const block1 = toggle(
  "You're both of you nuts. I know more about casino security than any man alive. I invented it!"
);

// Array of strings
const block2 = toggle(["My mistake. ", "Table's cold, anyway."]);

// Options object with color
const block3 = toggle({
  rich_text: "Somebody made a duplicate of my vault.",
  color: "red",
});

// With rich text formatting
const block4 = toggle({
  rich_text: [
    "Are you a man? Yes. ",
    buildRichTextObj("Are you alive? Yes.", { italic: true }),
    buildRichTextObj(" Evel Knievel.", { bold: true }),
  ].flat(),
  color: "blue_background",
});

// With child blocks
const block5 = toggle({
  rich_text:
    "I still owe you for the thing with the guy in the place, and I'll never forget it.",
  children: [
    paragraph(
      "You could try the lounge at the Caesar's. I hear it gets busy after three o'clock."
    ),
    heading2("Haha, he's a balloon boy!"),
    toggle("What, did you guys get a group rate or something?"),
  ],
});
Video
You can create video blocks using either block.video.createBlock() or the shorthand alias video().
import { video, buildRichTextObj } from "notion-helper";

// External URL (string)
const block1 = video("https://www.youtube.com/watch?v=ec5m6t77eYM");

// Options object with URL
const block2 = video({
  url: "https://www.youtube.com/watch?v=ec5m6t77eYM",
});

// With caption (string)
const block3 = video({
  url: "https://www.youtube.com/watch?v=ec5m6t77eYM",
  caption: "Never gonna give you up",
});

// With caption (array of strings)
const block4 = video({
  url: "https://www.youtube.com/watch?v=ec5m6t77eYM",
  caption: ["Video title", "Video description"],
});

// With caption (rich text)
const block5 = video({
  url: "https://www.youtube.com/watch?v=ec5m6t77eYM",
  caption: buildRichTextObj("Rich text caption with ", { bold: true }),
});

// File upload ID (from local upload or external import)
const block6 = video("123e4567-e89b-12d3-a456-426614174000");
Page Meta Methods
Notion Helper provides a page_meta API for creating page meta properties, such as:
parentpage_idblock_idproperty_idcovericontemplateposition
To set data source property values, see the Page Property Methods below to explore Notion Helper's page_props API.
You have two ways of using these functions. First, you can import the entire page_meta API and use the methods directly. When you do, the page meta property names are exactly as they are in the official Notion API:
import { page_meta } from "notion-helper";

const parent = page_meta.parent.createMeta({
  id: "your-data-source-id",
  type: "data_source_id",
});

const icon = page_meta.icon.createMeta("🐕");

const cover = page_meta.cover.createMeta("https://example.com/cover.jpg");
Alternatively, you can use the shorthand alias methods for each page meta type. You can import these directly as needed, and they're identical to the page meta methods available in the createNotionBuilder() fluent interface:
import {
  parentDataSource,
  parentPage,
  icon,
  cover,
  pageId,
  blockId,
  propertyId,
  position,
} from "notion-helper";

const parent = parentDataSource("your-data-source-id");

const pageParent = parentPage("your-page-id"); // If parent is a page

const icon = icon("🐕");

const cover = cover("https://example.com/cover.jpg");

const pageIdObj = pageId("your-page-id");

const blockIdObj = blockId("your-block-id");

const position = position("page_start"); // Only for pages with page parent
Here's a table listing all available page meta methods, along with their shorthand alias functions:
| Page Meta Method | Shorthand Alias | Notes |
| --------------------------------- | ------------------------------------ | --------------------------------------------- |
| page_meta.parent.createMeta() | parentDataSource() or parentDs() | Creates a parent data source object |
| page_meta.parent.createMeta() | parentPage() | Creates a parent page object |
| page_meta.parent.createMeta() | parentDatabase() or parentDb() | Creates a parent database object (deprecated) |
| page_meta.page.createMeta() | pageId() | Creates a page_id object