
react-cartoon-planet
v1.1.2
Published
Animated cartoon globe for React — zoom from orbit to ground level
Maintainers
 krzysztofradomski
Readme
react-cartoon-planet
Animated cartoon globe for React — zoom from orbit to ground level, switch visual styles, drop markers, and drive the camera from your own UI.
Install
npm install react-cartoon-planet three
# or
pnpm add react-cartoon-planet three
Peer dependencies (you install these):
react(18 or 19)react-domthree(>=0.160) — WebGL scene, globe mesh, markers, custom render modes
three is a peer so your app and the globe share one Three.js instance — that's what makes controller.getThree() objects, instanceof checks, and the re-exported THREE all line up. Construct your own meshes from the package's re-exported THREE (see Direct Three.js access).
React Native / Expo? The optional
react-cartoon-planet/nativeentry point renders throughexpo-glinstead of a DOM canvas and addsreact-native+expo-glas (optional) peers — see React Native / Expo.
Dependencies (installed automatically with the package):
earcut— polygon triangulation for continent geometry
Import the bundled stylesheet once in your app:
import "react-cartoon-planet/style.css";Quick start
Mount the globe, wire a ref for programmatic control, and compose the built-in HUD / sidebar controls as children:
import { useRef, useState } from "react";
import "react-cartoon-planet/style.css";
import {
  AltitudeDisplay,
  BUILTIN_RENDER_MODES,
  CartoonPlanet,
  EARTH_MAP,
  FpsDisplay,
  HintDisplay,
  MarkerLabelsDisplay,
  MarkerManagerControl,
  MOON_MAP,
  OutlineStyleControl,
  PlanetMapControl,
  PlacingToastDisplay,
  QuickJumpControl,
  RenderModeControl,
  ScaleBarDisplay,
  StartLevelControl,
  START_VIEWS,
  SURFACE_RENDER_MODE,
} from "react-cartoon-planet";
import type { CartoonPlanetController, GlobeState } from "react-cartoon-planet";

export function GlobeDemo() {
  const controllerRef = useRef<CartoonPlanetController | null>(null);
  const [planetState, setPlanetState] = useState<GlobeState | null>(null);

  return (
    <div style={{ width: "100%", height: "100vh" }}>
      <header>
        <button
          onClick={() => controllerRef.current?.flyTo(-74.006, 40.7128, 1_500)}
        >
          Fly to NYC
        </button>
        <button
          onClick={() =>
            controllerRef.current?.flyTo(
              START_VIEWS.globe.lng,
              START_VIEWS.globe.lat,
              START_VIEWS.globe.alt_m,
              { duration: 900 },
            )
          }
        >
          Reset view
        </button>
      </header>

      <CartoonPlanet
        ref={controllerRef}
        maps={[EARTH_MAP, MOON_MAP]}
        renderModes={BUILTIN_RENDER_MODES}
        initialState={{
          map: EARTH_MAP,
          renderMode: SURFACE_RENDER_MODE,
          startView: "globe",
        }}
        onStateChange={setPlanetState}
      >
        <FpsDisplay />
        <AltitudeDisplay />
        <ScaleBarDisplay />
        <MarkerLabelsDisplay />
        <PlacingToastDisplay />
        <HintDisplay />
        <StartLevelControl />
        <PlanetMapControl />
        <RenderModeControl />
        <OutlineStyleControl />
        <QuickJumpControl />
        <MarkerManagerControl />
      </CartoonPlanet>

      <footer>
        lng {planetState?.hud.focusLng?.toFixed(2)}° · alt{" "}
        {planetState?.hud.scaleLabel}
      </footer>
    </div>
  );
}
Give the canvas room to breathe — the globe fills its container (width / height: 100% on a sized parent works well) and tracks container resizes automatically via ResizeObserver, so collapsing surrounding panels never leaves the canvas stretched.
Starting camera (initialCamera)
startView snaps the camera to a named preset ("globe" / "ground") on first mount. To open on an exact spot instead — e.g. the user's current location, or a region rather than the default globe view — pass initialCamera in initialState. It overrides startView for the initial framing only; later flyTo / setStartView calls work as usual.
<CartoonPlanet
  initialState={{
    map: EARTH_MAP,
    renderMode: SURFACE_RENDER_MODE,
    initialCamera: { lng: 15, lat: 50, alt_m: 6_000_000 }, // open centred on Europe
  }}
/>
React Native / Expo
The globe also runs on React Native through a dedicated entry point that renders into an expo-gl context instead of a DOM canvas. The scene engine, markers, render modes, initialCamera, and the full controller API are identical — only the host view and input wiring differ.
npx expo install expo-gl
# plus a gesture source for pan/zoom/tap, e.g. react-native-gesture-handler
Native adds react-native and expo-gl as optional peers alongside three.
import { PixelRatio, View } from "react-native";
import * as THREE from "three";
import {
  CartoonPlanetNative,
  EARTH_MAP,
  type CartoonPlanetController,
  type GlobeInteractionTarget,
} from "react-cartoon-planet/native";

// You build the renderer so the Expo GL context + canvas shim stay under your control.
const createGlRenderer = (gl, width, height) =>
  new THREE.WebGLRenderer({ context: gl, antialias: true /* + a canvas shim */ });

<CartoonPlanetNative
  createGlRenderer={createGlRenderer}
  pixelRatio={Math.min(PixelRatio.get(), 2)}
  maps={[EARTH_MAP]}
  initialState={{
    map: EARTH_MAP,
    initialCamera: { lng: 15, lat: 50, alt_m: 6_000_000 },
  }}
  onReady={(c: CartoonPlanetController) => {
    /* same controller API: flyTo, setMarkers, … */
  }}
  onInteractionReady={(target: GlobeInteractionTarget) => {
    // RN has no DOM pointer events — forward your gesture handler's events:
    // target.dispatch({ type: "pointerdown", clientX, clientY, pointerId: 1 })
    // types: "pointerdown" | "pointermove" | "pointerup" | "wheel" | "click"
  }}
/>;
How native differs from the web <CartoonPlanet>:
createGlRenderer(gl, width, height)(required) — you construct theTHREE.WebGLRendereragainst the Expo GL context, keeping the canvas shim and pixel ratio yours.onInteractionReady(target)— pan / zoom / tap are dispatched manually viatarget.dispatch(...); wire it to your gesture library.- No composable UI children /
uiprop — HUD and sidebar panels are web-only. Lay native controls out as ordinary RN views over the globe. dayNight,clouds,bloomdefault tofalseon native (they default totrueon web), so the base globe stays cheap on mobile GPUs.- The default render mode is
SURFACE_NATIVE_RENDER_MODE— a lighter solid mode tuned for mobile — which is also exported for explicit use.
Render modes
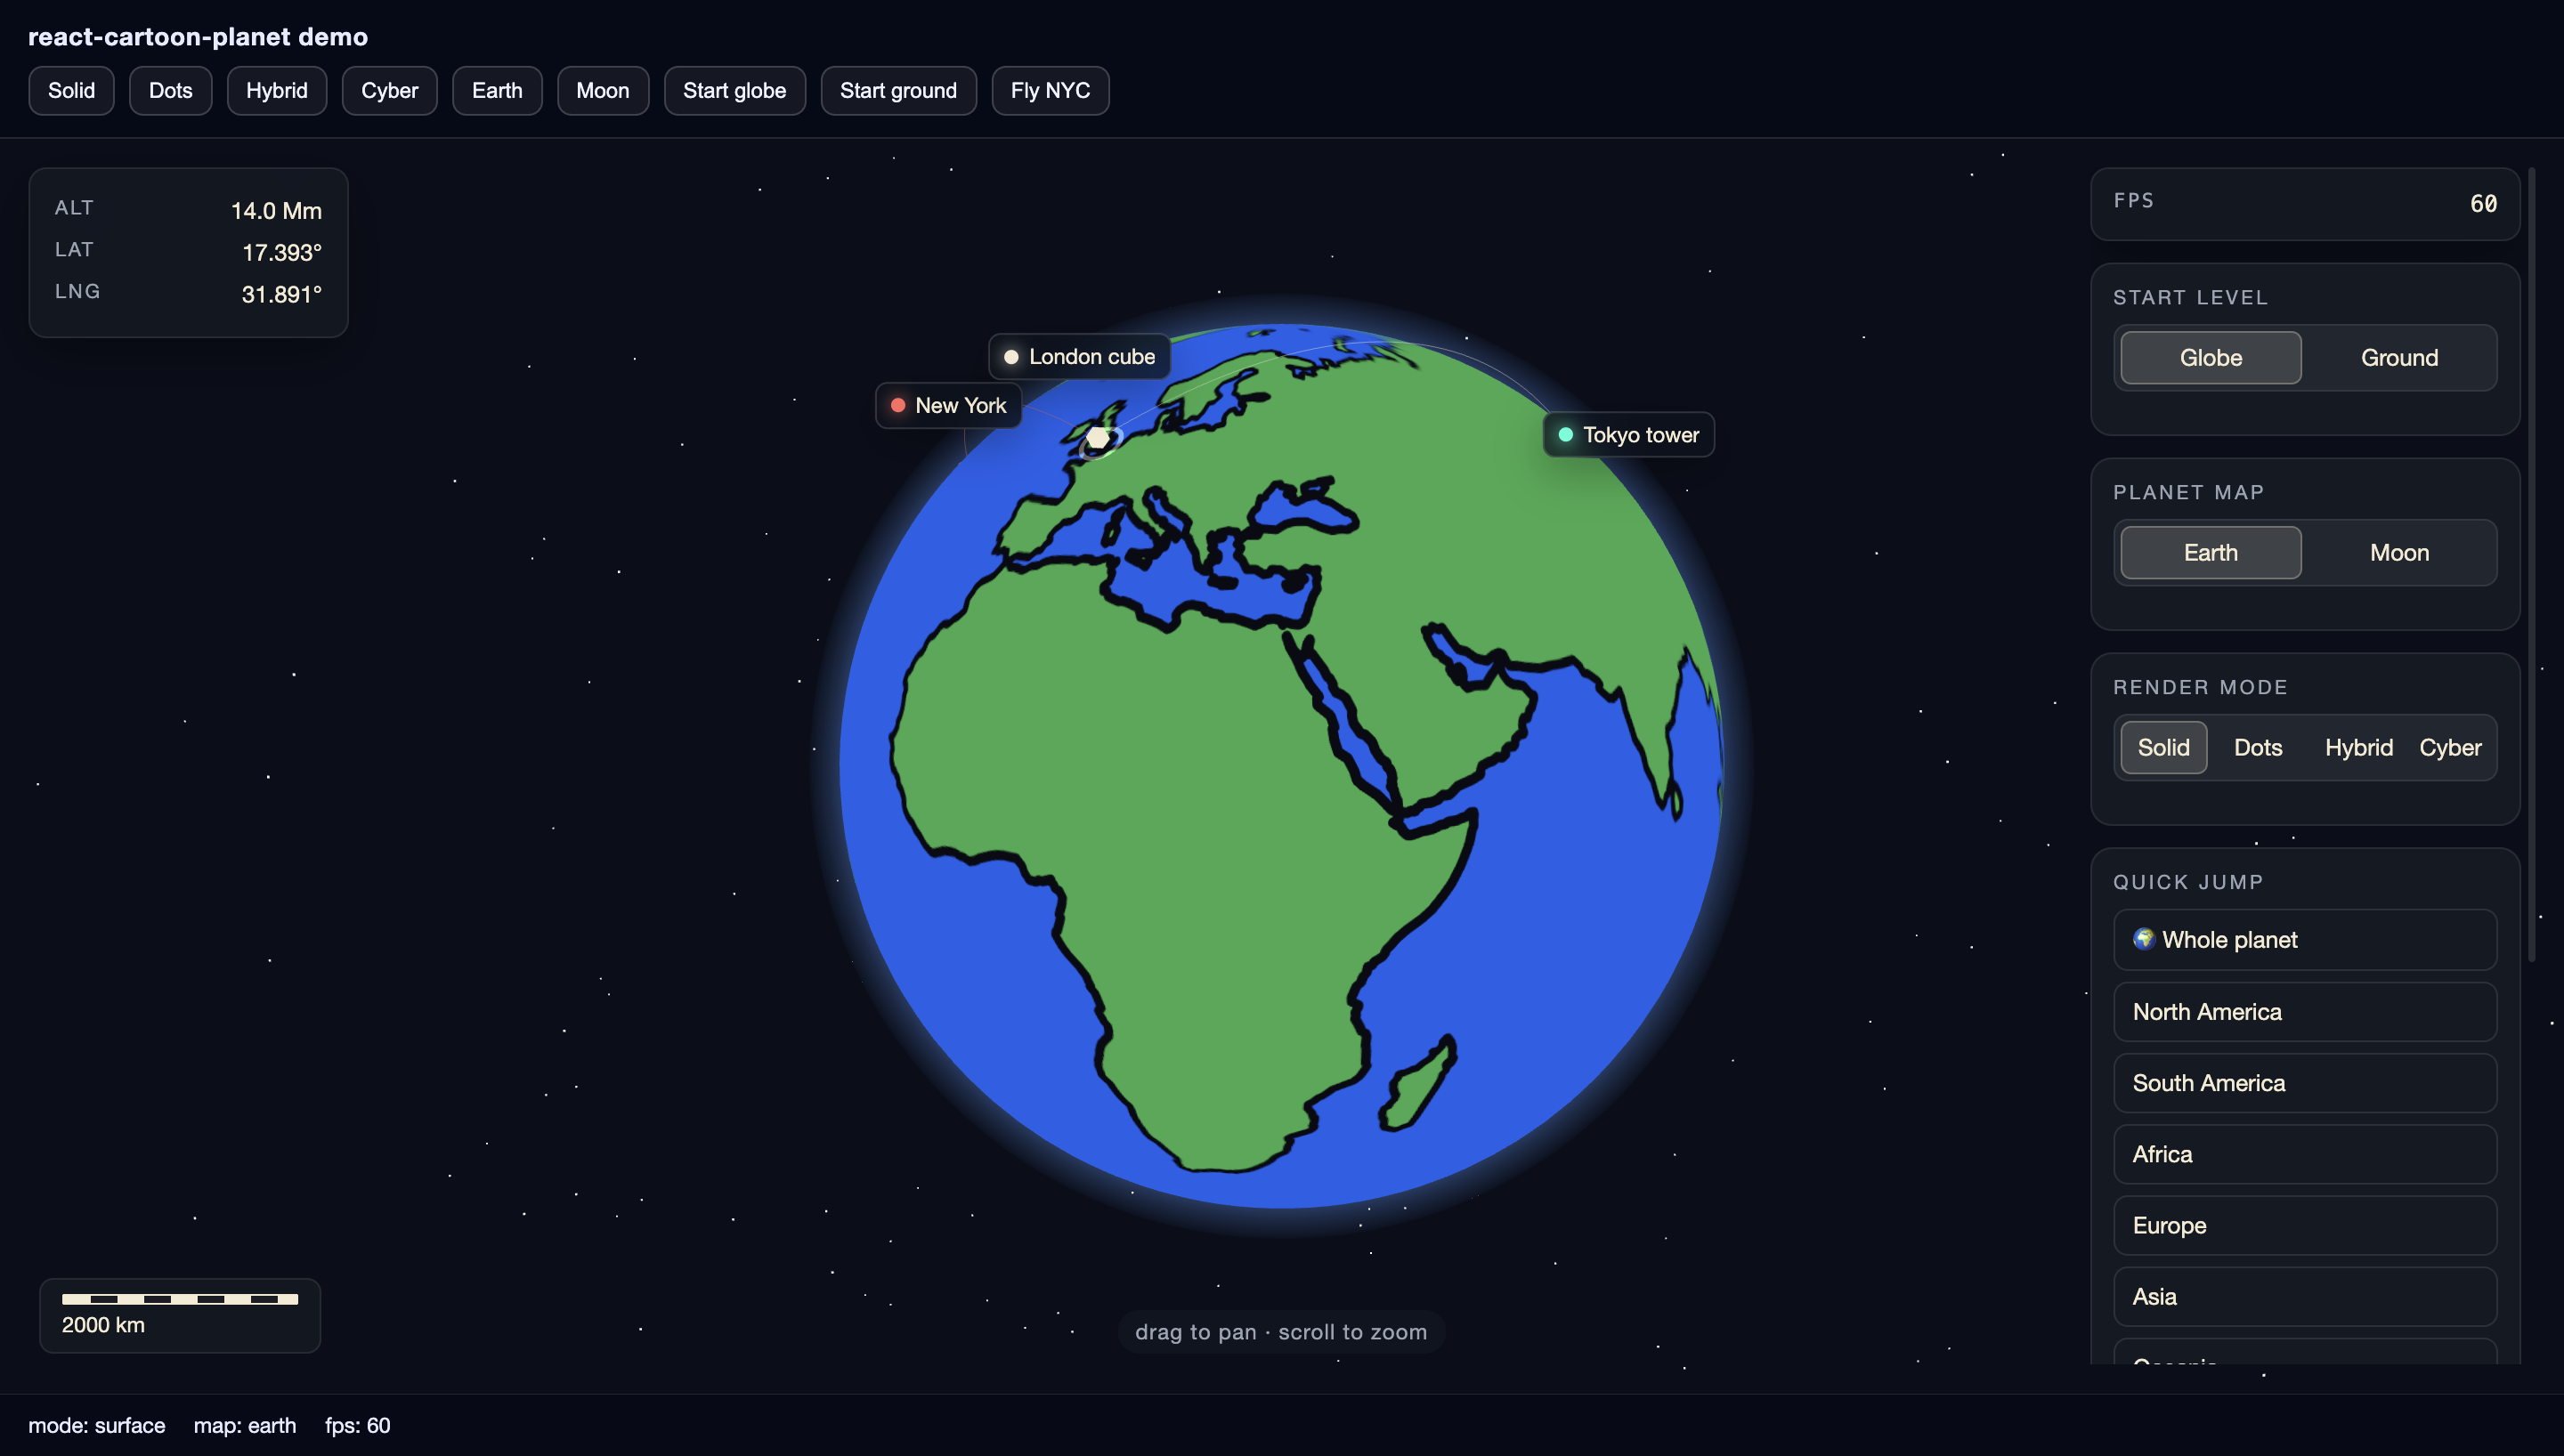
Four built-in styles ship out of the box. Switch them in the sidebar (RenderModeControl) or via controller.setRenderMode("Cyber").
| Solid | Dots |
| ---------------------------------------------------------------------------------------------------------------------------------- | -------------------------------------------------------------------------------------------------------------------------------- |
| |  |
|
| Hybrid | Cyber |
| ------------------------------------------------------------------------------------------------------------------------------------ | ---------------------------------------------------------------------------------------------------------------------------------- |
| 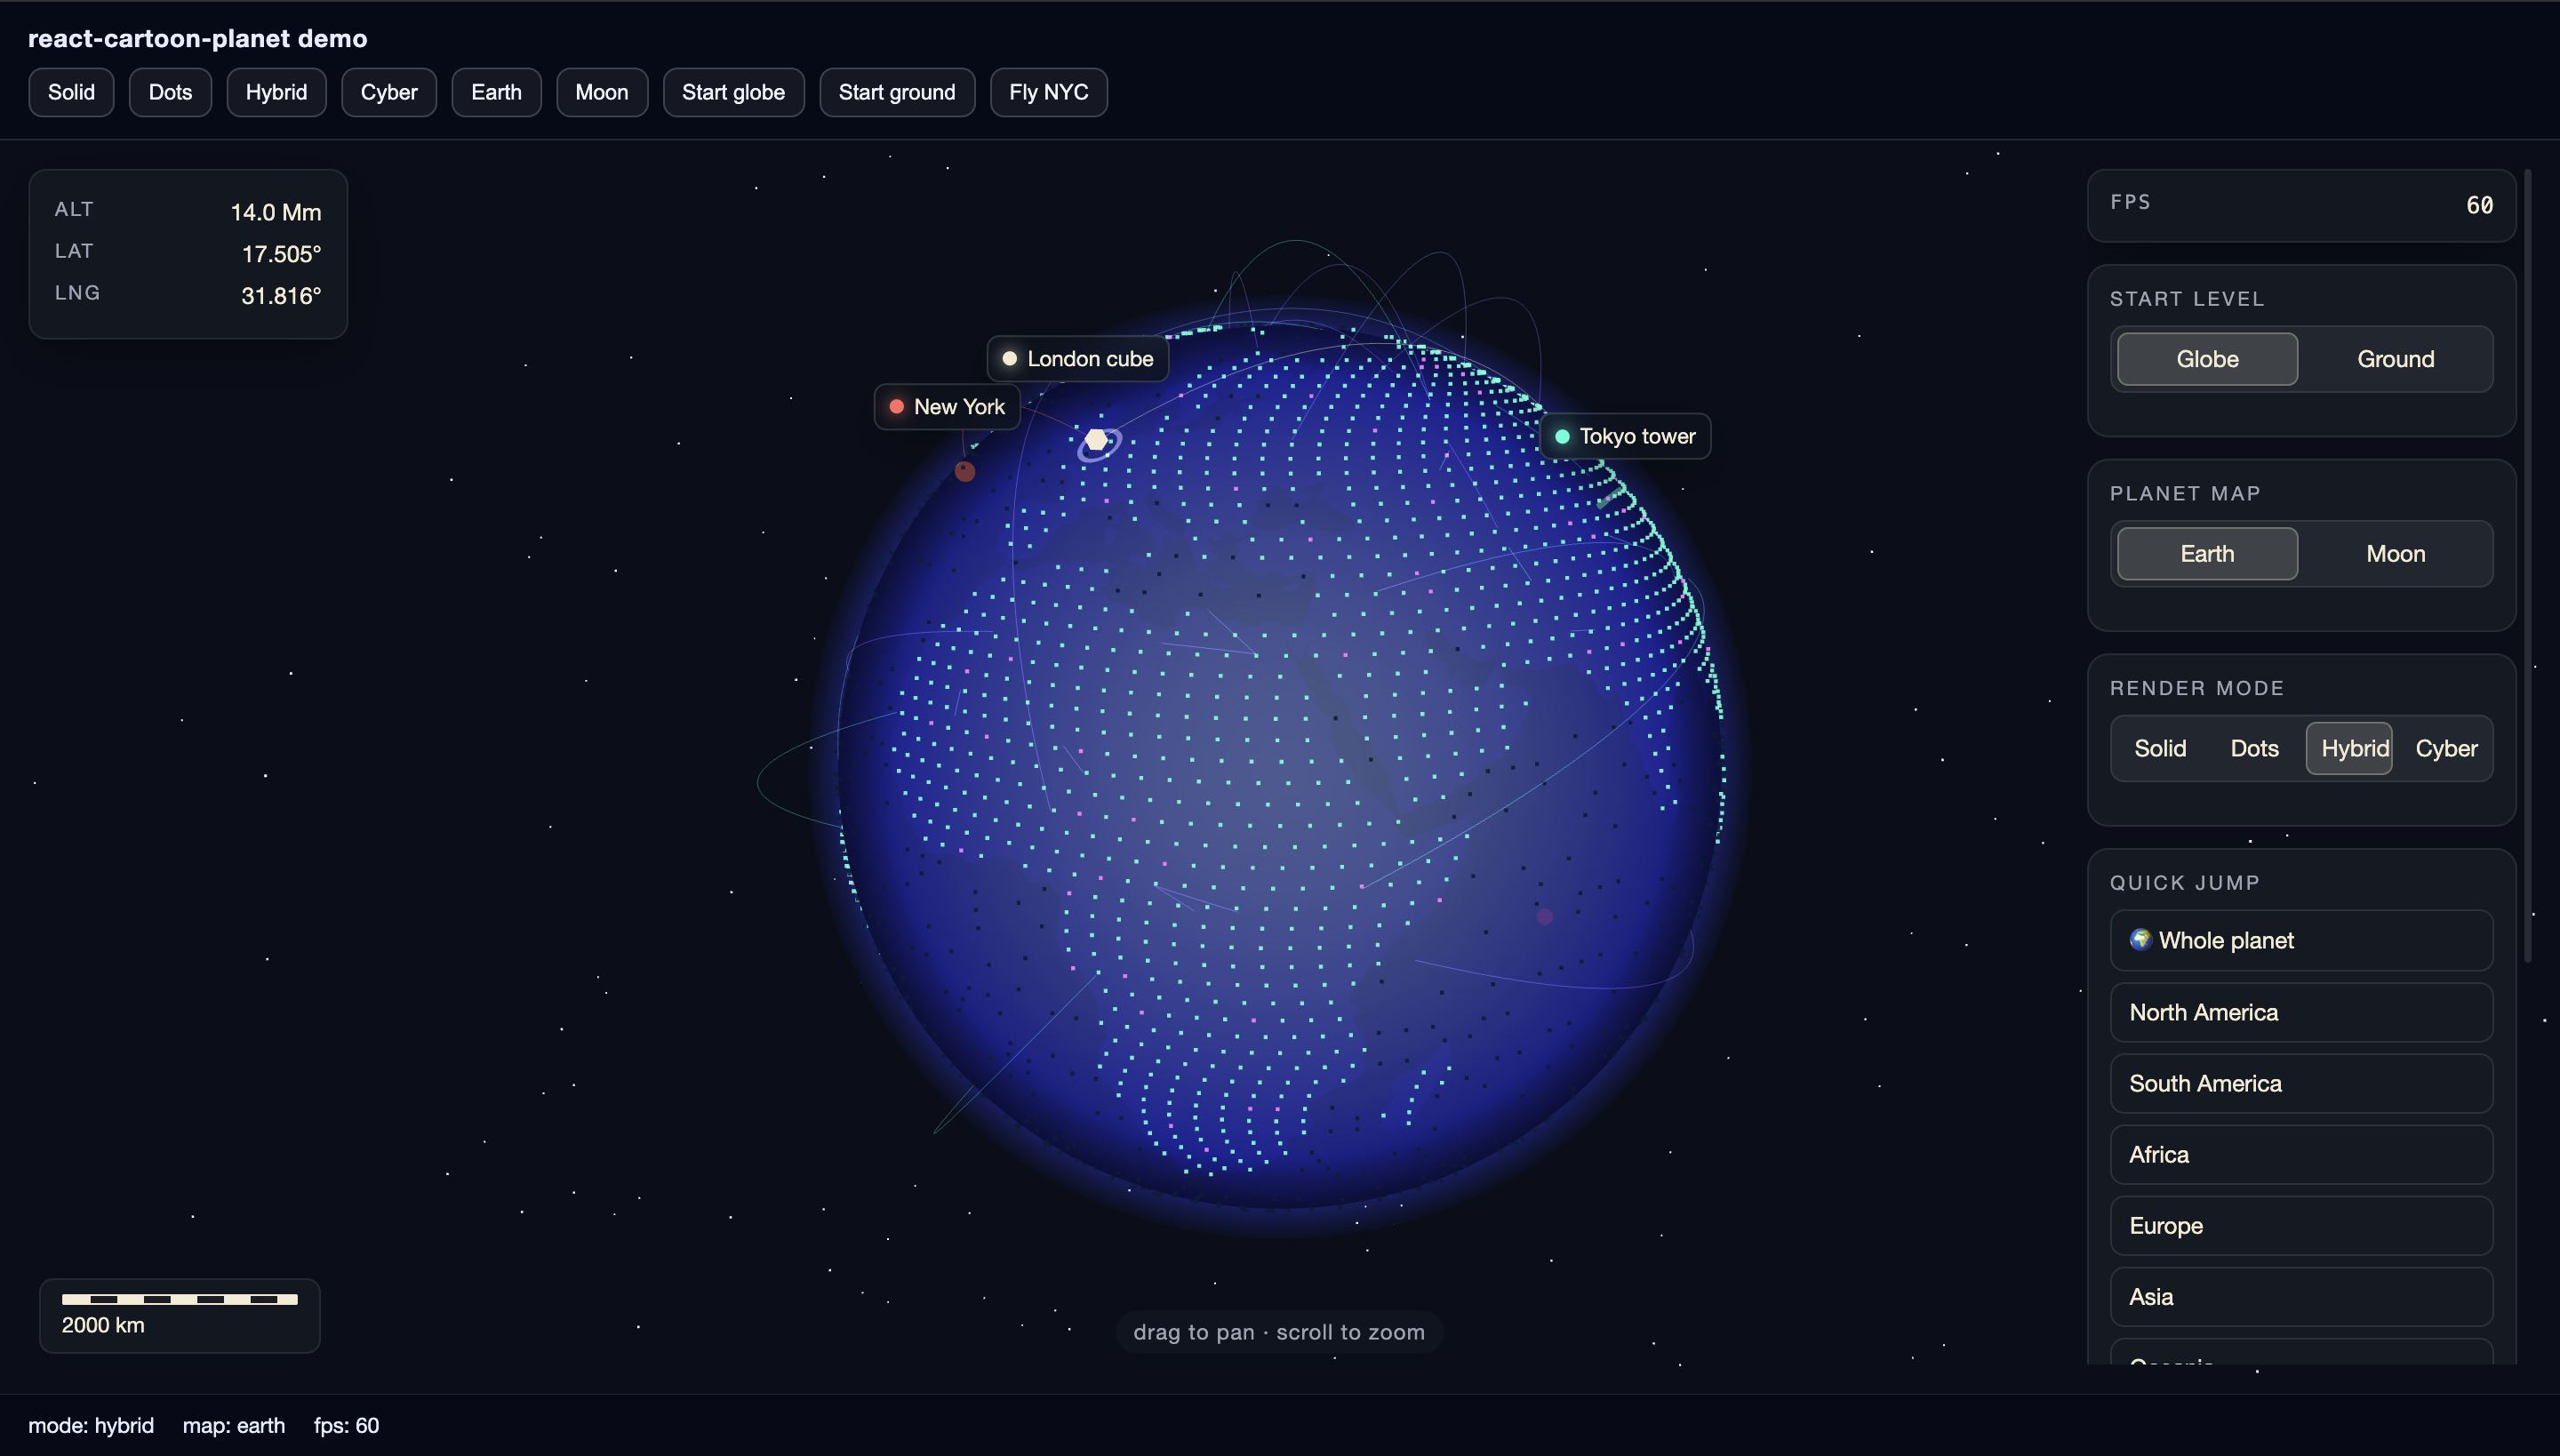 |
| 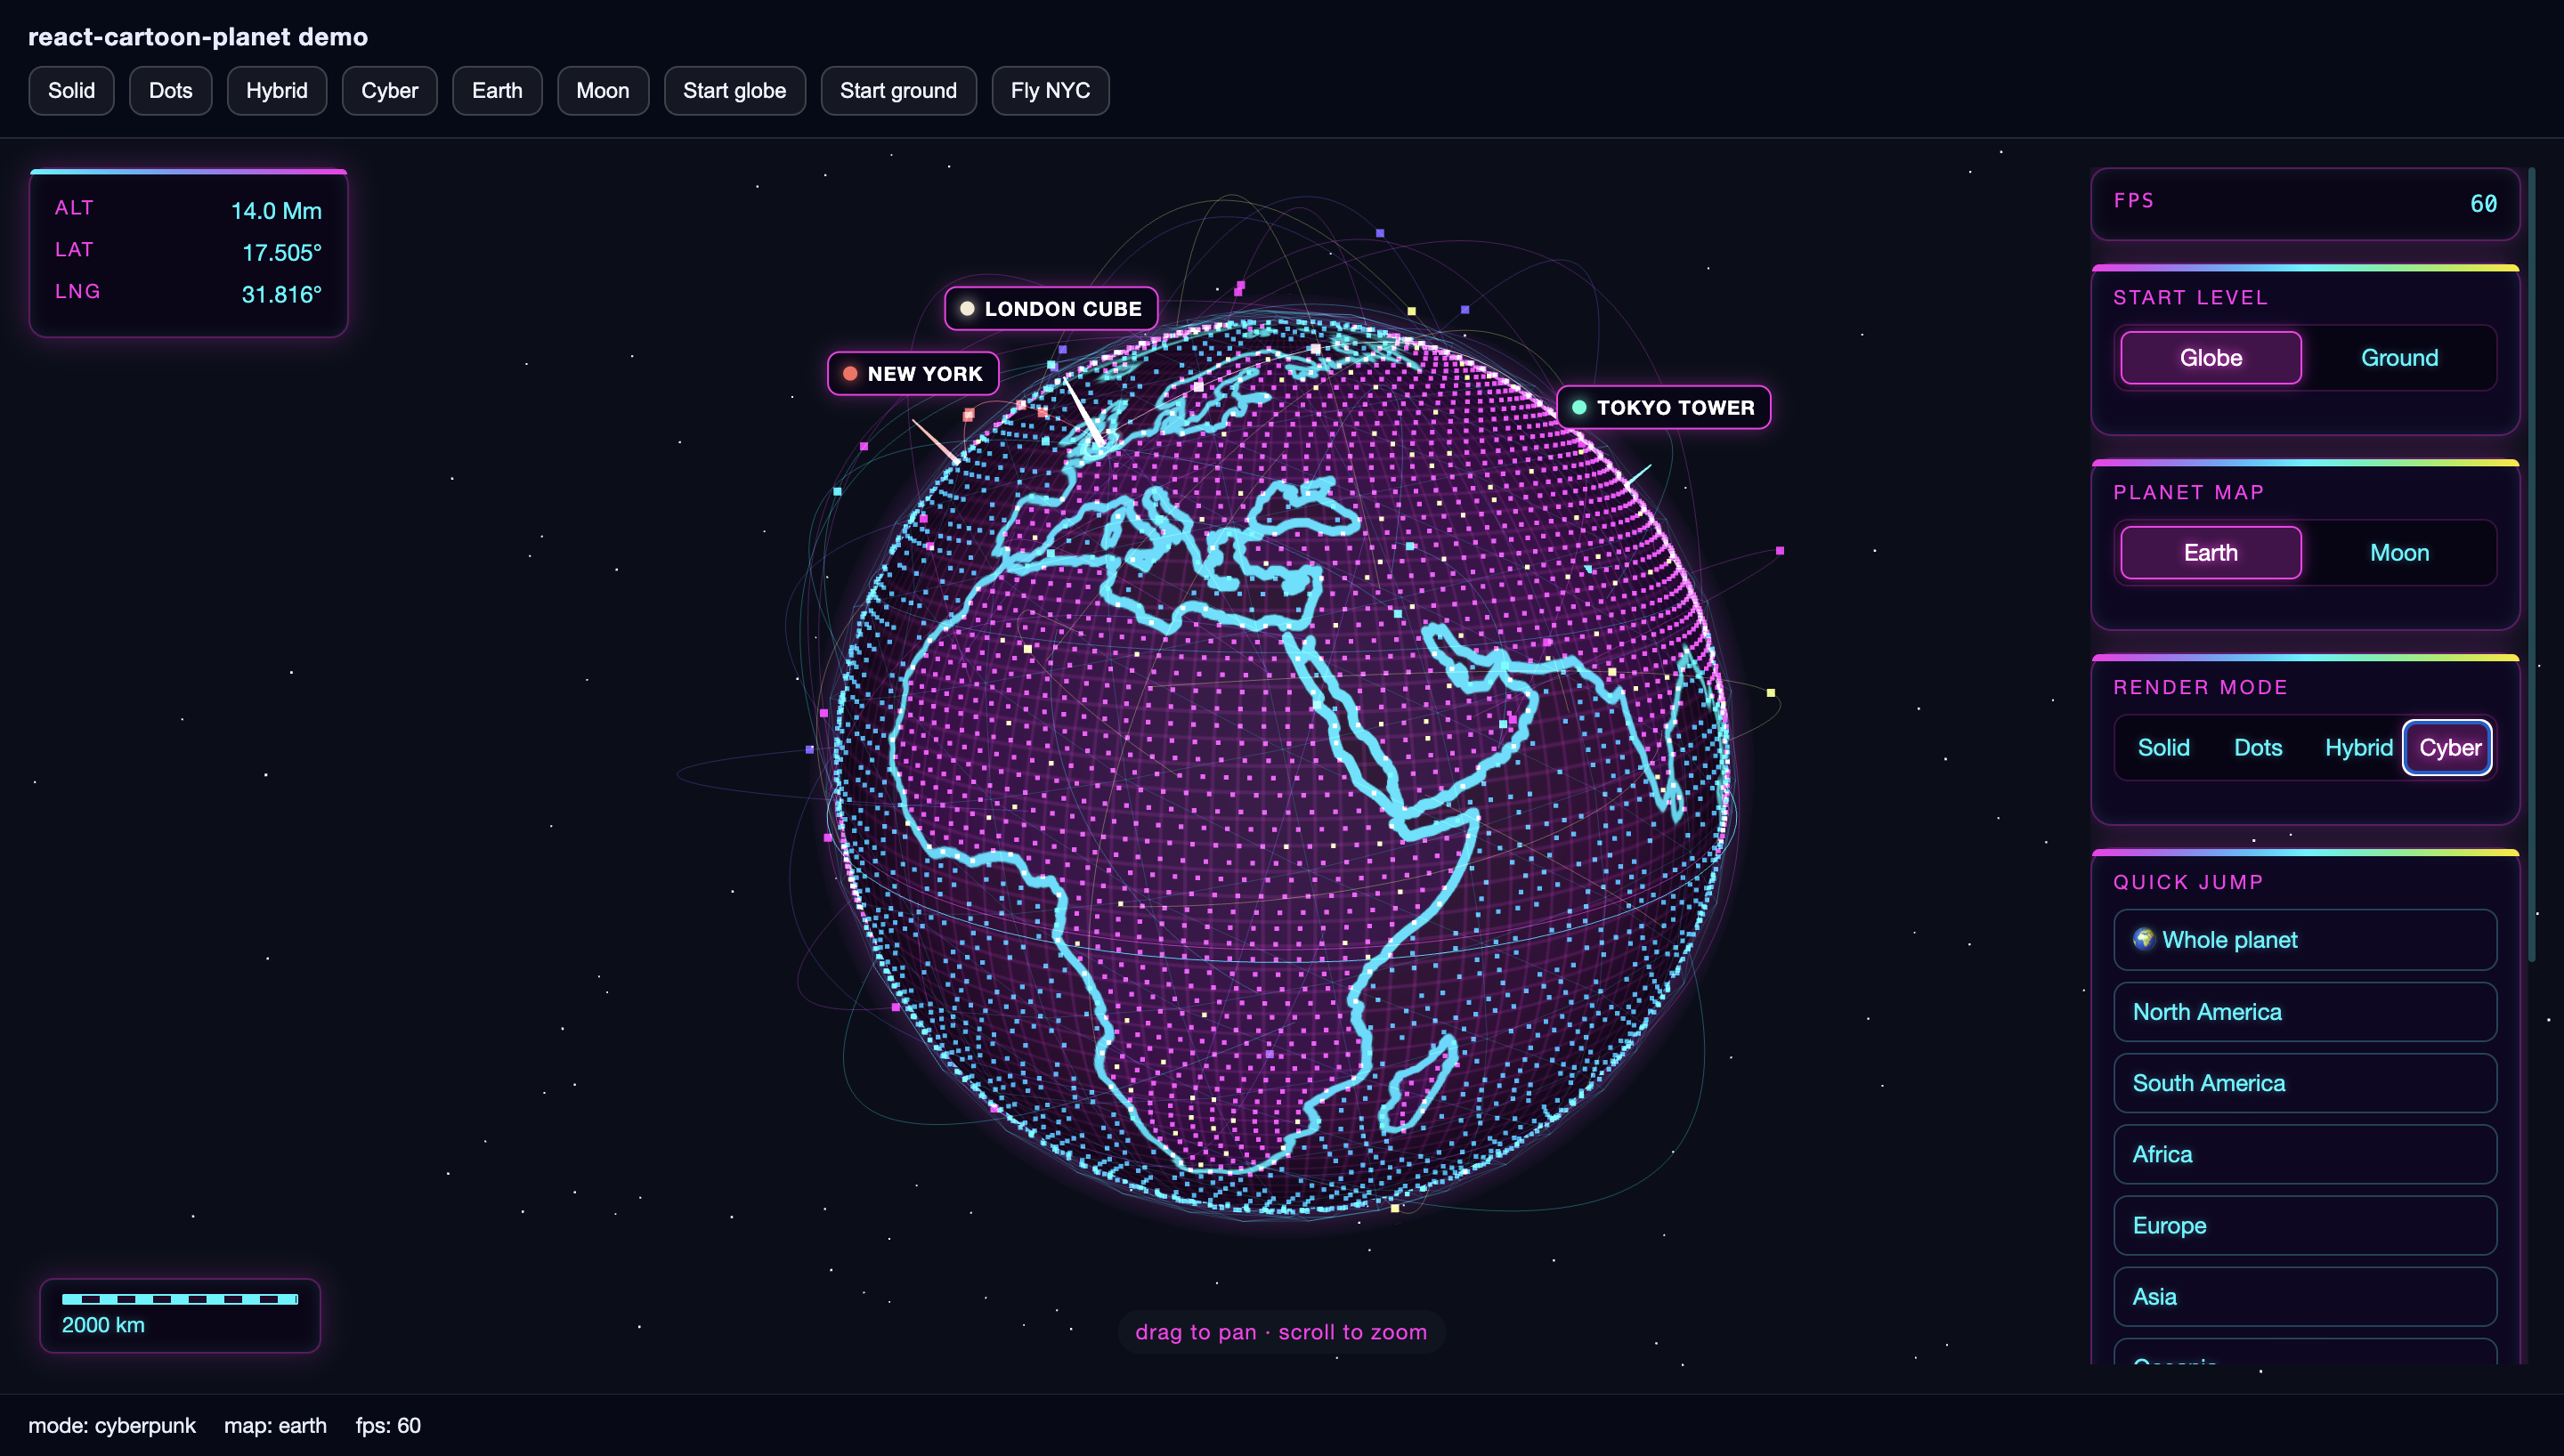 |
|
Cyber mode in motion:
Presets: SURFACE_RENDER_MODE (Solid), DOTS_RENDER_MODE, HYBRID_RENDER_MODE, CYBERPUNK_RENDER_MODE, or the full BUILTIN_RENDER_MODES array.
Day/night cycle, clouds & city lights
Render modes can opt in to a day/night cycle via getDayNight() { return true; } (the built-in Solid mode does). When active, a soft terminator shadow drifts slowly around the globe (full cycle ≈ 3.5 min), and the active map can enable two extra layers:
clouds: true— a procedural, slowly drifting cloud sphere (on forEARTH_MAP)nightLights: true— warm city lights scattered over land, visible only on the night side (on forEARTH_MAP)
All three layers fade out as you descend toward ground level, so they never obstruct the close-up view — markers stay fully readable day and night.
Like bloom, both are runtime-toggleable props (no scene rebuild — flip them freely from your UI):
<CartoonPlanet dayNight={showDayNight} clouds={showClouds} bloom={showBloom} />Both default to true; the mode's getDayNight() and the map's clouds / nightLights flags still decide what each toggle can show.
Plug in your own layer generators
clouds and nightLights are composable the same way render modes are: pass a GlobeLayerBuilder function instead of true and the globe uses your layer in place of the built-in one. The builder receives { map, continents, pixelRatio, sunDir } and returns a Three.js Object3D (unit sphere — surface ≈ radius 1.0, built-in clouds sit at 1.018). Attach userData.update = ({ alt, time, sunDir }) => … for per-frame animation; the object is disposed automatically when the map or mode changes.
import { THREE, buildCloudLayer } from "react-cartoon-planet";
import type { GlobeLayerBuilder, PlanetMapDefinition } from "react-cartoon-planet";

const myClouds: GlobeLayerBuilder = ({ sunDir }) => {
  const mesh = new THREE.Mesh(
    new THREE.SphereGeometry(1.02, 64, 48),
    new THREE.MeshBasicMaterial({ map: myCloudTexture(), transparent: true, depthWrite: false }),
  );
  mesh.renderOrder = 3; // clouds slot: above the surface, below the terminator
  mesh.userData.update = ({ alt }) => {
    mesh.rotation.y += 0.0002;
    mesh.material.opacity = THREE.MathUtils.clamp((alt - 60_000) / 700_000, 0, 0.9);
  };
  return mesh;
};

const MY_MAP: PlanetMapDefinition = { ...EARTH_MAP, name: "Mine", clouds: myClouds };
The built-in builders (buildCloudLayer, buildCityLights, buildTerminator) are exported too, so you can wrap or extend them. The demo's Vapor map plugs in a custom neon streak-cloud generator this way. (The atmosphere halo and starfield aren't pluggable yet — drop replacements into the scene via onSceneReady if you need to restyle those.)
Bloom
Pass the bloom prop for an UnrealBloomPass post-processing glow — neon-heavy modes like Cyber pop hard:
<CartoonPlanet bloom />                                  // defaults
<CartoonPlanet bloom={{ strength: 0.8, radius: 0.6, threshold: 0.1 }} />
It's toggleable at runtime (just flip the prop), and rendering falls back to the plain renderer when off. Color output is identical in both paths (the composer ends with an OutputPass).
Coastlines
Continent borders render as screen-space vector lines (not a baked texture stroke), so they stay a crisp, constant thickness from orbit all the way to ground level instead of ballooning as you zoom in. Toggle bold vs. thin via OutlineStyleControl, controller.setFatOutlines(boolean), or initialState.fatOutlines:
- off (default) — thin 1px lines: crisp and cheap to render.
- on — bold screen-space "fat" lines (~2.5px), DPR-independent (won't look hairline on HiDPI); a little heavier since each segment is a shaded quad.
Markers
Markers are screen-constant pins anchored to the surface — readable from orbit and at ~5 m ground level alike. Supply them via initialState.markers or the controller's marker methods. Two sample sets ship: DEFAULT_MARKERS (cities) and WARSAW_LANDMARK_MARKERS (three imaginary Warsaw landmarks ~2 m apart, for the clustering demo).
- Clustering — at altitude, markers that would overlap on screen merge into a count badge (e.g. "3 landmarks"). Clicking a cluster flies down to an altitude that frames and separates its members.
- Ground level — keep zooming (down to ~5 m) to see individuals at their true coordinates.
- Placement —
startPlacing()(orMarkerManagerControl) → click the globe to drop a marker exactly where the cursor lands. The built-in editor previews it live on the map (size, color, label, shape); Save finalizes, Cancel discards. - Links —
setLinksEnabled(true)draws arcs between markers; toggle in the UI withLinksDisplay. - Hover — markers grow smoothly under the pointer and the cursor switches to a pointer; subscribe with the
onMarkerHoverprop (fires with the marker, thennullon leave). - Click hook —
onMarkerClick={(marker) => …}fires before the default fly-to (clusters included — checkmarker.isCluster). Returnfalseto suppress the default and handle the click entirely yourself (e.g. open your own popover).
Planet maps
- Earth —
EARTH_MAP(bundled GeoJSON, blue ocean / green land) - Moon —
MOON_MAP(bundled maria data)
Pass your own PlanetMapDefinition with a GeoJSON URL, or pre-parsed continents to skip the fetch. Use flattenGeoJsonToContinents if you already have GeoJSON in memory.
Map data sources
Bundled land/maria geometry comes from third-party datasets. Full attribution, download URLs, and processing notes:
Geospatial data sources (mvp/data/geospatial/source.md)
| File | Origin |
| -------------------- | -------------------------------------------------------------------------------------------------------------------------------------------------------------------------------------------------------- |
| earth-land.geojson | Natural Earth ne_110m_land — source GeoJSON (Public Domain) |
| moon-maria.geojson | LROC Global Mare boundaries — converted from the official shapefile ZIP with shpjs |
Bundled GeoJSON is simplified for globe-scale rendering with scripts/slim-geojson.mjs (coordinates rounded to 4 decimals, sub-pixel ring points dropped) — the moon dataset shrinks from 18 MB to ~6 MB with no visible difference at the globe's 4096px texture resolution.
Controller API
Attach a ref (useRef<CartoonPlanetController>()) or use onReady to get the controller.
| Method | Description |
| ------------------------------------------- | ---------------------------------------- |
| flyTo(lng, lat, altitudeMeters, options?) | Animated camera move (default 1800 ms) |
| flyToAltitude(altitudeMeters, options?) | Zoom in/out at current heading |
| flyToMarker(id) | Fly to a marker by id |
| rotateBy(lngDelta, latDelta, options?) | Nudge heading (default 600 ms) |
| rotateTo(lng, lat, options?) | Absolute heading at current altitude |
| startAutoRotate / stopAutoRotate | Continuous spin |
| getView() | Current { lng, lat, altitudeMeters } |
| setRenderMode(mode) | Switch visual style (name or definition) |
| setPlanetMap(map) | Switch planet map |
| setStartView("globe" \| "ground") | Orbit vs near-ground preset |
| setMarkers / addMarker / removeMarker | Marker CRUD |
| startPlacing / cancelPlacing | Click-to-place marker mode |
| setLinksEnabled(boolean) | Toggle marker link lines |
| setFatOutlines(boolean) | Bold vs thin (1px) vector coastlines |
| getThree() | Live Three.js objects (see below) |
| getState() / subscribe(listener) | Reactive globe state |
onStateChange on <CartoonPlanet> is the React-friendly alternative to subscribe.
Composable UI
Sidebar panels and HUD widgets are optional React children — include only what you need:
| Component | Role |
| ------------------------ | ------------------------------ |
| FpsDisplay | Frame rate |
| AltitudeDisplay | Current altitude |
| ScaleBarDisplay | Map scale bar |
| MarkerLabelsDisplay | Screen-space marker labels |
| PlacingToastDisplay | “Click globe to place” hint |
| HintDisplay | Interaction hints |
| StartLevelControl | Globe / ground start level |
| PlanetMapControl | Earth / Moon (or custom maps) |
| RenderModeControl | Style picker |
| OutlineStyleControl | Bold (fat) coastlines toggle |
| QuickJumpControl | Preset locations |
| MarkerManagerControl | Add / remove markers |
| LinksDisplay | Marker link-lines toggle |
| CartoonPlanetDefaultUi | All of the above in one bundle |
If you pass children, the legacy ui={{ … }} prop is ignored. Without children, every built-in panel stays off unless you opt in via ui.
Custom render modes
Implement GlobeRenderModeDefinition with a renderFunction that receives continent geometry and returns a three.js Group. Continent outlines are already triangulated (via earcut) in config.continents — your mode typically textures or stylizes that mesh.
Register modes in the renderModes prop or call setRenderMode with a new definition at runtime.
import * as THREE from "three";
import type { GlobeRenderModeDefinition } from "react-cartoon-planet";

const MY_MODE: GlobeRenderModeDefinition = {
  name: "MyStyle",
  renderFunction(config) {
    const group = new THREE.Group();
    // build from config.continents, config.map, config.outlinePx …
    return group;
  },
};
Direct Three.js access
Need to drop your own meshes into the scene, raycast, add post-processing, or run a custom animation loop? The globe exposes its live Three.js objects via the onSceneReady prop (fires on mount) or controller.getThree() (returns null until mounted).
import { CartoonPlanet, THREE } from "react-cartoon-planet";
import type { CartoonPlanetThree } from "react-cartoon-planet";

<CartoonPlanet
  onSceneReady={(three: CartoonPlanetThree) => {
    // Build from the package's THREE so it's the SAME instance the globe runs on.
    const ring = new THREE.Mesh(
      new THREE.TorusGeometry(1.25, 0.012, 12, 96),
      new THREE.MeshBasicMaterial({ color: "#ff2eea" }),
    );
    ring.rotation.x = Math.PI / 2;
    three.scene.add(ring); // add to `three.planet` instead to move with the globe
  }}
/>;
three contains:
| Field | Type | Notes |
| ------------------ | ------------------------- | --------------------------------------------- |
| scene | THREE.Scene | Root scene |
| camera | THREE.PerspectiveCamera | Globe camera |
| renderer | THREE.WebGLRenderer | The WebGL renderer |
| controls | GlobeControls | Orbit/zoom controls (radius, theta, …) |
| planet | THREE.Group | Surface + markers; child of scene |
| surfaceGroup | THREE.Group | Textured surface + coastline lines |
| markerRoot | THREE.Group | Marker meshes |
| getMarkerGroup() | THREE.Group \| null | Current marker group (rebuilds on clustering) |
The render loop is persistent — anything you add draws every frame. The globe lives on a unit sphere (surface ≈ radius 1.0; one scene unit ≈ Earth's radius). Always construct objects from the re-exported THREE, not your own import * as THREE from "three", so you share the globe's single instance.
Props
| Prop | Type | Notes |
| --------------------- | ---------------------------------------- | ---------------------------------------------- |
| maps | PlanetMapDefinition[] | Defaults to Earth + Moon |
| renderModes | GlobeRenderModeDefinition[] | Defaults to all four built-ins |
| initialState | CartoonPlanetInitialState | Map, mode, start view / initialCamera, markers |
| bloom | boolean \| CartoonPlanetBloomOptions | Post-processing glow; runtime-toggleable |
| dayNight | boolean | Terminator + city lights; runtime-toggleable |
| clouds | boolean | Cloud layer; runtime-toggleable |
| onStateChange | (state: GlobeState) => void | HUD, fps, active map/mode |
| onReady | (controller) => void | Fires when engine is ready |
| onSceneReady | (three) => void | Live Three.js objects on mount |
| onMarkerClick | (marker) => boolean \| void | Before default fly-to; false suppresses it |
| onMarkerHover | (marker \| null) => void | Pointer enters / leaves a marker |
| className / style | — | Root container |
| children | React nodes | Composable UI (see above) |
Demo app included
The demo-app folder is a Vite + React playground that mirrors the quick start above — toolbar buttons call flyTo, rotateBy, and a scripted intro across all render modes, and the "Warsaw landmarks" button drills into the ground-level marker cluster. It also exercises the newer APIs: a Layers group toggles the dayNight, clouds, and bloom props at runtime, clicking any marker opens an info card via onMarkerClick (without suppressing the default fly-to), the Vapor map plugs a custom neon streak-cloud GlobeLayerBuilder into an Earth-shaped synthwave planet, and onSceneReady exposes the live scene as window.__three for devtools tinkering.
cd demo-app && pnpm install && pnpm devLinks
License
MIT © radomski.dev