
regl-feedback
v1.0.0
Published
visual feedback effect for regl meshes
Downloads
18


Readme
#regl-feedback
add a visual feedback effect to your regl mesh.
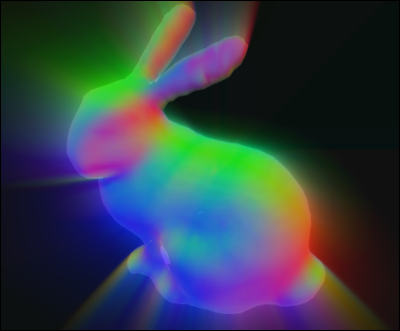
##example
in this example we'll add a glowing feedback-based effect to the bunny in the bunny.js regl example.
const regl = require('regl')()
const bunny = require('bunny')
const normals = require('angle-normals')
const camera = require('regl-camera')(regl, {
  center: [0, 5, 0],
  distance: 20,
  theta: 1.0,
  phi: 0.7
})
var feedback = require('./feedbackeffect.js')
var drawfeedback = feedback(regl, `
  vec3 sample (vec2 uv, sampler2D tex) {
    return 0.97*texture2D(tex, (0.99*(2.0*uv-1.0)+1.0)*0.5).rgb;
  }
`)
const feedBackTexture = regl.texture({})
const drawBunny = regl({
  frag: `
    precision mediump float;
    varying vec3 vnormal;
    void main () {
      gl_FragColor = vec4(abs(vnormal), 0.2);
    }`,
  vert: `
    precision mediump float;
    uniform mat4 projection, view;
    attribute vec3 position, normal;
    varying vec3 vnormal;
    void main () {
      vnormal = normal;
      gl_Position = projection * view * vec4(position, 1.0);
    }`,
  attributes: {
    position: bunny.positions,
    normal: normals(bunny.cells, bunny.positions)
  },
  elements: bunny.cells,
  blend: {
    enable: true,
    func: { src: 'src alpha', dst: 'one minus src alpha' }
  },
  cull: { enable: true }
})
regl.frame(() => {
  regl.clear({ color: [0, 0, 0, 1] })
  drawfeedback({texture: feedBackTexture})
  camera(() => {
    drawBunny()
    feedBackTexture({ copy: true, min: 'linear', mag: 'linear' })
  })
})
##api
var feedback = require('regl-feedback')###var drawfeedback = feedback(regl, src)
regl is a regl
instance.
src is a string that contains the glsl code that defines your feedback effect.
in your glsl code you should describe a sample function (described below).
###vec3 sample (vec2 uv, sampler2D tex)
vec2 uv is the screen coordinates from 0 to 1.
sampler2D tex is the texture containing the pixels from
the screen.
your sample function should return an rgb vec3. you can use texture2D to sample from the texture object.
###drawfeedback({texture: feedBackTexture})
this draws the feedback with the sample effect applied to
it. it samples from feedBackTexture.
you can create the feedBackTexture by calling regl.texture({}).
##run the example on your own machine
the below instructions are entered via command line (the "terminal"). you will need to have node.js and npm installed for this to work.
first clone this repository to your own computer.
then run npm install while you're in the repository directory.
run budo example.js and wait until you see some output that looks like
this:
[0006] info Server running at http://192.168.2.12:9966/ (connect)
then point your browser to localhost:9966.
##install
npm install regl-feedback
##license
BSD
##acknowledgments
thank you to substack and mikola lysenko for all of your help!