
roku-dev-studio-remote-server
v1.1.0
Published
Remote server for Roku Dev Studio - enables remote device control and telnet debug console streaming
Downloads
35


Readme
Roku Dev Studio Remote Server
A lightweight Node.js server that runs on a computer at a remote location so the Roku Dev Studio desktop app can control Roku devices over the network. The server discovers Rokus on its own LAN and exposes an HTTP/WebSocket bridge that mirrors all Roku ECP (External Control Protocol) functionality, plus telnet relay and RALE / App Connector access.
Part of Roku Dev Studio — see the main repo for the desktop app, MCP server, and other packages.
Requirements
- Node.js 18 or higher
- Network access to Roku devices on the server's local network
- Port 4951 (default) reachable from wherever the Roku Dev Studio app is running
Install and run
Option A — From npm:
npm install -g roku-dev-studio-remote-server
roku-remote-server          # default port 4951
roku-remote-server 4000     # or pick a port
Option B — From source (full repo clone):
git clone https://github.com/paramount-engineering/roku-dev-studio.git
cd roku-dev-studio
npm install
npm run remote-server       # root script — listens on 4951 by default
Installation as a Service (macOS)
To run the server automatically on boot:
1. Create a Launch Agent
A starter com.roku-dev-studio.remote-server.plist ships inside the package. Copy it to your LaunchAgents directory and edit the two paths inside (Node binary and the roku-remote-server.js location on this machine):
# Adjust the source path to wherever you installed the package
cp ./node_modules/roku-dev-studio-remote-server/com.roku-dev-studio.remote-server.plist \
   ~/Library/LaunchAgents/com.roku-dev-studio.remote-server.plist
The bundled plist looks like this — the inline comments call out which paths you need to replace before loading:
<?xml version="1.0" encoding="UTF-8"?>
<!DOCTYPE plist PUBLIC "-//Apple//DTD PLIST 1.0//EN" "http://www.apple.com/DTDs/PropertyList-1.0.dtd">
<plist version="1.0">
<dict>
    <key>Label</key>
    <string>com.roku-dev-studio.remote-server</string>
    <key>ProgramArguments</key>
    <array>
        <!-- Path to your Node binary -->
        <string>/usr/local/bin/node</string>
        <!-- Path to the installed roku-remote-server.js -->
        <string>/Users/YOUR_USERNAME/remote-server/roku-remote-server.js</string>
        <string>4951</string>
    </array>
    <key>RunAtLoad</key>
    <true/>
    <key>KeepAlive</key>
    <true/>
    <key>StandardOutPath</key>
    <string>/tmp/roku-remote.log</string>
    <key>StandardErrorPath</key>
    <string>/tmp/roku-remote.error.log</string>
</dict>
</plist>
Rename the Label if you want a different reverse-DNS identifier — it just has to be unique on the box.
2. Load the Launch Agent
launchctl load ~/Library/LaunchAgents/com.roku-dev-studio.remote-server.plist3. Manage the Service
# Start
launchctl start com.roku-dev-studio.remote-server

# Stop
launchctl stop com.roku-dev-studio.remote-server

# Unload (disable)
launchctl unload ~/Library/LaunchAgents/com.roku-dev-studio.remote-server.plist

# Check status
launchctl list | grep roku
4. View Logs
tail -f /tmp/roku-remote.log
tail -f /tmp/roku-remote.error.log
Installation as a Service (Linux)
A starter systemd unit ships as roku-remote-server.service. Edit User, WorkingDirectory, and ExecStart paths, then:
sudo cp roku-remote-server.service /etc/systemd/system/
sudo systemctl daemon-reload
sudo systemctl enable --now roku-remote-server
journalctl -u roku-remote-server -f
Ensure port 4951 is open in the host firewall if Dev Studio connects from another machine.
Installation as a Service (Windows)
Run the server at logon with Task Scheduler (adjust paths):
- Open Task Scheduler → Create Task.
- Triggers: At log on (or At startup).
- Action: Start a program
- Program:
C:\Program Files\nodejs\node.exe - Arguments:
C:\path\to\roku-remote-server.js 4951 - Start in:
C:\path\to\
- Program:
- Allow task to run whether user is logged on or not (optional for headless hosts).
Alternatively use NSSM to wrap node roku-remote-server.js 4951 as a Windows Service.
Health check: GET http://<host>:4951/health returns apiVersion (bundled roku-dev-studio-api version) — keep the relay host updated when Dev Studio reports sideload/screenshot mismatches.
API Documentation (Swagger)
The server includes interactive API documentation powered by Swagger/OpenAPI 3.0.
Access Swagger UI: http://localhost:4951/api-docs
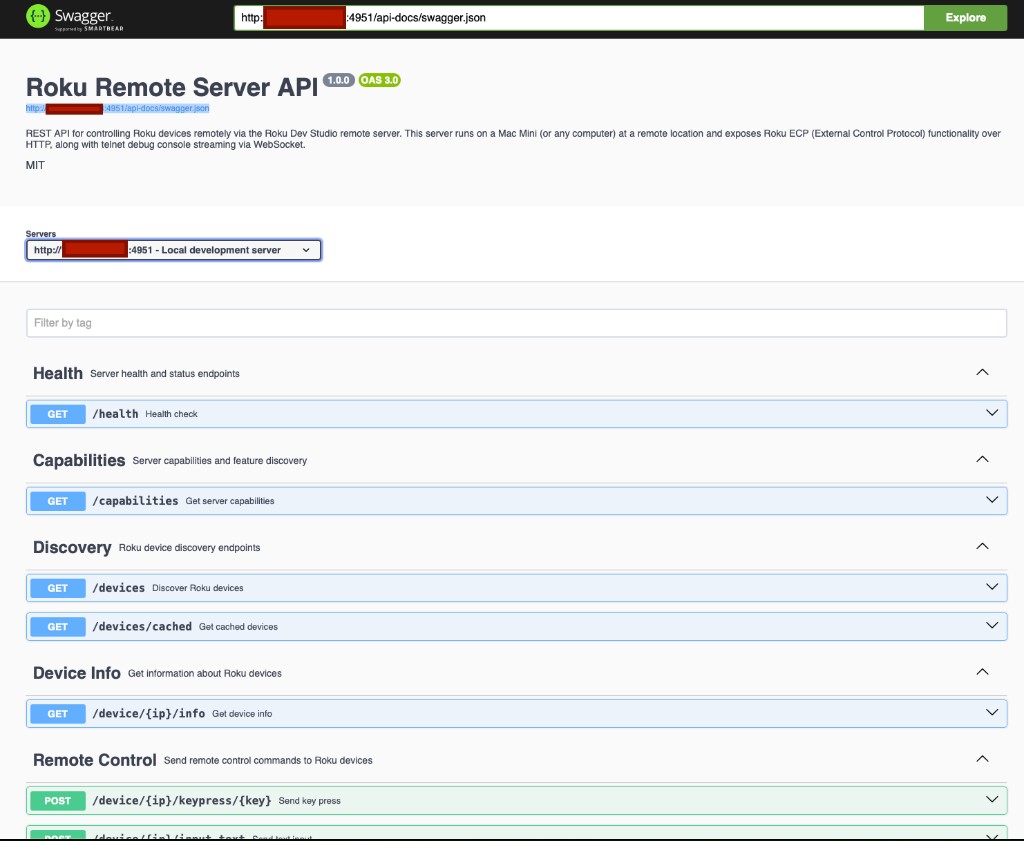
The Swagger UI provides:
- Interactive API explorer (Health, Capabilities, Discovery, Device Info, Remote Control, RALE …)
- Request/response examples for every endpoint
- Try-it-out functionality for testing endpoints against a live Roku
- Complete parameter documentation generated from the OpenAPI 3.0 spec at
/api-docs/swagger.json
API Spec Endpoints
| Endpoint | Description |
|----------|-------------|
| /api-docs | Swagger UI interactive documentation |
| /api-docs/swagger.json | OpenAPI 3.0 specification (JSON) |
API Endpoints
Health & Discovery
| Endpoint | Method | Description |
|----------|--------|-------------|
| /health | GET | Server health check |
| /api-docs | GET | Swagger UI documentation |
| /devices | GET | Discover all Roku devices (full scan) |
| /devices/cached | GET | Get cached devices (fast) |
Device Control
All device endpoints use the pattern: /device/:ip/...
| Endpoint | Method | Description |
|----------|--------|-------------|
| /device/:ip/info | GET | Get device info |
| /device/:ip/keypress/:key | POST | Send key press (e.g., Up, Down, Select) |
| /device/:ip/launch/:appId | POST | Launch an app |
| /device/:ip/query/* | GET | Query endpoint (device-info, apps, etc.) |
| /device/:ip/post/* | POST | POST endpoint (sgrendezvous, fwbeacons, etc.) |
| /device/:ip/input-text | POST | Send text input |
| /device/:ip/deeplink | POST | Deep link to content |
| /device/:ip/icon/:appId | GET | Get app icon as base64 |
GET /device/:ip/query/* — short response cache: Successful JSON responses are cached per (device IP, query path) for 500 ms (same value as Roku Dev Studio's minimum Device performance sampling interval). Multiple Dev Studio clients polling the same Roku through this relay therefore share one ECP hit per path within that window. Failed responses are not cached.
Developer Features
| Endpoint | Method | Description |
|----------|--------|-------------|
| /device/:ip/sideload | POST | Sideload a channel package |
| /device/:ip/delete-sideload | POST | Delete sideloaded channel |
| /device/:ip/screenshot | POST | Take screenshot |
RALE (App Connector)
| Endpoint | Method | Description |
|----------|--------|-------------|
| /device/:ip/rale/wake | POST | Wake up TrackerTask |
| /device/:ip/rale/connect | POST | Connect to TrackerTask |
| /device/:ip/rale/command | POST | Send RALE command |
| /device/:ip/rale/disconnect | POST | Disconnect |
Network Inspector (MITM capture)
| Endpoint | Method | Description |
|----------|--------|-------------|
| /network/status | GET | Live state: enabled, mitmEnabled, mitmActive (really bound, not just configured), mitmLastError |
| /network/config | GET / PUT | Read or persist enabled / mitmEnabled / mitmPort — persisted config survives restarts |
| /network/stream | GET | Server-Sent-Events stream of live status + captured events |
| /network/events | GET | Buffered captured events for a device |
| /network/ca/pem, /network/ca/cert | GET | Download the RDS CA certificate the sideloaded channel must trust |
Network Inspector starts disabled on every fresh install. Nothing is captured and MITM never binds a port until something enables it — after that, the setting is persisted (~/.roku-dev-studio-remote/network-inspector.json) and restored automatically on every restart. Enable it from Roku Dev Studio's Settings → Network Inspector location dropdown, or directly:
curl -X PUT http://<relay-host>:4951/network/config \
  -H "Content-Type: application/json" \
  -d '{"enabled": true, "mitmEnabled": true}'
Confirm it's actually running (don't rely on capabilities.networkInspector.supported for this — that only means the feature is available on this host, not that it's currently on):
curl http://<relay-host>:4951/network/status | jq '{enabled, mitmEnabled, mitmActive, mitmLastError}'MITM capture requires the sideloaded dev channel to route its own HTTPS traffic through the proxy — Roku has no device-wide proxy setting. The channel's BrightScript must prefix outgoing request URLs, e.g. http://<relay-host>:8888/;https://example.com/api, and the device must trust the RDS CA certificate (/network/ca/pem / /network/ca/cert). Without both of those, mitmActive: true (the proxy really is listening) but zero captured traffic is expected — not a bug.
Example Usage
Replace <relay-host> with the address (hostname or IP) of the machine running the relay, and <roku-ip> with the device IP as seen on the relay's network.
Discover Devices
curl http://<relay-host>:4951/devicesSend Key Press
curl -X POST http://<relay-host>:4951/device/<roku-ip>/keypress/HomeLaunch an App
curl -X POST http://<relay-host>:4951/device/<roku-ip>/launch/<appId>Query Device Info
curl http://<relay-host>:4951/device/<roku-ip>/query/device-infoGet Installed Apps
curl http://<relay-host>:4951/device/<roku-ip>/query/appsTake Screenshot
curl -X POST http://<relay-host>:4951/device/<roku-ip>/screenshot \
  -H "Content-Type: application/json" \
  -d '{"password": "your-dev-password"}'
Firewall Configuration
Ensure port 4951 (or your custom port) is open on the relay host's firewall.
macOS:
- System Settings → Network → Firewall → Options
- Add Node.js (or this server's binary) to allowed applications.
Or via Terminal:
sudo /usr/libexec/ApplicationFirewall/socketfilterfw --add /usr/local/bin/nodeLinux (ufw):
sudo ufw allow 4951/tcpWindows: allow Node.js (or the server binary) through Windows Defender Firewall via Settings → Privacy & security → Windows Security → Firewall & network protection.
Security Considerations
Network Security: This server should only be accessible from trusted networks. Consider using a VPN or SSH tunnel for remote access.
Authentication: The server currently does not require authentication. For production use, consider adding API key authentication.
Developer Passwords: Developer passwords are sent in API requests. Ensure the connection is secure (use HTTPS or VPN).
Troubleshooting
Server won't start
- Check if port 4951 is already in use:
lsof -i :4951 - Ensure Node.js is installed:
node --version
No devices found
- Ensure Roku devices are on the same network as the relay host
- Check the relay host's firewall settings (see Firewall Configuration)
- Try a fresh subnet scan by hitting the
/devicesendpoint (uncached) instead of/devices/cached
RALE connection fails
- Ensure the sideloaded app has TrackerTask integrated
- Check if the dev app is running on the Roku
- Verify the correct port (default: 49200)
Network Inspector shows no traffic
- Check
GET /network/status(or/capabilities'snetworkInspectorobject) formitmActive— if it'sfalse/missing, MITM was never turned on (see Network Inspector) or failed to bind a port (mitmLastErrorsays why, e.g. already in use — check withlsof -i :8888). The server also logs its Network Inspector state once at startup so this shouldn't be a mystery from the console alone. - Even with
mitmActive: true, the sideloaded channel must explicitly route its own requests through the proxy URL and trust the RDS CA cert — Roku has no device-wide proxy setting, so a correctly running proxy with a channel that was never built to use it will also show zero traffic.
License
Released under the MIT License. This package has no third-party runtime dependencies beyond roku-dev-studio-api.