
sf-jwt-tool-mc
v1.1.17
Published
Salesforce OAuth2 JWT Setup Wizard — CLI + Web UI


Readme
SF JWT Tool 🔐
Salesforce OAuth2 JWT Bearer Flow Wizard — a Node.js CLI + Express web UI that guides developers through every step of setting up server-to-server JWT authentication with Salesforce. It generates SSL certificates, manages configuration, retrieves access tokens, and provides a polished dark/light-mode web dashboard — all without leaving your terminal.
Table of Contents
- What is the JWT Bearer Flow?
- Prerequisites
- Installation
- Quick Start
- CLI Commands
- The jwt.json Config File
- Salesforce External Client App Setup
- Frontdoor Login (Browser SSO)
- Architecture
- Project Structure
- Data Flow Diagram
- API Reference
- Security Considerations
- Troubleshooting
- References
Screenshots
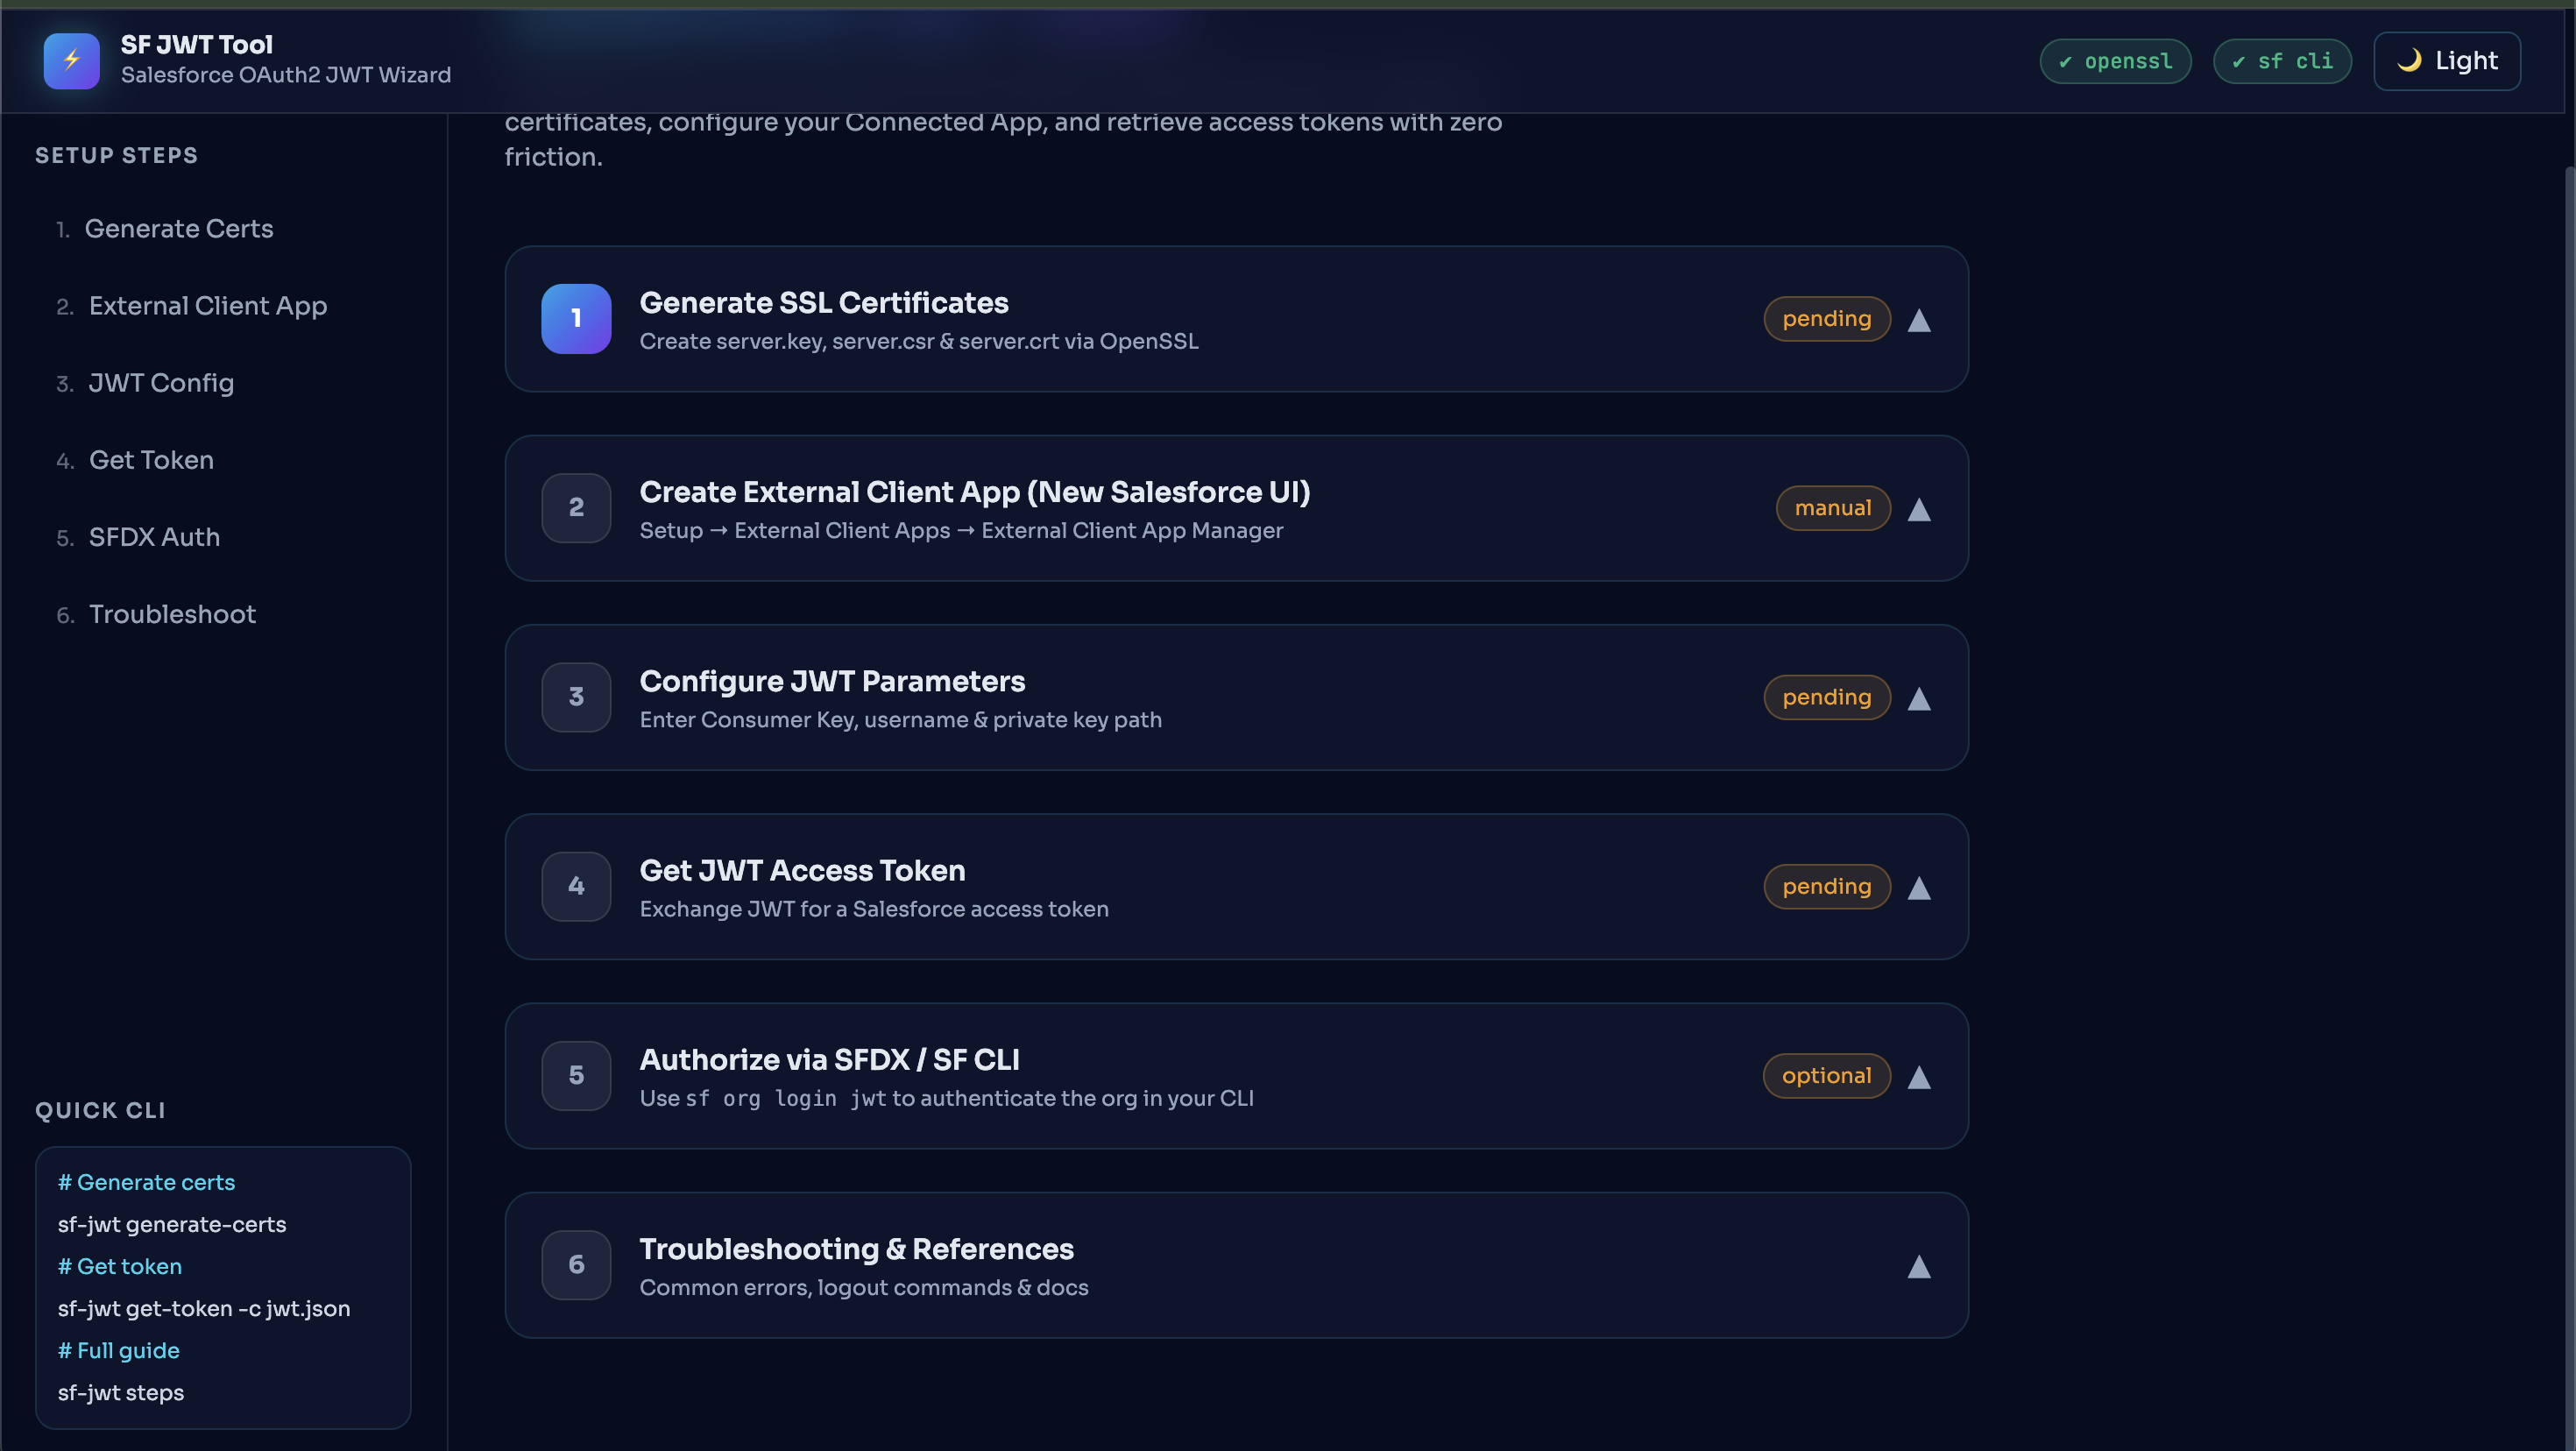
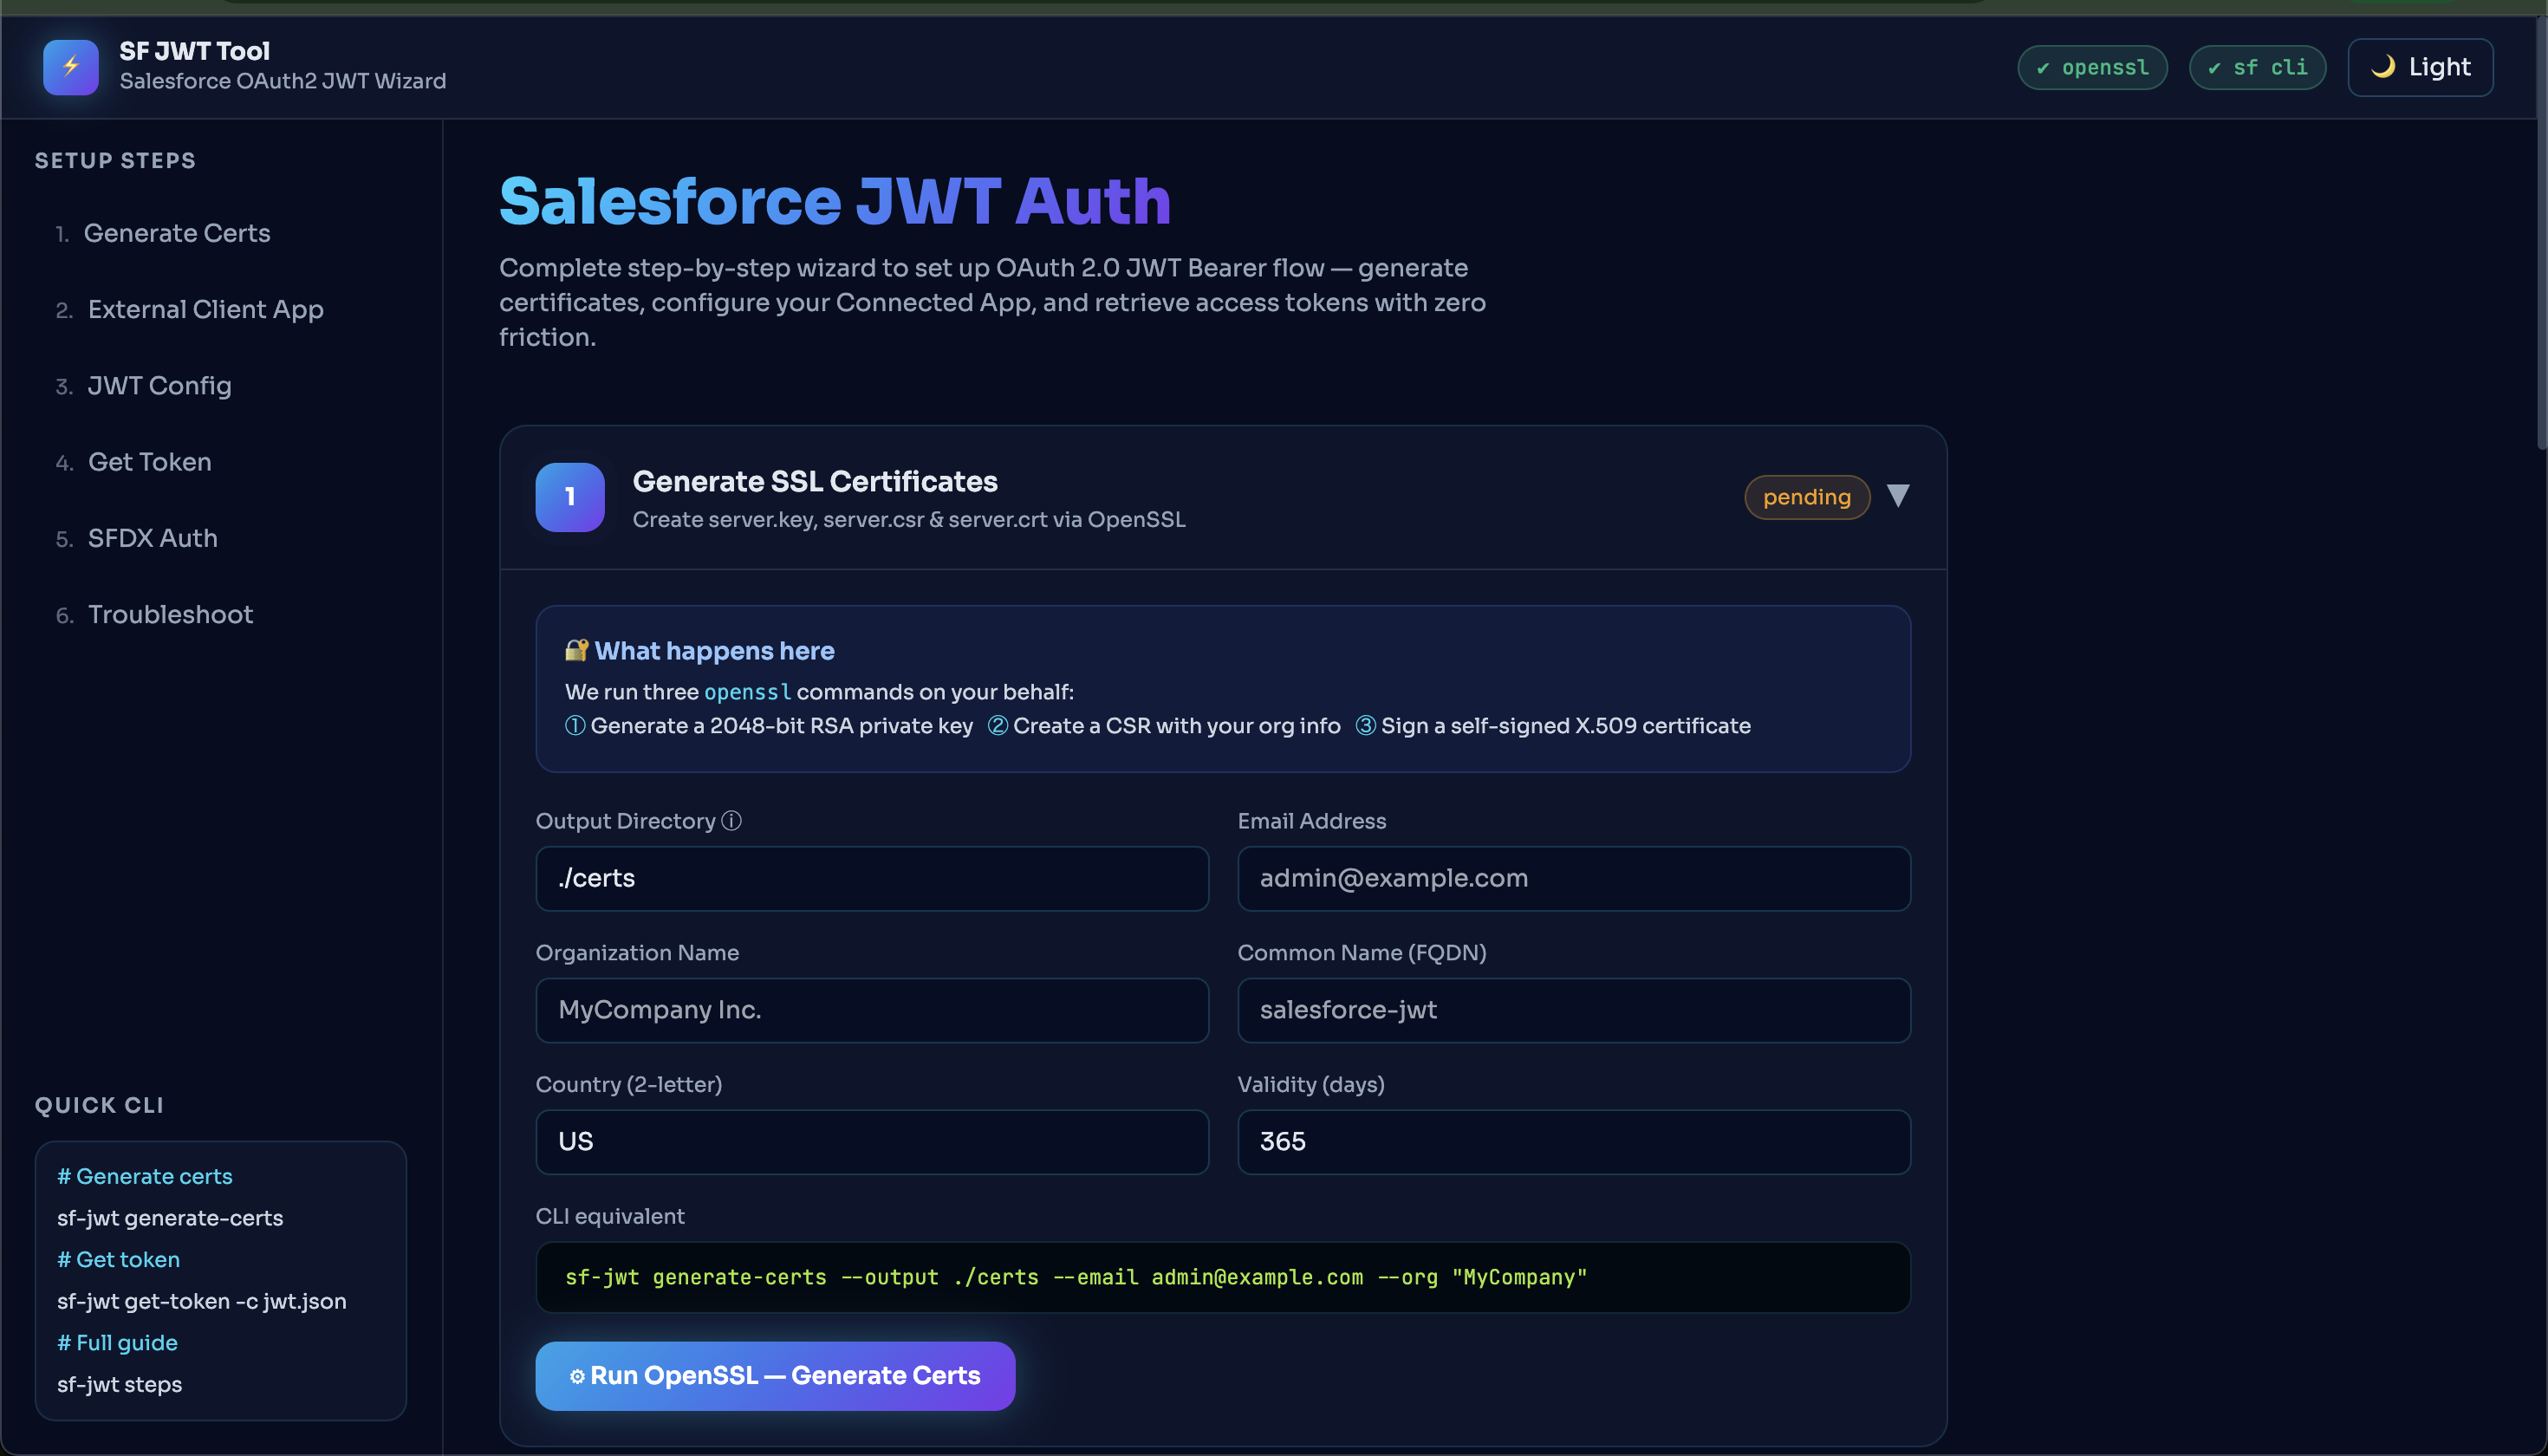

1. What is the JWT Bearer Flow?
The OAuth 2.0 JWT Bearer Flow is a server-to-server authentication mechanism that allows an application to authenticate with Salesforce without human interaction — no browser popup, no password prompt. It is designed for automated integrations, CI/CD pipelines, batch jobs, and headless server environments.
How it works at a high level
Your App                        Salesforce
   │                                │
   │  1. Sign JWT with private key  │
   │ ─────────────────────────────► │
   │                                │  2. Verify JWT using
   │                                │     uploaded server.crt
   │  3. Return access_token        │
   │ ◄───────────────────────────── │
   │                                │
   │  4. Use Bearer token in        │
   │     API calls                  │
   │ ─────────────────────────────► │
JWT Bearer Flow vs other OAuth flows
| Flow | User interaction | Use case | |------|-----------------|----------| | JWT Bearer | None | Server-to-server, CI/CD, automation | | Web Server (Auth Code) | Browser redirect | Web apps with user login | | Username-Password | Credentials | Legacy; not recommended | | Device Flow | Code entry | CLI tools, IoT |
Key components required
| Component | Description | Created by |
|-----------|-------------|------------|
| server.key | RSA private key (2048-bit) | OpenSSL — Step 1 |
| server.crt | Self-signed X.509 certificate | OpenSSL — Step 1 |
| External Client App | OAuth client registered in Salesforce | Salesforce Setup — Step 2 |
| Consumer Key | OAuth client ID from the External Client App | Salesforce Setup — Step 2 |
| jwt.json | Config file combining all credentials | This tool — Step 3 |
2. Prerequisites
| Tool | Required | Purpose | Install |
|------|----------|---------|---------|
| Node.js >= 14 | Required | Runs the CLI and Express server | https://nodejs.org |
| npm >= 6 | Required | Installs dependencies | Bundled with Node.js |
| openssl | Required | Generates RSA keys and certificates | macOS: built-in · Ubuntu: apt install openssl · Windows: Git Bash or WSL |
| SF CLI (sf) | Optional | Authorize orgs with sf org login jwt | https://developer.salesforce.com/tools/salesforcecli |
| sfdx CLI | Optional | Legacy sfdx force:auth:jwt:grant | Bundled with older Salesforce DX installations |
Verify prerequisites
node  --version          # should be v14.x or higher
npm   --version          # should be 6.x or higher
openssl version          # should print OpenSSL 1.x or 3.x
sf    --version          # optional: @salesforce/cli/...
3. Installation
npm install -g sf-jwt-tool-mc4. Quick Start
Use the interactive web wizard (recommended for first-time setup):
sf-jwt ui
# Opens http://localhost:3131 automatically
The fastest path from zero to an access token:
# Step 1 — Generate SSL certificates
sf-jwt generate-certs --output ./certs --email [email protected] --org "MyCompany"

# Step 2 — (Manual) Create External Client App in Salesforce Setup
#           Upload server.crt, enable JWT Bearer Flow, copy Consumer Key
#           See Section 7 for the full walkthrough

# Step 3 — Create config file
sf-jwt setup-config \
  --consumer-key  3MVG9Kip4IKAZ... \
  --username      [email protected] \
  --key-file      ./certs/server.key

# Step 4 — Get access token
sf-jwt get-token --config ./jwt.json

# Step 5 — (Optional) Visual dashboard
sf-jwt ui --port 3131
5. CLI Commands
All commands are available via the sf-jwt
sf-jwt generate-certs
Runs four OpenSSL commands on your behalf to generate all required certificate files:
openssl genrsa— generates an encrypted 2048-bit RSA private keyopenssl rsa— strips the passphrase, producing the cleanserver.keyopenssl req— generates a Certificate Signing Request (CSR)openssl x509— signs the CSR to produce a self-signed certificate
sf-jwt generate-certs [options]

Options:
  -o, --output <dir>      Output directory for cert files  (default: ./certs)
  --country <code>        2-letter country code            (default: US)
  --state <state>         State or province                (default: California)
  --city <city>           City                             (default: San Francisco)
  --org <org>             Organization name                (default: MyCompany)
  --unit <unit>           Organizational unit              (default: Engineering)
  --name <n>              Common name / FQDN               (default: salesforce-jwt)
  --email <email>         Email address                    (default: [email protected])
  --days <days>           Certificate validity in days     (default: 365)
Example:
sf-jwt generate-certs \
  --output   ./certs \
  --email    [email protected] \
  --org      "Acme Corp" \
  --country  US \
  --state    "New York" \
  --city     "New York City" \
  --name     acme-salesforce \
  --days     730
Output files:
./certs/
├── server.key   ← Private key  (keep secret — never commit)
├── server.csr   ← Certificate Signing Request (can be discarded after use)
└── server.crt   ← Self-signed certificate (upload to Salesforce)
sf-jwt verify-key
Validates that a private key file is a well-formed RSA key using openssl rsa -check.
sf-jwt verify-key <keyfile>

Arguments:
  keyfile   Path to server.key

Example:
  sf-jwt verify-key ./certs/server.key
  # → ✔ ./certs/server.key — RSA key OK
sf-jwt setup-config
Creates a jwt.json config file with all parameters needed for token requests.
sf-jwt setup-config [options]

Options:
  -o, --output <file>         Output config file path     (default: ./jwt.json)
  --consumer-key <key>        Salesforce Consumer Key     (required)
  --username <user>           Salesforce username         (required)
  --key-file <path>           Path to server.key          (default: ./certs/server.key)
  --sandbox                   Target a sandbox org        (default: false)
  --expires-in <seconds>      Token expiry in seconds     (default: 300)
Example:
sf-jwt setup-config \
  --consumer-key  3MVG9Kip4IKAJXfebqe2CL4... \
  --username      [email protected] \
  --key-file      ./certs/server.key \
  --output        ./jwt.json \
  --expires-in    300
sf-jwt get-token
Builds and signs a JWT assertion using the private key, then exchanges it with the Salesforce token endpoint for a Bearer access token. Prints the token, instance URL, scope, and a ready-to-use frontdoor login URL.
sf-jwt get-token [options]

Options:
  -c, --config <file>   Path to jwt.json config    (default: ./jwt.json)
Example output:
  Token Details:
  ──────────────────────────────────────────────────────────
  access_token:  00D3h000007R1Lu!AR0AQLTCNgMvcSwNZNJv...
  instance_url:  https://acme.my.salesforce.com
  token_type:    Bearer
  scope:         web id api

  Frontdoor URL (login directly):
  https://acme.my.salesforce.com/secur/frontdoor.jsp?sid=00D3h000007R1Lu!...
sf-jwt ui
Starts the Express web server and opens the visual dashboard in your default browser.
sf-jwt ui [options]

Options:
  -p, --port <port>   Port to listen on     (default: 3131)
  --no-open           Do not auto-open browser
6. The jwt.json Config File
This file holds all parameters used to sign and exchange JWT tokens. Keep it outside of source control.
{
  "consumerKey":    "3MVG9Kip4IKAJXfebqe2CL4...",
  "subject":        "[email protected]",
  "sandbox":        false,
  "expiresIn":      300,
  "privateKeyFile": "./certs/server.key"
}
| Field | Type | Description |
|-------|------|-------------|
| consumerKey | string | OAuth Client ID from your External Client App |
| subject | string | The Salesforce username to authenticate as |
| sandbox | boolean | true uses test.salesforce.com; false uses login.salesforce.com |
| expiresIn | number | JWT expiry in seconds (Salesforce max is 300) |
| privateKeyFile | string | Absolute or relative path to server.key |
Security: Add
jwt.jsonandcerts/to your.gitignore. Never commit private keys or consumer keys.
7. Salesforce External Client App Setup
Salesforce now uses the External Client App Manager (introduced Winter '25) instead of the classic App Manager Connected App flow. Follow the three phases below.
Phase A — Create the External Client App
In Salesforce Setup, use Quick Find and search
app manIn the left nav under External Client Apps, click External Client App Manager
Click New External Client App
Fill in Basic Information:
| Field | Value | |-------|-------| | External Client App Name | e.g.
mohancJWT| | API Name | auto-populated | | Contact Email | your admin email | | Distribution State |Local|Scroll to API (Enable OAuth Settings) → check Enable OAuth
Set Callback URL:
http://localhost:1717/OauthRedirectUnder OAuth Scopes, move from Available → Selected:
Manage user data via APIs (api)Manage user data via Web browsers (web)Perform requests at any time (refresh_token, offline_access)
Under Flow Enablement → check Enable JWT Bearer Flow
- A Certificate Upload drop zone appears
- Click Upload Files and select your
server.crtfrom./certs/
Click Create
Phase B — Configure OAuth Policies
- After creation, click Edit Policies
- Under OAuth Policies → Plugin Policies → Permitted Users, select:
Admin approved users are pre-authorized - A dialog appears: "Confirm permitted user policy" — click OK
- Under App Policies → Select Profiles, shuttle System Administrator (or your profile) to Selected Profiles
- Optionally assign Permission Sets
- Click Save
Phase C — Retrieve the Consumer Key
- Open your saved External Client App
- Scroll to the OAuth Settings section
- Click Consumer Key and Secret button
- Copy the Consumer Key — paste it into
jwt.jsonasconsumerKey
Important: After saving OAuth Policies, wait approximately 10 minutes before the JWT Bearer Flow becomes active.
8. Frontdoor Login (Browser SSO)
Once you have an access token, you can open a live Salesforce browser session without re-entering credentials:
https://<instance_url>/secur/frontdoor.jsp?sid=<access_token>Example:
https://acme.my.salesforce.com/secur/frontdoor.jsp?sid=00D3h000007R1Lu!AR0AQL...The web dashboard automatically generates and displays this URL after a successful token exchange.
9. Architecture
The tool is composed of three independent but coordinated layers: a Commander CLI, an Express REST API, and a Tailwind-powered single-page web dashboard.
High-level component overview
┌─────────────────────────────────────────────────────────────────────┐
│                         sf-jwt-tool                                  │
│                                                                       │
│  ┌──────────────────┐     ┌──────────────────┐                       │
│  │   CLI (cli.js)   │     │  Web UI          │                       │
│  │                  │     │  (index.html)    │                       │
│  │  Commander.js    │     │                  │                       │
│  │  chalk / ora     │     │  Tailwind CSS    │                       │
│  │  6 commands      │     │  Dark/Light theme│                       │
│  └────────┬─────────┘     └────────┬─────────┘                       │
│           │  direct require()       │  fetch() over HTTP              │
│           ▼                         ▼                                 │
│  ┌─────────────────────────────────────────────────┐                  │
│  │              Express Server (server.js)          │                  │
│  │                                                  │                  │
│  │  GET  /api/status          — tool availability   │                  │
│  │  POST /api/generate-certs  — shell → openssl     │                  │
│  │  POST /api/get-token       — jwt-helper          │                  │
│  │  POST /api/validate-key    — jwt-helper          │                  │
│  │  POST /api/save-config     — fs.writeFileSync    │                  │
│  │  GET  *                    — serve index.html    │                  │
│  └────────────────────┬────────────────────────────┘                  │
│                       │                                               │
│           ┌───────────┴──────────┐                                    │
│           ▼                      ▼                                    │
│  ┌────────────────┐   ┌──────────────────────────┐                   │
│  │  jwt-helper.js │   │  child_process (openssl) │                   │
│  │                │   │                          │                   │
│  │  jsonwebtoken  │   │  genrsa / rsa / req /    │                   │
│  │  RS256 signing │   │  x509 / rsa -check       │                   │
│  │  axios POST    │   └──────────────────────────┘                   │
│  └────────┬───────┘                                                   │
│           │                                                           │
└───────────┼───────────────────────────────────────────────────────────┘
            │  HTTPS POST
            ▼
  ┌─────────────────────────────────────┐
  │       Salesforce Token Endpoint      │
  │                                      │
  │  login.salesforce.com/services/      │
  │  oauth2/token                        │
  │                                      │
  │  grant_type=urn:ietf:params:oauth:   │
  │  grant-type:jwt-bearer               │
  └─────────────────────────────────────┘
Layer 1 — CLI (src/cli.js)
Built with Commander.js, the CLI is the primary entry point for terminal users. Each command is self-contained and does one thing well.
Key design decisions:
- Commands that run OS-level operations (
generate-certs,verify-key) use Node'schild_process.execSyncwithstdio: 'pipe'so output can be captured, formatted, and displayed with chalk colour coding and ora spinners. - The
uicommand starts the Express server and then callsopen()to launch the browser — the CLI and the web server run in the same process. - The
stepscommand is entirely offline — it prints static guidance with no network or filesystem access, making it safe to run in any locked-down environment. - All file path arguments are resolved with
path.resolve()so relative and absolute paths both work correctly regardless of the current working directory.
Layer 2 — Express API (src/server.js)
The Express server acts as a local backend for the web dashboard, exposing the same operations as the CLI through a REST API. This decoupling means the web UI never needs direct filesystem or child_process access from the browser — all sensitive operations (running openssl, reading private key files) remain server-side.
Routing design:
| Method | Path | Operation | Implementation |
|--------|------|-----------|----------------|
| GET | /api/status | Check openssl + sf cli presence | execSync with try/catch |
| POST | /api/generate-certs | Full OpenSSL cert sequence | execAsync (4 commands) |
| POST | /api/get-token | Sign JWT, exchange for token | jwt-helper.getToken() |
| POST | /api/validate-key | PEM key file validation | jwt-helper.validateKeyFile() |
| POST | /api/save-config | Write jwt.json to disk | fs.writeFileSync |
| GET | * | Serve the SPA | express.static + fallback |
All POST endpoints accept and return JSON. Error responses always include an error field with a human-readable message. The generate-certs endpoint returns a steps array so the web UI can render per-operation progress.
Layer 3 — Web Dashboard (public/index.html)
A single-file, zero-build-step web application. All CSS is loaded from the Tailwind CDN; all JavaScript is vanilla ES2020 inline script. There are no frameworks, no bundlers, and no build step required — the file is served directly by Express.
UI structure:
index.html
├── <style>          Custom CSS: glass morphism, neon accents, shimmer animations
├── <header>         Fixed top bar — brand, system status pills, theme toggle
├── <aside>          Sidebar step navigation (desktop only)
├── <main>           Step sections 1–6, each independently collapsible
│   ├── Step 1       Cert generation form  →  POST /api/generate-certs
│   ├── Step 2       External Client App guide  (static, no API call)
│   ├── Step 3       JWT config form  →  POST /api/save-config
│   ├── Step 4       Token exchange  →  POST /api/get-token
│   ├── Step 5       SFDX command builder  (client-side string interpolation)
│   └── Step 6       Troubleshooting + reference links  (static)
└── <script>         State, API calls, theme toggle, step progress tracking
State management uses a plain JS object (state) — no framework, no virtual DOM. DOM manipulation is direct. Theme switching toggles dark/light classes on <html> and relies on Tailwind's dark mode variant for all component colours.
Layer 4 — JWT Helper (src/jwt-helper.js)
The cryptographic and HTTP core of the tool. Kept separate from both the CLI and server so it can be require()d by either without duplication.
buildAssertion(config) — constructs a signed JWT using the RS256 algorithm:
Header:   { alg: "RS256", typ: "JWT" }
Payload:  {
  iss: <consumerKey>,          // OAuth client ID — identifies the app
  prn: <subject>,              // the Salesforce user to authenticate as
  aud: "https://login.salesforce.com",
  exp: <unix timestamp>        // now + expiresIn seconds
}
Signature: RS256(base64url(header) + "." + base64url(payload), privateKey)
getToken(config) — exchanges the signed assertion with Salesforce:
POST https://login.salesforce.com/services/oauth2/token
Content-Type: application/x-www-form-urlencoded

grant_type=urn:ietf:params:oauth:grant-type:jwt-bearer
&assertion=<signed_jwt>
Returns the full Salesforce response plus computed convenience fields: frontdoorUrl and Authorization header string.
validateKeyFile(keyPath) — a lightweight pre-flight check that reads the file and scans for PEM headers (BEGIN RSA PRIVATE KEY or BEGIN PRIVATE KEY) before attempting any crypto operations. Returns { valid, path } or { valid, error }.
10. Project Structure
sf-jwt-tool/
│
├── src/
│   ├── cli.js              # Commander CLI — 6 commands, chalk/ora output
│   ├── server.js           # Express server — 5 REST endpoints + static serving
│   └── jwt-helper.js       # JWT signing (RS256), token exchange, key validation
│
├── public/
│   └── index.html          # Single-file SPA — Tailwind CDN, dark/light theme,
│                           # 6-step wizard, real-time progress bars
│
├── certs/                  # Generated at runtime (add to .gitignore)
│   ├── server.key          # RSA private key  ← KEEP SECRET
│   ├── server.csr          # Certificate Signing Request
│   └── server.crt          # Self-signed X.509 cert → upload to Salesforce
│
├── jwt.json                # Generated at runtime (add to .gitignore)
├── package.json
└── README.md
Recommended .gitignore additions:
certs/
jwt.json
*.key
*.crt
*.csr
node_modules/
11. Data Flow Diagram
Complete JWT Bearer authentication sequence
Developer                sf-jwt CLI / UI             Salesforce
    │                          │                          │
    │  1. generate-certs       │                          │
    │ ────────────────────────►│                          │
    │                          │  openssl genrsa (key)    │
    │                          │  openssl req    (csr)    │
    │                          │  openssl x509   (crt)    │
    │  server.key + server.crt │                          │
    │ ◄────────────────────────│                          │
    │                          │                          │
    │  2. Upload server.crt ───┼─────────────────────────►│
    │     to External Client   │                          │  stores public cert
    │     App in Salesforce    │                          │
    │                          │                          │
    │  3. Copy Consumer Key ◄──┼──────────────────────────│
    │                          │                          │
    │  4. setup-config         │                          │
    │ ────────────────────────►│                          │
    │                          │  write jwt.json to disk  │
    │                          │                          │
    │  5. get-token            │                          │
    │ ────────────────────────►│                          │
    │                          │  build JWT payload       │
    │                          │  RS256 sign with key     │
    │                          │                          │
    │                          │  POST /oauth2/token ────►│
    │                          │  grant_type=jwt-bearer   │  verify RS256 sig
    │                          │  assertion=<jwt>         │  using server.crt
    │                          │◄─────────────────────────│
    │                          │  { access_token,         │
    │                          │    instance_url, scope } │
    │  access_token            │                          │
    │ ◄────────────────────────│                          │
    │                          │                          │
    │  6. Salesforce API calls │                          │
    │ ─────────────────────────┼─────────────────────────►│
    │  Authorization: Bearer   │                          │
    │  <access_token>          │                          │
    │ ◄────────────────────────┼──────────────────────────│
12. API Reference
The Express server exposes these endpoints on http://localhost:<port> (default 3131).
GET /api/status
Check whether required system tools are installed.
Response:
{ "openssl": true, "sfdx": false, "node": "v20.11.0" }POST /api/generate-certs
Run the full OpenSSL certificate generation sequence.
Request body:
{
  "outputDir": "./certs",
  "country": "US", "state": "California", "city": "San Francisco",
  "org": "MyCompany", "unit": "Engineering",
  "commonName": "salesforce-jwt", "email": "[email protected]",
  "days": 365
}
Response:
{
  "success": true,
  "steps": [
    { "step": "generate_pass_key", "status": "ok", "file": "./certs/server.pass.key" },
    { "step": "strip_passphrase",  "status": "ok", "file": "./certs/server.key" },
    { "step": "generate_csr",      "status": "ok", "file": "./certs/server.csr" },
    { "step": "generate_crt",      "status": "ok", "file": "./certs/server.crt" },
    { "step": "verify_key",        "status": "ok", "message": "RSA key ok" }
  ],
  "files": { "key": "./certs/server.key", "csr": "./certs/server.csr", "crt": "./certs/server.crt" },
  "crtContent": "-----BEGIN CERTIFICATE-----\nMIIDl...",
  "keyPreview": "-----BEGIN RSA PRIVATE KEY-----\nMIIEp..."
}
POST /api/get-token
Sign a JWT and exchange it for a Salesforce access token.
Request body:
{
  "consumerKey": "3MVG9Kip4IKAJXfebqe2CL4...",
  "username": "[email protected]",
  "privateKeyFile": "./certs/server.key",
  "sandbox": false,
  "expiresIn": 300
}
Response:
{
  "success": true,
  "result": {
    "access_token": "00D3h000007R1Lu!AR0AQL...",
    "instance_url": "https://acme.my.salesforce.com",
    "token_type": "Bearer",
    "scope": "web id api",
    "assertion": "eyJhbGciOiJSUzI1NiJ9...",
    "Authorization": "Bearer 00D3h000007R1Lu!...",
    "frontdoorUrl": "https://acme.my.salesforce.com/secur/frontdoor.jsp?sid=00D3h..."
  }
}
POST /api/validate-key
Check whether a file is a valid PEM RSA private key.
Request / Response:
// Request
{ "keyPath": "./certs/server.key" }

// Valid response
{ "valid": true, "path": "/absolute/path/to/server.key" }

// Invalid response
{ "valid": false, "error": "File does not appear to be a PEM private key" }
POST /api/save-config
Write a jwt.json config file to disk.
Request / Response:
// Request
{
  "configPath": "./jwt.json",
  "consumerKey": "3MVG9Kip4IKAJXfebqe2CL4...",
  "username": "[email protected]",
  "privateKeyFile": "./certs/server.key",
  "sandbox": false,
  "expiresIn": 300
}

// Response
{ "success": true, "path": "/absolute/path/to/jwt.json" }
13. Security Considerations
Private key (server.key)
The private key is the most sensitive asset. Anyone who possesses it can authenticate as the subject user without additional credentials.
- Never commit it to version control — add
*.keyandcerts/to.gitignore - Set restrictive file permissions:
chmod 600 ./certs/server.key - In production, store it in a secrets manager (AWS Secrets Manager, HashiCorp Vault, GitHub Actions Secrets)
- Rotate certificates annually, or immediately if there is any suspicion of compromise
Consumer Key (jwt.json)
The consumerKey is the OAuth client ID. While not a secret on its own, it should not be in public repositories. Add jwt.json to .gitignore.
Token expiry
Salesforce enforces a maximum JWT expiry of 300 seconds (5 minutes). The tool defaults to this value. Longer-lived JWTs will be rejected by Salesforce.
Network exposure
The Express server binds to localhost only — it is not reachable from other machines on the network. The dashboard communicates only with this local server and with login.salesforce.com or test.salesforce.com.
Certificate rotation
The self-signed certificate is valid for the number of days specified at generation time (default 365). Set a calendar reminder to regenerate and re-upload before expiry. Expired certificates cause JWT authentication to fail with JWT validation failed.
14. Troubleshooting
user hasn't approved this consumer
The user's profile or permission set has not been assigned to the External Client App.
Fix: Setup → External Client App Manager → open the app → Edit Policies → App Policies → Select Profiles → move the user's profile to Selected Profiles → Save.
JWT validation failed
The server.crt in Salesforce does not match the server.key being used to sign.
Fix: Run sf-jwt generate-certs again, re-upload the new server.crt, and update jwt.json to point to the new server.key.
JWT Bearer token expired
The exp claim is in the past, or your system clock is out of sync.
Fix: Check your system clock with date. Sync on macOS/Linux: sudo ntpdate -u pool.ntp.org.
Login Rate Exceeded
Too many authentication requests in a short period.
Fix: Wait a few minutes. Review Setup → Session Settings for rate limit configuration.
Certificate expired
The server.crt has passed its validity period.
Fix: Run sf-jwt generate-certs, re-upload server.crt, and update jwt.json.
openssl: command not found
- macOS:
brew install openssl - Ubuntu/Debian:
sudo apt install openssl - Windows: Install Git for Windows and use Git Bash
Sandbox vs production
If authenticating against a sandbox:
- Set
"sandbox": trueinjwt.json - The External Client App must exist in the sandbox org (not production)
- Token endpoint used:
https://test.salesforce.com/services/oauth2/token
15. References
- This app is written based on this resource