
snowflake-database
v1.0.3
Published
Advanced, easy-to-use and highly customizable in-memory database
Downloads
431

Maintainers
 ho3ein.ie
Readme



- SnowflakeDB - Introduction
SnowflakeDB - Introduction
SnowflakeDB is an advanced in-memory database system inspired by Redis. With SnowflakeDB, you can create a database inside your machine's RAM, which improves read and write operations on your application.
How to install?
You can easily install SnowflakeDB from NPM and import it in your project. If you are willing to modify the source you can directly download SnowflakeDB from this GitHub repository.
Install from NPM (recommended)
1. Run install command first
npm install snowflake-database2. import and run
const { startSnowflake } = require("snowflake-database");

startSnowflake("configs.yaml", "app.json");
You can change the name of configs.yaml and app.json files name or path.
Both files will be auto-generated if didn't exist, then you can modify as you need.
Install from GitHub
1. Clone this repository
git clone https://github.com/Ho3ein83/snowflake-dbOpen the project directory:
cd snowflake-db2. Install dependencies
npm install3. Run it
node index.jsWhen using this method, both configs.yaml and app.json files will be inside your project directory.
Examples
Set / Get / Remove
This is the basic set, get and remove methods:
const { Snowflake, startSnowflake } = require("snowflake-database");

// Call this before using the database
// You can also use the absolute path, if just a file name was given,
// it's going to use current directory.
// If the given path didn't exist, it'll create a new file with
// default configuration that you can change later.
startSnowflake("config.yaml", "app.json");

// Set / Update some values
Snowflake.core.set("first_name", "John");
Snowflake.core.set("last_name", "Doe");
Snowflake.core.set("age", 20);

// Get a value (with a default value)
const firstName = Snowflake.core.get("first_name", "No Name");

// Delete a value
Snowflake.core.remove("last_name");
You can also bind the methods for easier use:
const { Snowflake, startSnowflake } = require("snowflake-database");

startSnowflake("config.yaml", "app.json");

// Binding the methods with local variables
// Note: you might lose IDE hints when using method binding
const set = Snowflake.core.set.bind(Snowflake.core);
const get = Snowflake.core.get.bind(Snowflake.core);
const remove = Snowflake.core.remove.bind(Snowflake.core);

// Set / Update some values
set("first_name", "John");
set("last_name", "Doe");
set("age", 20);

// Get a value (with a default value)
const firstName = get("first_name", "No Name");

// Delete a value
remove("last_name");
Benchmark
This benchmark is measured using my personal laptop (Asus K3605ZF, 12th Gen Intel Core i7 × 20 with a M2 SSD and 40GB of DDR4 RAM) running SnowflakeDB 1.0.x with 2 different methods:
- TCP shell: which allows you to manage the database via a TCP connection from terminal using
netcatcommand. - Shared memory: which benchmark process is attached to the same process as the database with shared memory using
Snowflake.core.set/Snowflake.core.get/Snowflake.core.removefunctions.
Data set (with memory monitor and encryption on)
| Method | Set (1 entry) | Set (1K entries) | Set (100K entries) | Update (1K entries) | Update (100K entries) | |:---------:|:-------------:|:----------------:|:------------------:|:-------------------:|:---------------------:| | TCP Shell | 2.577 ms | 14.669 ms | 1,333 ms | 16.376 ms | 999.91 ms | | Shared | 0.022 ms | 11.508 ms | 1,059 ms | 5.884 ms | 846.52 ms |
Data read (with memory monitor and encryption on)
| Method | Get (1 entry) | Get (1K entries) | Get (100K entries) | |:---------:|:-------------:|:----------------:|:------------------:| | TCP Shell | 0.331 ms | 1.983 ms | 108.24 ms | | Shared | 0.0009 ms | 0.781 ms | 92.63 ms |
Data deletion (with memory monitor and encryption on)
| Method | Remove (1 entry) | Remove (1K entries) | Remove (100K entries) | |:---------:|:----------------:|:-------------------:|:---------------------:| | TCP Shell | 0.998 ms | 11.529 ms | 1,142 ms | | Shared | 0.006 ms | 5.565 ms | 696.02 ms |
Data sanitization
| Method | Sanitize (key) | Sanitize (value) | |:-----------:|:--------------:|:----------------:| | TCP Shell | 0.331 ms | 0.408 ms | | Shared | 0.0003 ms | 0.0002 ms |
TCP shell commands takes longer time to execute, because there are a few extra steps for TCP connection to allow the execution, such as authentication, message validation and permission management.
Database performance (small data - encryption on)
| Test | Execution time | |:------------------------------------------:|:--------------:| | Startup time for empty database (0 B) | 6.591 ms | | Startup time for 1,000 entries (45 KB) | 32.213 ms | | Startup time for 10,000 entries (458 KB) | 159.855 ms | | Startup time for 1,000,000 entries (48 MB) | 14.595 s |
Note: startup time depends on the number of entries, not the database file size.
Program performance
| Test | Execution time | |:------------------------------------------:|:--------------:| | Webserver and TCP start | 2.266 ms | | CLI commands initialization | 0.002 ms | | Parsing a command | 0.565 ms | | Entry lookup | 0.004 ms |
Note: these values are measures with current version and may change on the future releases.
How does it work?
Database files: Each database is stored in a
.sfdfile, which contains the actual data in binary format. These database files are referred to as MEIDs (Mapped Excluded Independent Databases). MEIDs are independent — if one becomes corrupted or gets lost, the other database parts remain usable, so you won't lose everything!Database keys: Each database file has a corresponding key file linked to it. The key file uses the
.sfkformat and shares the same index as the database file. For example, if a database file is namedmeid-0.sfd, the related key file will bekey-0.sfk. These key files contain a list of keys, hashes, and the length of the corresponding data in the database file. They are used solely for indexing and are crucial for data recovery. Key files also stores as binary, which will be explained later.Backup files: Instead of updating each entry in the database (which can be time-consuming), SnowflakeDB tracks every change and stores it as a backup file in the
.sfbformat. These backups are later collected and merged by worker processes to persist the database. These processes run in the background and does not block the main process. If the application crashes while taking or restoring a backup, it won’t cause any issues, as all operations are handled in order.Encode / Decode: It uses msgpack for encoding and decoding data into binary, which supports various data types such as numbers, strings, booleans, objects and arrays.
TCP Shell: SnowflakeDB provides a simple TCP shell that allows you to manage your database over a TCP connection, all you have to do is set the TCP port (or use the default) and run the following command in your terminal:
nc 127.0.0.0 6401ornc domain.com 6401Note that you might need an access token (if configured one) to access the shell.
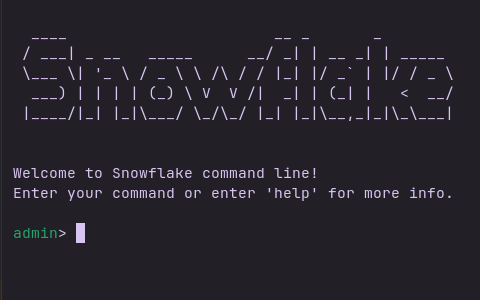
Security: There are several security options. For instance, you can set up one or more access tokens to authenticate the shell and run commands. You can also encrypt your data using your own encryption key, change the default ports to enhance database security and change the login attempts limit to prevent brute-force attacks.
Logs: If you enable the logging option (enabled by default), you can track login attempts, connections, and other activities. It worth mentioning that you can customize logging options, which will be explained later.
Why should I use this one?
There are many in-memory database and cache systems such as Redis, Memcached, and Valkey that you can use. However, in this project, simplicity is considered an important factor.
Other than simplicity, it's lightweight and easy to set up.
In addition, you get a lot of customization options, such as memory management, encryption, security features, and permission management.
How to use command line (TCP shell)?
1. Set up your access keys
To use the TCP shell for managing your database, you first need to create your access key(s). To do this, open the app.json file located in the snowflake-db directory.
By default, the access key is empty, which means you can leave the access token field blank to access the database:
"access_keys": {
    "": {
        "alias": "admin",
        "permissions": ["*"],
        "max_connections": -1
    }
}
To change this, simply replace the empty string with your own custom key:
"access_keys": {
    "my-access-token": {
        "alias": "admin",
        "permissions": ["*"],
        "max_connections": -1
    }
}
You can also add more than one token with different permissions:
"access_keys": {
    "my-access-token": {
        "alias": "admin",
        "permissions": ["*"],
        "max_connections": -1
    },
    "xjZApfk84NfiD10p": {
        "alias": "SnowflakeDB",
        "permissions": ["set", "get", "remove"],
        "max_connections": -1
    }
}
Note: Read Permissions.md for more details.
To limit the maximum allowed connections, set the max_connections property to a positive number. To allow unlimited connections, leave it set to -1.
2. Enter your shell
To open the TCP shell, use the netcat command to connect to the configured TCP port and host and start the session:
nc localhost 6401or:
nc host.com 64013. Enter your access key
After opening the connection, enter one of your access keys and press Enter.
You have only 5 seconds to enter your access key; otherwise, the connection will be terminated, and you’ll need to reconnect.
See server.cli_authentication_timeout in configs.yaml to change this behaviour.
4. Done!
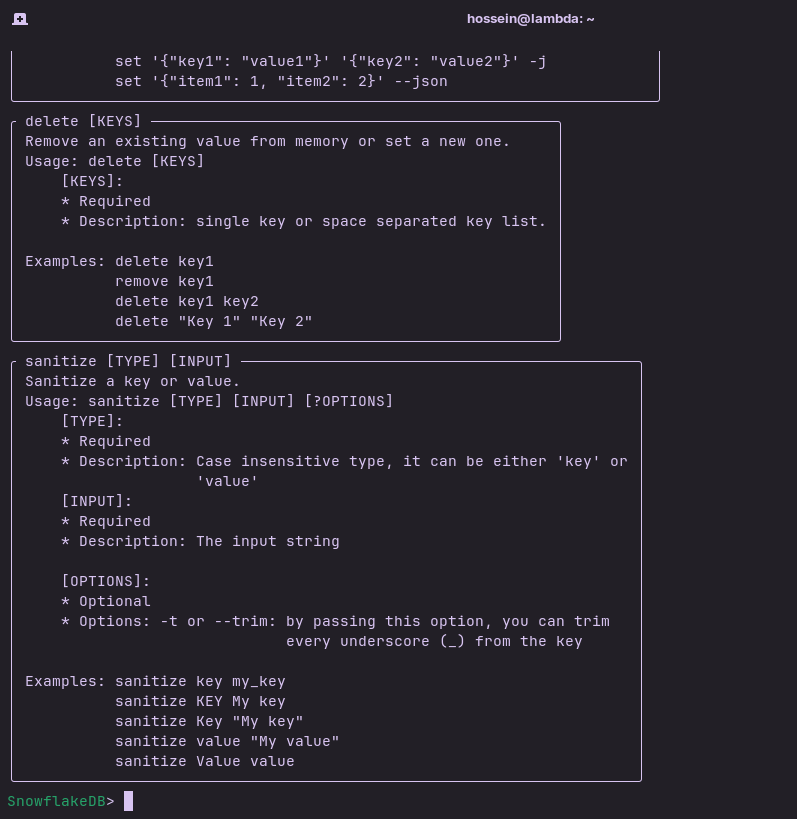
Now you can enter any available command or run help to get the list of existing commands with usage.
Configuration
To change the database configuration, refer to the configs.yaml file, which is already documented within the file itself.
GUI web interface
The built-in web interface allows you to manage your database data and statistics within a single web page.
By installing this app, you get the web control panel too, but if you need to customize it or see the codes, you can always inspect the codes from SnowflakeDB GUI React repository and build them your own.
Learn more
If you're interested in how this software works, read the following sections. You’re also welcome to explore the codes.
Database files (MEIDs)
By default, database files are located in the snowflake-db/db directory (this can be changed in the configuration file). These files are stored in binary format, so you can use tools like Hexdump or GHex to view their contents.
If you open a MEID (.sfd) file, you see something like this:
00 01 51 62 34 53 44 36 78 46 00 00 00 00 00 00
00 00 00 00 00 00 00 00 00 00 00 00 00 00 00 00
8d 06 90 bf e5 07 7b 8c bf da 75 e9 02 72 65 8a
9b 82 21 d0 2b 20 90 fc 8c 4d 32 75 25 9e 7e 85
00 00 00 06 76 61 6C 75 65 31
The first 32 bytes make up the file header, which contains the MEID version and application signature used later for backward compatibility:
00 01 51 62 34 53 44 36 78 46 00 00 00 00 00 00
00 00 00 00 00 00 00 00 00 00 00 00 00 00 00 00
The database begins immediately after the header, so the first 32 bytes of data represent the key hash of the next entry:
8d 06 90 bf e5 07 7b 8c bf da 75 e9 02 72 65 8a
9b 82 21 d0 2b 20 90 fc 8c 4d 32 75 25 9e 7e 85
The next 4 bytes represent size of the value, which can be up to 2³² bytes, allowing you to store up to 4 GiB of data in each entry. In this case, the data length is only 6 bytes:
00 00 00 06This means the next 6 bytes contain the actual data:
76 61 6C 75 65 31Now if you decode that into its actual format (using msgpack), you get the string value of "value1" which is the data of that entry.
If there are additional entries, they follow this value, and the process repeats.
Key files
When you open a key file (with the .sfk extension), you’ll see a similar structure: the first 256 bits are the header, followed by a 256-bit hash, then a 32-bit value indicating the key length, and finally the actual key value.
TCP shell
The TCP shell is a simulated terminal with an authentication system. It uses ANSI codes to display colored text. It uses a simple command parser to handle commands effectively. You can also disable the TCP shell or change its port if needed, also possible to integrate your own commands into it.
Encryption
You can encrypt your database to make it unreadable without having the encryption key.
- For start enable
meids.encryptfrom config file. - Now change
meids.encryption_cypherto a safe path for encryption key, by default it's set to./db/snowflake.sfx(not recommended to use this path in production).
Note: since snowflake.sfx file is a binary, you can name it whatever you want, for example you can use family-picture.png as the encryption key file as long as the content is a valid key.
Using custom encryption key (optional)
To use a custom encryption key, create a new file at the path specified by encryption_cipher and place a 32-character string inside it. If no file is provided, a random key will be generated automatically.
Now after running the database a binary file will be generated automatically in the given path containing your encryption key. Here is what the file looks like:
00 01 02 39 64 65 30 65 36 39 65 00 00 00 00 00
00 00 00 00 00 00 00 00 00 00 00 00 00 00 00 00
65 76 39 56 6E 75 4A 4D 74 56 44 35 77 6C 6D 4D
52 66 69 78 4E 66 61 32 77 64 4E 43 7A 79 4D 58
The first 32-byte is the header and the next 32-byte represents the encryption key.
How does an encrypted entry look like?
When encrypting the database, each entry value will be encrypted without touching the hash.
Here is how does an encrypted database look like using AES-256-CTR algorithm:
Disable the encryption
If you have your data encrypted, and now you need to disable the encryption, set both meids.encrypt and meids.recover to true, then restart your app to see this message:
[DATABASE] Database files were recovered, you can disable 'meids.recover' by setting it to 'false' in 'configs.yaml' file.set both meids.encrypt and meids.recover to false and restart the app, now all of your database files will be decrypted.
Attributes
You can use @echo and @json attributes to set the mode of the current connection. If you’re building an application for your database, you should send @json attribute immediately after authentication is completed.
For CLI don't change the mode or send @echo to change it back to CLI mode.
╭ @echo | @json ────────────────────────────────────╮
│ Enter echo mode (for CLI) or JSON mode (for apps) │
╰───────────────────────────────────────────────────╯
To see how long a command takes to execute, enable set timing attribute to on by sending @timing on. To disable it, send @timing off.
╭ @timing on|off ──────────────────────────╮
│ Toggle execution time measurement state. │
╰──────────────────────────────────────────╯
Internal commands
╭ help ───────────────────────────────────────────────────────────────────╮
│ Get the list of existing commands with usage                            │
│ Usage: help [?COMMANDS]                                                 │
│     [COMMANDS]:                                                         │
│         * Optional                                                      │
│         * Space separated commands you want to know more about.         │
│ Examples: help                                                          │
│           help command1                                                 │
│           help command1 command2                                        │
│           help clear get set                                            │
╰─────────────────────────────────────────────────────────────────────────╯
╭ clear ──────────────────────────────────╮
│ Clears your screen if this is possible. │
│ Alias: cls │
╰─────────────────────────────────────────╯╭ logout ──────────────────────────────────────────────────────────╮
│ Terminates current session and asks for another token if needed. │
╰──────────────────────────────────────────────────────────────────╯╭ exit ───────────────────────────────────────────────────────────────────╮
│ Exit the shell │
│ Usage: exit [?STATUS] │
│ [STATUS]: │
│ * Optional │
│ * Exits the shell with a status. If [STATUS] is omitted or invalid, │
│ the exit status will be 0 │
│ Examples: exit │
│ exit 1 │
╰─────────────────────────────────────────────────────────────────────────╯╭ shutdown [?EXIT_CODE] ────────────────────────────────────────────╮
│ Shutdown the process and offload │
│ the database from memory. │
│ Usage: shutdown [?EXIT_CODE] │
│ [EXIT_CODE]: │
│ * Optional │
│ * Description: The exit code of the process, the default is 0 │
│ │
│ Examples: shutdown │
│ shutdown 1 │
╰───────────────────────────────────────────────────────────────────╯╭ info [FILTERS] ─────────────────────────────────────────────────────────────────────────────────────────╮
│ Get all the information about the running application. │
│ Usage: info [?FILTERS] │
│ [FILTERS]: │
│ * Optional │
│ * Default value: "all" │
│ * Options: "database" or "db", "persistent", "memory" or "mem", "app", "server", "all" or "*" │
│ │
│ Examples: info databases │
│ info db │
│ info app server │
│ info persistent │
╰─────────────────────────────────────────────────────────────────────────────────────────────────────────╯Output of the info command:
╭ Now ──────────────────────────╮
│ Sat, 07 Mar 2026 13:36:20 GMT │
╰───────────────────────────────╯
╭ Info ──────────────────────────────────────────────╮
│ ── Server ───────────────────────────────────────  │
│ Uptime --------------- 00:26                       │
│ Webserver Port ------- 6401                        │
│ CLI Port ------------- 6402                        │
│ ── Application ──────────────────────────────────  │
│ Version Name --------- 1.0.0                       │
│ Version Code --------- 1                           │
│ ── Memory ───────────────────────────────────────  │
│ Monitor -------------- Enabled                     │
│ Heap Total ----------- 12.89 MiB                   │
│ Heap Used ------------ 10.45 MiB                   │
│ Max Memory ----------- 953.67 MiB                  │
│ Used Memory ---------- 42 B (0.00%)                │
│ ── Database ─────────────────────────────────────  │
│ MEID Version --------- 1                           │
│ MEIDs Count ---------- 1                           │
│ MEIDs Encryption ----- Disabled                    │
│ Last Reload ---------- 26 seconds ago              │
│ ── Configuration ────────────────────────────────  │
│ Status --------------- Changed (restart required)  │
│ ── Persistent ───────────────────────────────────  │
│ Persistent Status ---- No changes                  │
│ Last Persistent Call - Never                       │
╰────────────────────────────────────────────────────╯
Database commands
╭ get [KEYS] ──────────────────────────────────────────────────────────╮
│ Get existing entries from memory.                                    │
│ Usage: get [KEYS] [?OPTIONS]                                         │
│     [KEYS]:                                                          │
│     * Required                                                       │
│     * Description: single key or space separated key list.           │
│     [OPTIONS]:                                                       │
│     * Optional                                                       │
│     * Options: -j or --json: force it to return JSON even for single │
│                              values.                                 │
│                                                                      │
│ Examples: get key_1                                                  │
│           get -j key_1                                               │
│           get key_1 key_2                                            │
│           get "key 1" "key 2"                                        │
│           get "key 1" -j                                             │
╰──────────────────────────────────────────────────────────────────────╯
╭ set [KEY_PAIRS] [?OPTIONS] ───────────────────────────────────────────╮
│ Change an existing value inside memory or set a new one. │
│ Usage: set [KEY_PAIRS] [?OPTIONS] │
│ [KEY_PAIRS]: │
│ * Required │
│ * Description: a key name followed by target value. │
│ [OPTIONS]: │
│ * Optional │
│ * Options: -j or --json: by passing this option, you can set │
│ entries using JSON. By passing this │
│ option you must provide a valid JSON set │
│ with a valid key and value. │
│ │
│ Examples: set key1 value1 │
│ set key1 "value 1" │
│ set key1 value1 key2 value2 │
│ set -j '{"key": "value"}' │
│ set '{"key1": "value1"}' '{"key2": "value2"}' -j │
│ set '{"item1": 1, "item2": 2}' --json │
╰───────────────────────────────────────────────────────────────────────╯╭ delete [KEYS] ─────────────────────────────────────────────╮
│ Remove an existing value from memory. │
│ Usage: delete [KEYS] │
│ [KEYS]: │
│ * Required │
│ * Description: single key or space separated key list. │
│ │
│ Examples: delete key1 │
│ remove key1 │
│ delete key1 key2 │
│ delete "Key 1" "Key 2" │
╰────────────────────────────────────────────────────────────╯ list [?PAGE] [?OPTIONS] ────────────────────────────────────────────────╮
│ List existing entries in memory. The list is │
│ paginated and shows a limited amount of entries. │
│ Alias: ls │
│ Usage: list [?PAGE] [?OPTIONS] │
│ [PAGE]: │
│ * Optional │
│ * Description: The number of current page (default is 1) │
│ │
│ [OPTIONS]: │
│ * Optional │
│ * Options: --limit: The amount of entry limit of each page, │
│ default is 30. Pass -1 for unlimited. │
│ --type: Filter out the entries by their type. │
│ The allowed types are: "number", "string", │
│ "bool" / "boolean", "object", "array", │
│ "buffer" / "bin", "all" / "*" (default). │
│ You can also pass multiple types by │
│ separating them with comma. │
│ --scope: Set the scope for data lookup, the │
│ allowed values are: "key", "value", "trash", │
│ "pair" (default, both key and value) │
│ │
│ Examples: list │
│ list 2 │
│ list --limit=10 │
│ list 2 --limit=10 │
│ list --type=string │
│ list --scope=key │
│ list --type=buffer,string,array │
╰─────────────────────────────────────────────────────────────────────────╯╭ sanitize [TYPE] [INPUT] ────────────────────────────────────────────╮
│ Sanitize a key or value. │
│ Usage: sanitize [TYPE] [INPUT] [?OPTIONS] │
│ [TYPE]: │
│ * Required │
│ * Description: Case insensitive type, it can be either 'key' or │
│ 'value' │
│ [INPUT]: │
│ * Required │
│ * Description: The input string │
│ │
│ [OPTIONS]: │
│ * Optional │
│ * Options: -t or --trim: by passing this option, you can trim │
│ every underscore (_) from the key │
│ │
│ Examples: sanitize key my_key │
│ sanitize KEY My key │
│ sanitize Key "My key" │
│ sanitize value "My value" │
│ sanitize Value value │
╰─────────────────────────────────────────────────────────────────────╯╭ truncate [INDEX] [CONFIRM] ─────────────────────────────────────────╮
│ Truncate the database or just a specific one. │
│ Note that it will regenerate the headers for each file after │
│ truncating. Also you need to reload the database after truncating │
│ to keep it up to date. │
│ If the database index is not loaded, won't be truncated. │
│ Usage: truncate [INDEX] [CONFIRM] │
│ [INDEX]: │
│ * Required │
│ * Description: The index of the database file to be truncated, │
│ starting from 0. │
│ Also you can set it to "all" to truncate all the │
│ database files that was loaded. │
│ Can be a comma separated string, for example │
│ "0,4" will truncate 0 and 4 database files. │
│ │
│ [INDEX]: │
│ * Required │
│ * Description: The confirmation of the truncation, must be │
│ either "1" or "confirm" string. │
│ │
│ Examples: truncate 0 confirm │
│ truncate all confirm │
│ truncate 1,2,3 confirm │
│ truncate "1, 2, 3" confirm │
╰─────────────────────────────────────────────────────────────────────╯╭ reload [?OPTIONS] ────────────────────────────────────────────────────╮
│ Reload the database files. │
│ Run this command after truncating or changing the │
│ database files. │
│ Usage: reload [?OPTIONS] │
│ [OPTIONS]: │
│ * Optional │
│ * Options: --no-backup: Omit the backup files restoration and │
│ just reload the database files. If not │
│ present, backups will be restored first. │
│ --delete-backups: Deletes every unhandled backup files. │
│ │
│ Examples: reload │
│ reload --no-backup │
│ reload --delete-backups │
╰───────────────────────────────────────────────────────────────────────╯╭ persistent [?OPTIONS] ───────────────────────────────────────────╮
│ Takes a snapshot from the current database │
│ and stores it in the database files. │
│ Alias: persist │
│ Shortcuts: snapshot => persistent -b │
│ Usage: persistent [?OPTIONS] │
│ [OPTIONS]: │
│ * Optional │
│ * Options: -b or --backup: if present, backup files will be │
│ restored before taking a snapshot │
│ use 'snapshot' command as │
│ an alias for this option │
│ │
│ Examples: persistent │
│ persistent -b <- you can use 'snapshot' instead │
│ persistent --backup <- you can use 'snapshot' instead │
╰──────────────────────────────────────────────────────────────────╯╭ restore ───────────────────────────────────────────────────────────╮
│ Restores all pending backup files into memory. │
│ You might want to call 'persistent' to store the data in database. │
│ Also you can use 'snapshot' command to restore backups and take │
│ a snapshot together. │
│ Do not use this command without running 'persistent', restoring │
│ backups without taking a snapshot can lead to data loss. │
│ Usage: restore │
│ │
│ Examples: restore │
╰────────────────────────────────────────────────────────────────────╯╭ path ────────────────────────────────────────────────────────────╮
│ Shows the absolute path of your database and configuration files │
│ Usage: path │
│ │
│ Examples: path │
╰──────────────────────────────────────────────────────────────────╯Backup files or AOL (Append Only List)
Instead of updating the whole database on every change, SnowflakeDB keeps the track of them in separate files, then they will be restored during the initialization and cleanup steps.
Backup files are located in snowflake-db/db directory by default, if you open one of them you may see something like this:
banana<2
apple<pineapple<1
#banana
#pineapple
watermelon<T
strawberry<N
In the first line, banana<2 means it should add a key named banana and set its value to integer 2.
On the line below that, apple<pineapple<1 means both apple and pineapple keys have the same value, which is integer 1. This can be very efficient for large duplicated data.
When a key is started with # it means that key should be removed at this point.
watermelon<T is the same as before, but T is an alias for true, it takes 3 bytes less storage, and it's simpler to read.
Strings are quoted with double quotations in the backup files to prevent conflict with aliases:
name<"Hossein"
; Don't get aliases mistaken for strings 👇
string<"T"
boolean<T
Other aliases:
Norn👉nullTort👉trueForf👉false
Programming - Backup files encoding / decoding:
Import the AOL object first:
const SnowflakeAol = require("snowflake-database/src/core/SnowflakeAol");To encode a new set, use encodeSets method:
const sets = SnowflakeAol.encodeSets({
    money: 20,
    age: 20,
    color: "white",
    job: false,
    skills: ["PHP", "JS"],
    car: null
});
Now sets value will be:
money<age<20
color<"white"
job<F
skills<["PHP","JS"]
car<N
To encode the removal items, use encodeRemoval method:
const removals = SnowflakeAol.encodeRemoval(["money", "car", "job"]);The output will be:
#money
#car
#job
Contribution
We welcome and appreciate all contributions to this project! Whether it's fixing bugs, improving documentation, suggesting new features, or submitting pull requests, your input helps make the project better for everyone. If you have ideas, questions, or improvements, don't hesitate to open an issue or contribute directly.
Copyright
This project is released with the intention of being freely usable by anyone for any purpose. You are welcome to copy, modify, redistribute, and use this project in any way you want — commercial or personal — without restriction.
License
Read License.txt for details