
ssw-contenthawk
v0.1.21
Published
Installer and Claude skill for SSW ContentHawk — sets the GitHub Actions secrets required to run the ContentHawk content-audit pipeline on a target repo.

Readme
SSW.ContentHawk
ContentHawk is a GitHub Actions–based pipeline for auditing repository content. It uses Copilot-powered workflows to judge content, open issues, and create pull requests.
To use ContentHawk on a repository you want to audit, follow these setup steps.
🎥 Video overview
 Video: Content Hawk - The wingman for updating your Markdown sites (8 min)
Installing ContentHawk
Option 1: Use the installer skill (recommended)
- The ContentHawk installer can be downloaded and used as a skill. The instructions below show you how to install the skill from different marketplaces:
Using NPX Skills
npx skills add -g SSWConsulting/SSW.ContentHawk

# Altenatively, you can install the skill directly for your your agent of choice like. The Example below shows you how to install the skill for claude.
npx skills add -g SSWConsulting/SSW.ContentHawk --agent claude-code
From the Claude Plugin Marketplace
The installer skill can also be downloaded as a plugin from the Claude Plugin Marketplace. Use the commands below to add the ssw-consulting Claude plugin marketplace and install the ssw-contenthawk plugin.
/plugin marketplace add SSWConsulting/SSW.ContentHawk
/plugin install ssw-contenthawk@ssw-consulting- Once you've added the installation skill, you can run it with the command below using your agent of choice. Please note that the skill can be run in your CLI from anywhere. ContentHawk runs the installation over HTTP on a sparse clone of your repository.
/contenthawk-install- Follow along with the installer instructions to complete the setup. The installer will copy the required workflows and configuration files to your repository and set up secrets.
Option 2: Manual installation
1. Copy the .github folder
Copy the entire .github folder from this repository into the root of the repository you want to audit. This folder contains the workflows and configuration required for the ContentHawk pipeline.
2. Copilot: fine-grained access token
Create a read-only, fine-grained personal access token with:
- Copilot Requests enabled
- Public repository access (sufficient for public repos)
Store this token in a repository secret named:
COPILOT_GITHUB_TOKEN
(Settings → Secrets and variables → Actions → New repository secret.)
4. Workflow permissions
In the repository you are auditing:
- Go to Settings → Actions → General.
- Under Workflow permissions, choose the option that allows GitHub Actions to create and approve pull requests (e.g. “Read and write permissions”).
Save the settings.
5. Tavily API key
Add a repository secret named:
TAVILY_API_KEY
Summary of required secrets
| Secret name | Description |
|-----------------------|-------------|
| COPILOT_GITHUB_TOKEN | Read-only fine-grained token with Copilot Requests; public repo access is fine. |
| TAVILY_API_KEY | Tavily API Key |
After completing these steps, the ContentHawk workflows in the copied .github folder can run in your repository.
Running the pipeline
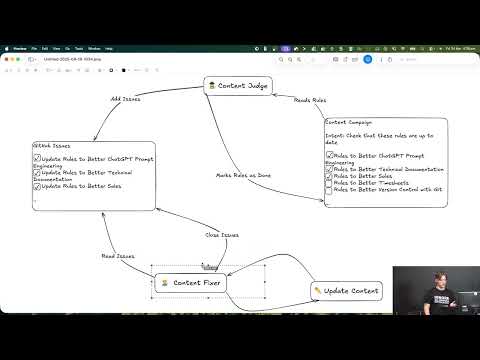
The pipeline runs in four stages. Run them in order; content-judge-pr is triggered automatically by content-judge, so you only manually run three workflows.
Flow: content-campaign → content-judge → content-judge-pr (auto) → content-fixer
1. Content Catalog (Agent 1)
Workflow: content-campaign
Actions → Content Catalog → Run workflow
Creates a snapshot of content to audit, a custom label, and opens a pull request.
Next: Merge the “[Content Catalog] ...” PR to main. Note the repo-relative path to the snapshot file (e.g. .github/ContentHawk/TODO/2026-03-05_Snapshot_archive-legacy-rules.md) — you need it for the next steps.
2. Content Judge (Agent 2a)
Workflow: content-judge
Actions → Content Judge → Run workflow
Reads the snapshot from main, reviews each file against the intent, and opens labelled issues. When it finishes, it automatically triggers content-judge-pr.
Next: content-judge-pr runs automatically and opens a “[Content Judge] …” PR that updates the snapshot with issue numbers. Merge that PR when ready.
3. Content Judge PR (Agent 2b) — automatic
Workflow: content-judge-pr
Triggered by: content-judge when it completes.
Updates the snapshot with issue numbers and opens a PR. You do not run this manually in the normal flow.
4. Content Fixer (Agent 3)
Workflow: content-fixer
Actions → Content Fixer → Run workflow
Groups open issues with the label into bundles and opens fix PRs that implement changes and close the linked issues.
Run this after the judge has created issues and you have merged the judge PR. You can run it multiple times as more issues are created or merged.
Publishing a new version of the installer
Install Script
The installer is published to npm as ssw-contenthawk and run via npx ssw-contenthawk@latest <owner/repo>. The Claude/AI skill (ssw-contenthawk/skills/contenthawk-install) is a thin wrapper that instructs the agent to invoke that npx command, so the same skill works with Claude Code or any other AI provider that can shell out. The installer itself is no longer bundled inside the skill.
To cut a new release:
- Bump
versioninpackage.jsonusing npm version with semver. - Authenticate with npm if you haven't already by running
npm login. Use SSW's NPM account in Keeper. - Get your code changes reviewed and merged to
main. - Run
npm run buildto produce the bundleddist/install.js(anddist/form.css). - Run
npm publishto push to npm. From then onnpx ssw-contenthawk@latest <owner/repo>resolves to the new version.
Skill
The skills in ssw-contenthawk are automatically published to the marketplace when merged to main. Their publication settings are defined in both the .claude-plugin/marketplace.json file at the root of the repo and the .claude-plugin folder(s) inside of ssw-contenthawk.
Testing skills locally
- Remove the skill if you have a previous version installed
npx skills remove -g <skill-name> - Install the skill locally from the
ssw-contenthawkfolder
npx skills add -g ./ssw-contenthawk/skills/<skill-folder-name>Note: The skills use the latest version of the
npxcommand that is published to the NPM registry. If you need to test changes to the installer script using the skill, you can temporarily modify the skill's command to point to a local file instead of the npm package. For example you would changenpx ssw-contenthawk@latest install <owner/repo>topnpm dev install <owner/repo>.
Publishing new versions of the npx commands
- Get your code changes merged to main, ensuring you bump the version in
package.jsonusing npm version with semver. - Go to Releases | Draft a new release in GitHub, add a release tag matching the version you set in
package.json(e.g.v0.1.16), and publish the release. This triggers the GitHub Action workflow that builds and publishes the package to npm. You can use the automatically generated release notes or add your own.