
store-asset-generator
v0.1.3
Published
AI-powered App Store & Play Store asset generator — MCP server for Claude Code
Downloads
558
Maintainers
 yarasaa
Keywords
Readme
StoreKit — AI-Powered App Store Asset Generator
An open-source MCP server for Claude Code that generates App Store & Play Store assets from your mobile app project.
One command. All your store assets.
cd my-ios-app
claude
> generate store assets for this app
What it does
StoreKit scans your mobile project, understands its screens, builds it, takes simulator screenshots, designs unique store mockups, writes ASO-optimized copy, and exports everything in Fastlane-ready format — all through Claude Code's MCP tools.
No fixed templates. No API keys. Each app gets a unique design based on its actual colors, category, and content.
Real examples
These mockups were generated by StoreKit from real apps — each one with a unique design tailored to the app's category, colors, and content:
Ingredio — AI Food Scanner & Nutrition Tracker

![]()
Qardly — Digital Business Card
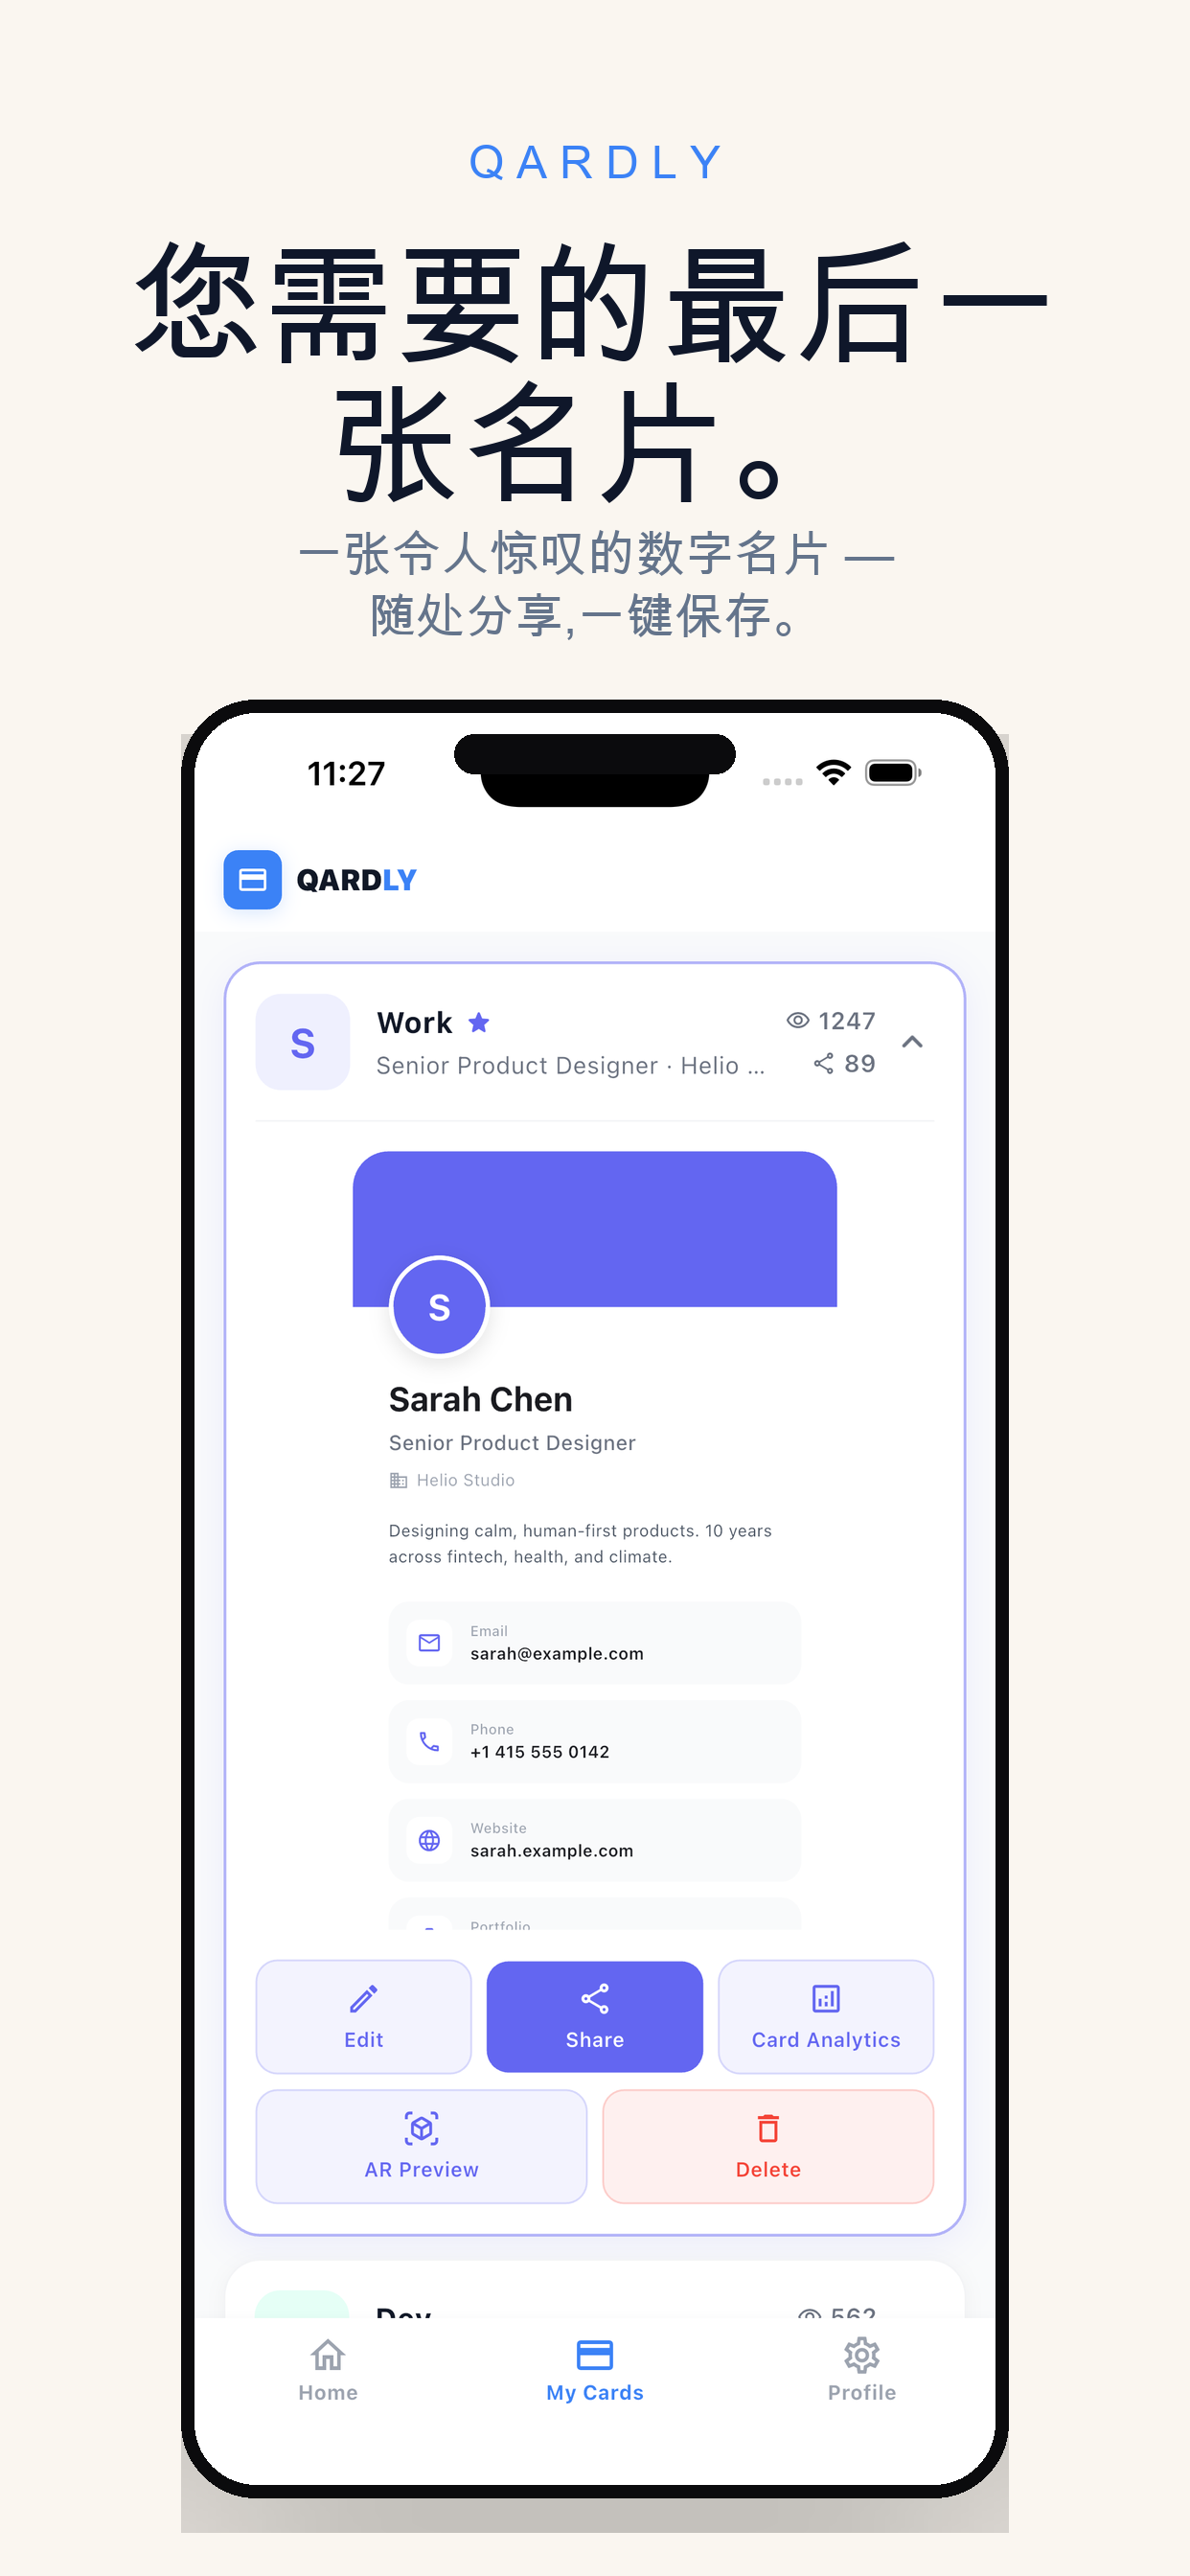
Same tool, completely different designs. StoreKit analyzes each app's colors, category, and screens — then Claude designs a unique mockup. No fixed templates, no two apps look the same.
Pipeline
detect_project     → scans code, finds screens, ranks by store importance
       ↓
build_project      → xcodebuild / gradle / flutter build
       ↓
simulator_control  → boots simulator, installs app
       ↓
take_screenshot    → captures each screen (status bar: 9:41, full battery)
       ↓
generate_mockup    → analyzes colors/palette, Claude designs custom HTML
       ↓
batch_render       → Puppeteer renders to every required store size
       ↓
generate_metadata  → Claude writes ASO descriptions, keywords, copy
       ↓
export_assets      → packages into Fastlane-ready directory
If the build fails or you skip the simulator, StoreKit automatically falls back to reading your source code and designing mockups from that.
Installation
Step 1 — Install
From npm (when published):
npm install -g store-asset-generatorFrom source:
git clone https://github.com/ArzuOzsoySW/store-asset-generator.git
cd store-asset-generator
npm install
npm run build
Step 2 — Register with Claude Code
From npm:
claude mcp add store-asset-generator --scope user -- npx -y store-asset-generatorFrom source (local):
claude mcp add store-asset-generator --scope user -- node /path/to/store-asset-generator/dist/index.jsStep 3 — Verify
claude mcp listYou should see:
store-asset-generator: ✓ ConnectedThen inside a Claude Code session:
/mcpShould list 9 tools under store-asset-generator.
Requirements
- Node.js >= 20
- Claude Code with Pro or Max subscription
- For iOS screenshots: Xcode + iOS Simulator (macOS only)
- For Android screenshots: Android SDK + emulator
- For Flutter: Flutter SDK
- For mockup rendering: Puppeteer Chrome — run once:
npx puppeteer browsers install chrome - Optional: Facebook IDB for better iOS simulator interaction
Not all of these are required. If you skip the simulator (skip_simulator: true), you only need Node.js and Puppeteer.
Usage
Quick start
cd /path/to/your-app
claude
Then type:
generate store assets for this app, top_n: 3That's it. StoreKit detects your project, picks the 3 most store-worthy screens, builds and screenshots them (or falls back to source code if build fails), designs unique mockups, writes store copy, and exports everything.
Real-world examples
Example 1: SwiftUI app (Ingredio — recipe/ingredient tracker)
> generate_all path: /Users/me/Projects/Ingredio, top_n: 3

[bootstrap mode — sampling not available in Claude Code]

Stage 1: detect_project ✓
  → SwiftUI app, 14 screens found
  → Top 3: TrackerView (importance 9), WeightCoachView (8), RecipeDetailView (8)

Stage 2: select_screens_deterministic ✓
  → Picked 3 of 14 screens by importance score

Stage 3: build_ios ✗ (Swift compile errors on current branch)
  → Automatic fallback: collected source code for 3 screens

Stage 4: analyze ✓
  → Design briefs generated with palette, typography suggestion, density

Result: work order returned with 3 design tasks + metadata task

Claude agent then:
  1. Reads each screen's Swift source code
  2. Designs a unique HTML mockup (dark glassmorphism for TrackerView,
     clean gradient for WeightCoach, editorial layout for RecipeDetail)
  3. Calls generate_mockup(batch_render) → PNG at all store sizes
  4. Writes App Store + Play Store copy in EN + TR
  5. Calls export_assets → Fastlane directory ready
Output:
store-assets/
├── mockups/
│   └── ios/
│       ├── tracker-view-6.7-inch.png
│       ├── tracker-view-6.1-inch.png
│       ├── tracker-view-5.5-inch.png
│       ├── tracker-view-ipad-12.9-inch.png
│       ├── weight-coach-view-6.7-inch.png
│       ├── ... (4 sizes × 3 screens = 12 mockup PNGs)
├── metadata/
│   └── copy.json          (ASO copy in EN + TR)
├── fastlane/
│   ├── metadata/en-US/
│   ├── metadata/tr/
│   ├── screenshots/
│   └── Deliverfile
└── config.json
Example 2: Flutter app with working build
> generate_all path: /Users/me/Projects/my-flutter-app, top_n: 4

Stage 1: detect_project ✓ → Flutter, 8 screens
Stage 2: select_screens ✓ → HomeScreen, ProductDetail, CartScreen, ProfileScreen
Stage 3: build_ios ✓ → flutter build ios --debug --simulator
Stage 4: boot_ios ✓ → iPhone 16 Pro Max simulator
Stage 5-8: screenshot × 4 ✓ → raw PNGs captured (9:41, full battery)
Stage 9-12: analyze × 4 ✓ → palettes extracted, design briefs ready
Stage 13-16: design + render × 4 ✓ → unique mockup HTML per screen
Stage 17: metadata ✓ → ASO copy in EN
Stage 18: export ✓ → Fastlane directory

→ 16 mockup PNGs (4 screens × 4 iOS sizes)
→ store-assets/ ready for upload
Example 3: Skip simulator entirely
If you don't have Xcode/simulator set up, or your build is broken:
> generate_all path: /Users/me/Projects/my-app, skip_simulator: true, top_n: 3StoreKit reads your source code directly and Claude designs mockups by imagining what each screen looks like. No build, no simulator, no screenshots needed. The mockups won't be pixel-perfect but they're good enough for store listing drafts.
Step-by-step (fine-grained control)
Instead of generate_all, you can call individual tools:
> detect what kind of project this is and list all screens

> build for iOS simulator

> boot the iOS simulator and take screenshots of the home screen

> analyze the screenshot at store-assets/.work/raw-home.png

> (Claude reads the design brief, writes custom HTML mockup)

> render this HTML as a mockup: [paste HTML]

> write App Store description and keywords in English and Turkish

> export everything in Fastlane format
Visual editor (after generation)
# From terminal (not inside Claude Code)
npx store-asset-generator-preview ./store-assets
# or if installed from source:
node /path/to/store-asset-generator/dist/preview/cli.js ./store-assets
Opens http://localhost:4321 with:
- Left panel: mockup thumbnail list
- Center: selected mockup at full size
- Right panel: edit headlines, accent color, metadata (with live character counters)
- Save + Regenerate buttons
How it works (two modes)
Bootstrap mode (Claude Code CLI)
Claude Code doesn't support MCP sampling, so generate_all runs in bootstrap mode:
- Runs all mechanical/deterministic stages (detect, build, screenshot, analyze)
- Returns a structured work order with design briefs for each screen
- Claude (the agent in your Claude Code session) reads the work order
- Claude designs HTML mockups, calls
generate_mockup(render), fills metadata, callsexport_assets
You don't need to do anything special — this happens automatically. The tool detects that sampling isn't available and switches mode.
Atomic mode (sampling-capable hosts)
On MCP hosts that support sampling (Claude Desktop, Cursor, etc.), generate_all runs everything in a single atomic call — including the AI design steps. No agent loop needed.
MCP Tools (9 total)
| Tool | Description |
|------|-------------|
| generate_all | End-to-end pipeline. Start here. Auto-detects bootstrap vs atomic mode. |
| detect_project | Scan project → platform, screens, importance scores, build config |
| build_project | Build for simulator (flutter / xcodebuild / gradle) |
| simulator_control | Boot, shutdown, install, launch simulators |
| navigate_and_interact | Tap, type, scroll, swipe in the running app |
| take_screenshot | Capture with clean status bar (9:41, full battery, full signal) |
| generate_mockup | Three modes: analyze (palette + brief), render (HTML→PNG), batch_render (all sizes) |
| generate_metadata | Structure ASO data for Claude to fill |
| export_assets | Package everything in Fastlane-ready format |
Supported platforms
| Platform | Detection | Build | Simulator | Screenshot | |----------|-----------|-------|-----------|------------| | Flutter | ✅ | ✅ | ✅ (via iOS/Android) | ✅ | | SwiftUI | ✅ | ✅ | ✅ | ✅ | | UIKit | ✅ | ✅ | ✅ | ✅ | | Jetpack Compose | ✅ | ✅ | ✅ | ✅ | | React Native | ✅ | ❌ (planned) | ❌ | ❌ | | Kotlin Multiplatform | ✅ | partial | partial | partial |
Output structure
store-assets/
├── mockups/
│   ├── ios/           (each screen × 4 sizes: 6.7", 6.1", 5.5", iPad 12.9")
│   └── android/       (each screen × 3 sizes: phone, 7" tablet, 10" tablet)
├── metadata/
│   └── copy.json      (ASO copy per locale)
├── fastlane/
│   ├── metadata/
│   │   ├── en-US/     (name.txt, subtitle.txt, description.txt, keywords.txt, ...)
│   │   └── tr/
│   ├── screenshots/
│   └── Deliverfile
└── config.json        (editable — source of truth for preview UI)
Store screenshot sizes
iOS (App Store): | Size | Device | Resolution | |------|--------|------------| | 6.7" | iPhone 16 Pro Max | 1290 × 2796 | | 6.1" | iPhone 16 | 1179 × 2556 | | 5.5" | iPhone 8 Plus | 1242 × 2208 | | 12.9" iPad | iPad Pro | 2048 × 2732 |
Android (Play Store): | Size | Device | Resolution | |------|--------|------------| | Phone | Pixel 9 | 1080 × 1920 | | 7" Tablet | Nexus 7 | 1200 × 1920 | | 10" Tablet | Pixel Tablet | 1600 × 2560 |
Upload to stores (Fastlane)
StoreKit generates a Fastlane-compatible directory. To actually upload to App Store / Play Store:
One-time setup
# Install Fastlane
brew install fastlane

# iOS — authenticate with App Store Connect
fastlane deliver init

# Android — authenticate with Google Play Console
fastlane supply init
Upload after StoreKit generates assets
cd /path/to/your-app/store-assets

# iOS → App Store Connect
fastlane deliver \
  --metadata_path ./fastlane/metadata \
  --screenshots_path ./fastlane/screenshots \
  --skip_binary_upload true \
  --force true

# Android → Google Play Console
fastlane supply \
  --metadata_path ./fastlane/metadata \
  --skip_upload_apk true \
  --skip_upload_aab true
--skip_binary_upload / --skip_upload_apk means it only uploads screenshots and metadata, not the app binary itself. You handle the binary upload through Xcode or your CI pipeline.
Or ask Claude directly:
upload the store assets to App Store Connect via fastlaneClaude will run the commands for you (if Fastlane is configured).
Troubleshooting
"Method not found" on sampling
Normal behavior in Claude Code CLI. The tool automatically switches to bootstrap mode. No action needed.
Build fails with architecture mismatch
Fixed in v0.1.0 — uses generic/platform=iOS Simulator destination which works on both Intel and Apple Silicon Macs.
Build fails with Swift/Kotlin compile errors
The tool catches this and falls back to source code collection. Claude designs mockups from the source code instead. Fix your compile errors if you want real simulator screenshots.
"Puppeteer: chrome not found"
Run once:
npx puppeteer browsers install chromeMockups look generic
The design brief passes dominant colors + content density + category-specific typography to Claude. If the output is generic, try providing more context:
generate_all path: /my/app, top_n: 3Then when Claude designs the HTML, give feedback: "make it more premium" or "use darker colors" — Claude will redesign.
MCP not appearing in /mcp
You need to restart Claude Code after adding the MCP. Exit with /exit or Ctrl+D, then start a new session.
Development
git clone https://github.com/ArzuOzsoySW/store-asset-generator.git
cd store-asset-generator
npm install
npm run build        # tsc + copy prompts and UI assets
npm test             # vitest — 3 files, 9 tests
npm run dev          # tsc --watch
Project structure
src/
├── index.ts              # MCP stdio entrypoint
├── server.ts             # 9 tool definitions + routing
├── types.ts              # Shared types (ProjectInfo, DesignBrief, ...)
├── tools/
│   ├── orchestrate.ts    # generate_all (bootstrap + atomic modes)
│   ├── detect.ts         # Multi-platform project detection
│   ├── build.ts          # flutter/xcodebuild/gradle
│   ├── simulator.ts      # xcrun simctl / adb
│   ├── navigate.ts       # UI interaction (IDB, AppleScript, adb)
│   ├── screenshot.ts     # Status-bar-masked captures
│   ├── mockup.ts         # analyze / render / batch_render
│   ├── metadata.ts       # ASO structure
│   └── export.ts         # Fastlane packaging
├── prompts/              # Sampling prompts (.md, human-editable)
├── utils/
│   ├── sampling.ts       # MCP sampling wrapper with probe
│   └── shell.ts          # execa wrapper
├── preview/
│   ├── server.ts         # Local HTTP editor
│   ├── ui.html           # Single-file UI (vanilla, no framework)
│   └── cli.ts            # store-asset-generator-preview bin
└── renderer/
    └── references/       # Old 12 fixed templates (inspiration only)
Contributing
PRs welcome! Good areas:
- React Native / Kotlin Multiplatform build adapters
- Per-category prompt tuning (
src/prompts/*.md) - New reference designs under
src/renderer/references/ - Preview UI improvements
- More test fixtures
License
MIT