
structured-react-hook
v1.48.0
Published
面向企业级的结构化的 React 状态管理框架
Maintainers
 kinop88
Readme
structured-react-hook
structured-react-hook 已整合到 mencius 库内部 结构化的, 基于响应式的 React 应用状态管理框架
快速上手
安装
yarn add reactx
创建 Hello World 组件
/**
 * defaultShowCode: true
 */
import React from 'react'
import { createComponent } from 'mencius'

const HelloWorld = createComponent({
  name: 'HelloWorld',
  state: {
    text: 'Hello World',
  },
  view: {
    render() {
      return <div>{this.state.text}</div>
    },
  },
})
修改组件状态
/**
 * defaultShowCode: true
 */
import React, { useEffect } from 'react'
import { createComponent } from 'mencius'

export const HelloWorld = createComponent({
  name: 'HelloWorld',
  state: {
    text: 'Hello World',
  },
  controller: {
    onMount() {
      this.setter.text('Welcome!!')
    },
  },
  view: {
    render() {
      useEffect(() => {
        this.controller.onMount()
      }, [])
      return <div>{this.state.text}</div>
    },
  },
})
使用 Props
传给 HelloWorld 组件的 Props 会被挂载到 this(HelloWorld 组件实例) 上.
/**
 * defaultShowCode: true
 */
import React, { useEffect } from 'react'
import { createComponent } from 'mencius'

const HelloWorld = createComponent({
  name: 'HelloWorld',
  state: {
    text: 'Hello World',
  },
  controller: {
    onMount() {
      this.setter.text('Welcome!!!')
    },
  },
  view: {
    render() {
      useEffect(() => {
        this.controller.onMount()
      }, [])
      return (
        <div>
          {this.state.text} and {this.props.text}
        </div>
      )
    },
  },
})

export default function Wrapper() {
  return <HelloWorld text="I love JavaScript" />
}
循环渲染 HelloWorld 组件
循环渲染 SRH 创建出来的组件时要注意, 和 React 要求的 key 一样为组件注入唯一的 sid,
这样才能确保每个 HelloWorld 组件获得属于自己的 Props
export default function Wrapper() {
  return [1, 2, 3, 4].map((number) => {
    return <HelloWorld sid={number} key={number} text="I love JavaScript" />
  })
}
异步响应其他组件的变化
示例中展示了多个场景
User组件登录异步获取username,username初始状态为nullWelcome组件初始化的时候通过this.getState读取了User.state.username的初始值- 点击
Login按钮User组件2000ms后读取username Welcome组件订阅了User的onClick触发和state变更
SRH 基于 Rx.js 实现的响应式机制确保开发者不需要关心变更是异步的还是同步的, SRH 会妥善处理这一点.
/**
 * defaultShowCode: true
 */
import React, { useEffect } from 'react'
import { createComponent } from 'mencius'

const User = createComponent({
  name: 'User',
  state: {
    username: null,
  },
  controller: {
    onClick() {
      setTimeout(() => {
        this.setter.username('jacky')
      }, 2000)
    },
  },
  view: {
    render() {
      return (
        <>
          <button onClick={this.controller.onClick}> Login </button>
        </>
      )
    },
  },
})

const Welcome = createComponent({
  name: 'Welcome',
  state: {
    text: 'Welcome',
  },
  subscribe: {
    User: {
      state({ nextState }) {
        this.setter.text((text) => {
          return `Welcome ~ ${nextState.username}`
        })
      },
      controller: {
        onClick({ state }) {
          this.setter.text('Welcome loading...')
        },
      },
    },
  },
  controller: {
    async onMount() {
      const UserState = await this.getState('User')
      this.setter.text(`Welcome ~ ${UserState.username}`)
    },
  },
  view: {
    render() {
      useEffect(() => {
        this.controller.onMount()
      }, [])
      return <div>{this.state.text}</div>
    },
  },
})

export default function Wrapper() {
  return (
    <>
      <User />
      <Welcome />
    </>
  )
}
响应式状态
什么是响应式状态?
组件是如何通过响应式状态来实现互相影响的? 下图 👇🏻 可以很好的解释这一过程
组件间状态响应关系
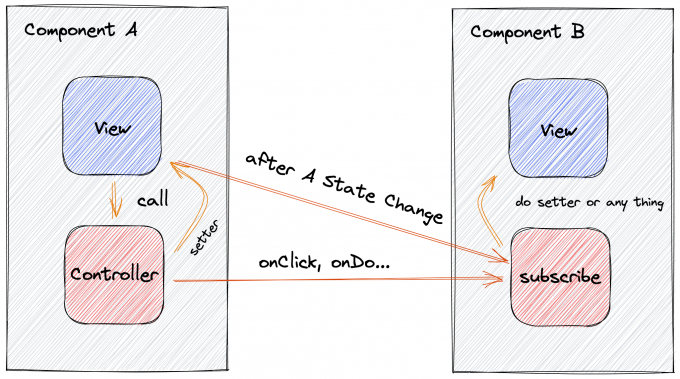
A 组件 通过在视图中调用 controller 来处理 UI 交互, 同时修改自身状态, 这一过程对订阅了 A 组件 的 B 组件 是可观察的. 但对于 A 组件而言, 它如何影响其他组件并不需要它自身来感知这一件事, 通过这种方式, 实现了组件间能够互相影响但又完全解耦的模式.
而对于 B 组件而言 subscribe 是独立于组件自身之外的一段逻辑, 当 A 组件不存在的时候, B 组件完全不受任何影响. 直接删除这些订阅逻辑也是可行的.
const ComponentB = createComponent({
  name:"ComponentB",
  // 完全移除 subscribe 不会对 Component B 产生任何影响
  // subscribe:{
  //   ComponentA:{
  //     state(){
  //       // do any thing
  //     }
  //   }
  // }
  ...
})
subscribe
使用 SRH 提供的 subscribe 声明式 api, 你可以很方便的编写响应式代码
响应 state 的变化
state 变化对象包含两个值
- key: 变化的 state key
- prevState: 变化前的 state
- nextState: 变化后的 state
/**
 * defaultShowCode: true
 */
import React, { useEffect } from 'react'
import { createComponent } from 'mencius'

const Count1 = createComponent({
  name: 'Count1',
  state: {
    count: 0,
  },
  controller: {
    onAddClick() {
      this.setter.count(this.state.count + 1)
    },
  },
  view: {
    render() {
      return (
        <>
          <span>
            {this.state.count}{' '}
            <button onClick={this.controller.onAddClick}> + </button>
          </span>
        </>
      )
    },
  },
})
const Count2 = createComponent({
  name: 'Count2',
  state: {
    count: 0,
  },
  subscribe: {
    Count1: {
      state({ nextState }) {
        this.setter.count(nextState.count)
      },
    },
  },
  view: {
    render() {
      return (
        <>
          <span>{this.state.count}</span>
        </>
      )
    },
  },
})

export default function Wrapper() {
  return (
    <>
      Count1: <Count1 />
      <div />
      Count2: <Count2 />
    </>
  )
}
响应 controller 交互事件
controller 变化对象包含三个值
- key: 触发的 controller 函数名, 以 on 开头
- args: 触发的 controller 函数参数
- state: 触发 controller 函数后最新的 state
/**
 * defaultShowCode: true
 */
import React, { useEffect } from 'react'
import { createComponent } from 'mencius'

const Count1a = createComponent({
  name: 'Count1a',
  state: {
    count: 0,
  },
  controller: {
    onAddClick(prevCount) {
      this.setter.count(prevCount + 1)
    },
  },
  view: {
    render() {
      return (
        <>
          <span>
            {this.state.count}{' '}
            <button
              onClick={() => this.controller.onAddClick(this.state.count)}
            >
              {' '}
              +{' '}
            </button>
          </span>
        </>
      )
    },
  },
})
const Count2a = createComponent({
  name: 'Count2a',
  state: {
    subscribeInfo: '未获取到任何交互信息',
  },
  subscribe: {
    Count1a: {
      controller: {
        onAddClick({ key, args, state }) {
          this.setter.subscribeInfo(
            `Count1a 触发了 ${key}, 参数是 ${[
              ...args,
            ]},最后的 state : ${JSON.stringify(state)}`
          )
        },
      },
    },
  },
  view: {
    render() {
      return (
        <>
          <span>{this.state.subscribeInfo}</span>
        </>
      )
    },
  },
})

export default function Wrapper() {
  return (
    <>
      Count1a: <Count1a />
      <div />
      Count2a: <Count2a />
    </>
  )
}
声明式 API
SRH 采用声明式 API 来创建组件, 这里介绍了主要的可声明的 API
name
对于 SRH 组件来说 name 并不是必须的, 你可以使用匿名组件, 但建议为每个组件声明一个唯一的 ID
注意匿名组件是不可订阅的, 也无法和其他组件产生响应
name: '唯一 ID'state
state 是一个组件的核心, 声明了组件所拥有的的状态, 然后你可以通过 this.setter[stateKey] 来操作这些状态,
要注意的是, SRH 只会为 state 声明的第一层 key 建立 setter 函数, 这样做是为了尽可能让 state 声明的结构不那么复杂
state: {
  foo: {
    bar: '1'
  }
}
// this.setter.foo({bar:'2'}) right!
// this.setter.foo.bar('2') wrong!!
derived
derived 意指派生状态, derived 下的派生函数通过 state 中声明的状态派生出一个新值, 通过 this.dervied[derivedKey]可以直接获取到派生出来的值, 和 state 一样, 派生值发生变化也会触发 render, 详见下面的例子
import React from 'react'
import { createComponent } from 'mencius'

export default createComponent({
  name: 'DerivedExample',
  state: {
    count: 0,
  },
  derived: {
    countIsNotZero() {
      if (this.state.count !== 0) {
        return 'true'
      }
      return 'false'
    },
  },
  controller: {
    onAddClick() {
      this.setter.count(this.state.count + 1)
    },
    onSubClick() {
      this.setter.count(this.state.count - 1)
    },
  },
  view: {
    render() {
      return (
        <>
          <div>
            {' '}
            count:
            <span>
              {this.state.count}
              <button
                style={{ margin: '0 8px' }}
                onClick={this.controller.onAddClick}
              >
                {' '}
                加 1{' '}
              </button>
              <button onClick={this.controller.onSubClick}>减 1</button>
            </span>{' '}
          </div>
          <div>count changed:{this.derived.countIsNotZero}</div>
        </>
      )
    },
  },
})
ref
ref 等价于 useRef, 但和直接使用 useRef Hook 不同的是, 在 SRH 组件内声明的 ref 可以像普通的字段那样直接使用, 在这点上, ref 更像是 classComponent 下直接挂载到 this 上的 key
ref:{
  count:0
},
controller:{
  onClick(){
    console.log(this.ref.count) // 0
    this.ref.count++
    console.log(this.ref.count) // 1
  }
}
使用 ref 存储 React dom 实例
和 useRef 不同点在于, 使用 ref 声明字段绑定到 React ref 属性上时需要做一些处理
import React from 'react'
import { createComponent } from 'mencius'

export default createComponent({
  name: 'DomRefExample',
  state: {
    value: 0,
    inputValue: 0,
  },
  ref: {
    inputEl: React.createRef(),
  },
  controller: {
    onChange(e) {
      this.setter.value(e.target.value)
    },
    onClick() {
      this.setter.inputValue(this.ref.inputEl.current.value)
    },
  },
  view: {
    render() {
      return (
        <>
          输入:{' '}
          <input
            ref={this.ref.inputEl}
            onChange={this.controller.onChange}
            value={this.state.value}
          />
          <button style={{ margin: '0 8px' }} onClick={this.controller.onClick}>
            {' '}
            通过 Ref 展示输入框的值{' '}
          </button>
          当前输入框的值: {this.state.inputValue}
        </>
      )
    },
  },
})
view
view 用来声明组件的视图, 通常是 React JSX. 在 view 声明的 render 函数中, 你可以使用 React 原生的 Hook API, 但要注意的是 Hook 的限制你同样也要遵守
view:{
  render(){
    return <>hello world</>
  }
}
注意!! view.render 是必须实现的函数
controller
controller 的函数签名必须以 on 开头, 以 click, change 等动词结尾, controller 对 view 来说是可见的, 但是对自身是不可见的, 简单讲, 你可以在 view 的 render 函数里调用 controller 来实现交互逻辑, 但是你无法在 controller 函数内调用另一个 controller 函数, 这是不被允许的
controller:{
  onClick(){
    //this.controller.onChange() wrong!!
  },
  onChange(){

  }
}
view:{
  render(){
    return(
      <button onClick={this.controller.onClick}></button> // right!!
    )
  }
}
service
service 函数对自身和 controller 可见, 但是对 view 不可见, 这是为了弥补 controller 函数无法调用其他 controller 函数导致逻辑无法被共享的问题
service:{
  doA(){
    // this.service.doB() right!!
  },
  doB(){}
}
扩展组件
SRH 提出了 Membrane 概念来解决如何让 扩展 SRH 组件
如果说通常我们所说的通过 Props 来控制的 React 组件是一种封闭型组件, 那么基于 Membrane 模式下的 SRH 组件, 就是一种开放型组件
首先 Membrane 是一种概念, 并不涉及到具体的 API , 通常将被扩展对象称为 Core, Membrane 就是覆盖在 Core 上的一层膜, 具有和 Core 一样或者更多的结构, 通过包裹 Core, Membrane 和 Core 共同组成了新的组件实体.
因此 Membrane 模式有两个必要条件
- Core 和 Membrane 在技术上必须可以实现 Merge, 例如 JS 对象
- Membrane 不能被其他 Membrane 再覆盖
/**
 * defaultShowCode: true
 */
import React from 'react'
import { createComponent } from 'mencius'
import deepmerge from 'deepmerge'

const core = () => {
  return {
    name: 'CoreButton',
    state: {
      text: 'Core Button',
    },
    view: {
      render() {
        return <button> {this.state.text} </button>
      },
    },
  }
}
export default createComponent(
  deepmerge(core(), {
    name: 'MembraneButton',
    state: {
      text: 'Membrane Button',
    },
  })
)