
tagui-windows
v4.1.3
Published
CLI tool for digital process automation (RPA)

Readme
TagUI
Why This | Set Up | To Use | Cheat Sheet | Developers | Tutorial | Slides | Video
TagUI is a CLI tool for digital process automation (RPA). It is maintained by AI Singapore, a government-funded initiative to build local artificial intelligence capabilities. To start, check out above tutorial, slides, or video.
FEATURES
- automate Chrome visibly or headlessly
- visual automation of websites and desktop
- write in 20+ human languages & JavaScript
- Chrome extension for recording web actions
- R & Python integration for big data / AI / ML
Why This
The goal of UI (user interface) automation is to reproduce cognitive interactions that you have with websites or your desktop, so that your computer can do it for you, base on your schedule or conditions. TagUI helps you rapidly automate your repetitive or time-critical tasks - use cases include process automation, data acquisition and testing of web apps.
Read on for more info or jump right into the flow samples section to see examples of TagUI automation in natural-language-like syntax. This is a full-feature and free open-source tool, so there's nothing to upgrade to or any paid subscription. To feedback suggestions or bugs, raise an issue or email [email protected].
Key Strengths
- cross-platform, works on Windows, macOS, Linux
- increased security as users can view source code
- rapid iteration cycles in improvement of features
- $0 to use, under Apache 2.0 open-source license
- easy to use, thus rapid development + deployment
- easy for IT policies to deploy, simply unzip and run
- native integration with Python and R for AI / ML / DL
- easy API calls to Azure / Amazon cognitive services
Neutral Differences
- scripts written in 21 human languages, not flowchart
- JavaScript for advanced scripting instead of C# / VB
- visual and OCR based automation for desktop apps
Key Weaknesses
- lack of enterprise audit, control, dashboard, reporting
- lack of SLA or 24/7 support team for incident-handling
- lack of large development teams (easily > 30 people)
- lack of user / developer base grown over many years
- lack of consultancies / partners distribution network
HOW IT WORKS
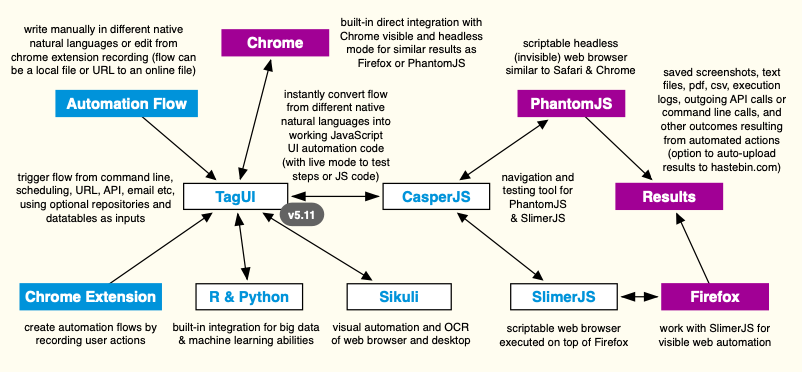
TagUI converts your intentions in different human languages into lines of working JavaScript code that perform UI automation. Under the hood, it uses Chrome DevTools Protocol, Sikuli, CasperJS, PhantomJS & SlimerJS.
https://www.typeform.com
click login
type username as [email protected]
type password as 12345678
click btnlogin
download https://admin.typeform.com/xxx to report.csv
For example, TagUI will instantly convert the automation flow above into 100+ lines of JavaScript code and automatically perform the steps to download a report. Conditions can also be written in natural language for making decisions or checking webpage. No further backend coding or step definition is required. This makes it easy for rapid prototyping, deployment and maintenance of UI automation, whether you are a developer or not. The language engine supports over 20 languages and can be modified or extended easily by users to improve accuracy or add more languages.
The automation flow can be triggered from scheduling, command line (in natural language), API URL, email etc. Everything happens headlessly in the background without seeing any web browser, so that you can continue using the computer or server uninterrupted. Running on a visible web browser is also supported, using Chrome or Firefox browser (see chrome or firefox option below). API or command calls can be made with a single line to integrate with other services or apps. Continuous integration with CI/CD tools is possible using CasperJS framework and TagUI's Chrome integration.
If you know JavaScript and want to be more expressive, you can even use JavaScript directly in the flow. If not, you will still enjoy friendly but powerful features such as repositories to store your reusable objects, flexible datatables for batch automation, and a Chrome extension which creates automation flows by recording your actions. For rapid prototyping, there's also an interactive live mode for trying out TagUI steps or JavaScript code in real-time. TagUI has built-in integration with Chrome / headless Chrome directly, which also works in live mode.
There is automatic waiting for web elements to appear + error-checking + nesting of JavaScript code blocks. Not forgetting the option to run automation flows hosted online or auto-upload run results online for sharing. TagUI also supports visual automation of website and desktop through built-in integration with Sikuli. Instead of using element identifiers, images can be used to identify user interface elements to interact with. TagUI has native integrations with R and Python for big data and machine learning capabilities. R and Python are popular languages with many frameworks and packages in this space.
Set Up
TagUI is in v4.1 - it unzips and runs on macOS, Linux, Windows (link to release notes)
Tip - to try cutting edge version with the latest features, download master.zip to overwrite an existing packaged installation (be sure to manually select and move the folders & files inside master.zip's TagUI-master/src folder to replace your existing tagui/src folder, otherwise some OSes will delete existing target folders that are missing from source folder)
PACKAGED INSTALLATION
TagUI is easy to use right away - no setup is needed, in most environments all required dependencies are packaged in
Platform|macOS|Linux|Windows|Node.js (macOS/Linux) :------:|:---:|:---:|:-----:|:-------------------: Package|unzip and run|unzip and run|unzip and run|npm install tagui
avoid spaces in the folder path as some components of TagUI don't work well with spaces in folder and file names
Recommended locations to unzip to
- Windows - c:\
- macOS - desktop
- Linux - /home/your_id
optional - configure web browser settings in tagui_config.txt, such as browser resolution, step timeout of 10s etc
MANUAL INSTALLATION
- PhantomJS (headless scriptable web browser) - http://phantomjs.org
- CasperJS (navigation/testing for PhantomJS) - http://casperjs.org
- SlimerJS (scriptable web browser for Firefox) - https://slimerjs.org
- TagUI (general purpose web automation tool) - https://git.io/vMCTZ
- PHP (only required for manual Windows setup) - http://windows.php.net
Tip - recommend putting TagUI to a folder path without spaces (some dependencies have issue with that). for manual Windows setup, 1. set SLIMERJS_EXECUTABLE env variable to point to slimerjs.bat, 2. put GNU utilities (cut / gawk / grep / head / sort / tail / tee), curl ssl in tagui\src\unx, 3. add phantomjs\bin, casperjs\bin, php folders to path
To Use
COMMAND LINE
tagui flow_filename option(s) for Windows./tagui flow_filename option(s) for macOS/Linux
- Flow filename can be a local file or the URL of an online file
- Filename can have no extension, .txt or .js or .tagui extension
- Type tagui without parameters to see its version and options
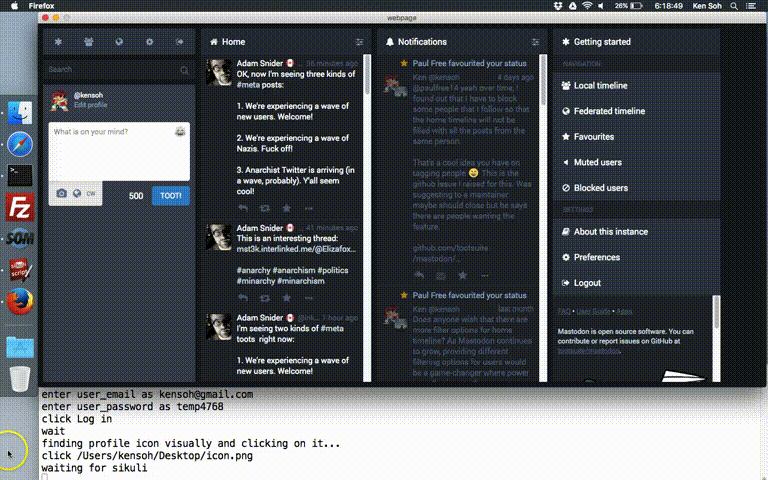
If your command prompt or terminal font size is too small, you can set it to much larger font sizes for easier reading. The following example will run a script to perform a search on Yahoo website and capture a screenshot of the results.
Windows - unzip the tagui folder to c:\. Open command prompt with Start Menu -> type run -> type cmd and enter
c:
cd c:\tagui\src
tagui samples\1_yahoo
macOS - unzip the tagui folder to your desktop. Open terminal from Apps -> Utilities -> Terminal and enter commands
cd /Users/your_id/Desktop/tagui/src
./tagui samples/1_yahoo
Linux - unzip the tagui folder to a convenient folder on your laptop for example /home/your_id and enter commands
cd /home/your_id/tagui/src
./tagui samples/1_yahoo
if the script works successfully, you will notice five .png files - congratulations, you have run your first TagUI script!
Troubleshooting potential exceptions
- For Windows computers, if you see 'MSVCR110.dll is missing' error, install this from Microsoft website (choose vcredist_x86.exe) - this file is required to run the Windows PHP engine packaged with TagUI.
- For some newer macOS versions, if you get a 'dyld: Library not loaded' error, install OpenSSL in this way.
- For some flavours of Linux (Ubuntu for example), which do not have PHP pre-installed, google how to install PHP accordingly (eg Ubuntu, apt-get install php). Most Linux distributions would already come with PHP.
Now, you can try the same automation script with Chrome browser by running with chrome option (for Windows enter tagui samples\1_yahoo chrome, for macOS/Linux enter ./tagui samples/1_yahoo chrome). The automation will now run in the foreground instead, so you'll be able to see the navigation on Yahoo and DuckDuckGo websites.
TagUI can also be run from desktop icons, scheduled tasks, or REST API calls.
Option|Purpose :----:|:------ headless|run on invisible Chrome web browser instead of default PhantomJS (first install Chrome) chrome|run on visible Chrome web browser instead of invisible PhantomJS (first install Chrome) firefox|run on visible Firefox web browser instead of invisible browser (first install Firefox) upload|upload automation flow and result to hastebin.com (expires 30 days after last view) report|web report for sharing of run results on webserver (default is only a text log file) debug|show run-time backend messages from PhantomJS for detailed tracing and logging quiet|run without output except for explicit output (echo / show / check / errors etc) speed|skip 3-second delay between datatable iterations (and skip restarting of Chrome) test|testing with check step test assertions for CI/CD integration (output XUnit XML file) baseline|output execution log and relative-path output files to a separate baseline directory input(s)|add your own parameter(s) to be used in your automation flow as variables p1 to p9 data.csv|specify a csv file to be used as the datatable for batch automation of many records
After each automation run, a .log file will be created to store output of the execution, a .js file is the generated JavaScript file, a .raw is the expanded flow after reading in any module sub-scripts that are called in that flow. These files are for user reference purpose and can be helpful in debugging or troubleshooting the automation flow.
To run tagui from anywhere
- For MacOS/Linux, use ln -sf /full_path/tagui/src/tagui /usr/local/bin/tagui to create symbolic link
- For Windows, add tagui/src folder to path, then tagui will be accessible from any folder
If you have issue running visible automation using Firefox/SlimerJS check this setting.
To do that on Windows, create a .cmd or .bat file with contents like the following, which goes to the directory where you want to run the automation, and run tagui command on the file with your specified options. You can also associate .tagui files directly to be opened by tagui\src\tagui.cmd command. Double-clicking the .cmd or .bat file will start automation.
@echo off
c:
cd c:\folder
tagui filename quiet speed chrome
To do that on macOS / Linux, create a file with contents like the following, which goes to the directory where you want to run the automation, and run tagui command on the file with your specified options. You will need to use the command chmod 700 on the file to give it execute permissions, so that it can be run by double-clicking on it.
cd /Users/username/folder
tagui filename quiet speed chrome
BY SCHEDULING
To schedule an automation flow with crontab (macOS/Linux), for example at 8am daily
0 8 * * * /full_path_on_your_server/tagui flow_filename option(s)Tip - for Windows, use Task Scheduler (search schedule from Start Menu) or Z-Cron freeware
TAGUI WRITER & SCREENSHOTER
TagUI Writer is a Windows app created by @adegard which makes it easy to write TagUI scripts. By pressing Ctrl + Left-click, a popup menu will appear with the list of TagUI steps for you to paste into your text editor. Arnaud also created a ScreenShoter app which makes it easy to capture snapshots for TagUI visual automation. To dowload, click here.

CHROME EXTENSION
Download from Chrome Web Store to use TagUI Chrome web browser extension for recording automation flows. TagUI Chrome extension records steps such as page navigation, clicking web elements and entering information.
To start recording automation flows
- Go to the website URL you want to start the automation at
- Click the TagUI icon, followed by the Start button
- Carry out the steps you want to automate
- Click the TagUI icon, followed by the Stop, then Export buttons to view the generated TagUI script
while recording the steps, you can right click to bring up a menu for steps such as showing the element identifier
The recording is not foolproof (for example, the underlying recording engine cannot capture frames, popup windows or tab key input). It is meant to simplify flow creation with some edits, instead of typing everything manually. See this video for an example of recording sequence of steps, editing for adjustments and playing back the automation.
NATIVE LANGUAGES
To run TagUI flows in native languages or output flow execution in other languages (see demo run)
- set your default flow language with tagui_language variable in tagui_config.txt
- write automation flow in native language base on language definition .csv files
- optionally set tagui_language in flow to any other languages as output language
Tip - as Windows Unicode support is not as straightforward as macOS/Linux, doing this in Windows may require changing system locale, using chcp command, and selecting a font to display native language correctly (more info)
TagUI language engine supports over 20 languages and can be modified or extended easily by users to improve accuracy or add more languages. The languages are Bengali, Chinese, English, French, German, Hindi, Hungarian, Indonesian, Italian, Japanese, Korean, Polish, Portuguese, Romanian, Russian, Serbian, Spanish, Tagalog, Tamil, Thai, Vietnamese. This starting set is partly chosen base on the list of most commonly used languages, partly from the countries around where I'm from (Singapore), and partly from countries with a lot of developers.
If your native language is not in the above list, you can also automate building a new native language definition by using this language build automation flow (src/languages/build) that self-builds the vocabulary set using Google Translate. To do that, update build.csv with the languages that you want to build and run tagui build using chrome in src/languages folder. Use quiet option to hide the verbose automation output. The generated files are named as their 2-character language codes to prevent overwriting existing language definitions by accident. To use the generated .csv files, rename them to their full language names. See full list of languages possible to be generated by Google Translate.
Most of the language definitions are automatically self-built using Google Translate (except english.csv and chinese.csv), and would be wrong without understanding vocabulary used in UI interaction context. Native language users can update the language definition csv themselves and are welcome to submit PRs with correct words to be used. Some languages are very different from English structure (for eg, written from right to left, different order of adjective and noun) and would be impossible to use correctly in TagUI.
VISUAL AUTOMATION
TagUI has built-in integration with Sikuli (base on OpenCV) to allow identifying web elements and desktop user interface elements for interaction. Steps that support visual automation are click, hover, type, select, read, show, save, snap. Sikuli is excluded from TagUI packaged installation due to complex dependencies that are handled by its installer.
How to install computer vision
- Make sure Java JDK v8 is installed (entering
java -versionreturns your Java version) - After Java is installed, you will have to restart your command prompt or terminal to use it
- Unzip contents of this file to tagui/src/tagui.sikuli folder (so that sikulixsetup-1.1.3.jar is there)
- Right-click sikulixsetup-1.1.3.jar to run as administrator and setup (choose option 1 - Pack1)
- Click yes to the pop-up dialog boxes during installation to use the unzipped setup files
- On Windows, set display magnification to recommended %, if it does not work then 100%
- On Windows, if TagUI just hangs there, see if it is due to this issue and try the solution
- On macOS, if can't find image on screen, may be due to how the image was captured
To use visual automation, simply specify an image file (in .png or .bmp format) to look for in place of the element identifier.
Important! The element that corresponds to the image must be visible on the screen for visual automation to succeed. If it is blocked by another window for example, the automation will be unable to find the element.
To type onto the screen instead of a particular element, use type page.png as text or type page.bmp as text. To do a snapshot or an OCR of the whole screen, use page.png or page.bmp as the element identifier for steps snap / read. The usual helper functions visible() / present() can also be used to check whether an image is visible on the screen. Relative paths are supported for image filenames (eg pc.png, images/button.bmp).
A screen (real or Xvfb) is needed for visual automation. Tesseract OCR (optical character recognition) is used for visually retrieving text.
Also, by using vision step, you can send custom Sikuli commands to do things such as typing complex keystroke sequences.
PYTHON INTEGRATION
TagUI has built-in integration with Python (works out of the box for both v2 & v3) - a programming language with many popular frameworks for big data and machine learning. The py step can be used to run commands in Python and retrieve the output of those commands. To use Python integration in TagUI, first download Python for your OS. macOS and Linux normally come pre-installed with Python. Make sure that python command is accessible from command prompt.
In your automation flow, use the py step followed by the Python commands to be executed, separated by ;. You can then use the print command in Python to output the result you want to be accessible in your automation flow as py_result variable. For a super basic example, below steps in your TagUI automation flow will output 3. If the result is JSON data, the JSON object py_json will be created for easy access to JSON data elements. If not, py_json will be null.
// using py step to denote Python code, and getting back output from py_result
py a=1;b=2
py c=a+b
py print(c)
echo py_result

// alternatively, you can use py begin and py finish to denote a Python code block
// indentation of Python code is also supported, for example in conditions or loops
py begin
a=1;b=2
c=a+b
print(c)
py finish
echo py_result

// an example of passing dynamically generated variables to Python integraton
phone = 1234567
name = 'donald duck'
py_step('phone = ' + phone)
py_step('name = "' + name + '"')

py print(name)
echo py_result
py print(phone)
echo py_result
You can also use the execfile() command in Python v2.X to run Python scripts. Or use exec(open('filename').read()) in Python v3.X to run Python scripts. For examples of using Python for machine learning, check out this essentials of machine learning algorithms article or this article on Python deep learning frameworks.
R INTEGRATION
TagUI has built-in integration with R - an open-source software environment for statistical computing and graphics. R can be used for big data and machine learning. The r step can be used to run commands in R and retrieve the output of those commands. To use R integration in TagUI, first download R software for your OS. Make sure that Rscript command is accessible from your command prompt (added to path or symbolically linked).
In your automation flow, use the r step followed by the R commands to be executed, separated by ;. You can then use the cat() command in R to output the result you want to be accessible in your automation flow as r_result variable. For a super basic example, below steps in your TagUI automation flow will output 3. If the result is JSON data, the JSON object r_json will be created for easy access to JSON data elements. If not, r_json will be null.
// using r step to denote R code, and getting back output from r_result
r a=1;b=2
r c=a+b
r cat(c)
echo r_result

// alternatively, you can use r begin and r finish to denote a R code block
r begin
a=1;b=2
c=a+b
cat(c)
r finish
echo r_result

// an example of passing dynamically generated variables to R integraton
phone = 1234567
name = 'donald duck'
r_step('phone = ' + phone)
r_step('name = "' + name + '"')

r cat(name)
echo r_result
r cat(phone)
echo r_result
You can also use the source() command in R to run R scripts. For examples of using R for machine learning, check out this essentials of machine learning algorithms article or this guerilla guide to machine learning video series.
CLI ASSISTANT
TagUI scripts are already in natural-language-like syntax to convert to JavaScript code. What's even better is having natural-language-like syntax on the command line. Instead of typing tagui download_bank_report june creditcard to run the automation flow download_bank_report with parameters june creditcard, you can type erina download my june creditcard bank report. For a demo of the CLI (command line interface) assistant in action, see this video.
The commands erina (macOS/Linux) and erina.cmd (Windows) can be renamed to some other name you like. The commands can be set up in the same way as the tagui / tagui.cmd above to be accessible from any folder. The command basically interprets this general syntax erina single-word-action fillers options/parameters fillers single-or-multi-word-context to call run the corresponding automation flow action_context with options/parameters.
Also, adding using chrome / using headless / using firefox at the end will let it run using the respective browsers. The default location where automation flows are searched for is in tagui/flows folder and can be changed in tagui_helper.php. Filler words (is, are, was, were, my, me) are ignored as they don't convey important information (more design info).
FLOW SAMPLES
Following automation flow samples (tagui/src/samples folder) are included with TagUI
Flow Sample |Purpose :-----------|:------ 1_yahoo|searches github on Yahoo and captures screenshot of results 2_twitter|goes to a Twitter page and saves some profile information 3_github|goes to a GitHub page and downloads the repository file 4_conditions|goes through examples of using conditions in natural language 5_repositories|shows using repositories on Russian social media site VK.com 6_datatables|set of flows uses datatables to retrieve and act on GitHub info 7_testing|shows how to use check step assertions for CI/CD integration 8_hastebin|used by upload option to upload flow result to hastebin.com 9_misc|shows how to use steps popup, frame, dom, js, { and } block a_facedetect|uses face recognition to detect profile images on webpages b_visualoutlook|uses visual recognition for desktop MS Outlook email sending c_chineseflow|run flow in other languages (first, change src/tagui_config.txt)
Cheat Sheet
AUTOMATION WORKFLOW
- What happens behind the scenes when you run an automation flow
FIND XPATH OF WEB ELEMENT
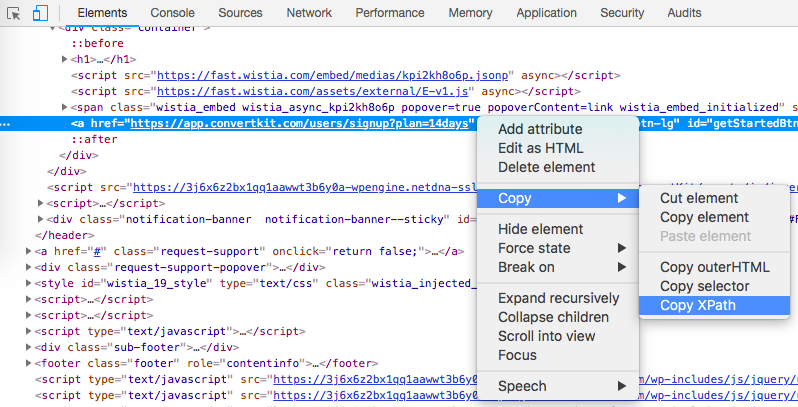
- In Chrome browser, right-click on the element, click Inspect, right-click on HTML code block, then
STEPS DESCRIPTION
- TagUI auto-waits for a webpage element to appear and interacts with it as soon as it appears
- Element identifier can be auto-recorded using TagUI Chrome extension, or found from web browser
- Identifiers help to pinpoint which webpage elements you want to interact with (examples in flow samples)
- TagUI auto-selects provided identifier in this order - xpath, css, id, name, class, title, aria-label, text(), href
Basic Step|Parameters (separator in bold)|Purpose :---------|:-----------------------------|:------ http(s)://|just enter full url of webpage (`variable` for variable)|go to specified webpage click|element to click|click on an element rclick|element to right-click|right-click on an element dclick|element to double-click|double-click on an element hover|element to hover|move cursor to element type|element as text ([enter] = enter, [clear] = clear field)|enter element as text select|element to select as option value ([clear] = clear selection)|choose dropdown option read|element to read (page = webpage) to variable name|fetch element text to variable show|element to read (page = webpage, ie raw html) |print element text to output save|element (page = webpage) to optional filename|save element text to file load|filename to variable name|load file content to variable echo|text (in quotation marks) and variables|print text/variables to output dump|text (in quotation marks) and variables to optional filename|save text/variables to file write|text (in quotation marks) and variables to optional filename|append text/variables to file variable_name| = value (for text, put in quotes, use + to concat)|define variable variable_name // (on new line)|user comments (ignored during execution)|add user comments tagui|relative or absolute filename (see MODULES section)|run another tagui flow ask|question or instruction for user (reply stored in ask_result)|ask user for input live|try steps or code interactively for Chrome / visual automation|enter live mode (Firefox not yet)
Tip - to use variables where text is expected, `variable` can be used. XPath is an expressive way to identify web elements. If you know xpath and use xpath for element identifier, use double quotes for text //*[@title="Login"]
Pro Step|Parameters (separator in bold)|Purpose :-------|:-----------------------------|:------ snap|element (page = webpage) to optional filename|save screenshot to file snap (pdf)|page to filename.pdf (headless Chrome / PhantomJS)|save webpage to basic pdf table|element (XPath selector only) to optional filename.csv|save basic html table to csv wait|optional time in seconds (default is 5 seconds)|explicitly wait for some time check|condition | text (in quotes) if true | text (in quotes) if false|check condition and print result upload|element (CSS selector only) as filename to upload|upload file to website download|url to download to filename to save|download from url to file receive|url keyword to watch to filename to save|receive resource to file frame|frame name | subframe name if any|next step or block in frame/subframe popup|url keyword of new tab window to look for|next step or block in new tab window { and }|use { to start block and } to end block (on new line)|define block of steps and code api|full url (including parameters) of api call|call api & save response to api_result run|OS shell command including parameters|run OS command & save to run_result dom|javascript code for document object model|run code in dom & save to dom_result js|javascript statements (skip auto-detection)|treat as JS code explicitly r|R statements for big data and machine learning|run R statements & save to r_result py|python code for big data and machine learning|run python code & save to py_result vision|custom visual automation commands|run custom sikuli commands timeout|time in seconds before step errors out|change auto-wait timeout
Tip - for headless and visible Chrome, file downloads can be done using normal webpage interaction or specifying the URL as a navigation flow step. For Firefox and PhantomJS, the download and receive step can be used.
on Windows, snap step requires display magnification to be set at 100% to work properly
As TagUI default execution context is local, to run javascript on webpage dom (eg document.querySelector) use dom step. Set dom_json variable to pass a variable for use in dom step. Or dom_json = {tmp_number: phone, tmp_text: name} to pass multiple variables for use in dom step (dom_json.tmp_number and dom_json.tmp_text).
For steps run, dom, js, r, py, vision, instead of typing the step and the command, you can use something like py begin followed by many lines of py code, and end with py finish to denote an entire code block. This saves typing the step repeatedly for a large integration code block. Indentation of Python code within py begin-finish and vision begin-finish blocks is supported, for example in conditions or loops.
For steps r, py, vision, the helper functions r_step(), py_step(), vision_step() can be used to pass dynamic variables to those integrations. Below is an example for py step for passing dynamically generated varibles from TagUI to Python integration.
phone = 1234567
name = 'donald duck'
py_step('phone = ' + phone)
py_step('name = "' + name + '"')

py print(name)
echo py_result
py print(phone)
echo py_result
CONDITIONS EXAMPLES
- Conditions help in decision-making and taking different actions base on run-time context
- Write text in quotation marks (either " or ' works) to differentiate text from variable names
- { and } block is required after for loop (while is deprecated - no auto-wait, hangs CasperJS)
- Use for loop to repeat blocks of steps (nested loops, conditions, break, continue supported)
Condition (in natural language)|JavaScript :------------------------------|:--------- example - if day equals to "Friday"| if (day == "Friday") example - if menu contains "fruits"| if (menu.indexOf("fruits")>-1) example - if A more than B and C not equals to D | if ((A > B) && (C != D)) example - for n from 1 to 4 | for (n=1; n<=4; n++)] example - for n from 1 to infinity | for (n=1; n<=1024; n++)] example - while cupcakes equal to 12| while (cupcakes == 12) contain|.indexOf("text")>-1 not contain|.indexOf("text")<0 equal to|== not equal to|!= more than / greater than / higher than|> more than or equal to / greater than or equal to / higher than or equal to|>= less than / lesser than / lower than|< less than or equal to / lesser than or equal to / lower than or equal to|<= and|&& or|||
Tip - use { and } step to define step/code blocks for powerful repetitive automation with for loop. The usual break and continue commands can be used on next line after an if condition, to break out of the immediate loop or continue to the next iteration. To loop 'indefinitely' use for n from 1 to infinity, where infinity is a pre-defined variable at 1024. When using contain / equal, you can write with or without s behind. You can use if present('element') to check if the element exists, before doing the step on next line. Other useful functions include visible('element'), count('element'), url(), title(), text(), timer(), which can be used in conditions and steps such as check or echo.
HELPER FUNCTIONS
- Below are helper functions which can be used in your steps or code like a variable
- You can define your own JS functions in tagui_local.js / tagui_global.js (see eg)
- TagUI will look for a local function file tagui_local.js in the same folder of flow
- TagUI will also look for a global function file tagui_global.js in tagui/src folder
- Local definitions take precedence over global definitions (same for repositories)
Function|Purpose :-------|:------ csv_row(row_array)|return formatted string for writing to csv file, eg using write step present('element')|return true or false whether element identifier specified is present visible('element')|return true or false whether element identifier specified is visible count('element')|return number of elements matching element identifier specified url()|return page url of current web page title()|return page title of current web page text()|return text content of current web page timer()|return time elapsed in sec between calls
// example of using csv_row() helper function
read name_element to name
read price_element to price
read details_element to details
item_info = [name, price, details]
write csv_row(item_info) to product_list.csv
MODULES
- This lets you reuse and compound automation scripts to build complex flows
- Sub-scripts can be multiple levels deep and be of any filename or extension
- To call sub-scripts, use tagui step followed by absolute or relative filename
- For example, tagui login_crm or tagui crm.login or tagui outlook\sendmail
- Variables can be directly used or modified in parent script and sub-scripts
Tip - tagui step works by expanding content of a sub-script into the flow, at the line where tagui step is used to call the sub-script. Thus variables that are accessible from the parent flow file will also be accessible from the sub-script. A .raw file will be created to store expanded contents of the automation flow (useful for checking error messages). Alternatively, try using run step to run tagui on a flow file, so that it is run as a separate child process.
REPOSITORIES
- Repository csv files have 2 columns, for example below (headers up to you to name)
- TagUI will look for a local repository file tagui_local.csv in the same folder of flow
- TagUI will also look for a global repository file tagui_global.csv in tagui/src folder
- Using `object` in your flow replaces it with its definition (which can contain objects)
- For example, `type email` becomes type user-email-textbox as [email protected]
OBJECT|DEFINITION :-----|:--------- email|user-email-textbox create account|btn btn--green btn-xl signup-btn type email|type `email` as [email protected]
DATATABLES
- When running TagUI, specify the csv file to use, eg tagui flow_filename trade_data.csv
- TagUI loops through each row to run automation using the data from different rows
- Eg, echo 'TESTCASE - `testname`' in your flow shows TESTCASE - Trade USDSGD
- echo '`[iteration]`' can be used in your flow to show the current iteration number
- A file tagui_datatable.csv will be created in tagui/src folder for TagUI internal use
#|testname|username|password|pair|size|direction :-|:-------|:-------|:-------|:---|:---|:-------- 1 |Trade USDSGD|test_account|12345678|USDSGD|10000|BUY 2 |Trade USDSGD|test_account|12345678|USDJPY|1000|SELL 3 |Trade EURUSD|test_account|12345678|EURUSD|100000|BUY
Developers Reference
TagUI is a young tool and it tries to do the task of automating UI interactions very well. It's designed to make prototyping, deployment and maintenance of UI automation easier by minimizing iteration time for each phase. Originally developed by a test automation engineer to avoid writing chunks of code when automating web interactions.
API
Automation flows can also be triggered via API URL. TagUI has an API service and runner for managing a queue of incoming requests via API. To set up, add a crontab entry on your server with the desired frequency to check and process incoming service requests. Below will check every 15 minutes and run pending flows in the queue. If there's an automation in progress, TagUI will wait for the next check instead of concurrently starting a new run.
0,15,30,45 * * * * /full_path_on_your_server/tagui_crontabTo call an automation flow from your application or web browser, use below API syntax. Custom input(s) supported. The default folder to look for flow_filename would be in tagui/src folder. Automation flows can also be triggered from emails using the API. For email integration, check out Tmail. It's an open-source mailbot to act on incoming emails or perform mass emailing; it also delivers emails by API. Emails with run-time variables can be sent directly from your flow with a single line (see flow sample 6C_datatables). For sending SMS, you can use api step to send through SMS-sending services, or host your own from your webserver using services like Skebby (see this example from @adegard). If you have data transformation in your process pipeline check out TLE, which can help with converting data.
your_website_url/tagui_service.php?SETTINGS="flow_filename option(s)"Besides integrating with web applications, TagUI can be extended to integrate with hardware (eg Arduino or Raspberry Pi) for physical world interactions or machine learning service providers for AI decision-making ability. Input parameters can be sent to an automation flow to be used as variables p1 to p9. Output parameters from an automation flow can be sent to your Arduino or application API URL (see samples 3_github and 6C_datatables).
For making outgoing API calls in your automation flow, to feed data somewhere or send emails etc, use the api step followed by full URL (including parameters) of the API call. Raw response from API will be saved in api_result variable. If the API response is JSON data, the variable api_json will be created for easy access to JSON data elements. If not, api_json will be null. For example, api_json.parent_element.child_element retrieves value of child_element.
api_config = {method:'PUT', header:['Header1: value1','Header2: value2'], body:{'id':123,'pwd':'abc'}};For advanced API calls, you can set above api_config variable which defaults as {method:'GET', header:[], body:{}}. Besides GET, you can use other methods such as POST, PUT, DELETE etc. You can define multiple headers in the format 'Header_name: header_value' and provide a payload body for PUT requests for example. You can set it as above before using the api step, or set using api_config.method = 'PUT'; and api_config.header[0] = 'Header1: value1'; etc. api_config.body will be automatically converted to JSON format for sending to API endpoint.
In addition, macOS/Linux/Windows CLI commands can be executed using run step. This can be used to call other apps or services hosted locally on the OS, instead of being hosted through webservices. To use run step, specify the full command including parameters. Execution result will be stored in run_result, which can be used in your automation flow.
CHROME
TagUI has built-in integration with Chrome web browser to run web automation in visible or headless mode. It uses a websocket connection to directly communicate automation JavaScript code and information to Chrome.
To develop new custom methods for Chrome integration, see this TagUI issue and tagui_header.js for examples of websocket calls from TagUI to Chrome (via Chrome DevTools Protocol). The function chrome_step(method, params) sends message to Chrome and returns the response. You will see examples from simple websocket calls such as getting webpage title to stacked ones such as handling of frame or popup window. To tweak how TagUI launches / kills Chrome and the integration PHP process, see TagUI runner script for macOS/Linux or Windows.
Probably the best way to see the websocket communication in action is to enter TagUI live mode (add live step in your automation flow), then tail -f tagui_chrome.log in another terminal to see the Chrome DevTools Protocol messages going to and fro as you enter TagUI steps or JavaScript code. If you are running on Windows, you can click on the PHP process window directly to see the messages.
At run-time TagUI will start a PHP thread in the background to manage the integration with Chrome for concurrent communication. The Textalk PHP websocket is used as it is super-light and most importantly, it works even without any update for 2 years. The normal approach to integrate with Chrome is through chrome-remote-interface project or tools such as Puppeteer and friends. However, that approach introduces Node.js dependency which means users without a Node.js development environment cannot run TagUI with Chrome. Outside of JavaScript ecosystem, there are also tools like chromedp in Go language to integrate with Chrome.
In order to retain TagUI unzip and run functionality, the approach of launching a separate PHP thread is chosen. Since the TagUI natural language interpreter is already written in PHP, there is no new dependency. Also, doing websocket communication within the single-threaded JavaScript environment used by CasperJS is not possible as it involves a redesign of fundamental CasperJS methods such as casper.exists to support async/await or use JavaScript promises which are not yet supported by CasperJS (for compatibility with latest PhantomJS).
Like chrome-remote-interface, TagUI communicates with Chrome through Chrome DevTools Protocol. The protocol is primarily designed for debugging the web browser instead of web automation, so many methods are still in experimental status. However, the API is stable enough for TagUI steps to work with Chrome. When chrome or headless option is used, TagUI replaces CasperJS methods it uses with custom methods to talk to Chrome instead of PhantomJS. When firefox option is used or by default, TagUI doesn't invoke custom methods and PHP process.
TESTING
The check step allows easy testing of conditions. When the test option is used, test assertions are automatically performed for check steps. This lets CasperJS framework output a XUnit XML file, which can be used for CI/CD integration with tools such as Jenkins. Below are examples of check steps, more examples in sample flow 7_testing.
// check whether the element search-buttons exists
check present('search-buttons') | 'search button exists' | 'search button does not exist'

// check whether the search button text is correct
read search-buttons to button
check button equals to 'Search' | 'search button text is correct - ' button | 'search button text is wrong - ' button

// check that the page has the text My Portfolio
check text() contains 'My Portfolio' | 'page text contains My Portfolio' | 'page text does not contain My Portfolio'

// check that number of header menu items are more than or equals to 6
check count('uh-tb-') more than or equals to 6 | 'header menu items >= 6' | 'header menu items < 6'
CasperJS test scripts are inherently different in structure and syntax from its usual automation scripts. With the test option, TagUI automatically sets up your automation flow to work as a test script. TagUI allows you to reuse the same flow for testing or automation by running it with or without the test option. More info about CasperJS testing framework.
Note that CasperJS is not yet supporting Chrome, below additional examples using CasperJS built-in test assertions won't work when chrome or headless option is used. TagUI smart selector can still be accessed using tx('selector'). As TagUI allows you to write JavaScript / CasperJS code directly within the automation flow, advanced testing or coding techniques that can be implemented in CasperJS should work directly within your flow.
test.assertTextExists('ABOUT','Check for ABOUT text');
test.assertSelectorHasText(tx('header'), 'Interface automation','Check for phrase in header element');
In the event you get an error saying that it cannot understand the step for your JavaScript line, raise an issue or modify the source code (tagui_parse.php is where interpretation of natural language to CasperJS JavaScript code takes place). Alternatively, use step js to explicitly declare that whatever follows on that line is JavaScript code and ensure that the line is not treated as a TagUI step.
FILES
Core Files|Purpose :---------|:------ tagui|main runner for TagUI automation tagui.cmd|main runner for Windows platform tagui_config.txt|web browser settings used for automation tagui_parse.php|to interpret natural language into code tagui_header.js|template for CasperJS / integrations code tagui_footer.js|template for CasperJS / integrations code test/positive_test|TagUI's interpretation positive test cases test/positive_test.signature|.js signature for positive test cases
Multi-Language |Purpose :--------------|:------ translate.php|translation engine for native languages translate.log|translation in English reference language languages/build|script to self-build language definitions languages/build.csv|default languages to be self-built
Chrome Integration |Purpose :------------------|:------ tagui_chrome.php|PHP thread for Chrome integration tagui_chrome.log|log for Chrome websocket transactions tagui_chrome.in|interface in-file for Chrome integration tagui_chrome.out|interface out-file for Chrome integration
Sikuli Integration |Purpose :------------------|:------ tagui.py|interface for Sikuli visual automation tagui.log|log for Sikuli Python transactions tagui_windows.log|same as above but for Windows tagui_sikuli.in|interface in-file for Sikuli integration tagui_sikuli.out|interface out-file for Sikuli integration tagui_sikuli.txt|Tesseract OCR integration interface file
R Integration |Purpose :-------------|:------ tagui_r.R|interface for R integration tagui_r.log|log for R platform transactions tagui_r_windows.log|same as above but for Windows tagui_r.in|interface in-file for R integration tagui_r.out|interface out-file for R integration tagui_r.txt|integration file for storing output
Python Integration |Purpose :------------------|:------ tagui_py.py|interface for Python integration tagui_py.log|log for Python platform transactions tagui_py_windows.log|same as above but for Windows tagui_py.in|interface in-file for Python integration tagui_py.out|interface out-file for Python integration tagui_py.txt|integration file for storing output
API Service |Purpose :-----------|:------ tagui_crontab|to run service request batch from crontab tagui_runner.php|retrieving service requests from queue tagui_service.php|receiving service requests into queue tagui_service.log|log to track service requests history tagui_service.in|log to track incoming service requests tagui_service.out|log to track processed service requests tagui_service.act|service request batch ready to execute tagui_service.run|service request batch currently running tagui_service.done|service request batch finished running
CLI Assistant |Purpose :-------------|:------ erina|natural language command line helper erina.cmd|same as above but for Windows platform tagui_helper.php|command line natural language parser tagui_helper|generated normal TagUI command to run tagui_helper.cmd|same as above but for Windows platform
Miscellaneous Files |Purpose :-------------------|:------ tagui_datatable.csv|temporary datatable internal representation transpose.php|transpose conventional datatable csv file tagui_report.php|to generate html report from text log sleep.php|allow adding execution pause on Windows
User-defined Files |Purpose :------------------|:------ tagui_local.csv|local repository (put in same folder as flow) tagui_global.csv|global repository (put in tagui/src folder) tagui_local.js|local functions (put in same folder as flow) tagui_global.js|global functions (put in tagui/src folder)
SECURITY
Below architecture diagram for TagUI will be used to elaborate on this topic of security.
As TagUI and the foundation it is built on is open-source software, it means users can read the source code of TagUI and all its dependencies to check if there is a security flaw or malicious code. This is an advantage compared to using commercial software that is closed-source, as users cannot see what is the code behind the software due to lack of visibility.
For open-source software, users and developers who spot security issues will raise issues to the maintainers and work towards a fix. For commercial software, other ways such as tracking the web traffic or file system activities have to be deployed to infer on what the software is doing.
Following are links to the source code for TagUI and its open-source dependencies. You can dig through the source code for the other open-source dependencies below, or assume that security issues would have been spotted by users and fixed, as these projects are mature and have large user bases.
- TagUI - https://github.com/kelaberetiv/TagUI
- Sikuli - https://github.com/RaiMan/SikuliX-2014
- CasperJS - https://github.com/casperjs/casperjs
- PhantomJS - https://github.com/ariya/phantomjs
- SlimerJS - https://github.com/laurentj/slimerjs
- Python - https://github.com/python/cpython
- R - https://github.com/wch/r-source
- PHP - https://github.com/php/php-src
Following are more comments specific to TagUI for the topic of security.
By design, TagUI does not send outgoing web traffic or send outgoing data, other than what the user is automating on, for example visiting a website. However, there is an upload option, when used, TagUI will go to an open-source service Hastebin that allows uploading of information to share via URL. This sends outgoing data of the automation execution log to that website and returns an URL to user so that user can share the output of the automation with colleagues or friends.
TagUI allows running of automation files whether they are stored locally as a file on your laptop or computer, or if the file is an online URL. This means users should be cautious to run automation from online URLs unless they are sure that the online URL is a safe source and not doing something destructive. This can be checked by accessing the URL using a web-browser to see the automation steps performed in the online automation file.
TagUI comes with a web service, that can be used to trigger automation flows if TagUI is installed on a web-server. More details in Developers Reference section under API. The design minimizes security risk by not forcing users to turn on exec() for their PHP configuration. This means execution of malicious commands cannot be injected through the web-service. Instead, the web-service works by using crontab to periodically check for automation requests. Webservice execution of online flows is now disabled by default so that malicious users cannot trigger execution of a malicious flow hosted online.
TagUI has very powerful features, including the ability to run command line programs, Python code, R code, API calls, and ability to make changes to the local file systems. These features can become security risks if a malicious automation flow file is executed. Imagine TagUI as a tool, such as fire. In evil hands it can be used to do evil things at scale. In good hands, it can be used to solve pain points related to digital processes that are repetitive and huge in volume.
As TagUI can replicate what a normal human user can do on the computer, TagUI is restricted and compliant to the same security policies as the normal human user would be subjected to. For example, having to use a hardware token in order to access the laptop, or user password in order to login to the computer. Or having a 2FA hardware token in order to access confidential information from a web or enterprise application.
License
TagUI is open-source software released under Apache 2.0 license