
test-crawler
v3.5.7
Published
**[★ Online documentation ★](https://apiel.github.io/test-crawler/)**

Readme
test-crawler
test-crawler is a tool for end to end testing, by crawling a website and making some snapshot comparison. This is fully open-source and can be self hosted or use directly on GitHub.
Getting started
🛈 Note: you need to use at least node v11
yarn global add test-crawler
test-crawler
Open url http://127.0.0.1:3005/ and create a new project:
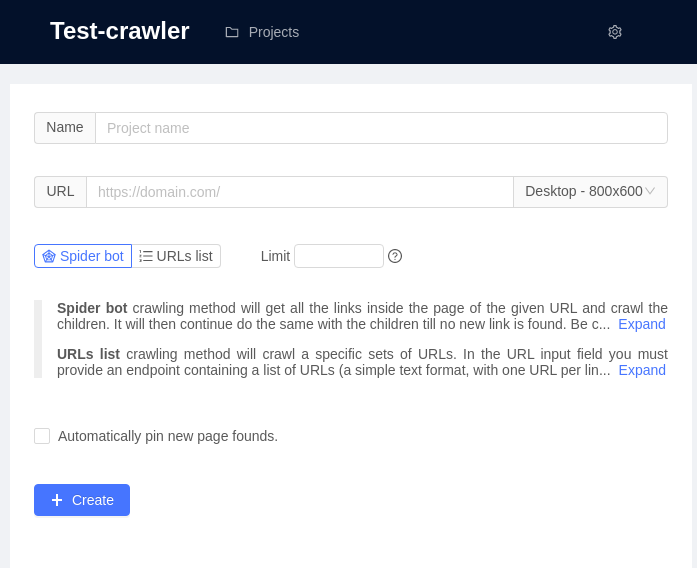
There is two way to crawl pages:
Spider bot crawling method will get all the links inside the page of the given URL and crawl the children. It will then continue do the same with the children till no new link is found. Be careful if you have big website, this is most likely not the right solution for you.
URLs list crawling method will crawl a specific sets of URLs. In the URL input field you must provide an endpoint containing a list of URLs (a simple text format, with one URL per line). The crawler will crawl each of those URL only and will not try to find links in the page.
URLs list example:
http://127.0.0.1:3005/
http://127.0.0.1:3005/page1
http://127.0.0.1:3005/category/page33
🛈 Note: to don't get false visual differences, you must run your test always on the same environment. Diffrent OS, different graphic card, ... might trigger visual differences in the snapshot, even if there was no changes. Prefer to always run your tests on the same machine.
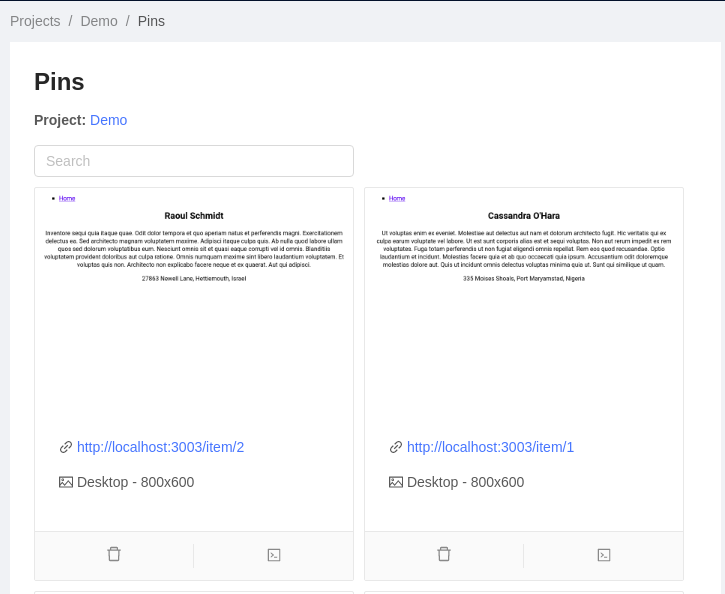
Pins
Pins are the references screenshot to make the comparison with. While crawling, the crawler is comparing page to pin. To create a pin go in the result page of your crawling result, each screenshot has some action buttons:

click on the button on the right with little pin icon.
You can then visualize all your pins:
Crawling result
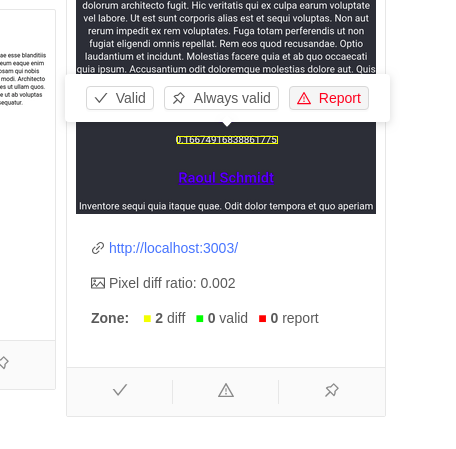
On the result page, you will see many screenshot with eventually some differences found. A difference is represented by a yellow rectangle. By clicking on the rectangle, popup 3 buttons giving you the possibility to report this difference (rectangle will became red) or validate this difference (rectangle will became green). You can as well validate this difference "for ever", then this area of the pages will always reconize this zone as valid place for changes.
Note: comparing page that are growing is very difficult (different height). For the moment this result to weird behaviors when comparing 2 screenshots of different size. To avoid this, use the code injection to remove the dynamic part of the page. Hopefully in the future, we will find better algarithm to reconize such changes.
Inject code
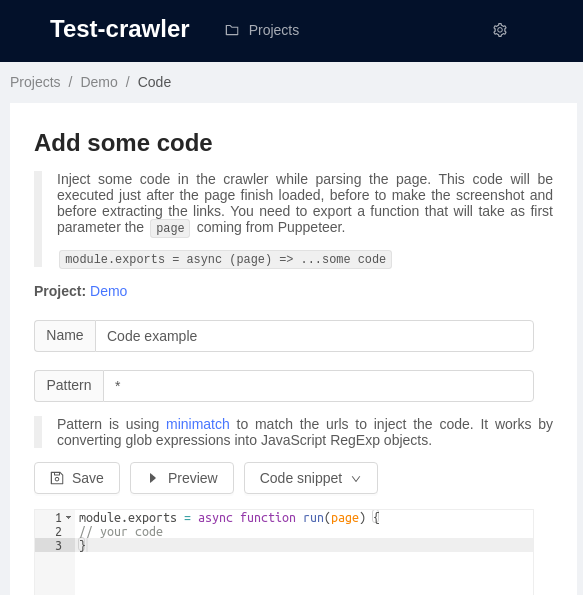
Inject some code in the crawler while parsing the page. This code will be executed just after the page finish loaded, before to make the screenshot and before extracting the links.
This can be useful to remove some dynamic part from a page, for example some comments on a blog pages or some reviews on prodcut page. You could also inject code to simulate user behavior, like clicking or editing an input fields.
Test-crawler is using Puppeteer to crawl the page and make the screenshot. By injecting the code, you can use all the functionnalities from Puppeteer.
In the editor, you need to export a function that will get as params the page currently opened by Puppeteer.
module.exports = async function run(page) {
// your code
}
You can then use this page variable to manipulate the page. Following is an example that will insert "Test-crawler is awesome!" on the top of the page:
module.exports = async function run(page) {
    await page.evaluate(() => {
        const div = document.createElement("div");
        div.innerHTML = "Test-crawler is awesome!";
        document.body.insertBefore(div, document.body.firstChild);
    });
}
You can as well make some assertion. Any failed assertion will be displayed in the result page.
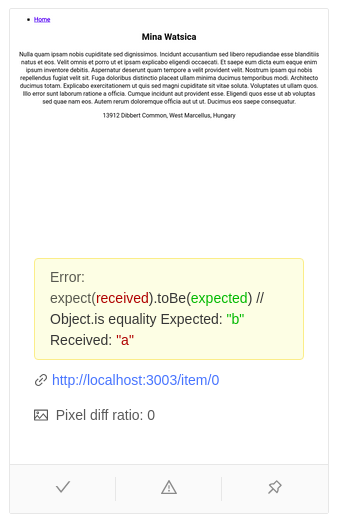
const expect = require('expect');

module.exports = async function run(page) {
  await expect(page.title()).resolves.toMatch('React App');
  expect('a').toBe('b'); // fail
}
By default expect library from jest is installed but you can use any library of your choice.
Storybook
You can use code injection to crawl storybooks. Say test-crawler to crawl your storybook url http://127.0.0.1:6006/ and then inject some code to extract the urls of the stories and transform them to there iframe version. The code should be something like that:
module.exports = async function run(page) {
    await page.evaluate(() => {
        hrefs = Array.from(document.links).map(
            link => link.href.replace('/?', '/iframe.html?')
        );

        document.body.innerHTML = hrefs.map(
            href => `<a href="${href}">${href}</a>`
        ).join('<br />');
    });
}
You can find this code by clicking the button Code snippet of the code editor.
🛈 Note: feel free to make some pull request to propose some new code snippet.
Cli
You can run test directly from the cli. This can be useful for continuous integration test.
# test-crawler-cli --project the_id_of_the_project
test-crawler-cli --project f0258b6685684c113bad94d91b8fa02a
With npx:
ROOT_FOLDER=/the/target/folder npx test-crawler-cli --project the_id_of_the_projectContinuous integration
As mentioned before, to don't get false visual differences, you must run your test always on the same environment. The best way to solve this is to include test-crawler in your continue integration, with
some tools like Travis or GitHub actions. Test-crawler is already supporting out of the box Github
actions. In order to run test-crawler in the CI container, you must use test-crawler-cli.
Example of GitHub action:
name: Test-crawler CI

on: [push]

jobs:
  build:

    runs-on: ubuntu-latest

    steps:
    - uses: actions/checkout@v2
    - name: Setup node
      uses: actions/setup-node@v1
    - name: Run test-crawler
      run: |
        ROOT_FOLDER=`pwd` npx -p test-crawler-cli --project ${{ github.event.client_payload.projectId }}
    - name: Commit changes
      run: |
        git config --local user.email "[email protected]"
        git config --local user.name "Test-crawler"
        git add .
        git status
        git commit -m "[test-crawler] CI save" || echo "No changes to commit"
        git pull
        git push "https://${{ secrets.GITHUB_TOKEN }}@github.com/${{ github.repository }}"
Contribution
If you are interested to work on this project, you are really welcome. There is many way to bring help, testing, documentation, bug fixes, new features...
For the one who want to dive in the code, you need to know about TypeScript, React and eventually Puppeteer but the most important thing to be aware is that test-crawler is base on isomor. It might be useful to undertsand the concept of this tool before to touch the code.
Since you was reading the doc, you now know that the code should be modified in "src-isomor".
To start the project in dev mode:
git clone https://github.com/apiel/test-crawler.git
cd test-crawler
npx lerna bootstrap
cd packages/test-crawler
yarn dev
yarn dev will start 3 processes using run-screen. The first process is the isomor-transpiler, the second is the backend server and the third is react server. To switch between process, press 1, 2 or 3.
If you have any question, feel free to contact me at [email protected]