
ywc-ui
v0.2.2
Published
## 介绍

Readme
ywc-ui
介绍
这是供插件开发者参考的简易版组件库模板
This is a simple component library template for developers
不会造轮子的开发,不是好开发。
看完这篇文章,你会有以下新的认识:
如何单独封装插件并发布
如何开发一套适合团队或是个人的组件库
为啥需要搭建组件库?
在此我简单举个身边的例子:
同事甲:小乙,你有封装过这个 xxx 组件吗?
同事乙:是的,我之前封装过了,你去 yyy 项目中找下吧。
乙给了甲项目的远程仓库地址,甲拉取了整个项目,然后找到了小乙封装的 xxx 组件并使用了起来。但是呢,很快啊,同事甲就对小乙说,我想要的效果和你封装稍微有点不一样,但我对你的代码又很陌生。你能再帮我再封装下嘛....
于是,小乙陷入了沉默...
作为小乙,他肯定就在想了为啥公司有那么多类似的项目,居然没有一套完整独立的组件库。如果有这么一套组件库,那么团队开发的时候,不就可以通过组件库查找所需的组件了嘛,这对团队开发的效率不就是一个质的起飞了嘛。
插件和组件
在我看来,插件的范围包括了组件,可以理解为组件就是插件的子集。
一般来说插件是全局引入的,并且有是否按需引入之说;组件的使用既包含全局又包含局部。
拿 element-ui 为例, 它就是插件同时也是我们说的组件库,但是它里面的每个小模块就是一个个组件,例如 Checkbox 多选框组件、Table 表格组件等等。
它们必须对具体的功能有着更多使用和开发方面的考虑,无非以下三个大方面:
样式: 指的就是这个组件在不同使用场景的状态以及大小、颜色等等
功能: 满足当前业务的同时考虑可能会有的新需求
规范: 代码既要干净又要质量,还要性能
如何封装并分布自己的插件
为了更简洁直观地介绍,我会用封装一个按钮插件并发布。(单纯就是个按钮,只是为了理解起来更轻松)
首先你需要创建一个单文件 btn.vue,
<template>
    <div class='yuiBtn' :style="computedStyle" @click="sayHi(hi)">
        {{btnName}}
    </div>
</template>

<script>
export default {
    name:'yuiBtn',
    data () {
        return {
        }
    },
    props:{
        btnName:{
            type: String,
            default: 'YuiBtn'
        },
        btnWidth:{
            type: Number,
            default: 60
        },
        btnHeight:{
            type: Number,
            default: 20,
        },
        hi:{
            type: String,
            default: '余大帅'
        }
    },
    computed:{
        computedStyle(){
            return {
                height: this.btnHeight +'px',
                lineHeight:this.btnHeight +'px',
                width: this.btnWidth + 'px'
            }
        }
    },
    methods:{
        sayHi(name) {
            alert(`hi,${name}~`)
        }
    }
}
</script>

<style lang='scss' scoped>
    .yuiBtn{
        text-align: center;
        border: 1px solid #000000;
    }
</style>
然后你需要给它增加一个 install 方法,别问为啥是 install 而不是别的,你要是去看下插件 vue-Router 和 vuex 的源码都可以发现他们中存在 install 方法。再深入 vue-Router 举个例子:
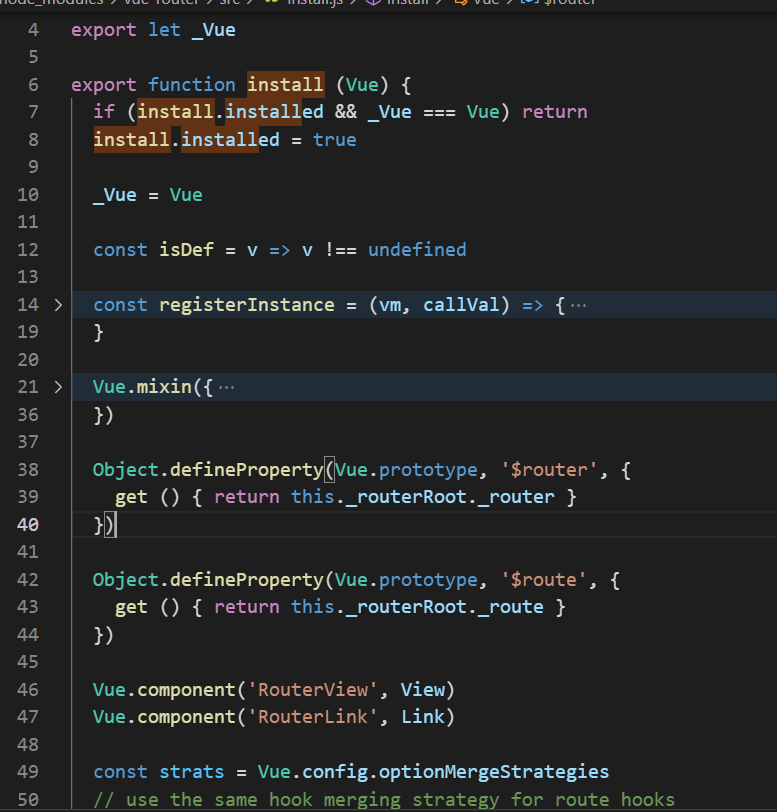
我们之所以能在 vue 项目中直接使用<router-view><router-link>,就是因为vue-Router中的install方法里已经帮我们全局注册这两个组件,而我们运行Vue.use(VueRouter)的时候便是执行的vue-Router的install
方法。
继续讲我们的插件 install,以下是 vue 官网给出的插件 install 方法的模板,满足了多种需求。
MyPlugin.install = function (Vue, options) {
  // 1. 添加全局方法或 property
  Vue.myGlobalMethod = function () {
    // 逻辑...
  }
  // 2. 添加全局资源
  Vue.directive('my-directive', {
    bind (el, binding, vnode, oldVnode) {
      // 逻辑...
    }
    ...
  })
  // 3. 注入组件选项
  Vue.mixin({
    created: function () {
      // 逻辑...
    }
    ...
  })
  // 4. 添加实例方法
  Vue.prototype.$myMethod = function (methodOptions) {
    // 逻辑...
  }
}
但是上述 install 方法中的功能并不合适我们现在想要的具象的 UI 组件。
因此需要以下写法,通过Vue.component()方法全局注册即可:
// index.js
import YuiBtn from "./btn.vue";

const myPlugin = {
  install(Vue) {
    Vue.component("YuiBtn", YuiBtn);
  },
};

export default myPlugin;
没错开发插件到这就完事了,但是为了发布插件,你还得初始化一个 npm 包,并将我们刚刚写的插件放入其中。基本步骤如下:
- 初始化包
npm init- 修改 package.json 中的入口文件信息:
"main": "index.js",
- 执行发包脚本
npm publish如果你没有 npm 官网账号,还得事先注册奥;未登录 npm 账号的情况下,会要求你进行登录。
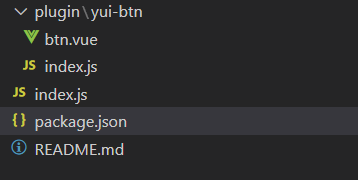
展示下,这个简单的插件的目录结构:
发布成功后呢,那我就得恭喜你成为了一名插件开发者了。
关于使用的话,很简单咯:
先安装,我以目前的简易按钮插件为例(你现在就可以在项目中测试这个按钮的功能):
npm install yui-btn再引入:
// main.js
import yuibtn from 'yui-btn'
Vue.use(yuibtn)
最后使用
// xx.vue
<YuiBtn />
如果还是有疑问的,可以看下源码,github 地址,点击这里 查看源码
补充一下发布插件的一些看法,有一些文章中介绍通过vue-cli初始化一个项目,然后开发插件,再发布。但是这会有个问题,你发布的插件的 package.josn 中的依赖信息将会是当前这个项目的依赖信息,显然这是不妥的。因此我的操作就是新建一个 npm 包,再移植插件代码,最后发布。
但是从另一个角度看的话,也是可以接受的--那就是开发组件库。如果当前项目就是针对于要开发的组件库而言的,那么依赖信息便不会显得过于累赘,同时仅限于 vue 的项目。 并且组件库涉及到分块打包等的问题,需要搭配 webpack,而正好 vue-cli 内置了 webapck。
如何封装并发布组件库
其实看完插件的开发与发布,你就应该明白了组件库的开发会是一个什么样的流程了。我前面也说过,组件库就是插件。
但是组件库是由众多组件集合而成的仓库,我们需要考虑到版本更新以及组件库在实际项目开发中的按需引入等问题:
所以大致可以从以下这几个方面考虑并开发组件库:
UI 设计
主题色控制
代码规范
版本管理
按需加载
优化打包
单元测试
文档说明
最合适想尝试搭建组件库的新手的方法如下:我们可以从最简单的方式开始搭建个人组件库,那就是不管 37 21 只看考虑组件全部引入的情况。以vue/cli 5.0.4为脚手架搭建项目,就按之前开发基础插件那样的话,我们很快就可以发布一个最简易版本的组件库 demo:
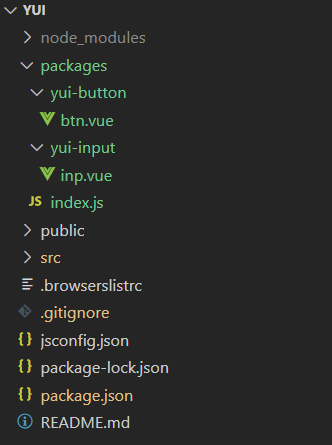
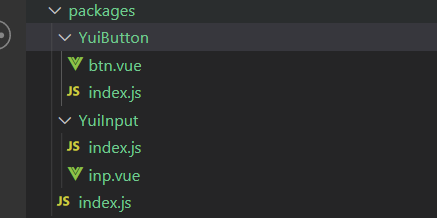
新创建一个文件夹 packages 用来存放我们后期需要增加的组件,并为每个组件创建单独的文件夹。目录结构如下:
和之前写的单个插件类似,唯一不同的就是需要遍历执行vue.component().
我们的index.js如下:
import Button from './yui-button/btn.vue';
import Input from './yui-input/inp.vue';

const components = [
  Button,
  Input
];
const install = function(Vue) {
  components.forEach(component => {
    Vue.component(component.name, component);
  });
}
export default {
  install
};
然后在 package.json 中设置 "main":"./packages/index.js", 就可以发布->安装->使用了。
当然前面只是最简单的版本,接下来开始完善之前提出的要求。
首先是代码规范的问题,我们一开始通过 vue-cli 创建的时候就可以选择 eslint 校验风格,所以无需多虑。
按需加载是非常关键的一步,其实就是对引入资源的优化,避免打包时将组件库中没用到的组件也打包了。大多个人组件库都是参照element-UI给出的方案: 给之前写好的组件各自增设install方法,打包的时候以多入口的形式,将组件各自打包。发布之后,需要在项目中按需引入组件库中的组件,并安装配置babel-plugin-import插件。。 这一步,我参考了掘金-悲伤日记写的一篇文章 深入 vue 组件库的按需引入。相关代码会在下面总结中展示。
组件库搭建上其他方面的完善个人感觉比较容易上手,查阅相关的资料和工具库文档不难实现。但由于时间有限,我准备面试的时间不够了!!!非常遗憾,暂时没法继续探索下去了,下次的更新脚手架的时候,应该就是更完整版本的了。
总结
下面四个问题是我在简易版的组件库模板开发过程中觉得有些疑问的地方,搞懂这几个问题能帮助我们更好得搭建组件库:
1.组件库的目录结构?
我给出的是最新版的 vue-cli 搭建出来并调整的目录结构,具体还得看你用的是哪个版本。
组件库根目录格式如下:
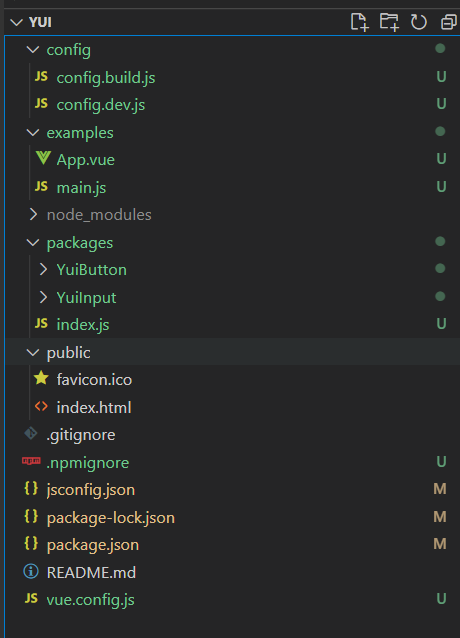
packages 文件夹目录:
2.如何配置打包(生产)环境和组件库开发环境?
根据process.env.NODE_ENV当前所处的环境,我们可以增设两个配置文件,由环境决定使用哪个配置文件:
config.dev.js
我们需要修改根目录中的 src 文件夹名,以防止后续开发组件库中出现同名的 src,而导致发布代码时文件被忽略。照理说打包之后应该也没啥影响。。。这个说法有待考证.
module.exports = {
  pages: {
    index: {
      entry: "examples/main.js",
      template: "public/index.html",
      filename: "index.html",
    },
  },
};
config.build.js
这块的难点就是在于打包组件时需要根据不同的组件设置各自的打包入口。getComponentEntries()方法就是对入口的封装。
const fs = require("fs");
const path = require("path");
const join = path.join;
//  获取基于当前路径的目标文件
const resolve = (dir) => path.join(__dirname, "../", dir);

function getComponentEntries(path) {
  let files = fs.readdirSync(resolve(path));
  const componentEntries = files.reduce((fileObj, item) => {
    //  文件路径
    const itemPath = join(path, item);
    //  在文件夹中
    const isDir = fs.statSync(itemPath).isDirectory();
    const [name, suffix] = item.split(".");
    //  文件中的入口文件
    if (isDir) {
      fileObj[item] = resolve(join(itemPath, "index.js"));
    }
    //  文件夹外的入口文件
    else if (suffix === "js") {
      fileObj[name] = resolve(`${itemPath}`);
    }
    return fileObj;
  }, {});

  return componentEntries;
}

const buildConfig = {
  //  输出文件目录
  outputDir: resolve("lib"),
  productionSourceMap: false,
  //  webpack配置
  configureWebpack: {
    //  入口文件
    entry: getComponentEntries("packages"),
    //  输出配置
    output: {
      filename: "[name]/index.js", //  文件名称
      libraryTarget: "umd", //  构建依赖类型
      libraryExport: "default", //  库中被导出的项
      library: "ywc-ui", //  引用时的依赖名
    },
  },
  css: {
    sourceMap: false,
    extract: {
      filename: "[name]/index.css",
    },
  },
  chainWebpack: (config) => {
    config.optimization.delete("splitChunks");
    config.plugins.delete("copy");
    config.plugins.delete("preload");
    config.plugins.delete("prefetch");
    config.plugins.delete("html");
    config.plugins.delete("hmr");
    config.entryPoints.delete("app");
  },
};
module.exports = buildConfig;
3. 发布时,非打包的代码如何忽略提交?
我们当然希望自己的包越小越好,钱包除外~!
增设.npmignore文件,其实跟.gitignore的功能一样,可以理解成是对它的补充。
# 忽略目录
examples/
packages/
public/
dist/
common/
build/
config/

# 忽略指定文件
vue.config.js
jsconfig.json
4.组件发布之后,如何在项目中引入并使用。
- 不考虑按需引入
那就跟引入 element-UI 一样:
先安装(下面按需亦是如此)
npm install ywc-ui// main.js
import yui from "ywc-ui";
Vue.use(yui);// 目标文件中直接引入组件
<YuiButton />- 按需引入组件
首先安装我们的组件库,然后安装babel-plugin-component
npm install babel-plugin-component -D项目中增设 babel.config.js
module.exports = {
  presets: ["@vue/cli-plugin-babel/preset"],
  plugins: [
    [
      "import",
      {
        libraryName: "ywc-ui",
        style: (name) => {
          return `${name}/index.css`;
        },
        camel2DashComponentName: false, // 是否需要驼峰转短线
        camel2UnderlineComponentName: false, // 是否需要驼峰转下划线
      },
    ],
  ],
};
// main.js
import { YuiButton } from "ywc-ui";
Vue.use(YuiButton);文章虽然比较简短,但是一个组件库 demo 基本功能都已实现,大佬的话就别杠我了(手动狗头)!
->github 点击这里 组件库模板地址
如果对这方面感兴趣的小伙伴,可以联系我,我计划过一段时间会开始系统性地开发自己的组件库,希望有小伙伴可以加入我的开源计划~缺人!!!
